AMX HPG-10, 50 pack Installation guide
- Category
- Mounting kits
- Type
- Installation guide
This manual is also suitable for
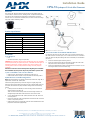
AMX HPG-10, 50 pack is an elegant means to control cables in conference rooms, meeting rooms, and personal workspaces. It's designed to be mounted into various surfaces like a conference room table, desk, or lectern to manage A/V, power, and/or networking cables.
The HPG-10's compact size and sleek black plastic enclosure make it aesthetically pleasing and suitable for any professional environment. Its installation is straightforward, requiring a 3/4" (19mm) round hole drilled into the mounting surface and then pressing the two halves of the grommet together and into the hole. This provides a secure and snug fit, preventing cables from becoming tangled or unsightly.

-
 1
1

AMX HPG-10, 50 pack Installation guide
- Category
- Mounting kits
- Type
- Installation guide
- This manual is also suitable for
AMX HPG-10, 50 pack is an elegant means to control cables in conference rooms, meeting rooms, and personal workspaces. It's designed to be mounted into various surfaces like a conference room table, desk, or lectern to manage A/V, power, and/or networking cables.
The HPG-10's compact size and sleek black plastic enclosure make it aesthetically pleasing and suitable for any professional environment. Its installation is straightforward, requiring a 3/4" (19mm) round hole drilled into the mounting surface and then pressing the two halves of the grommet together and into the hole. This provides a secure and snug fit, preventing cables from becoming tangled or unsightly.
Ask a question and I''ll find the answer in the document
Finding information in a document is now easier with AI
Related papers
-
AMX HPG-10 Quick start guide
-
AMX NMX-MM-1000 Declaration of conformity
-
-
AMX HPX-AV102-RGB+A Product information
-
-
-
-
AMX MXD-1001 Hardware Reference Manual
-
-
AMX HPX-600 User guide
Other documents
-
Hyundai HPG6500 User manual
-
Wacker Neuson SC50 User manual
-
Wacker Neuson HPG50A User manual
-
STIEBEL ELTRON HPG-I 04-15_D(C)S_Premium Operation Instruction
-
-
Mitsubishi HG-JR User manual
-
Pentair Hydromatic TL-Pro Owner's manual
-
Mitsubishi Electric HG-MR/HG-KR/HG-SR/HG-JR/HG-RR/HG-UR/HG-AK SERVO MOTOR User manual
-
-