Page is loading ...

Warning - To reduce the risk of fire, electric shock, or injury
to persons _hen using your appliance, follo_ basic
precautions, including the following:
1_ Read aH instructions before using the appJianc÷°
2, Usethisapplianceonly for itsintendedpurposeas described in this useand
careguide.
3_ Useonly detergentsor softenersas recommendedfor usein thismanualand
keepthemoutof thereachof children,
4. Thisappliance mustbe properly installedin accordancewith theinstallation
instructionsbeforeit isused.
5. Never unplugyour applianceby"pulling on thepower cord. Always graspthe
plug firmly and pull straightout from theoutlet,
& Replaceimmediatelyany worn power cords,looseplugsand poweroutlets.
7. Unplugyour appliance beforecleaningor before makingany repairs.
8, if your old appliance isnot being used,we recommendthatyou removethe
doon ThiswiJJreducethepossibilityof danger to children.
9. Do notoperateyour appliance in thepresenceof explosivefumes.
10_Do notusethisapplianceto wash clothesthat havebeensoaked,spottedor
washedin gasoline,dry cleaningsolventsor any otherexplosiveor flammable
substancesthat may ignite and explode.
11_Clothesor ragsusedto cleanflammableor explosivematerialsshouldnotbe
washedin thisappliance untilall tracesof this material havebeen removed.
12_Do notadd or mix any flammableor explosivesubstancesto thewask
13. Do nottry to removeclotheswhile thetub ismoving_Allow it cometo a
completestopbeforereachingin.
14_Theappliance'sJoding door mustbe dosedwhen thetub isspinning.
15. Do notoperateyour appliancewhen partsare missingor broken.
1& Do not usethisappliance for commercialuses_
17. Do notoperatethis applianceunlessaJJenclosurepanelsare properlyin place.
18. Do nottamper with controls.
19_Toreducethe riskof injury, do notallow childrento play in or on the
appJiance_Closesupervisionof childrenis necessarywhentheapplianceis
usednear chiMren.
20. Thisappliance mustbe connectedto a proper dectricd outletwith thecorrect
electricalsupply.
]

21. Proper grounding must be ensured to reduce the risk of shockand fire. DO
NOT CUTOR REMOVE THEGROUNDING PLUG. If you do not have a
three-prong electric receptade outlet in the wdJ, have a certified electrician
instdJ the proper receptade. The wall receptacle MUST be properly grounded.
22. Hydrogen gas may be produced if thewater heater has not been used in more
then 2 weeks_This may be expJosive under certain circumstances. If this is the
case, before using this appJiance turn on aJJthe hot faucets and Jetthe hot
water run for a few minutes_This 'dJJ Jetthe trapped hydrogen escape. During
this process do not turn on an dectric appJiance, smoke, Jight a matchiJighter
or use a flame to avoid an accident, as hydrogen gas is fJammabJe and can
expJde.
23. Do not repair or repJaceany part of theappJianceor attemptany servicing
unJessspecificaJJyrecommendedin theuser-repairinstructions,which you
understandand havetheskiJJtocarry out.
Note: If for any reasonthis product requiresservice,we strongJy
recommendthat a certifiedtechnicianperform theservice.
24. Toreduce the risk or eJectric shockor fire, do not use extension cords or
adapters to connect the unit to eJectricd power source.
SAVETHESEiBiSTRIJCTiOBiS
J:erFutureUse
guide you in getting the best use of
your washer.
Remember to record the model and
serial numben They are on a label in
back of the washer.
Model number
Serial number
Date of purchase
Staple your receipt to your manual. Ye_ wiJJ need it te ebtdn
warranty se_ice.

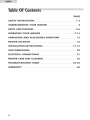
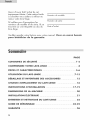
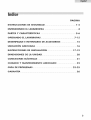
PAGE
SAFETY mNSTRUCTmON$................................................................ 1-2
UNDERSTANDING YOUR WASHER ................................................ 4
PARTS AND FEATURES .................................................................. 5-6
OPE_YmNG YOUR WASHER ........................................................
UNPACKmNG AND ACCESSORmE$mNVENTORY ............................
PROPER LOCAYmON ........................................................................ 16
mNSTALLATmONmNSTRUCTmONS.............................................. 17-19
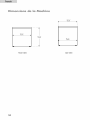
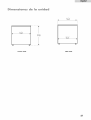
UNmT DmM_:NSmON$........................................................................ 20
_:LI:CTRmCALCONN_:CTmON$ .......................................................... 21
PROP_:R ¢AR_: AND ¢L_:ANmNG.................................................... 2:2
TROUBL_:SHOOTmNG GUmD_:.................................................... 23-25
WAR_NTY ...................................................................................... 26

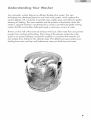
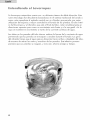
derst di g Your W sher
Yourautomaticwasherfeaturesan efficientdouble drive system.Thisnew
technologywas developedbasedon our hand wash system,which replacesthe
centralagitator with a pulsatorto providemore usablespaceand allow for gentler
cleaningof c[othing_Theinner washtuband thepulsatorat the bottomof the tub
rotate in oppositedirectionssimultaneouslyto createa powerfulyet gentleswirling
motionthat liftsand tumblesclothing througha continuouscurrentof waten
Thefins on thewall of theinner tubenhancethe for_eof thewater flow and prevent
laundry from twistingand knotting.Theturningof the pulsatormakesthewater
spiral in an upward direction around thewashtubin a mannerthat removessoil
and residuefrom clothesfor theultimatecJean_Thiseffectiveprocessprotectsyour
clothingfrom wear and tearand furthermoresavesyou both timeand waten

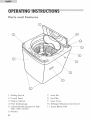
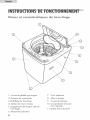
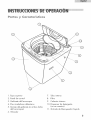
_rts _d Features
©
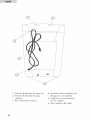
1. Folding Top Lid
2. Control Panel
3. Washer Cabinet
4_ Front Leveling Legs
5. Cabinet Handle ([ocatecJon both
sides of the washer}
6. Pulsator
7. inner Tub
8_ Lint Filter
9. Inner Cover
10. Detergent Dispenser (not shown}
11. Liquid Bleach inlet

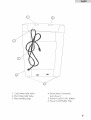
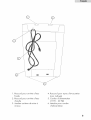
©
1. Cold Water inlet Valve
2. Hot Water Inlet Valve
3. Rear Leveling Legs
4. Drain HoseConnection
(not shown}
5_PowerCord (115Vi 60Hz)
6. PowerCord HoMerCJip

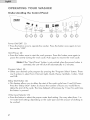
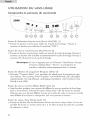
O£1RATING YOUR %A$HfR
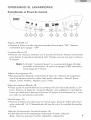
IJnderstanding the ¢ontroJ Pane]
\
\ m
\\
\
Power ON/OFF: (1)
" Press the button once to operate the washer. Pressthe button once again to turn
the washer "OFF".
Start/Pause: (2)
®Pressthis button once to start the wash process. Pressthis button once again to
pause the activity during the wash cycle. Push again to resume the wash cycle.
Note: If the "Start/Pause" button is not pushed when the power button is
activated, the unit wi/shut off automaticdly in 5 minutes.
ProgramSelect:(3)
" Selectyour desiredcycleprogram by pressingthe"ProgramSeJec¢button.There
are 8 options to selectfrom:Normal, Light,Quick, Heavy,Synthetic,Cotton, Wool
and Silk.
Delay StartButton:(4)
" Thisfeatureallows you todelay thestartof thewash cyclefrom 2 and 24 hours.
Pressthe"DelayStart" buttonto choosethenumberof hoursyou would like to
delaythe startof thecycle.ThetimedelayedwiJJincreaseby 1 hour for eachtime
thebutton ispressed.
Water LevelSelector: (5)
Pressthebuttonto selecttheproper water levelsetting Youmay selectfrom 1 to
10 water levelsettingsdependingon thecycletypeand theamountof clothing to
be washed.

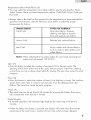
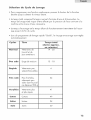
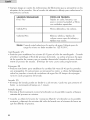
Temperature Sdect Wash/Rinse: (6)
® You may select the temperature according to fabric type by pressing the "Temp
Select" button. There are three temperature options: CoJdiCdd, \'VarmiCold and
Hot/Col&
Always refer to the Jabd on the garment for the temperature as recommended by"
garment manufacturers_ See the reference chart below to select the proper
temperature for fabrics_
"_PES OF FABRICS
Non-cdor fabrics, lingerie,
clothingwith light or normal
Soil,and specialcarefabrics.
Warm/Cold Ddicate and colored fabrics.
Hot/Cold Sturdy whites and colored fabrics
such as work or play clothes and
soiled fabrics
Note: When selectingthe hotwater option for your load, incominghot
water mustnot exceed122'F/50°C.
Spin:(7}
Pushthisbutton to selectthenumberof minutes(0-9) in the spincycle.The
spinningof thedrumat theend of thecycle,extractsexcesswater from clothing
sothat theyare notas dampwhen takenfor drying_Thespintimevaries for each
program.
Rinse:(8}
Pressthisbuttonto selectthe numberof times(0-4/clothing is rinse& Themachine
spraysfreshcdd water to removesoiland odor from thedetergentfrom the
clothes.Therinsetimevariesfor eachprogram.
Wash:(9)
Thewashtime can be setfrom 0-25 minutesby pressingthebutton.Eachpress
wiJJincreasethewash time by 1 minute.
Digital Display:
® in normal operation, the indicator light displays the remaining wash time in
minutes.
When thedelay startbuttonispressed,thedisplaywill switchfrom the minutes
remainingin thewash timeto numberof hoursthe cycBhasbeenddayed_

FunctionLighthdicator:
®ThefunctiondisplaylightindicatesthattheselectedfeatureisONorthatthecycle
isabouttobegin.
During the wash cycle, a flashing light indicates the current program.
Note: Refer to the Troubleshooting Guide on page 23-25 for _Error
Code _explanations.
Loading the Washer
Loadeachitem loosely.
Separatethewhite from thecoloredclothing. Separateheavyfabrics from light
fabrics.
CarefullycheckaJJpocketsand cuffsfor small items.Theycan easily dide in to the
tuband causedamageto thetub.
®Pre-treataJJstainsand heavily soiledareasfor bestresults.
Do notoverloadyour washen
Closethedoor properly after loading theclothes.
®When loading wet items,keepwater Jevdhigh enoughto keeptheunit in
balanceand to allow clothing to float easily in thewaten

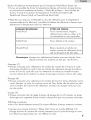
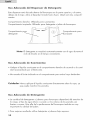
Proper Use of the Dispenser
The detergent dispenser is Iocatd inside the washer at the upper middle part
beneath the washer door: Open the dispenser by pulling it out. Youwill see that
there are 2 compartments,
RightCompartment:Usefor fabric softenen
LeftCompartment:Usefor Jaundrydetergent.
Note: The detergent will be automaticaJJy mixed with the water during the
wash cycJeat the proper time.
Proper Use of Fabric Softener:
Pourtheliquid fabric softenerinto thecompartmenton theright as recommended
by"themanufacturen
Do notexceedtheJevdindicatedin thecompartmentto avoid overflowing.
Warning: Never pour fabric softenerdirectlyontocJothesasit wiJJstainand spot
thecJothing.
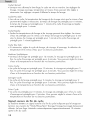
Proper Use of Detergent:
®Theamountof detergentuseddependson thesizeof theJod, thewater type
(hard or soft)and whethertheclothesare heaviJysoiJe8or JighflysoiJe&Besides
theperformanceof thewashing machine,thequaJityof thedetergentaJsoaffects
thewashing resuJt.
® For best resuJts,use Jow sudsing detergents.
10

iiiiiiiiiiiiiiiiiiiiiiiiiiiiiiiiiiiiiiiiiiiiiii i! i!il ii ii ii ii ii ii ii ii ii ii ii ii ii ii ii ii ii ii ii ii ii ii ii ii ii i !i !!
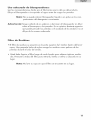
Proper Use of BJeach:
Use only the bleach manufacturer's chart for" the recommended use of liquid bleach,
Dilute the bleach and add it to the water before putting clothes into the washtub.
Note: You cannot use Jiquid or powder bleach in the detergent or fabric
softener dispenser.
Worming: Becareful not to spill undiJuted bJeachonto the washer cabinet or onto
cJothing_ It is a strong chemical that may damage ),'our clothes and the
finish of the washer if not properJy diluted.
Lint FiJter
®ThefiJteris Jocatedinsidethewasherat the upperpart of thedrum. A smdJnyJon
bag coJJectsJintand residuefrom dothes during thewash cyde_
You must dean the fiJter after every Joad for the best resuJts.PuJJup the fiJter to
remove. CJean and dide the fiJterback to repJace.
Note: Do notwash your cJotheswithoutthe fiJterin itscompartment
insidethetub.
11

iiiilililililililililililililililililililililililililili
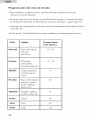
Progra_ $÷Ject Wash ¢yde Options
Toset any Function, press the respective Function button until the desired levd is
reached,
®Total time includes the normal water intake and drain time Total washing time
may be influenced by the water inlet pressure and the water levd needed.
Spin timeisfrom the timetheintermittentspinning startsto the momentitstops
running.
® Hnthe '_QuickCycld _,the washing machine will set the complete procedure
automatically.
Cycles Fabric T@taJ
Time
(appro×. minutes)
N@rl_c_J Work and 19 - 25
play clothes,
Household
linens
Light Lightly soiled, 15 - 18
Permanent press
Quick Small loads 6
lightly soiled
under 2 Jbs
Heavy Rdativdy 54
bigger and
thicker clothing
(e_g_,jeans}
Synthetic Pdyester, Acrylic 41
nylon, etc.
Cotton Cottons 49
Wool Wools 24
Silk Silks 30
12

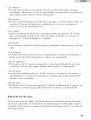
Normal Cycle:
®When the washer is turned on, this cycle is activated. The wash, rinse, spin,
temperature and water level setting can be adiusted as needed. Theadiustments
may affect the washing time.
LightCycle:
®Hnthiscycle, thewash/rinse temperatureand water level can be adiusted_The
wash time is presetat 6 minutes,rinseis setat 1 time,and spincycleis setat 1
minute.
Quick Cycle:
Only thewash/rinse temperaturescan be adjusted.Thewater levelis presetat
level3, wash timeat 2 minutes,the rinseat 1 time,and spincycleat 1 minute.
Heavy Cyde:
Hfneeded, adiust the wash, rinse, spin, temp select and water level for customized
settings.
Synthetic Cycle:
®The wash time is preset at 12 minutes, rinse at 2 times, and spin cycle at 4
minutes. You can adjust the water Jevd and temperature to your needs.
Cotton Cycle:
®The wash is preset at 10 minutes, rinse at 3 times, and spin cycle at 4 minutes.
The water level and temperature can be adiusted to your needs.
Wool Cycle:
The presets are wash at 3 minutes, rinse at 2 times, and spin cycle at 3 minutes.
The water level and temperature can be adiusted to suit your needs.
Silk Cyde:
The wash is preset at 5 minutes, rinse at 2 times, and spin at 3 minutes. The water
level and temperature can be adiusted to suit your needs.
EndoofoCycie Signal
ThemachinewiJ[beep at theend of thecycle, indicating that thewashing is
compJete_The_WashiRinseiSpin_indicator lightswiJJstillbe ON ThewasherwiJJ
turnOFFautomaticallyin approximately 10 minutesafter thecompletionof the
cycle.
13

Closingthe TopLid
Forsafet'/purposes,thetoplidmustalwaysbeclosedduringthewashprocess,ff
youopen thetop lid while thewash c';,'cJeis in progress,you wiJJobservethe
following:
An alarm will sound.
®Thetubwill not spinwhib thelid isopen.
®Hfthe unitis in wash mode, it wiJJstoprunning_
Simply dose the top lid and press the start/pause button to resume the cycJe.
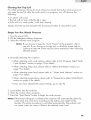
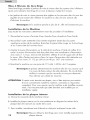
Steps f@r the Wash Pr@¢ess
1.Turnthepower ON.
2. Fillthedetergent/softenerdispensen
3. Selectthedesiredwashprogram_
Note: Hfyou choose to keep the "Auto Presets" of the program, skip to
step #5. Hfyou choose to change any or dJ of the preset options,
continue to step #4. There may be some restrictions when choosing
selected options.
4. Manually Selecting Your Options
• When selecting wash cycle options, please refer to the "Program SelectWash
Cycle Options" section on page 12 for details.
• When selecting delay start, please refer to "Delay Start Button" section on
page 7 for details_
® When selecting water level, please refer to " Water Levd Selector" section on
page 7 for details.
® When selecting temperature, please refer to "TemperatureSelect Wash/Rinse"
section on pages 8 for details.
• Once you have selected the proper settings, go to step #5.
5. Loadclothesinto thewashtub_
6. Closethewasherdoorsproperly.
7. Pressthe "Start/Pause"buttonto begin thewash process_
Note: If the Normal Program is selected, the machine will automatically select the
water level and wash time according to the clothes and weight of the
Jaundry_The entire procedure is controlled automatically. The pulsator wiJJ
not rotate unless the water is filled to the selected water levek
14

NormaJ Operating Sounds
The following sounds are normally heard during the operation of the washer:
* TumbJing sounds can be heard as heavy wet clothes in the \'Vasher are tossed
around continuousJy.
®Air rushing noise is the res@ of the washtub spinning at a very high RPM.
" Clicking sounds are caused by the wash and rinse cycles turning ON and OFF.
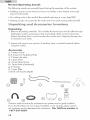
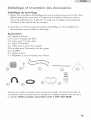
pocki g A ess@ries ve t@ry
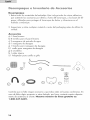
Unpacking
1. Remove aJJpacking materials. This incJudesthe foam base and aJJadhesive tape
hoJding the washer accessories inside and outside_SJideout and remove the
bottom Styrofoam that is used to protect the washer from shipping damage due
to vibrations and shock_
2. Inspectand removeany remainsof packing, tapeor printed materialsbefore
usingthewashen
A¢¢essor'ie$
a) 1 Bottom Pand
b) 8 Screws for the Bottom PJate
c) 2 Water InJetHose
d) 1 Drain Hose
e) 1 Drain Hose CJamp
f) 1 Drain Hook (Gooseneck}
g} 4 Washers
h) I Inner Plate
i} Quick sink faucet adapter
© ®
Check to make sure that the accessories are present and in good conditiom
If you find that they are not in good condition or are missing, pJeasecontact
our customer service department for assistance. @ur ToJJoFree number is
] °877°337°3639°
15

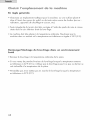
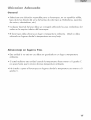
GeneraJ
* Sdect a suitable location for the washer on a hard even surface away from direct
sunlight and heat sources (e.g., radiators, baseboard heaters, cooking appliances,
etc.)
®Any floor unevennessshouldbe correctedwith thelevelinglegslocatedon the
bottomcornersof thewashen
The washer must be placed at room temperature. You must not place the washer
where the temperature is at or below freezing_
Storage in Cold Environments
® This appliance must be stored at room temperature.
Hfyou received this appliance when the outside temperature is below freezing, do
not operate until this appliance has warmed to room temperature.
® Do not install or operate this appliance in an area whe_ room temperature is
below freezing,
16

HStr Cti@ S
Read carefuJly and understand all installation instructions before installing this
washing machine. Hfafter compJefing the process you are stiJJunsure whether the
washing machine has been properJy instalJed, we recommend that you contact a
qualified instaJler
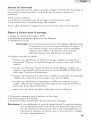
TeeJs and MateriaJs Required
You wiJJneed to use the foJlowing tools when instdJing your washer:
Scissors
Phillips Screwdriver
Hothead Screwdriver
PJiers
Wrench
Tape Measure
GJoves
Levd
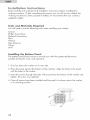
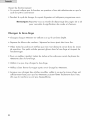
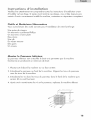
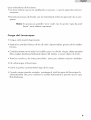
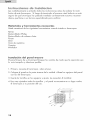
JnstaJJing the Bottom PaneJ
The bottom paneJ bJocksnoises to provide you with the quietest performance
possibJeduring the wash cycJeoperation.
1. First,Jaydown thewasheron its rear side.
2. PJacethepaneJagainst thebottomof themachine.AJignthe hoJesin thepaneJ
with thehoJesin thewashen
3. Insertthescrewsthroughthe hoJesof thepaneJinto thebottomof thewasherand
tighten.(8 screwsare suppJied}
4. Once aJJscrewshavebeeninstdJedand thepond isin pJace,returnthewasher
toits standingposition.
J /
17

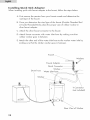
Levding the Washer
Yourwasher has4 levding legsthat are Jocatd on the4 bottomcorners_After
properly placingyour washerin its final location,you may levd thewasher.
'p Leveling legs can be adiustd by turning them counter-clockwise to raise the
washer and clockwise to lower the washer.
Note: Hfthemachineis slantingmorethan2°it will notwork.
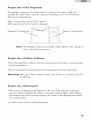
Installing Your Washer
Readtheinstallationinstructionscarefullybeforebeginning_
1.Connectthehot and cdd water inlet hosesto thehot and cold water faucet.
2. Connect the other ends to their respective washer inlets located at the top rear of
the machine. Connect the red tinted hose fitting to the washer and the other end
to the incoming water supply.
3_Installthedrain hoseto thesideof thewasher usingdrain hoseclamp_Thedrain
hosemustbe placedinto a drainpipe or sinkat least 1-1/2 inchesin diameten
Usethegooseneckdrain hookto hold hosein pJace_Toavoid possiblewater
back up, thedrain hosemustreacha heightof at least31-1/2 inchesminimum
and 40 inchesmaximum.
4_ Plug in the Washer to a regdar 115 Volt / 60 Hz, 15 Amps outlet.
Not÷: Carefully inspect for any leaks around and back of the machine. If
there is a leak, turn off the unit and unplug it, then check if any
connections are loose. You may need to tighten any loose
connections_
CAUTION: if after completingthesestepsyou are still unsureif unithasbeen
properly installed,contacta qualified instaJJen\'Ve recommendthat the
washerbe installedby a certified techniciantoensurethat it is
properly installed.
installing inner Plato
A. Open thetop lid of thewashing machine.
B.installthe inner plateon theoutertub by"aligning the plateshaftsto thetubcover
groves,
C. To install, insert on one side first and then snap in on the other side.
Note: Do Not use washer without installingthe inner plate. ] 8

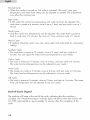
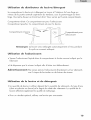
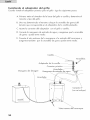
Installing Quick Sink Adapter:
When instaJJingquick sinkfaucetadapter to thefaucet,follow thestepsbeJow:
A. First remove the aerator from your faucet nozzJe and determine the
size/type of the faucet.
B. Once you determine the size/type of the faucet (Outside Threaded End
or Inside Threaded End}, pJacethe proper size of rubber washer in
sliver faucet adapten
C. Attach the siJverfaucet connector to the fauceL
D. Attach faucet connector with water inJethose by making sure that
rubber washer goes in between.
E.Attach theotherend of the,waterinJethoseto thewasherwater inJetby
making surethat therubber washergoesin between.
Drain hose
Faucet_
_-_-___ Washers
Faucet Adapter _
Quick Connector
\,Vasher_o
Water _Jet hose
Washer
Y Connector
(notincJuded)
SINK
Rear View of Washer
19
Page is loading ...

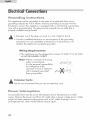
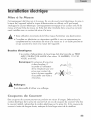
Gr@ HdiHg Hstructi@ s
Thisappliance mustbegrounded_Hntheeventof an dectricaJshortcircuit,
grounding reducestherisk of electricshockby providing an escapewire for
theelectriccurrenLThisapplianceis equippedwith a cord havinga grounding
wire with a grounded pJug_Theplug mustbe insertedintoan outletthat is
properly installedand grounded.
• Improper useoftheplug can resultin a riskof electricshock.
®Consulta qualified electricianor servicepersonif thegrounding
instructionsare not completelyunderstoodor if doubtexistsas to
whether theapplianceis properlygrounded.
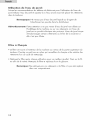
Wiring Requirements:
Thisappliance mustbe plugged intoat least 15 AMP 115-120 VOLT,
60 HZ GROUNDEDOUTLET.
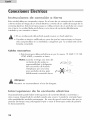
Note:
Where a standard two-prong
outlet is encountered,
it is the personal responsibility
and obligation of the
consumer to have it repJacd
with a properly grounded
three-prong outlet.
Aj_ i:xtension Cords:
VVedo notrecommendthat you usean extensioncord.
Occasionallytheremay be power interruptionsdue to thunderstormsor other
causes_Removethe powercord from AC outletwhen a poweroutageoccurs.When
power hasbeenrestoredre-plug powercord to AC outlet.If outageisfor a
prolonged period, dean washer beforeusingit again.
2]
Page is loading ...
Page is loading ...
Page is loading ...
Page is loading ...
Page is loading ...
Page is loading ...
Page is loading ...
Page is loading ...
Page is loading ...
Page is loading ...
Page is loading ...
Page is loading ...
Page is loading ...
Page is loading ...
Page is loading ...
Page is loading ...
Page is loading ...
Page is loading ...
Page is loading ...
Page is loading ...
Page is loading ...
Page is loading ...
Page is loading ...
Page is loading ...
Page is loading ...
Page is loading ...
Page is loading ...
Page is loading ...
Page is loading ...
Page is loading ...
Page is loading ...
Page is loading ...
Page is loading ...
Page is loading ...
Page is loading ...
Page is loading ...
Page is loading ...
Page is loading ...
Page is loading ...
Page is loading ...
Page is loading ...
Page is loading ...
Page is loading ...
Page is loading ...
Page is loading ...
Page is loading ...
Page is loading ...
Page is loading ...
Page is loading ...
Page is loading ...
Page is loading ...
Page is loading ...
Page is loading ...
Page is loading ...
Page is loading ...
Page is loading ...
Page is loading ...
Page is loading ...
Page is loading ...
Page is loading ...
Page is loading ...
Page is loading ...
-
 1
1
-
 2
2
-
 3
3
-
 4
4
-
 5
5
-
 6
6
-
 7
7
-
 8
8
-
 9
9
-
 10
10
-
 11
11
-
 12
12
-
 13
13
-
 14
14
-
 15
15
-
 16
16
-
 17
17
-
 18
18
-
 19
19
-
 20
20
-
 21
21
-
 22
22
-
 23
23
-
 24
24
-
 25
25
-
 26
26
-
 27
27
-
 28
28
-
 29
29
-
 30
30
-
 31
31
-
 32
32
-
 33
33
-
 34
34
-
 35
35
-
 36
36
-
 37
37
-
 38
38
-
 39
39
-
 40
40
-
 41
41
-
 42
42
-
 43
43
-
 44
44
-
 45
45
-
 46
46
-
 47
47
-
 48
48
-
 49
49
-
 50
50
-
 51
51
-
 52
52
-
 53
53
-
 54
54
-
 55
55
-
 56
56
-
 57
57
-
 58
58
-
 59
59
-
 60
60
-
 61
61
-
 62
62
-
 63
63
-
 64
64
-
 65
65
-
 66
66
-
 67
67
-
 68
68
-
 69
69
-
 70
70
-
 71
71
-
 72
72
-
 73
73
-
 74
74
-
 75
75
-
 76
76
-
 77
77
-
 78
78
-
 79
79
-
 80
80
-
 81
81
-
 82
82
-
 83
83
-
 84
84


Ask a question and I''ll find the answer in the document
Finding information in a document is now easier with AI
in other languages
- français: Haier HLP22P Manuel utilisateur
- español: Haier HLP22P Manual de usuario
Related papers
Other documents
-
Signature Hardware 430415 Installation guide
-
Electrolux L22IY
-
-
LG WT5270CW Owner's manual
-
Danfoss and Installation guide
-
-
-
-
JADO 832 860 Series Installation guide
-
Samsung WA70F4H6QWP/TL User manual