Glacier Bay HD461-8204 Installation guide
- Category
- Sanitary ware
- Type
- Installation guide
This manual is also suitable for
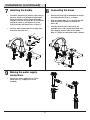
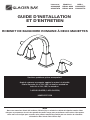
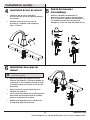
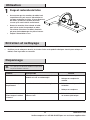
Glacier Bay HD461-8204 Two-Handle Roman Tub Faucet is great for anyone looking to give their bathroom a new look, with a classic roman tub faucet. It features durable construction and a lifetime warranty, and its two handles make it easy to control the water flow and temperature. Installation is simple, with all the necessary hardware included.
Glacier Bay HD461-8204 Two-Handle Roman Tub Faucet is great for anyone looking to give their bathroom a new look, with a classic roman tub faucet. It features durable construction and a lifetime warranty, and its two handles make it easy to control the water flow and temperature. Installation is simple, with all the necessary hardware included.


-
 1
1
-
 2
2
-
 3
3
-
 4
4
-
 5
5
-
 6
6
-
 7
7
-
 8
8
-
 9
9
-
 10
10
-
 11
11
-
 12
12
-
 13
13
-
 14
14
-
 15
15
-
 16
16
-
 17
17
-
 18
18
-
 19
19
-
 20
20
-
 21
21
-
 22
22
-
 23
23
-
 24
24
-
 25
25
-
 26
26
-
 27
27


Glacier Bay HD461-8204 Installation guide
- Category
- Sanitary ware
- Type
- Installation guide
- This manual is also suitable for
Glacier Bay HD461-8204 Two-Handle Roman Tub Faucet is great for anyone looking to give their bathroom a new look, with a classic roman tub faucet. It features durable construction and a lifetime warranty, and its two handles make it easy to control the water flow and temperature. Installation is simple, with all the necessary hardware included.
Ask a question and I''ll find the answer in the document
Finding information in a document is now easier with AI
in other languages
Related papers
-
Glacier Bay HD65601-5027D Installation guide
-
-
Glacier Bay HD67420-3127D Installation guide
-
-
-
-
-
-
-
Other documents
-
DANCO 15098 Installation guide
-
-
Allen + Roth 73-BRT2-BN-AR Installation guide
-
Jacuzzi 73-BRT2-BN-J Installation guide
-
Pegasus 879-0096 Installation guide
-
Rubi RAB11 Installation guide
-
-
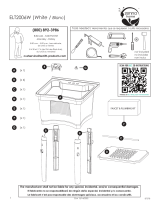 Zenna Home ELT2006W Installation guide
-
-
stufurhome ST288CH Installation guide
