
EP 790
Instruction Manual
-15 -

-16-
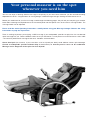
You can now enjoy a relaxing, effective massage in the privacy of your own home whenever you like and without being
dependent on others. Congratulations on having bought a NAiS Massage Lounger. Nothing could be easier to use.
Before you settle back for your first massage, read through the following pages: they will tell you everything you need to
know about selecting the required course on the control panel and the specific uses of the various massage modes. The
massage heads can be adjusted.
Please read the entire Operating Instructions carefully before using your Massage Lounger. Observe the safety
instructions on page 23, in particular.
There is nothing to prevent you enjoying a NAiS massage if your orthopaedic specialist or physician has not banned
spinal massages for you. Feel the tiredness drain out of you. Backache is usually due to muscular tension or strain. NAiS
- the name for professional massage of the neck, shoulders and entire back.
Severe back pain (for instance, if you have taken a fall or injured your back) could indicate serious spinal damage.
Consult an orthopaedic specialist without delay in such cases, so that the precise cause can be established.
Massage can be dangerous if the spine has been injured!
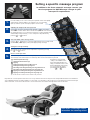
Your personal masseur is on the spot
whenever you need him

•
Position the Massage Lounger so that when the pillow’s flipped over the back of the
Massage Lounger, it does not touch the wall or other objects. (The backrest and legrest
should be at least 45 cm / 17-3/4 in. from the wall or other objects in normal position) to
avoid contacting the backrest and legrest to the wall or other objects.
•
Check that an adult can stand sideways between the Massage Lounger and the wall.
When the Massage Lounger is first unpacked, it will be as shown above. In this position,
normal reclining operation is not possible. After determining where
the Massage Lounger will be located and placing it there, check that
there is enough space for reclining. Then plug the power cord into a
wall outlet (AC 230V).
The power switch is located at the rear left side of the Lounger. Use
the key provided to prevent it from being switched on accidentally (childproof lock). You
can remove the key only when the power switch is in the “off” position. You should
always disconnect the power switch after your massage to avoid misuse by children.
Always keep the key in a safe place. The power supply is not disconnected simply by
switching off the hand-held control panel!
Please note: The lock may be damaged if the key is accidentally overturned in either
direction. In addition, always remember to securely insert the key all the way into the
cylinder before turning, otherwise there is a risk of damaging the lock.
-17-
Initial settings after unpacking Massage Lounger
Criteria for reclining space
Because this Massage Lounger was delivered in special formed for transort, please bring
it into normal position as following steps.
➀
With the legrest in the stored position, press and hold the Recline button on the
control panel.
➁
Release the button when the Massage Lounger backrest has stopped moving completely.
•
When this operation is performed, never extend the legrest with the lever. Doing so may
cause
a malfunction.
Final steps
Only the backrest
will move up.

-18-
Quick stop
Press the red “O” button. The massage
heads stop immediately. Depending on
their position, however, they are often
uncomfortable when sitting in the chair.
It is therefore advisable to start again
and then to stop with the “I/S” button so
that the massage heads return to their
home position.
Restore and stop
Press the “I/S” button. The massage heads
do not stop immediatley but return to their
home position first, so that they do not make it
uncomfortable to sit in the Lounger. The
pilot lamp turns to red and the chair remains
operational. The power supply is not dis-
connected until the power switch at the rear
left of the chair has been switched off.
Switching on
Press the “I/S” button. The pilot lamp
will change from red to green. The mas-
sage course does not start immediately,
even when the
massage heads begin to move.
1.
2.
3.
5.
4.
Press the sliding cover lightly and push downwards
fully, so that the automatic massage courses can be
selected. The sliding cover must engage.
Back course Neck and shoulder course Lower back course
Set your height (automatic courses)
Use the slide control to set your height.
The massage heads must start with your shoulders when
correctly set. If necessary, you can correct the setting with
the slide control. The position of the massage heads can also be
corrected during the massage course.
Selecting an automatic massage course
Press the required massage button:
• Back (whole back)
• Neck and shoulders
• Lower back (lumbar region)
The corresponding red pilot lamp lights up.
Simply press the required button to change over to a different massage
course. The new commands will then take priority.
Press “5 min.” if you wish to reduce the massage course to 5 minutes.
This short operation is stopped by pressing the button again.
Gentle mode (automatic courses)
If the massage feels too strong, press the button. The pilot lamp will light
up and the entire massage course will become gentler. To return to the standard
intensity, press the button again. This massage halts automatically at the end
of the course and the massage heads return to their home position.
Leg massage
Press after folding out the massage legrest. Leg massage does not stop
automatically like the selected course, but continues for approx. 30 minutes
altogether. It should therefore be switched off if it is no longer required.
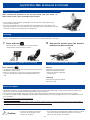
The hand-held control panel is normally kept in the left-hand side pocket of the chair.
Three automatic
massage courses
Each course lasts approx.
15 minutes. Different massage
techniques are used as by a
professional masseur and
massage your back accordingly.
Slide control
Range of body height*:
Stage 1: 1.85 m and taller
Stage 2: > 1.70 m
Stage 3: > 1.60 m
Stage 4: 1.60 m and shorter
* These heights are only approximate
since people’s torsos are usually of
different lengths.
Sliding cover
Control panel
For details of massage
courses, see p. 21.
}
O
–
/
+
O
–
/
+

Shiatsu/upward massage
Shiatsu/downward massage
Tapping
Rolling/stretching massage/whole back
Rolling/stretching massage/regional
Kneading and rolling/stretching massage/whole back
Kneading and rolling/stretching massage/regional
Tapping and rolling/stretching massage/whole back
Tapping and rolling/stretching massage/regional
Try out the various modes and see which suits you best!
-19-
1.
2.
3.
4.
Push the sliding cover on the control panel upwards. Press down lightly
and slide it up until the sliding cover engages. The pilot lamp
lights up and the specific massage programs can be used.
Adjusting the height of the massage heads
Press to move the massage heads upwards or to move them
downwards. Hold the button down until the massage heads have reached
the required position on your back, then release it. In rolling, tapping rolling
and kneading rolling massage you can change the rolling direction by
pressing or buttons.
Select the width of the massage heads
Use the or buttons to select the width between the massage heads
(available only in the tapping, rolling and tapping rolling massage).
Setting the massage intensity
The intensity of the massage can be adjusted as required by pressing
the and buttons.
5.
Choice of massage mode
Press “massage mode” until the red or green pilot lamp lights up beside the required massage mode.
The massage mode will change in the following order each time the button is pressed.
Important: Do not massage the same area for too long, otherwise the muscles may become cramped. We therefore recommend that
such individual massage should be limited to not more than 5 or 10 minutes. Like a masseur, you should end your personal massage
with an automatic course for the whole back to ensure uniform blood circulation throughout the whole of the back.
Setting a specific massage program
In addition to the three automatic massage courses, you
can also program the NAiS Massage Lounger to your
own specific requirements.
Rest after a massage course
intensifies the relaxing effect.
All functions which include
“rolling“, are available for the
whole back (indicated by red
lamp) or a limited section of the
back (indicated by green lamp).
You can change the area by
pressing and buttons.

-20-
ADJUSTING THE MASSAGE LOUNGER
Before sitting down
Reclining
Returning back to upright after reclining Raising and lowering only the legrest
• The massage heads should be spread apart near the top of the Massage Lounger
backrest (home position).
• If the massage heads are not in the position describe above, do not sit down in the
Massage Lounger. Press the I/S button on the control panel twice. Wait for the massage
heads to reach the home position before sitting down.
• Use the reclining function as desired. (Reclining can also be performed during a massage.)
• Although the legrest is moved automatically according to the movement of the Massage Lounger backrest during reclining, the
legrest can also be raised and lowered independently using the side lever.
• The maximum height (angle) of the legrest when using powered reclining and when using the side lever may vary slightly.
• The legrest cannot be stored completely if the Massage Lounger backrest is not raised completely. (The same condition occurs for
lever operation.)
• Be car
eful of the lever during powered reclining.
It will move automatically.
• Since the legrest will be locked in position when it is raised using the side lever, it cannot be lowered using the reclining buttons.
Always use the side lever to lower it if it has been raised using the side lever.
Press and hold
• The legrest will be returned to its normal position (lowered) and
the backrest will be raised.
• After use, always be sure to return the legrest and backrest
to their normal positions (legrest lowered and backrest rai-
sed).
Raising
While pressing the lock button,
tilt the lever toward the back.
• Always tilt it back completely
(until it locks).
Lowering
While pressing the lock button,
pull the lever up.
• Do not sit or stand on the legrest
when it is raised. (Doing so may
result in an accident.)
• Do not raise the legrest directly by pulling it with your hands,
since the lock may not operate correctly in such cases.
(Doing so may result in an accident.)
After checking the positions of the massage heads with your hands, sit
down slowly in the center of the Massage Lounger.
2
Release the button when the desired
position has been reached.
About the legrest
Caution
!
Press and hold
1
While the button is held pressed, the legrest will be
raised and the backrest will be reclined.

-21-
PROGRAMMED MASSAGE
Whole back course
Details of Automatic Course
The above diagrams have been abbreviated to enable easy understanding of the massage action.
Neck and shoulder course
Lower back course
Complete massage including
neck, shoulder, back stretching
and lower back
Concentrated massage of
neck and shoulders
Concentrated massage of
lower back
Rolling
Rolling Downward Tapping rolling Rolling Rolling
Upward Upward/
Rolling
Tapping/
Tapping rolling
Rolling
Rolling
Rolling Upward Downward Tapping/
Tapping rolling
Rolling
Upward Downward Tapping/
Tapping rolling
Rolling
Rolling
Rolling Downward Tapping/
Tapping rolling
Rolling Rolling
Downward Rolling Downward Rolling

-22-
What to do if ...
(something does not work)
• Has the Lounger been plugged into the mains socket?
• Has the other end of the lead been plugged into the Lounger?
• Has the switch at the rear left of the Lounger been switched on?
• Does the childproof lock prevent the Lounger being switched on?
• Has the sliding cover on the control panel engaged?
• Has the power lead been plugged into both the mains socket
and the Lounger?
• Has the switch at the rear left of the Lounger accidentally
been switched off?
• Has the required massage course button been pressed?
(The corresponding red pilot lamp lights up.)
• Has the sliding cover on the control panel engaged?
• Has the correct height been set for automatic massage
courses? – Check the setting and correct it if necessary.
• This is a safety precaution to prevent the motor overheating.
Such a stop may occur under adverse conditions when
massage starts, for instance if you have pressed heavily
against the massage heads at the very beginning. Remedy:
raise yourself slightly in the chair and start again.
• Call the customer service department if the chair cannot be
restarted and pilot lamps start flashing again.
• When a specific massage program has been set, there may
be a short delay while the massage heads first move to their
starting position before rolling/stretching massage, for
instance, begins.
• This is normal when the massage heads have reached the
upper or lower limit positions, for example, or the “strong/
gentle” or “narrow / wide” limits. Release the button and
correct the setting in the opposite direction or select the
required massage mode (see page 19, No. 3 and 4).
• You have not set the slide control (right-hand side of the
control panel) to the correct body height for you. Further
details on page 18, No. 2.
If your Massage Lounger does not work, this is often due to
minor causes which you can remedy yourself. Check the follow-
ing points/tips before you call the customer service department.
The faults listed under “What to do if ...” are due to causes which you can remedy yourself. Be sure to check this list
before contacting the service department as you may otherwise have to pay service charges, even during the warranty
period. This also applies to malfunction arising from incorrect operation.
... the Massage Lounger does not work at all
... the power indicator does not light up
... the Massage Lounger does not
massage you at all or not correctly
... massage stops and the control panel
issues a warning in flashing pilot lamps
... massage does not start immediately
... the massage heads stop when personal
massage is set
... the massage heads start too high or too
low for one of the automatic courses

-23-
• The NAiS Massage Lounger has been tested by Germany’s Technical Control Board (TÜV Rheinland Product Safety GmbH)
and has been awarded their safety-tested GS symbol. This appliance complies with the provisions of the EC council directive
89/336/EEC as amended by 92/31/EEC and Art. 5 of 93/68/EEC as well as the provisions of the EC council directive
73/23/EEC as amended by Art. 13 of 93/68/EEC.
• The chair is secured to the floor by means of the enclosed screws, which are inserted through the holes in the underframe.
• The Lounger should only be connected to an AC supply (see rating plate on the rear of the chair).
Refer also to the Specifications in the Operating Instructions.
• The back of the chair can be lowered by up to 160 degrees. It should not be allowed to strike a wall or other obstacle, as this may
cause malfunctions. Care should therefore be taken to ensure that there is always sufficient space behind the Lounger. Do not leave
anything under the chair either.
• The Massage Lounger must not be used in “wet rooms” (sauna, swimming pool) or out of doors.
• Invalids or elderly persons must never be allowed to use the Massage Lounger without supervision. It must not be used by children
either.
• As with all electrical appliances, never pull the power lead in order to disconnect the plug from the socket.
The Lounger must always be switched off via the power switch (at the rear left of the chair) after use. It should be secured
by means of the childproof lock.
• The Massage Lounger must never be started up if the power lead or the chair itself is damaged.
• Do not attempt to repair any faults yourself; always call the customer service department or your retailer. All warranty rights become
void if you attempt to repair the Lounger yourself. Such repairs can also cause danger to the user.
• Do not sit on or drop the control panel. Ensure that the control panels lead does not become jammed between the armrest and the
back of the chair.
• Repeatedly pressing one of the buttons on the control panel at short intervals can cause malfunctions.
• The massage heads may stop for reasons of safety if too much pressure is applied to them.
• Please treat your Massage Lounger with care: do not turn it on its side or upside down and do not stand on it. Avoid direct sunlight,
otherwise the upholstery fabric may fade or become discolored.
• Never sit on the extended massage legrest, as the chair may tip and/or the legrest be damaged. The same applies to the
backrest.
• The NAiS Massage Lounger has been specially designed to massage your neck, shoulders or whole back. Do not attempt
to massage other parts of the body, such as the head, abdomen, arms, etc. with it, as these might get jammed. The NAiS
Massage Lounger is not suited for massaging other parts of the body.
• Please only use the extended legrest to massage your feet and legs.
• Never put your hands under the mechanism on the underside of the Lounger as they might get jammed or possibly injured.
• The Massage Lounger should not be used by expectant mothers, invalids and children.
Consult your physician/orthopedic specialist if in doubt.
Massage may be dangerous if the spine has been injured or after surgery.
• Excessive massage may have the opposite effect. The automatic massage courses consequently stop after 15 minutes.
We recommend that the personal massage of an individual area of tension be limited to not more than 5 or 10 minutes.
• Do not lie on the Massage Lounger without clothing. Even a flimsy garment can protect your skin form irritation.
• Massage should never be unpleasant! Do not lower the back of the Lounger too far at first, for the massage effect is
intensified by your body weight.
Please read before using the NAiS Massage Lounger for the first time.
Important safety instructions

Seat dimensions, normal: Height: 105 cm
Width: 75.5 cm
Depth: 105 cm
Horizontal:
* Backrest lowered completely: Height: 62 cm
* Legrest extended: Width: 75.5 cm
Depth: 175 cm
Weight of Lounger: 56 kg
Max. body weight of user: 120 kg
The Massage Lounger has casters under the chair base and can be
moved easily by tilting the front end up. Be careful not to allow the power
cord to become entangled around the casters.
The casters are for transport purposes only. Do not move the chair during
operation.
AC supply: 230 V, 50Hz
Power construction: 150 W
Massage modes · Shiatsu (kneading) massage
and courses: · Rolling/stretching massage
· Tapping massage
· 3 automatic massage courses
· Individual massage can be set entirely
to meet your personal needs
· Leg massage
Casters
If you have to transport the Lounger, we recommend that the massage
heads be set to their lowest position. Use the personal massage course
for this purpose and press the button.
Instructions for transport
-24-
Specifications
Neck
Shoulders
Back
Hips
60
Position
(approx.)
* Units are cm
Massage Mode
Upward kneading Kneading/
Tapping
Tapping/
Downward kneading Rolling Rolling
Massage area:
60
7,5
8,5
11
-
 1
1
-
 2
2
-
 3
3
-
 4
4
-
 5
5
-
 6
6
-
 7
7
-
 8
8
-
 9
9
-
 10
10


Ask a question and I''ll find the answer in the document
Finding information in a document is now easier with AI
Related papers
-
 NAiS EP-1060G2 User manual
-
Panasonic EP3205 User manual
-
-
Panasonic EP1285TL User manual
-
-
-
-
-
-

Other documents
-
 Hooker Furniture Seven Seas Style EC216 Operational Instructions
-
 S R Smith DS-1-61-2PK User manual
-
 S R Smith D898.391 User manual
-
 S.R.Smith R-Series™ Rotomolded Lounger In Pool-Chair Owner's manual
-
Protocol 4382-2AA Porta Lounger User manual
-
Sharper Image Panasonic Heated Roller Massage Chair100% SATISFACTION Owner's manual
-
 Repose R500 User manual
-
Infinity ALTERA User manual
-
 RST Brands OP-OL04-Bei User guide
-
 Fuji Bikes AS-888 User manual


