Page is loading ...

36
MASSAGE LOUNGER
Instruction Manual
EP3205

39
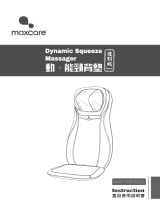
Attaching the Armrests
Align the o
marks.
Control
Panel Stand
Allen Key (provided)
Slide the armrest
forward until the p
aligns with the A.
1. Insert the armrests into
the seat.
• Marks indicating left and right can
be found on the underside of each
armrest.
Attaching the Control Panel Stand
Secure the control panel stand to the right hand side of the unit using the three
screws provided.
Attaching and Removing the Control Panel
When attaching the
control panel, slide
it in from the top.
Slide the control panel
up to remove it.
• Loosen the screw to situate the
control panel stand at the desired
angle, then tighten screw again.
For smooth removal of the
control panel, press on the back
of the unit while sliding up.
2. Push the armrest
forward until it clicks
into position.
3. Insert the attachment
screw into the hole and use
the Allen key to secure it.
(Repeat the procedure for the armrest
on the other side.)
Clip
Screw
Turn the screw
clockwise to
tighten it.
38
SETTING UP THE MASSAGE LOUNGER
BEFORE USING THE UNIT
Ensure there is adequate space for reclining
• Do not use the massage lounger in direct sunlight
or in places where it will be exposed to high
temperatures, such as in front of a heater, etc., as
this can cause discoloration or hardening of the
synthetic leather.
• Place the unit on a mat to prevent floor damage.
After removing everything from the box, you should have the following
Where to Use the Unit
Massage Lounger Accessories
Armrest
Marks indicating left and right
can be found on the underside
of each armrest.
Control Panel Stand
Pillow
Front Front
Back
Left
Right
Back
Attachment Screws (M6#10) – 5
Control Panel Stand – 3
Left Armrest – 1
Right Armrest – 1
Allen Key
At Least 40 cm
Mat
At Least 40 cm
CAUTION
• Do not use the unit in areas with high humidity,
such as the bathroom, etc. as this can lead to
electric shock or other accidents.
• Do not allow children to play on the unit. Doing
so may lead to accidents or injury.
• Place the unit on a totally flat surface.
Failure to do so may result in the seat tipping over.

4140
BEFORE USING THE UNIT
Please Check the Following Before Using the Unit
Check the Surrounding Area
(1) Check that there is nothing around the unit.
(2) Check that there is enough room (40 cm) to recline the unit.
Lower the Legrest Prior to Sitting Down.
• When the legrest is raised, press to lower the legrest before
sitting down.
• Do not sit on the legrest when it is raised. Doing so may cause it
to collapse down or bend the ottoman. The ottoman is not meant
to support full body weight.
Adjust the Height of the Pillow
• Adjust the height of the pillow using the pillow fastener.
• Adjust the front part of the pillow so that it supports the back of the
head and will not be too far down when massaging the neck.
Press
Fastener
Adjusting the Control Panel Stand
1. The control panel stand can rotate
forward and back.
Return the Backrest to the Upright Position
1. Plug the power plug into the power
outlet.
2. Turn the lock switch to the “Open”
position.
3. Turn on the power switch on the back
of the unit.
4. Push Twice. (See Page 43)
• The backrest will return to the upright position
automatically.
• The massage heads will move to the retracted position.
Attaching the Pillow
Attach the pillow using the fasteners
on the pillow and on the top of the
backrest.
2. The angle can also be adjusted.
off
lock
lock switch
open
on
3
2
1

4342
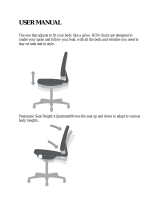
CONTROL PANEL
ON/OFF Button
• Press this button to start the massage and
to stop it at any time during the massage.
* The massage heads will not move until
you press one of the Programmed
Operation buttons or Manual Operation
buttons.
* If this button is pressed during the
massage, the massage heads will move
to the retracted position and both the
backrest and the legrest will return to their
original positions.
Ottoman Button
• Use this button to adjust
the angle of the legrest.
Vibration ON/OFF Button
Reclining Button
• Use this button to adjust
the angle of the backrest
and legrest.
Quick Stop Button
• Press this button to stop the
massage immediately.
(The massage heads will stop in
the position they are in without
retracting and air will be released
from the legrest.)
Display
• The display shows the kind
of massage selected.
Control Panel Cover
• Open the cover to manually
select massage settings.
Neck Roller Position
Button
• Pressing this button allows
the unit to adjust the shoulder
position after searching the
position of your body.
Go to any one of the following sections if you want to start the massage lounger immediately.
When you want to use the massage lounger straight away.
PROGRAMMED OPERATION (shiatsu, deep, gentle, refresh)
This program is ideal for the following people:
• Those who feel tired all over.
• Those who want to operate the massager simply by using one of the 15 minute stored programs.
When you want a massage suited to your degree of fatigue.
SELF PROGRAM
This program is ideal for the following people:
• Those who feel tired in different parts of their body.
• Those who want only their shoulders or legs massaged. This program allows the user to customize the massage. (See Page 52)
USER ADJUSTMENT FUNCTIONS
When you want more control over individual massage settings.
MANUAL OPERATION (open the control panel)
This program is ideal for the following people:
• Those who want to massage a certain area using a certain kind of massage.
• Those who want to make many different adjustments to massage settings.
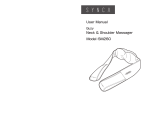
PART NAMES AND FUNCTIONS
Massage Lounger
Control Panel Stand
Front
Back
Armrest
Pillow
Back Cushion
Retracted Position of Massage Heads
*The massage heads are normally
retracted to the left and right in the lower
part of the backrest.
(However, if the Quick Stop Button is
pushed to stop the massage then the
massage heads will not return to the
retracted position.)
SeatSide CoverLegrest
When Lowered When Raised
• Massages the calves and
the soles.
• Includes an air massage function.
• The back cushion is detachable.
• Massages the legs from
the ankles to the knees.
• Includes an air massage
function.
Backrest
(Contains massage heads.)
Legrest Slide Lever
• Used to slide the legrest in and
out. (See Page 47)
• For use when watching TV or
just relaxing.
• The pillow has a height
adjustment. (See Page 41)
• The pillow is detachable, and
can also be flipped over.
Back Cushion Fastener
Handle
Pillow Fastener
Back Cover
Wheels
Safety Precaution Label
Power Switch
Power Cord

4544
4. After the Massage has been Completed the Unit will Automatically Stop.
After the designated program has been completed the massage lounger will automatically stop.
(Approximately 15 minutes.)
Stopping the Massage during a Program
• Press again.
• The legrest will automatically be lowered and the massage heads will return to the retracted position.
After the massage heads have stopped moving the backrest will return to the original position.
Stopping the Massage Immediately
• Press if you want to stop the massage immediately.
• All movement will immediately stop.
• Please press twice in order to return the massage heads to the retracted position.
Adjusting the Strength of the Back Massage
Please press to adjust massage strength.
Adjusting the Strength of the Leg/Calf Massage
Please press to adjust massage strength.
3-Stage
Adjustment
*When the strength is set to 0 (i.e. no bars are lit on the display)
the leg/calf air massage will stop and change to the back
massage only.
Body Searching — Adjusting Shoulder Position
The massage rollers will rise up the back until
they reach the area behind the neck, after
which they will descend to the level of the
shoulders where soft tapping will be carried
out for approximately 10 seconds.
Turning off Vibration
Please press to stop the vibration in the desired area. Press it again to restart it.
Soft Tapping
Use the Neck Roller Position Adjustment button
to properly set the shoulder position while soft
tapping is being carried out.
Pressing one of the buttons
once will raise or lower the
massage heads by approxi-
mately 1.8 cm.
• When there is nobody sitting in the seat or when body searching has not been carried out successfully, “massage
terminated” will be announced and the soft tapping will stop. If this happens then please sit as far back as possible with
your head on the pillow (back cushion/backrest) and push to carry out body searching again.
• When someone else wishes to use the massage lounger midway through a massage, please push to stop the
massage and start from the beginning again as the shoulder position will vary from person to person.
Down
Up
Too High
Correct Position
Too Low
WHEN YOU WANT TO USE THE MASSAGE LOUNGER RIGHT AWAY. (PROGRAMMED OPERATION)
USING THE MASSAGE LOUNGER
Display of Massage Areas
• Shows the massage areas currently
being massaged by flashing.
Program Strength Display
• This displays the strength of
the selected program.
Pressure Level Display
• This displays the amount of
pressure exerted on the body.
Neck Roller Position
Button
• Pressing this button allows
you to adjust the shoulder
position after body searching
has been carried out.
Movement Display
• This displays the program
that is currently in use.
Program Strength Button
• Use these buttons to adjust
the strength of the back
massage or calf/foot
massage.
1
2
1. Press .
• The Programmed Operation buttons (four) and the Self Program buttons will start to flash.
• The massage heads will not start to move until you press one of the program buttons.
2. Select the program you want.
• Please press one of the flashing buttons.
• See Page 46 for details regarding the content of each of these Programmed Operation.
• It is possible to change programs during the massage by pressing one of the other program buttons.
3. Sit as far back in the seat as possible with your head
on the pillow (back cushion/backrest).
Press the program button you desire to start the massage. The seat will
automatically recline to the massage position and body searching will
commence.
• You will feel a light tapping sensation on your shoulders. Always check the
shoulder position and when necessary adjust it manually with the neck roller
position button.
• Body searching can be carried out for people with a height of 140 cm to 185 cm.
After body searching has been completed the massage will commence.
• The air massage on the legs/calf will commence at the same time that body
searching commences.
• You can freely adjust the angle of the backrest and legrest.
• Slide the legrest to adjust the position of your knees and calves. (See Page 47)
• This program uses mainly Shiatsu massage
to provide a strong massage that is ideal for
people who have extremely stiff shoulders, etc.
• This program uses kneading massage to
thoroughly relax stiff muscles in many areas.
Still a strong massage.
• This program uses a gentle massage to help
soothe a tired body with a gentler, longer
Swedish style massage strokes.
• This is a more general program using a variety
of massage movements to help refresh people
when they’re feeling tired. Mixes both Shiatsu
and Swedish.
• If the massage lounger is reclined further than
this angle then it will not automatically recline.
Reclined approximately 11°.
Raised approximately 50°.
Correct Massage Position

4746
1. Hold down until you reach the desired angle.
• Holding the button down will recline the seat and raise the legrest.
• Shortly after the backrest starts to recline the legrest will be raised.
• When both the backrest and legrest have been raised or lowered as far
as possible you will hear a “beep-beep-beep” sound.
• The backrest and legrest may reach their limits at different times.
• Adjust the position of the back cushion so that it does not come into
contact with your elbows.
2. Release when you have reached the desired
position.
• If you have reclined the back more than you want, press to raise it
again.
• Do not recline the back too far when first using the unit as you may find
the massage to be too strong.
Raising the Backrest and Legrest
Hold down to raise the backrest and legrest
• When both the backrest and legrest have been raised as far as
possible you will hear a “beep-beep-beep” sound.
ADJUSTING THE SEAT
Raising and Lowering Only the Legrest
Raising the Legrest
Hold down to raise the legrest.
• When the legrest has been raised as far as possible you will hear a
“beep-beep-beep” sound.
Lowering the Legrest
Hold down to lower the legrest.
• When the legrest has been lowered as far as possible you will hear a
“beep-beep-beep” sound.
• Ensure that the legrest slide has been fully retracted before lowering
the legrest otherwise it will hit the floor (see below).
Extending the Legrest
1. Slide the legrest out to the desired position by
pulling the legrest slide lever.
2. Release the legrest lever.
Reclining the Massage Lounger
1
2
Approx. –5°
Approx. 85°
Approx.
170°
Approx. 120°
Push the legrest
down with the backs
of your legs.
Legrest Slide Lever
Once you have released the legrest
slide lever the legrest will click into
place and lock.
When you wish to retract the legrest, pull the legrest slide lever to
release the legrest. Raise your legs slightly to allow the springs to
retract the legrest.
Additional Information
Display of Massage Areas
Sometimes the massage areas displayed on the control panel will be different from what
you are actually experiencing.
* Due to limitations in the size of the display, the massage areas displayed on the control panel
are only a general indication of the area being massaged. This means that sometimes the
areas that are actually being massaged are different from those shown on the display. Areas
of massage displayed may change depending on changes to massage intensity or position of
massage heads.
Pressure Level Display
The pressure being applied to the body is shown on the display.
• The actual pressure experienced may vary from the level indicated on the display.
• Depending on the seatback fabric, the pressure level indicated may change even when nobody is sitting in the seat.
Pressure Feedback Function
The strength of the massage (pressure level) is automatically adjusted if it is too much or too little.
• The standard body pressure level varies according to the strength of the program selected.
Programmed Operation
• Please see Page 58 for details regard the lower body massage.
• The movements below are shown in simplified form for the sake of illustration.
Shoulder grasp
and Shiatsu A
Tap A and Roll Shiatsu A,
Shoulder grasp
and Tap A
Shiatsu A,
Shiatsu B and
Knead A
Knead B and Roll Shoulder grasp,
Shiatsu A and
Knead B
Knead A and
Tap B
Shiatsu B, Tap A
and Knead B
Tap B, Knead B
and Roll
Shiatsu A and
Knead B
Swedish and Roll Knead A and
Knead B
Knead A and
Tap B
Knead B and Roll Shiatsu A and
Knead B
Knead A and
Tap B
Knead B and
Shiatsu B
Swedish, Roll
and Tap B
Knead B and
Swedish
Knead B and
Tap A
Knead B and Roll Swedish, Knead B
and Tap B
Knead A, Tap B
and Knead B
Tap B, Swedish
and Knead B
Knead B, Knead A
and Tap B
Knead A, Knead B,
Swedish and
Tap B
Swedish, Roll
and Tap B
Shiatsu A and
Knead B
Tap A and Roll Knead B, Tap A
and Shiatsu A
Knead A, Tap B,
Roll and Tap B
Knead A and
Tap A
Knead B, Tap B
and Tap C
Knead B Tap C, Roll,
Tap B and Roll
Swedish and Roll
Shiatsu Program
Deep Program
Gentle Program
Refresh Program

4948
4. Sit back in the seat as far as possible with your head on the pillow (back cushion,
backrest).
After pressing the seat will automatically recline to the massage position and body searching will commence.
• You will feel a light tapping sensation on your shoulders. Always check the shoulder position and when necessary adjust it
manually.
After body searching has been completed the massage will begin.
• The air massage on the lower body will commence at the same time that body searching commences. (If the legs has not
been selected then the air massage will not commence.)
• You can freely adjust the angle of the backrest and legrest.
• Slide the legrest to adjust the position of your knees and calves. (See extending the legrest on Page 47.)
5. After the massage has been completed the unit will automatically stop.
After the designated program has been completed the unit will automatically stop. The usual program takes about 15
minutes.
• If you want to stop the massage during a program press . Press if you want to stop the massage immediately.
Self Program Example
“My shoulders and lower back are a bit sore today so I think I’ll focus on those areas.”
(1) I just want a light
massage on my
neck so I’ll set
this at 1.
(2) My shoulders are
really stiff so I’ll
set this at 5.
(3) My back’s fine so
I’ll set this at 0.
(4) My lower back
feels pretty stiff
so I’ll set this at 4.
(5) I just want a light
massage on my
legs so I’ll set this
at 1.
15041
Press
Degree of Fatigue
Press Press Press Press
WHEN YOU WANT TO CREATE YOUR OWN MASSAGE PROGRAM (SELF PROG.)
Degree of Fatigue Display
• This is used in the Self Program to
indicate how tired you are in each
area of your back and legs.
Program Strength Display
• This displays the strength of
the selected program.
Please ensure that the cover
is closed securely.
Pressure Level Display
• This displays the amount of
pressure exerted on the body.
Neck Roller Position
Button
• Pressing this button allows
you to adjust the shoulder
position after body searching
has been carried out.
Movement Display
• This displays the program
that is currently in use.
1
2
3
Display of Massage Areas
• The massage points currently
being massaged flash.
1. Press .
• Programmed Operation buttons (four) and the Self Program buttons will start to flash.
2. Press .
• The Degree of Fatigue indicators on the display will all start to flash on the neck area.
• The massage heads will not start to move until you press .
* It is not possible to use the Self Program if the cover of the control panel is not completely closed.
3. Select the degree of Fatigue.
(1) Press location to select the desired area of the body. The button will toggle down each time you press it.
(2) Press fatigue to select the degree of fatigue.
(3) Press after you have finished inputting settings for the various parts of the body.
The massage lounger will automatically create the massage program best suited to the information you have input.
Your selections will not be recorded until you have pressed .
—— NECK
—— SHOULDER
—— BACK
—— LOWER BACK
—— LEGS
• The area of the body selected will start to flash.
The degree of fatigue will decrease as you continue to
press the button.
After reaching the minimum setting, if you press the
button again it will return to the maximum setting.
The greater your selection, the more time and movement
will be spent on that area. (See Page 51 for examples.)

5150
Additional Information
• A simple explanation of the movements is provided below.
Details regarding Self Program
Stiff Neck/Fatigue
Degree of
Fatigue
After using Knead B to relax the area surrounding the neck, Knead C and Tap A are used to
massage areas of more severe stiffness.
After using Knead B to relax the area surrounding the neck, Tap A and Knead B are used to
relax the muscles.
After using Knead B to relax the area surrounding the neck, Tap B and Knead C are mainly
used to finish off with.
Tap B and Knead B are used to relax the area surrounding the neck.
Tap B is mainly used to relax the area surrounding the neck.
After using Shoulder grasp, Tap A and Shiatsu A to relax the shoulders, a kneading
massage is used along the shoulder blades.
After using mainly Shoulder grasp and Shiatsu A to relax the shoulders, Knead C and
Knead A are used on the area surrounding the shoulders.
After using mainly Tap B and Tap A to relax the shoulders, Shiatsu A and Knead B are used
to finish off the area surrounding the shoulders.
Mainly kneading and Tap B are used to thoroughly relax the area surrounding the shoulders.
Mainly Tap B is used to gently relax the area surrounding the shoulders.
After using Knead B to relax the back muscles, Shiatsu B is then used to stretch the back
muscles after which Knead A, Knead B and Knead C are used to relax the back muscles.
After using Knead B to relax the back muscles, Shiatsu B is then used to stretch the back
muscles after which Knead A and Knead B are used to relax the back muscles.
Knead B and Knead A are used along the back muscles to relax them.
After using Tap B to relax the back muscles, Knead B and Knead A are used to relax them.
Mainly Tap B and Swedish are used to thoroughly relax the back muscles.
Knead B, Shiatsu B and Tap A are used to thoroughly relax the lower back muscles.
Knead B, Shiatsu B and Knead A are used to thoroughly relax the lower back muscles.
In addition to Knead B and Swedish, Tap C is used to relax the lower back muscles.
After using Tap B, Knead B and Tap B are used to relax the muscles.
Mainly Tap B and Swedish are used to thoroughly relax the muscles.
The selected area is repeatedly grasped and then squeezed. (See Page 59 for explanation
of “grasp” and “squeeze” massage.)
After the selected area has been repeatedly grasped it is then repeatedly squeezed.
After the selected area has been relaxed using grasping and squeezing it is then finished off
with a rubbing movement.
After the selected area has been slightly relaxed using grasping and squeezing a rubbing
movement is used.
A rubbing movement is used to gently relax the selected area.
Stiff Shoulders/
Fatigue
Back Muscle
Fatigue
Lower Back
Fatigue
Legs/Soles/Seat
Degree of
Fatigue
Degree of
Fatigue
Degree of
Fatigue
Degree of
Fatigue
Changing the Degree of Fatigue During the Program
• After pressing the button corresponding to the area you want to change and making any changes, press .
• You can change the program even during mid-program by following the procedures on Pages 48 and 49.
(1) Press location to select
the area you want to change.
(2) Press fatigue to input
the degree of fatigue.
(3) Press after you have
finished making the desired
changes.
Additional Information
The massage will be carried out in descending order from the greatest degree of fatigue.
• If the degree of fatigue selected is the same, the massage will be carried out in the
following order. Neck -> Shoulders -> Back -> Lower Back.
• If the degree of fatigue selected for any particular area is , then no massage
will be carried out in that area and the massage heads may merely pass over that
area on the way to the next selected area.
• If the degree of fatigue selected for the Neck to the Lower Back is , no upper
body massage will be carried out.
• If the degree of fatigue selected for the Legs is , no air massage will be carried
out.
— 3rd
— 1st
— No Massage
— 2nd
— Constantly
Massaged
Degree of Fatigue Settings are NOT Massage Strength Settings
• The movement and duration of the massage is determined by the unit based on the degree of fatigue selected.
• Use the Strength buttons to adjust the strength of the massage.
• Please note that in the Self Program massage strength for the legs cannot be set to 0.
• The focus button cannot be used in Self Program mode.

5352
1. Press .
2. Select and press the User Memory Button you require.
(You can actually press one of the User Program buttons without pressing .)
3. Select and press the program you desire. (i.e., shiatsu, deep, gentle, refresh, Self Prog.)
The specific treatment areas you recorded are displayed.
• The massage lounger will carry out body searching to check whether or not someone with the same physical
characteristics is using the unit. (Nothing will be displayed and no sounds will be emitted during this period.)
If the physical characteristics are the same as those recorded the previous time then the massage will start immediately. If,
however, the physical characteristics are determined to be different then body searching will be carried out in the normal
way before the massage begins.
When you Want More Control over Individual Massage Settings
Creating a Customized Program
After following the procedures outlined on this page and the previous page, after the program has
finished and while the button is still flashing press the same User Memory Button. You must press A or
B or C to record any changes made.
Erasing Recorded Data
• It is possible to restore the factory default settings.
(It is not possible to return to the previously recorded User Program setting.)
(1) Press .
(2) Select and press the button with the information you want to erase.
• The button will stop flashing and the Programmed Operation buttons will start flashing.
(3) Hold the same button down (for at least 3 seconds) until , , and stop flashing.
• The button selected will start to flash (for approximately 15 seconds).
(4) Press the same button again while it is flashing.
• The data recorded will be erased and the button will stop flashing.
WHEN YOU WANT MORE CONTROL OVER INDIVIDUAL MASSAGE SETTINGS. (USER ADJUSTMENT FUNCTIONS)
2
Programmed Operation and
Self Program buttons
1
Massage Position
Adjustment button
2
Focus button
User Memory Buttons
3
Using the User Memory Buttons allow you to customize the back massage.
The more you use these functions the more you’ll customize it to provide just what it is you like.
1. Select and start the program (Programmed Operation and Self Program) you desire
by following the procedures shown on Pages 44–51.
2. After the massage starts, adjust the program to your individual needs.
Spend more time on the location and type of massage you like with the focus button.
When you Want More Control over Individual Massage Settings
Press to increase
the time spent on
a particular location
and type of massage.
• During the program when the massage feels particularly good, press to concentrate on
that particular massage action.
• will flash and the unit will increase the amount of time spent on that particular type of massage.
• That particular kind of massage action will be repeated once more.
• The location and the type of massage will be recorded and the program will be changed to
emphasize this area and type of massage during the overall program.
• The focus function cannot be used in the Self Program.
• The focus function cannot be used when , or are displayed.
3. Recording the adjustments you have made.
(1) After the program has finished, or when you have pressed , after the massage heads have moved
back to the retracted position will start flashing after 20 seconds.
(2) Select and press the User Memory Button you want to record this program in. (Press one of the
buttons while are flashing. They will flash for approximately 15 seconds.)
(3) The button you selected and pressed will then continue to flash, will flash and then the massage
will be completed.
Press to fine tune
the massage location.
• Press this button to make minor adjustments to the location and lateral movement of the
massage heads during a program.
• will start flashing.
• The massage heads will move in accordance with the buttons you press.
• The location to which you have moved the massage heads will be recorded and the program
will be changed to move to this location whenever the program is selected.
• If you press the button and hear “beep-beep-beep”, this means that the massage heads
cannot be moved in the direction you have selected.
Fine Tuning Massage Location.
Recording over existing programs.
• If you try and record over an existing program then the button you have pressed will flash quickly.
• Press the same button again to erase the existing information and record the new information.
• If you do not want to erase the information, select and press another of the User Memory Buttons.
• If you decide that you do not want to record the information, press without pressing any of the User Program
buttons to cancel.
• While the information is being saved, none of the other buttons apart from the reclining and legrest button can be used.

5554
WHEN YOU WANT TO CONTROL EVERYTHING YOURSELF. (MANUAL OPERATION)
Massage Action Display Massage Point Display
Pressure Level Display
• This displays the amount of
pressure exerted on the body.
Lower Body Action Button
• Allows you to select the massage
action for the lower body massage.
Vibration Button
Lower Body Position Selection
Button
• Allows you to select the area in the
legs/calf/seat that you want to
massage.
Program Strength/Speed Display
• This displays the strength and speed
of the selected program.
Massage Position
Adjustment Button
• This allows you to make small
adjustments to the position of
the massage heads.
Massage Strength
Adjustment Button
• Allows you to adjust the
strength of both the upper
and lower body massages.
Massage Action
Selection Button
• This allows you to select the
massage action you desire.
Upper Body Massage
Speed Adjustment Button
• This allows you to adjust the
speed of the upper body
massage.
Lateral Movement Button
• This allows you to laterally move
the massage heads during the
massage.
• If this button is not pressed then
the massage will be carried out
in the factory default locations.
1. Press .
2. Open the cover.
3. Select the massage action you desire and
press the appropriate button.
Sit as far back in the seat as possible with your head on the
pillow (back cushion/backrest).
• After pressing body searching will be carried out in
order to verify the shoulder position before the massage begins.
(The shoulder position can also be adjusted.)
• The icons of the massage actions selected are shown on the
display.
• You will feel a light tapping sensation on your shoulders. Always
check the shoulder position and when necessary adjust it manually.
You can Combine Multiple Massage Actions
• Press the buttons of the massage actions you require.
(Example)
Press the following buttons if you want to combine Shiatsu A, Tap A and Roll
(1) Press . (2) Press . (3) Press .
* The order in which the buttons is pressed does not matter.
• It is not possible to combine the massage actions within each of the groups shown in the diagram.
e.g. It is not possible to combine Shiatsu A, Swedish, Tap A and Tap B, etc.
Stopping a particular Massage Action
• To remove a massage action press the button corresponding to that action again. These switches are on/off toggles.
(Example)
If you want to remove Roll from the selection shown above then press .
Upper Body Massage
Open the cover
• The selected massage
actions are shown in the
display.
• Roll has been removed from the massage
action shown in the display.
Additional Information
Detailed Information regarding User Adjustment Functions
(1) What happens when I press ?
• The program will be changed so that the overall amount of time spent on that particular area during the program is
increased.
• The massage action at the time when the button was pressed will first be repeated.
• The massage action at the time when the button was pressed will be increased in that area when that same
massage action is carried out within the massage program.
• The overall time of the massage (approximately 15 minutes) will not be increased.
• This function cannot be used in the Self Program.
(2) What happens when I press ?
• The point where the massage is currently being carried out will be changed slightly.
• This is to ensure that the correct acupressure points can be reached on people with different physical characteristics.
• The button can be pushed once in each direction. This moves the
massage heads approximately 1.8 cm up or down and approximately 0.6 cm
left or right from the center of the pre-programmed acupressure point.
• The new point will be recorded and whenever that point is massaged
during a program the massage heads will automatically move there.
• The new point is used in all programs.
(The information recorded in each User Memory Button is independent of other User Memory Buttons.)
Massage Point Priority Display
When is pressed or adjustments are made to the user data the results are shown in the Massage
Point Priority Display.
Advanced Use of the User Program Function
• Programmed Operations were created by professional massage therapists in accordance with the aim of each
program. While based on these programs, the User Adjustment Functions allow users to modify the massage
parameters. Therefore, it is not possible to focus on one particular area using this function (e.g. the shoulders)
during a single massage. If you want to focus on one particular area then please use the Self Program or the
Manual Operation.
What Kind of Data Can Be Recorded?
Recordable Data
• The five Programmed Operations can be recorded in each of the User Adjustment Functions buttons.
(The massage actions of Programmed Operations. The data from the previous Self Program.)
• Data regarding physical characteristics.
(When the User Adjustment Functions button is pressed and the massage begins, body searching is carried out in
accordance with this data and if that data matches then the massage begins. If it does not match then body
searching is carried out again.).
The following are not recorded as part of the User Adjustment Functions:
• Data regarding Manual Operations.
• Massage lounger position (reclining angle and legrest angle).
• Data regarding the leg/calf massage.
• When Manual Operation has been selected during a Programmed Operation.
• Massage strength settings in the Programmed Operations.
• When the massage has been stopped by pressing and the massage terminated.
Approx. 1.8 cm
Approx. 0.6 cmApprox. 0.6 cm
Approx. 1.8 cm
Acupressure
Points
• The amount of time that will be spent on each point during the next massage is displayed.
• The higher the level, the longer the amount of time that will be spent on that point.
• The number of levels is an indication only and is not necessarily an exact indicator of the proportion of
time that will be spent on each point.

5756
Additional Information
How to Get the Most Out of Your Massage Lounger
(1) Start with a rolling massage only to allow your body to get used to the massage lounger. This
stretches out your spine and relieves pressure from your cervical disks.
(2) Next use a kneading or tapping massage in areas surrounding stiff muscles.
(3) To finish off with use a rolling massage again to stretch your spine again.
Example of
a Localized Massage
Adjusting Massage Strength
• For safety reasons there are areas where it is not
possible to select a massage strength of 5.
• is pressed when massage strength has been set to
4 or 5, massage strength will automatically be set to 3 or
4 depending on the type of massage before lateral
massage is carried out.
• When using Roll independently or in combination with
other kinds of massage, the maximum massage
strength setting is 3.
Rolling Massage
• When a massage is being carried out over a wide area,
if Roll is selected, then the width of the massage will
automatically be reduced before the Roll massage
begins.
Upper Body Massage Adjustment
The scope of the massage rollers depending on the type of massage selected is shown below.
Shoulder grasp massage
Neck and Shoulders Back Lower Back
Use Knead B on the neck and
Knead A, Shoulder grasp and
Shiatsu A on the shoulders.
Use Swedish, Knead C and
Soft Shiatsu up and down
the back.
Use Swedish and
Shiatsu B from the bottom to
the top.
Approx. 15cm
Approx. 15cm
Approx. 21cm
Approx. 5cm
Points where massage
can be carried out at
the maximum strength
of 5.
Points where rolling
massage can be carried
out up and down the
back.
Points where massage
can only be carried out
at a maximum strength
of 4.
When the strength of the
massage has reached 4
you will hear a “beep-
beep-beep” sound.
Approx. 15cmApprox. 15cm
Approx. 15cmApprox. 15cmApprox. 15cm
Approx. 21cmApprox. 21cmApprox. 21cm
Approx. 76cm
Approx. 5cm
Approx. 30cm
Approx. 21cm
Approx. 5cmApprox. 5cm
Approx. 15cm
Approx. 5cm
Rolling Massage Other Massage
Approx. 15cm
Approx. 15cm
Approx. 21cm
Approx. 5cm
(1) The massage rollers move to the
shoulder position.
(2)The shoulders are pressed from
directly above by the upper rollers.
(3)The air unit provides a Shiatsu
massage from behind.
Please try the following if you want a stronger shoulder-grasping massage.
1. Remove your sweater or jacket if you are wearing one.
2. Lower the shoulder position slightly.
3. Lower the backrest.
4.
Push your shoulders further back while moving them from side to side when setting the shoulder position or during the massage.
5. If the massage is still not strong enough then remove the pillow and the back cushion.
4. When you want to customize your massage even more.
You can adjust the height and lateral movement of the massage heads, as well as the speed and strength
of the massage.
5. After the massage has been completed the unit will automatically stop.
• The unit will automatically stop approximately 15 minutes after the massage begins.
•
If you want to continue using the massage lounger then we recommend that you wait at least 10 minutes in between each massage.
• If you want to stop the massage during a program press . Press if you want to stop the massage immediately.
Adjusting Massage Position
Press .
• Press the button as many times as you like in any direction to move the massage
heads to the position you require.
• Each time you press the button the massage heads move approximately 1.8 cm up or
down and approximately 0.6 cm left or right.
• If you hold the up or down button down the massage heads will continue to move until
you release the button.
• When the massage heads have been moved as far as possible you will hear a "beep-
beep-beep" sound.
• In some places the strength of the massage will be automatically reduced.
• The approximate position of the massage will be shown on the display.
• In some cases the massage action will not immediately change even though the
massage action button is pressed.
Adjusting Massage Speed
Press .
• You can press the button as many times as you like to increase or decrease the speed
of the massage.
• When the speed of the massage has been increased or decreased as much as
possible you will hear a “beep-beep-beep” sound.
• It is not possible to adjust Shoulder grasp.
• The speed of the massage is shown on the Massage Action Display in five stages.
Adjusting Massage Strength
Press .
• You can press the button as many times as you like to increase or decrease the
strength of the massage.
• When the strength of the massage has been increased or decreased as much as
possible you will hear a “beep-beep-beep” sound.
• In some places the strength of the massage will not be able to reach the maximum
level of 5.
• The strength of the massage is shown on the Massage Action Display in five stages.
• Shoulder grasp can be adjusted in five stages.
• In some cases the massage action will not immediately change even though the
massage action button is pressed.
Adjusting Lateral Movement
Press .
• Press this button to increase the width of the massage in the location the
massage heads were in when you pressed the button.
• will be shown on the display.
• In some places the strength of the massage will be automatically reduced.
• Press the button again to revert to normal massage action.
Massage Actions (Upper Body)
Shiatsu: This feels as though the thumbs of both hands are being
used to work on the acupressure points. The initial strong push is
followed by a short pause to give the impression of a professional
shiatsu massage therapist.
3-Stage Shiatsu: This massage features three increasingly strong
pushes.
Pressing: This massage presses stiff muscles toward the outside
and is effective on areas around the shoulder blades on the outer
shoulders as well as the lower back.
Kneading: With this massage, a strong push is followed by a quick
release in a rhythm that is designed to relax stiff muscles. It is ideal
for loosening stiff muscles in the neck and beside the spine.
Deep Kneading: With this massage the massage heads work slowly
over the acupressure points in a deep kneading motion.
Wide Kneading: This motion is like the palms of both hands being
used to press and rub over a wide area from both sides of the body.
This type of massage is ideal for someone wanting a broad swedish
style massage on the back or lower back.
Tapping: This motion is like a fist used in a rhythmic pattern to
provide a solid tapping that is designed to eliminate stubborn
stiffness and tiredness.
Soft Tapping: With this massage soft tapping is carried out in a
rhythmic pattern alternately to the left and right.
Rhythmic Tapping: With this massage slow tapping is alternated
with light tapping to relax stiff muscles.
Rolling: The massage heads become rollers that roll over the back
up and down from the neck to the lower back to stretch the back
muscles and relieve tension.
Regional Rolling: The massage heads become rollers that roll over
the back muscles, but this time in a specified 10 cm location.
Pressing: With this massage the shoulder muscles are pressed down
from directly above to bring relief to stiff muscles.
Vibration: The high frequency vibration action helps your tense body
to relax. This is ideal when used together with rolling, etc. for a full
body massage.

5958
5. After the massage has been completed the unit will automatically stop.
• The unit will automatically stop approximately 15 minutes after the massage begins.
• It will take a number of seconds for the air to be completely released. (After pressing you will hear air being released.)
• Press if you want to stop the massage during a program. Press if you want to stop the massage immediately.
Massage Actions (Lower Body)
Grasp
• After applying pressure to the sides and backs of the legs, pressure is applied to each of the
points on the calves and the muscles in the calves are relaxed in a rhythmic manner.
• This kind of massage is ideal after exercising when your muscles feel tired.
Squeeze
• After applying pressure to the sides and backs of the legs, pressure is applied to the calves and
they are slowly squeezed from the bottom up.
• This kind of massage is ideal for preventing swelling in the feet.
Auto
• In addition to the Grasp and Squeeze actions mentioned above, a diverse range of actions are
used to promote the circulation of blood through the backs of the legs and feet that are prone to
swelling, and to help refresh tired muscles.
Grasping
Squeezing
Preparation
Adjust the angle of the legrest and slide before starting a massage.
• It is also possible to adjust the legrest and slide
during a massage.
Air will be released while you are pressing .
Please change the position of your legs while air
is being released.
1. Press .
2. Open the cover.
Leg/Calf/Seat Massage
When you want to massage the
soles of your feet and your calves.
When you want to massage your
legs from your ankles to your calves.
3. Select the area and massage type you require.
• The areas and massage actions you have selected will be shown on the display. (See below.)
Auto Grasp Squeeze
• If you press one of the Sole/Leg/Calf/Seat Area Selection Buttons first then the massage action will be set to Auto.
• If you press one of the Sole/Leg/Calf/Seat Massage Type Selection Buttons first then the entire lower body will be selected.
• You can change to a different massage or a different area during the massage. If you change the massage or area then
the air will be completely released before the massage begins again.
If you press one of the Sole/Leg/Calf/Seat Massage Type Selection Buttons while carrying out
Sole/Leg/Calf/Seat massage at the same time as carrying out back massage, the air massage will be
terminated and only the back massage will continue.
• If you press one of the Sole/Leg/Calf/Seat Massage Type Selection Buttons while carrying out only a Sole/Leg/Calf/Seat
massage, then the massage will not stop.
To stop the massage please press or .
4. Adjusting Massage Strength.
• Massage strength can be adjusted in three stages.
• Press as many times as you like until you reach the required strength.
• When the strength of the massage has reached its limit you will hear a “beep-beep-beep” sound.
• The strength of the massage will be shown in Program Strength/Speed Display.
Sole/Leg/Calf/Seat Area
Selection Buttons
Sole/Leg/Calf/Seat Massage
Type Selection Buttons

6160
Moving the Unit
CLEANING AND MAINTENANCE
Using the Wheels to Move the Unit
• Please lift up the front of the unit when moving it by holding the pipe section on
either side of the legrest.
* Please be careful because the unit is heavy.
• It is easier to move the unit with the massage heads retracted and the backrest
in the upright position.
* Place a mat on the floor and gently roll the unit over it to avoid damaging the floor.
* Do not move the unit while someone is seated on it.
* Please remove the control panel from the control panel stand.
* Please make sure the legrest slider is fully retracted when moving the unit.
Lifting the Unit
• Move the chair by having one person hold onto the pipe sections on either side
of the legrest and another person use the handles on the back.
* Please hold the handles and legrest securely to avoid dropping the unit as it
may damage your floor.
* Please make sure the legrest slider is fully retracted when moving the unit.
Synthetic Leather on the Pillow, Back
Cushion and Armrests
• Wipe these areas with a soft, dry cloth. (Do NOT use
cloths containing any kind of chemical, etc.)
• If the synthetic leather is particularly dirty, soak a soft
cloth in water or a 3~5% solution of mild detergent,
wring it out thoroughly and tap the surface with it. Next,
rinse the cloth in water, wring it out thoroughly and then
wipe any remaining detergent from the surface, wipe the
surfaces with a soft dry cloth and allow them to dry
naturally.
(Do NOT use a hair dryer to try to dry the surfaces more
quickly.)
• Do not allow the unit to be in contact with these areas
for extended periods of time as this may lead to
discoloration.
Pipe and Plastic Areas
(1) Wipe the unit with a cloth
that has been soaked in a
mild detergent and then
thoroughly wrung out.
(2) Next wipe the unit with a
cloth that has been
moistened with just water
and thoroughly wrung out.
* Make sure you thoroughly
wring out the cloth first when
cleaning the control panel.
(3) Allow the unit to dry naturally.
• Please do NOT use
thinners, benzene or alcohol.
Seat Fabric
(1) Wipe the seat fabric with a
cloth that has been soaked in
a mild detergent and then
thoroughly wrung out.
(2) Use a mild detergent and
brush on areas where the
seat fabric has become
particularly soiled. Be careful
not to brush the fabric too
much as you may damage it.
(3) Next wipe the fabric with a
cloth that has been moistened with just water and
thoroughly wrung out.
(4) Allow the fabric to dry naturally.
Mat
Mat
Place your fingers in
the groove.
Hold the pipe sections on
either side of the unit.
Wheels
Roll the unit slowly.
CAUTION
• Do not move the unit while someone is seated on it.
• When moving the unit using the wheels, remove all obstacles
from around it, make sure the backrest is in the upright position,
lift it no higher than waist height (no higher than 80 cm) and roll
it slowly.
Failure to do so may cause the unit to tip over, which may lead to damage
or injury.
Water
Mild
Detergent
Water
CAUTION
Always unplug the unit before cleaning it. Never
touch a power plug with wet hands.
Failure to follow these instructions may lead to
electrocution or burns.
Thinners
Benzene
Alcohol
Mild Detergent
Water
RETURN THE SEAT TO THE ORIGINAL POSITION
AFTER COMPLETING THE MASSAGE
1. Check that nothing is under the legrest and that
air is being released.
2. Press to return the backrest and legrest to
their original positions.
• If you have slid the legrest out, ensure that it has been retracted before
you press .
3. Replace the control panel in the control panel
stand.
DISCONNECT THE POWER
3
off
lock
lock switch
open
on
1
2
Check that nothing
is under the legrest.
Press
1. Turn the power supply switch to the off
position.
2. Turn the lock switch to the lock position.
3. Unplug the power cord.
4. The unit should be switched to the off and
the lock engaged when not using.

6362
Problem Cause and Remedy
Reclining does not take place even though a
massage is started in Programmed Operation.
(The seat does not automatically recline.)
In some cases the seat may not automatically recline
depending on the position (angle) of the backrest or
the legrest.
H
The unit will not operate at all.
• Upper body (neck to lower back) massage.
• Lower body (calves to seat) massage.
• The power cord has been disconnected.
(See Page 40)
• The power switch on the unit has not been turned on.
(See Page 40)
• After pressing button Programmed Operation
button or the Manual Operation button has not been
pushed. (See Pages 44, 48, 55)
H
The unit has been damaged.
Stop using the unit immediately.
H
The power cord or power plug is abnormally
hot.
Stop using the unit immediately.
H
The backrest does not return to the upright
position.
The backrest will not return to the upright position if
the timer is activated or the button is pressed.
H
The legrest does not go down.
The legrest will not go down properly if the legrest
slide has been extended. Try again after retracting it.
H
It is not possible to recline the unit.
The legrest cannot be raised or lowered.
If the unit encounters an obstacle or if excessive
force is exerted on it during operation, in the
interests of safety the unit will come to a stop.
If all markings and buttons on the control panel start
to flash, which is extremely unusual, turn off the
power switch, wait for approximately 10 seconds and
then turn the power switch on again.
H
Problem Cause and Remedy
Motor Noises
• It sounds and feels like the massage heads are
straining to get over wrinkles in the cloth.
• The motor groans when it comes under load.
• There is excessive noise during Tapping. (The
noise is greater at the top of the massage lounger.)
• There is a creaking noise when the massage heads
are in operation.
• There is a sound when the vibration action is
selected.
• There is a rattling sound when the massage heads
move up or down.
• The belt can be heard rotating.
• There is a rubbing sound produced by the massage
heads rubbing on the seat fabric.
• There is a noise when the backrest cushion moves
over the armrest when the seat is reclining.
• There is a noise when I sit down.
• There is a strange sound when the massage heads
move in and out.
• When the power switch is turned on there is
a humming sound.
• Air massage-related sounds.
There is a hissing sound of air escaping.
There is a humming sound from the pump.
• The legrest rattles.
These sounds are perfectly normal and will not have
any effect on the operation of the unit.
PROBLEM
TROUBLESHOOTING
H
The massage heads stop during operation.
If excessive force is applied to the massage heads
during operation, in the interests of safety the
massage heads may stop moving. If this occurs,
raise your body slightly before restarting it.
If all markings and buttons on the control panel start
to flash, which is extremely unusual, turn off the
power switch, wait for approximately 10 seconds and
then turn the power switch on again.
H
In the Self Program the button does not flash
even though it has been pushed
(i.e. it is not possible to select the Degree of Fatigue).
The cover of the control panel has not been closed
properly (i.e. it has to click into place).
(See Page 48)
H
The massage heads do not come up to the
shoulder or neck.
The position of the massage heads is incorrect.
(See Page 45)
H
The height of the left and right massage
heads is different.
An alternating tapping method is employed, which
means that this phenomenon will naturally occur.
There is nothing wrong with the unit.
H
The air in the seat is not being released.
If the power cord is unplugged or there is a power
cut while air massage is being carried out, the air will
be trapped in the unit. The air will automatically be
released when the power cord is plugged back in
again (or when the power comes back on).
H

6564
SAFETY PRECAUTIONS
WARNING: To avoid the risk of injury:
1. Pregnant women, people who are ill, in poor physical shape or undergoing medical treatment, and people
suffering from back, neck, shoulder or hip pain should consult their doctor before using the unit. If you have a
pacemaker, defibrillator, or other personal medical device, consult with the manufacturer of your device before
using the unit. Your physician may be able to assist you in obtaining this information.
2. Sit down slowly after checking the position of the massage heads. Never put any part of your body between
the massage heads as the squeezing action of the massage heads may cause injury. Never put your fingers or
feet in the gap between the backrest and seat, the backrest and the armrest, the seat and cover under the
armrest, or the gap between the legrest and the footrest. Do not place your fingers or any part of your body in
the mechanism below the legrest, or between the legrest and footrest.
3. Do not use the unit against bare skin. While thin clothing may increase effectiveness, exposing the skin directly
to the massager may irritate the skin.
Do not use the unit while wearing anything hard on your head like a hair accessory, etc.
4. Do not use the unit for massaging the head, abdomen, front neck, elbows or knees. Do not use excessively
strong massage action on the back of the neck.
5. When using the body searching function, always ensure that the shoulder position is correct. If the shoulder
position is not correct, use the Neck Roller Position Adjustment Button to adjust it properly. You can adjust the
shoulder position in this way in the Programmed Operation, Self Program and Rolling in the Manual Operation.
Failure to align the shoulder position correctly can lead to injury.
6. Do not stretch the back muscles for more than approximately 15 minutes at a time. To avoid overstretching the
muscles which may result in discomfort, do not use the unit for more than 5 minutes when first using it. You
can gradually increase the duration and strength of the massage as you become used to it.
Do not massage any one point for more than 5 minutes at a time.
Excessive massaging can overstimulate the muscles and nerves and result in an adverse effect.
To prevent excessive massaging, do not use the massager for more than a total of 15 minutes each session.
After approximately 15 minutes, the massage heads will be retracted and stop moving.
The back cushion can be removed if you want to experience a stronger back massage. Exercise extreme care
when you use this mode in order to avoid back pain or injury. Use only for short periods of time (no more than
15 minutes). Reinstall the back cushion if you want to restore to normal massage intensity.
7. While using the massager, if you start feeling sick or if the massage seems painful, stop using it immediately.
While using the massager, if the pressure seems too strong, the movement of the massage heads can be
stopped at any time by pressing the Quick Stop Button.
8. Do not go to sleep while using the unit. Do not use the unit after drinking alcohol.
9. When the seat back is in a reclined position, do not sit on it or sit with your legs resting on the headrest.
Do not sit on the legrest as the unit may fall over.
10. Do not allow children or pets to play on or around the unit, especially during operation.
11. Do not unplug the unit or turn it off during operation. Unplug the unit immediately if there is a power outage.
12. Be sure to start on the gentle massage program if using the massager for the first time. The shiatsu massage
is stronger and should be enjoyed after one has gotten accustomed to the chair.
13. Do not allow children to play on this mechanized furniture or operate the mechanism. Legrest folds down on
closing so that a child could possibly be inquired. Always leave in an upright and closed position. Keep hands
and feet clear of mechanism. Only the occupant should operate it.
IMPORTANT SAFETY INSTRUCTIONS
Basic precautions should always be followed when using an electrical unit, including the following.
Please ensure that you read all instructions before using the Household Massage Lounger.
DANGER – To reduce the risk of electric shock:
1. Always unplug the unit immediately after use.
2. Always unplug the unit before cleaning.
WARNING – To reduce the risk of burns, fire, electric shock, or injury to persons:
1. Always insert the power plug all the way into the outlet to reduce the risk of short-circuit and fire.
2. The unit should never be left unattended when plugged in. Always unplug the unit when not in use.
3. Close and continuous supervision is necessary when the unit is used by people who are limited in their ability to
move or communicate.
4. Only use the unit for the purpose described in these instructions.
5. Do not stand on the unit.
6. Do not use any accessories other than those recommended by the manufacturer.
7. This unit should not be used by children. Keep children away from the unit. Always return the seat to the
upright position and retract the legrest completely to avoid possible injury. Make sure that nothing is in the way
when retracting the legrest.
8. Never operate the unit if it has a damaged power cord or plug. Return the unit to the nearest authorized service
center if it is not working properly, if it has been dropped or damaged, or if it has been immersed in water.
9. Always raise the back cushion to check that the fabric of the unit itself has not been ripped before using the
unit. Please also check other areas to ensure that the fabric has not been ripped. No matter how small the rip,
if you find one then immediately stop using the unit, unplug the power cord and have the unit repaired at an
authorized service center.
10. Keep power cords away from heated surfaces. Do not carry the unit by the power cord. Do not allow pins,
rubbish or moisture to come into contact with the plug.
11. Do not use the unit on top of heating appliances, such as electric carpets, etc.
12. Never block the air openings during operation and make sure that all air openings are kept free of lint and hair, etc.
Do not drop or insert anything into any of the openings of the unit.
13. Do not use the unit in bathrooms or other damp or humid places as this may cause electric shock or cause the
unit to malfunction. Do not spill water, etc. onto the control panel.
14. Do not use the unit outdoors.
15. Do not use the unit in places where aerosol spray products are in use or where oxygen is being used.
16. When unplugging the unit, turn off all controls before removing the plug from power outlet. Do not use the unit
with a transformer as this may lead to malfunction or electric shock.
17. Connect this unit to a properly grounded outlet only. See Grounding Instructions.
18. To avoid electric shock or injury, do not attempt to open or disassemble any part of the unit as it contains no
user-serviceable parts.
SAVE THESE INSTRUCTIONS

6766
GROUNDING INSTRUCTIONS
The unit must be properly grounded. If it should malfunction or breakdown, grounding provides a path of least
resistance for electric current in order to reduce the risk of electric shock.
This unit is equipped with a cord with an equipment-grounding conductor and a grounding plug. The plug must be
plugged into an appropriate outlet that has been properly installed in accordance with all local codes and
ordinances.
DANGER
Improper connection of the equipment-grounding conductor may lead to electric shock. Check with a qualified
electrician if you are in doubt as to whether or not the unit is properly grounded. Do not modify the plug provided
with the unit if it will not fit the power outlet. Instead, have a proper outlet installed by a qualified electrician.
This unit has a grounding plug. Make sure that the product is connected to a power outlet with the same
configuration as the plug.
Do not use an adaptor with this unit.
OPERATING PRECAUTIONS
WARNING: To avoid damaging the chair, follow these precautions:
1. The chair is designed for a maximum user weight of 120 kg. Exceeding the maximum weight may cause
permanent damage to the massage mechanism and/or other components of the unit. Any such damage is
deemed to be user abuse and is not covered under the Limited Warranty.
2. Do not sit on or drop the control panel. Do not pull the control panel cord or the power cord. Be careful not to
catch the cord of the control panel between the armrest and the chair back.
3. Do not treat the chair roughly, such as turning the chair on its side, turning the chair over or standing on it.
4. Do not treat the covering roughly.
• Keep sharp or pointed objects away from the covering of the chair. Be careful not to drop lit ashes, lit
cigarettes or matches on the chair.
• Exposure to direct sunlight can cause fading or a change in color of the covering.
5. If the massager functions abnormally, immediately turn off the power and have the massager checked by an
authorized service center.
6. Do not attempt to repair the massager yourself.
7. Do not repeatedly operate any switch at short intervals. Such action may cause the switch to malfunction.
8. Some noise may be heard coming from the massager while in use. This is due to the structure of the
massager and is normal.
9. Make sure there are no obstacles behind the chair before reclining it. The chair can be reclined to a maximum
angle of 170°. If the back hits a wall or pillar, the chair may malfunction. Be sure to have ample space behind
the chair. Recline the chair slowly in order to avoid contact with an obstacle.
10. When excessive pressure is applied to the massage heads, they may stop moving for safety. When moving
the heads up from the lowered position, one’s body weight may stop the heads’ movement. In such case,
slightly raise your body and allow the massage heads to move up.
11. After each massage, slide the power switch, which is located on the right side of the chair, to the “off” position
and turn its lock switch to the “lock” position.
12. Do not sit on the chair with wet body or hair.
13. The unit must not be used in “wet rooms” (sauna, swimming pool) or outdoors.

6968
Power Supply: AC230V 50 Hz
Power Consumption: 220 W
Upper Body Massage
Massage Area (Up-Down): Approx. 76 cm (The massage heads move a total of approx. 64 cm)
Massage Area (Left-Right): Distance between Massage Heads during Operation
Neck, Shoulder, Lower Back: Approx. 5 – 21 cm
Back: Approx. 5 – 15 cm
Massage Area (Forward-Back): Approx. 10 cm
Up-Down Movement Speed: Approx. 25 – 90 sec. return.
Massage Speed: Knead A, B: Approx. 9 – 15 cycles/min.
Tap: Approx. 200 – 700 sec. (one way)
Lateral/Vertical Travel: Lateral Travel: Approx. 5 cm left-right auto return
Vertical Travel (Long): Approx. 76 cm up-down auto return
Vertical Travel (Short): Approx. 10 cm up-down auto return
Massage Width: Rolling, Vertical Movement: Approx. 5 – 15 cm
Other than the above: Same as massage area (left-right).
Lower Body Massage
Air Pressure: Strong: Approx. 22 kPa
Medium: Approx. 16 kPa
Weak: Approx. 10 kPa
Reclining Angle: Backrest: Approx. 120°–170°
Legrest: Approx. -5°–85°
Automatic Shut-Off: Approx. 15 min. for both upper and lower body
Dimensions:
When not reclined. (H#W#D) 115#77#125 cm
When reclined. (H#W#D) 72#77#185 cm
Weight of Unit: Approx. 74 kg
Weight in Box: Approx. 88 kg
Maximum User Weight: 120 kg
Minimum Distance from Wall: 40 cm
SPECIFICATIONS
/