Panasonic CQVX1300W Operating instructions
- Category
- CD players
- Type
- Operating instructions

15
CQ-VX1300W
2
E
N
G
L
I
S
H
14
CQ-VX1300W
1
E
N
G
L
I
S
H
Panasonic welcomes you to our ever growing family of electronic product owners. We know that this
product will bring you many hours of enjoyment. Our reputation is built on precise electronic and mechani-
cal engineering, manufactured with carefully selected components and assembled by people who take
pride in their work. Once you discover the quality, reliability, and value we have built into this product, you
too will be proud to be a member of our family.
Volume level
Keep the volume level low enough to be aware of road
and traffic conditions.
When Washing Your Car
Do not expose the product, including the speakers, CDs
and tapes to water or excessive moisture. This could
cause electrical shorts, fire, or other damage.
Car Ventilation
Parking in direct sunlight can produce very high tempera-
tures inside your car. Give the interior a chance to cool
down before switching the unit on.
Use the Proper Power Supply
This product is designed to operate with a 12 V DC, nega-
tive ground battery system.
Disc Mechanism
Do not insert coins or any small objects. Keep screw-
drivers and other metallic objects away from the disc
mechanism and disc.
Tape Mechanism
Keep magnets, screwdrivers or other metallic objects
away from the tape mechanism and tape head.
For Installation
The product should be installed in a horizontal position
with the front end up at a convenient angle, but not more
than 30˚.
Note: The preset memory is cleared to return to the orig-
inal factory setting when the power connector or battery
is disconnected.
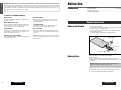
❏ Use This Product Safely
Before Use
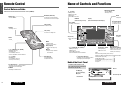
Remote Control Unit
q
w
e
(Back side)
Lithium battery
Position B
Battery holder
q Remove the battery holder.
Pull the holder out at position B while pushing position A as indicated.
w Install the battery on the battery holder.
Place the battery in the holder with its (+) side upwards as shown.
e Insert the battery holder.
Push in the battery holder back into its original position.
Remove and dispose of an old battery immediately.
Battery Information:
¡ Battery Type: Panasonic lithium battery (CR2025) (Included)
¡ Battery Life: Approximately 6 months under normal use (at room tem-
perature)
Caution: Improper use of batteries may cause overheating, an
explosion or ignition, resulting in injury or a fire.
¡ Do not disassemble or short the battery. Do not throw a battery into a
fire.
¡ Keep batteries away from children to avoid the risk of accidents.
¡ Follow local regulations when disposing of batteries.
Accessories
¡ Operating Instructions .................................................................................... 1
¡ Supplied hardware .............................................................. 1 set (a page 38)
¡ Remote Control Unit........................................................................................ 1
¡ Lithium Battery (CR2025) .............................................................................. 1
Position A
Battery Installation
Battery Notes

17
CQ-VX1300W
1
E
N
G
L
I
S
H
16
CQ-VX1300W
3
E
N
G
L
I
S
H
SEL
TUNE
TRACK
VOL
DISC
AM
REVERSE RANDOM
CQ-VX1300W
INTEGRATED CD/CASSETTE RECEIVER WITH DSP
MTL B NR TPS SKIP REPEAT
SCAN REPEAT CLOCK
SOURCE
DISPLAY
APM
M
U
T
E
DIREC
T
M
EM
O
RY
PWR
S
·
ANALYZER
E
Q
•
A
U
D
IO
•
P
O
S
I
•
SPACE
SPC
D
·
M
S
·
A DISP
123456
OPEN
OPEN
Human
Equalizer
FM
DISC
4
CD EJECT
CST EJECT
CD IN
CST IN
GRADATION LARGE FLUORESCENT DISPLAY ■
15BAND SPECTRUM ANALYZER ■
41Wx4CH AMPLIFIER ■
FLIP DOWN PANEL ■
INTEGRATED CD/CASSETTE RECEIVER WITH DSP
u
u
RESET
H
u
m
a
n
E
q
u
a
l
i
z
e
r
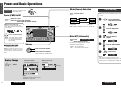
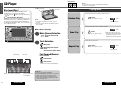
CD Slot
Cassette Tape Slot
Reset Switch
CST (Cassette tape)
u (Eject)
CD u (Eject)
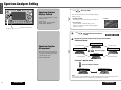
Name of Controls and Functions
][ (TUNE)/
s d
(TRACK)
¡Change frequency
¡Change track
¡Select/Adjust the item
¡Fast Forward/Fast Reverse/Rewind
SPC (SPACE)
¡Change sound space
REMOTE
(Remote control sensor)
SEL (Select)
¡Select the setting
item
DISP (Display), CLOCK
¡Change display
¡Adjust the clock
Display
(VFD: Vacuum Fluorescent Display)
S
•
A(Spectrum Analyzer)
¡Change Spectrum Analyzer pattern
¡Arrange Spectrum Analyzer
OPEN
¡Open the panel
PWR (Power)/SOURCE
¡Power ON/OFF
¡Change source
D
•
M (Direct Memory)
¡Recall the direct memory
¡Memorize the frequency
MUTE/Attenuator
APM (Auto Preset Memory)
¡Mute the sound completely
¡Decrease the volume 10 steps
¡Auto preset memory
}{(DISC)
¡Change band
¡Change tape side
¡Change disc
¡Select/Adjust the item
VOL (Volume)
¡Adjust volume
1 to 6
¡Preset memory/Recall preset memory
¡Memorize GEQ level adjustment/Recall GEQ level adjustment
Behind the Front Panel
Remote Control
Control Reference Guide
Point the remote control unit at the main unit’s sensor (REMOTE).
PWR (Power)
¡Power ON/OFF
MUTE/ATT (Attenuator)
¡Mute the sound completely
¡Decrease the volume 10 steps
VOL (Volume)
¡Adjust volume
SEL (Select)
¡Select the setting item
DISP (Display)
¡Change display
¡Adjust the clock
BAND
¡Change band
¡Auto preset memory
PRG (Program)
¡Reverse the tape play
side
3 (Stop)
¡Stop the tape rewind or
fast forward
Spectrum Analyzer
¡Change Spectrum Analyzer pattern
¡Arrange Spectrum Analyzer
DIMMER
¡Change the dimmer level
SPACE
¡Change sound space
SOURCE
¡Change source
][ (TUNE)/
s d
(TRACK)
¡Change frequency
¡Change track
¡Select/Adjust the item
¡Fast Forward/Fast Reverse/Rewind
}{(DISC)
¡Change disc
¡Select/Adjust the item
¡Recall preset memory
For details about terminals on the
rear of the unit, please see "Electrical
Connections" (a page 40)
¡MTL(Metal tape mode).........................[1]
¡B NR(Dolby B NR)................................[2]
¡Random/TPS(Tape program search) ....[4]
¡Scan/SKIP ............................................[5]
¡Repeat..................................................[6]

19
CQ-VX1300W
1
E
N
G
L
I
S
H
18
CQ-VX1300W
5
E
N
G
L
I
S
H
6
Decreasing volume range depends on setting.
(MUTE/ATT setting a page 36)
¡MUTE : No sound (Default)
¡ATT: Decrease the volume 10 steps.
TAPE
CHANGER
Mode (Source) Selection
Note: Skipping “AUXILIARY” can be set. (a page 36)
Mute/ATT (Attenuator)
: Press to select
SOURCE
(When a changer is
connected.)
(When AUX-IN
setting is ON.)
: Press
(Press again to cancel)
M
U
TE
MUTE ON
TUNER
CD
SEL
TUNE
TRACK
VOL
DISC
AM
REVERSE RANDOM
CQ-VX1300W
INTEGRATED CD/CASSETTE RECEIVER WITH DSP
MTL B NR TPS SKIP REPEAT
SCAN REPEAT CLOCK
SOURCE
DISPLAY
A
P
M
MUTE
D
IR
E
C
T
M
E
M
O
R
Y
PWR
S
·
ANALYZER
E
Q
•
A
U
D
IO
•
P
O
S
I
•
S
P
A
C
E
S
P
C
D
·
M
S
·
A DISP
123456
OPEN
OPEN
H
u
m
a
n
E
q
u
a
liz
e
r
FM
DISC
MUTE
DISP
OPEN
SOURCE
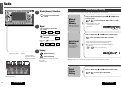
Volume
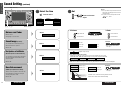
Power on : Press
Power off : Press again and hold
(Press again for remote control)
Power (PWR) On/Off
Press to increase volume
Setting Range : 0 to 40
¡
A
C
C
¡
O
N
Turn your car's ignition key to
ACC or ON position.
Preparation
PWR
SOURCE
CLOCK
DISP
Note: The sound level for each source is
stored in memory. (For radio, one volume
setting for AM, one volume setting for all
FMs.)
OPEN
Display Change
: Press
CLOCK
DISPLAY
DISP
Example: CD Mode
V
OL
U
ME
0
Clock display
Dot Spectrum Analyzer display
Track number/Track playing time
CD 0
Power and Basic Operations
: Press to cancel this display
SOURCE
Notes:
¡Displayed contents vary with sources.
¡CD text is not supported.
When Power is Off
Clock display
Display off
Press twice
Press to decrease volume
Clock Setting
: Press to move to
minute
: Press and hold for
more than 2 seconds
: Press to adjust hour
: Press to adjust minute
8
8
8
8
CLOCK
D
DISP
: Press to set
Notes:
¡The 24-hour system is used for the clock.
¡The clock is not adjustable when the power is off.
¡You can select clock display pattern. (a page 36)
CLOCK
D
DISP
¡Press and hold for rapid adjustment.
Demonstration Message
When you use this unit for the first
time, a demonstration message appears
on the display.
: Press and hold for more than
1 second when turning power
on to display a demonstration
message again
Integrated
Scrolling....
AUXILIARY(AUX-IN)
¡Adjust the clock when "ADJUST" appears on the
screen.

21
CQ-VX1300W
1
E
N
G
L
I
S
H
20
CQ-VX1300W
7
E
N
G
L
I
S
H
8
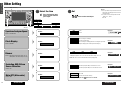
Select a band and frequency (step q, w and e on the
previous page)
Preset Station Setting
Up to 6 stations each can be saved in the FM1, FM2, FM3 and AM preset station memories.
Select a band (step q and w on the previous page)
Select a band (step q and w on the previous page)
Preset
Station
Calling
Auto Preset
Memory
Automatically save
strong stations in the
preset memory.
Manual
Preset
Memory
Manually save a station
in the preset memory.
FM -
FM - 87.50
A
M
U
T
E
Note: New stations are overwritten on existing saved stations after following this procedure.
: Press and hold for more than 2 seconds
¡The 6 stations with good reception
will be automatically
saved in the memory under preset numbers
1 to 6.
¡Once set, the preset stations are sequentially scanned for 5
seconds each.
to : Press to select the station.
6
1
blinks once
blinks
to : Press to select the station.
6
1
to : Press and hold for more than 2 seconds
6
1
¡The display blinks once, and a
receiving station is saved in
the memory.
SEL
TUNE
TRACK
VOL
DISC
AM
REVERSE RANDOM
CQ-VX1300W
INTEGRATED CD/CASSETTE RECEIVER WITH DSP
MTL B NR TPS SKIP REPEAT
SCAN REPEAT CLOCK
SOURCE
DISPLAY
A
P
M
MUTE
D
IR
E
C
T
M
E
M
O
R
Y
PWR
S
·
ANALYZER
E
Q
•
A
U
D
IO
•
P
O
S
I
•
S
P
A
C
E
S
PC
D
·
M
S
·
A DISP
123456
OPEN
OPEN
H
u
m
a
n
E
q
u
a
liz
e
r
FM
DISC
SOURCE
FM1 FM2
FM3
AM
FM1 FM2 FM3
AM
Radio
SOURCE
: Press to select the radio
mode
: Press to select an FM
band
Band Frequency
FM Stereo Indicator
lights when FM stereo
broadcast is received.
Preset Number
When in radio mode
F
D
Mode (Source) Selection
Band
: Press to determine the
AM band
Note: Press when using the remote
control
BAND
PRG/
: Higher frequency
: Lower frequency
Press and hold for more than 0.5 seconds
then release.
Seeking will start.
Tuning

23
CQ-VX1300W
1
E
N
G
L
I
S
H
22
CQ-VX1300W
9
E
N
G
L
I
S
H
10
Playing Mode
Random Play
Scan Play
Repeat Play
: Press
(Press again to cancel)
RANDOM
4
: Press
(Press again to cancel)
SCAN
5
: Press
(Press again to cancel)
REPEAT
6
R
SCAN
REP
lights
lights
lights
¡After playing 10 seconds of all
tracks, the scan play is finished and
the starting position goes to the
beginning of the first played track.
All the available tracks are played in random sequence.
The first 10 seconds of each track play in sequence.
Repeat the current selection.
SEL
TUNE
TRACK
VOL
DISC
AM
REVERSE RANDOM
CQ-VX1300W
INTEGRATED CD/CASSETTE RECEIVER WITH DSP
MTL B NR TPS SKIP REPEAT
SCAN REPEAT CLOCK
SOURCE
DISPLAY
A
P
M
MUTE
D
IRE
C
T
M
E
M
O
R
Y
PWR
S
·
ANALYZER
E
Q
•
A
U
D
IO
•
P
O
S
I
•
S
P
A
C
E
SP
C
D
·
M
S
·
A DISP
123456
OPEN
OPEN
H
u
m
a
n
E
q
u
a
liz
e
r
FM
DISC
SOURCE
OPEN
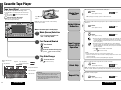
When a CD is inside or in CD mode
CD Player
SOURCE
Mode (Source) Selection
: Press to select the CD
mode
: Next track
Press and hold
: Beginning of the current
track/
Previous track (Press twice)
Track Selection
Fast Forward/Reverse
: Fast forward
: Fast reverse
¡Release to resume the regular CD play.
Track Number Play Time
Repeat, Random and
Scan Indicator
Cautions:
¡Do not use irregularly shaped CDs.
¡To avoid damaging the front panel, do not push it
down or place objects on it while it is open.
¡Do not pinch your finger or hand in the front
panel. Do not insert foreign matter into the disc
and cassette tape slots.
When a CD is in the player
C
D
E
J
E
C
T
M
D
E
J
E
C
T
u
u
C
S
T
I
N
I
N
T
E
G
R
A
T
E
D
C
D
/
C
A
S
S
E
T
T
E
R
E
C
E
I
V
E
R
W
I
T
H
D
S
P
CQ-VX1300
C
D
I
N
R
E
S
E
T
CD u (Eject) Button
Notes:
¡8 cm CD is not available for this unit, so never
insert it.
¡The power will be turned on automatically when a
disc is loaded.
CD-RW
CD-RW
CD-RW
Notes:
¡
Refer to the section on “Notes on CD-Rs/RWs” (a Page 48).
¡ CD text is not supported.
Available Discs
Note: WMA/MP3 file is not playable.
Random indicator
Repeat indicator
Disc Insert/Eject
Do not insert a disc in the following cases.
¡“NO DISC” is not displayed in the CD mode.
¡The disc indicator lights in any mode other than the
CD mode.
: Press to open the panel
Insert a disc and close the front panel. Playback will start
automatically after the unit recognized the loaded disc as
an ordinary music CD. (When a CD-R or CD-RW which
has CD-DA formatted data is loaded, this unit recognizes it
as an ordinary music CD.)
OPEN
OPEN
Label Side

25
CQ-VX1300W
1
E
N
G
L
I
S
H
24
CQ-VX1300W
11
E
N
G
L
I
S
H
12
Repeat Play
: Press
(Press again to cancel)
RANDOM
4
TPS
: Press
(Press again to cancel)
REPEAT
REPEAT
6
Blank Skip
: Press
(Press again to cancel)
SCAN
SKIP
5
Metal Tape
Mode
: Press
(Press again to cancel)
1
MTL
MTL
B NR
TPS
Dolby B Noise
Reduction
: Press
(Press again to cancel)
2
B NR
¡When playing normal tape, please set this function off.
SKIP
REP
lights
lights
lights
lights
lights
Note:
The TPS mode may not work correctly in the following cases.
¡There is an interval less than 4 seconds or having a high level of noise or hum
between programs.
¡There is particularly low-level passage during the program.
Note: The blank skip does not work when the unrecorded portion of a tape is less
than 15 seconds, and there is particularly low-level passage during the program.
Tape Program
Search (TPS)
Operation
¡Activates the tape rewind and goes back to the beginning of the
current program. The TPS finds the beginning of a following
program depending on how many times you press this button.
(Up to 8 programs)
¡Activates the tape fast forward and goes to the beginning of
the next program. The TPS finds the beginning of a following
program depending on how many times you press this button.
(Up to 9 programs)
*
Press to cancel rewind or fast forward.
(Press for remote control)
BAND
PRG/
F
D
When playing metal or chromium dioxide (CrO2) tapes.
Set the Dolby B NR mode when playing back a tape recorded with Dolby B Noise
Reduction.
Skip unrecorded portions longer than 15 seconds on the tape.
Repeat the current program.
C
D
E
J
E
C
T
M
D
E
J
E
C
T
u
u
C
S
T
I
N
I
N
T
E
G
R
A
T
E
D
C
D
/
C
A
S
S
E
T
T
E
R
E
C
E
I
V
E
R
W
I
T
H
D
S
P
CQ-VX1300
C
D
I
N
R
E
S
E
T
SEL
TUNE
TRACK
VOL
DISC
AM
REVERSE RANDOM
CQ-VX1300W
INTEGRATED CD/CASSETTE RECEIVER WITH DSP
MTL B NR TPS SKIP REPEAT
SCAN REPEAT CLOCK
SOURCE
DISPLAY
A
P
M
MUTE
D
IR
E
C
T
M
E
M
O
R
Y
PWR
S
·
ANALYZER
E
Q
•
A
U
D
IO
•
P
O
S
I
•
S
P
A
C
E
S
P
C
D
·
M
S
·
A DISP
123456
OPEN
OPEN
H
u
m
a
n
E
q
u
a
liz
e
r
FM
DISC
SOURCE
OPEN
When a Cassette tape is in the player
Cassette Tape Player
Tape u (Eject)
Button
SOURCE
Mode (Source) Selection
: Press to select the cas-
sette tape mode
: Fast Forward
: Rewind
Fast Forward/Rewind
Play Side Change
Cautions:
¡To avoid damaging the front panel, do not push it
down or place objects on it while it is open.
¡Do not pinch your finger or hand in the front
panel. Do not insert foreign matter into the disc
and cassette tape slots.
Note: The power will be turned on automatically
when a tape is loaded.
When in Cassette tape
mode
TPS Indicator
Metal tape Indicator
Dolby B NR Indicator
Repeat Indicator
Skip Indicator
Playside
: Press to reverse
(Press for remote control)
BAND
PRG/
:
Press to resume the tape play
(Press for remote control)
BAND
PRG/
Top side playing :
Bottom side playing :
PLAY
PLAY
Tape Insert/Eject
Do not insert a tape in the following cases.
¡“CST NO TAPE” is not displayed in the cassette tape
mode.
¡
The tape
indicator lights in any mode other than
the cassette tape mode.
: Press to open the panel
¡Insert the tape and playback will start.
Close the front panel manually.
OPEN
OPEN
Exposed
tape end

27
CQ-VX1300W
1
E
N
G
L
I
S
H
26
CQ-VX1300W
13
E
N
G
L
I
S
H
14
SEL
TUNE
TRACK
VOL
DISC
AM
REVERSE RANDOM
CQ-VX1300W
INTEGRATED CD/CASSETTE RECEIVER WITH DSP
MTL B NR TPS SKIP REPEAT
SCAN REPEAT CLOCK
SOURCE
DISPLAY
A
P
M
MUTE
D
IR
E
C
T
M
E
M
O
R
Y
PWR
S
·
ANALYZER
E
Q
•
A
U
D
IO
•
P
O
S
I
•
S
P
A
C
E
S
PC
D
·
M
S
·
A DISP
123456
OPEN
OPEN
H
u
m
a
n
E
q
u
a
liz
e
r
FM
DISC
SOURCE
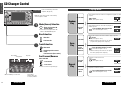
Connect the CD changer, and load a
magazine.
(a page 42)
Disc Number
Track Number
Play Time
CD Changer Control
SOURCE
Preparation
¡Insert a disc or a magazine when "NO
DISC" or "NO MAGAZINE" appears.
Mode (Source) Selection
: Press to select the CD
changer mode
Disc Selection
: Next disc
: Previous disc
Track Selection
Fast Forward/Reverse
¡Release to resume the regular CD play.
When a CD Changer is connected.
Repeat (Disc),
Random (Disc) and
Scan (Disc) Indicator
: Next track
: Beginning of the current
track/
Previous track (Press twice)
: Fast forward
: Fast reverse
Press and hold
Playing Mode
: Press
(Press again to cancel)
SCAN
S
5
:
Press and hold for more than 2 seconds
(Press and hold again to cancel)
SCAN
5
:
Press and hold for more than 2 seconds
(Press and hold again to cancel)
RANDOM
4
: Press
(Press again to cancel)
REPEAT
6
:
Press and hold for more than 2 seconds
(Press and hold again to cancel)
REPEAT
6
All Tracks
First
Track on
All Discs
Scan
Play
Current
Track
Current
Disc
Repeat
Play
DISC
DISC
DISC
: Press
(Press again to cancel)
RANDOM
4
lights
lights
lights
lights
lights
lights
lights
lights
lights
¡With the scanning of all tracks over, the original
program starts playing from the beginning.
¡With the scanning of all tracks over, the original
disc starts playing from the beginning.
All Tracks
Current
Disc
Random
Play
R
R
SCAN
SCAN
REP
REP
All the available tracks on all discs in the magazine are played in a random
sequence.
All the available tracks on current disc are played in a
random sequence.
The first 10 seconds of each track on the discs plays in sequence.
The first track of all the discs in the magazine is played for 10 seconds each.
Repeat the current track selection.
Repeat the current disc selection.
Random indicator
Repeat indicator
Note: The power will be turned on automatically
when a magazine is loaded.

29
CQ-VX1300W
1
E
N
G
L
I
S
H
28
CQ-VX1300W
15
E
N
G
L
I
S
H
16
: Press to change as follows
SPACE
SPC
SPACE OFF LIVE HOUSE
DISCOVOCAL
CINEMA JAZZ CLUB
CONCERT HALL
STADIUM
: Press
(Press again to cancel)
D
IR
E
C
T
M
E
M
O
R
Y
D
·
M
¡
New station is overwritten on existing saved station.
¡
The direct memory station is received.
: Press and hold for more than
2 seconds
D
IR
E
C
T
M
E
M
O
R
Y
D
·
M
D·M 8 .50
D·M MEMORY
FM1 98.50
¡
After setting, "SPACE" indicator will light.
Select the station in Radio mode
(a page 20)
❏ Recalling the Direct Memory
❏ Memorize
Example:
LIVE HOUSE
SEL
TUNE
TRACK
VOL
DISC
AM
REVERSE RANDOM
CQ-VX1300W
INTEGRATED CD/CASSETTE RECEIVER WITH DSP
MTL B NR TPS SKIP REPEAT
SCAN REPEAT CLOCK
SOURCE
DISPLAY
A
P
M
MUTE
D
IR
E
CT
M
E
M
O
R
Y
PWR
S
·
ANALYZER
E
Q
•
A
U
D
IO
•
P
O
S
I
•
S
P
A
C
E
S
P
C
D
·
M
S
·
A DISP
123456
OPEN
OPEN
H
u
m
a
n
E
q
u
a
l
iz
e
r
FM
DISC
SOURCE
S
P
C
D
·
M
Sound Space
Reproduction
(SPACE)
Sound space can be created in a car to
simulate being in a concert hall.
Default : SPACE OFF
Setting range : 8 types
(including SPACE OFF)
Sound space is available for each mode
(AM, FM, CD, Cassette Tape, CD Changer,
AUX-IN).
SPACE
D
•
M
(Direct Memory)
SOURCE
Sound Space and Useful Functions
Direct Memory
Your favorite FM/AM radio station can be
memorized in the D
•
M button and you can
call back radio stations just by pressing
the button whatever the current sound
source is, even if the power is off.
Default : FM 87.50 MHz

31
CQ-VX1300W
1
E
N
G
L
I
S
H
30
CQ-VX1300W
17
E
N
G
L
I
S
H
18
: Press to change as follows
❏ Positive - Negative Switch
Notes:
¡If no operation is performed within 10 seconds, the display will return to the normal operation mode.
¡The indication pattern cannot be changed at letter indicating part of the display.
Arrange the spectrum analyzer display using these methods
:
Press to change
SPEANA POSI
(Positive)
SPEANA NEGA
(Negative)
reversed vertically
reversed horizontally
reversed horizontally
reversed vertically
NORMAL
REVERSE 1
REVERSE 2
REVERSE 3
1
: Press and hold for more than 2
seconds
REVERSE
S
·
ANALYZER
S
·
A
2
❏ Direction Change
F
D
A
: Press to change
REVERSE
S
·
ANALYZER
S
·
A
Example:
¡
BLANK SPEANA
In this display, only the spectrum analyzer is turned off.
¡
ALL DISP OFF
The whole display, including the lights, goes out.
(When some operation is performed, the display lights
for about 5 seconds.)
There are special functions in Spectrum Analyzer Display
Pattern as follows :
SEL
TUNE
TRACK
VOL
DISC
AM
REVERSE RANDOM
CQ-VX1300W
INTEGRATED CD/CASSETTE RECEIVER WITH DSP
MTL B NR TPS SKIP REPEAT
SCAN REPEAT CLOCK
SOURCE
DISPLAY
A
P
M
MUTE
D
IR
E
CT
M
E
M
O
R
Y
PWR
S
·
ANALYZER
E
Q
•
A
U
D
IO
•
P
O
S
I
•
S
P
A
C
E
S
PC
D
·
M
S
·
A DISP
123456
OPEN
OPEN
H
u
m
a
n
E
q
u
a
l
iz
e
r
FM
DISC
S
·
A
S
•
A (Spectrum Analyzer)
}{
Spectrum Analyzer Setting
Spectrum Analyzer
Display Pattern
You can select display patterns to set the
display as you like.
Default : WAVE
Variety : 14 types (including BLANK
SPEANA and ALL DISP OFF.)
Spectrum Analyzer
Arrangement
With regard to the spectrum analyzer pat-
tern, you can change the indicating direc-
tion and switch the display from positive
to negative and vice versa.
Default : NORMAL/POSI
][

33
CQ-VX1300W
1
E
N
G
L
I
S
H
32
CQ-VX1300W
19
E
N
G
L
I
S
H
GEQ-3 1.6kHz
20
and : Press to select and
adjust
• Recreation
• Enjoyable drive
• Calm down
• Concentration
• Safe drive
• Stress relieving
• Refresh
• Listen to the music
• Rhythmical
• Awakening
Heavy
Light
Sharp
Soft
Frequency (Hz)
Level
(dB)
GEQ Preset Number
80 10 k
¡A cursor moves in the HEQ display and blinks at the
adjusted point.
SHARPSOFT
LIGHT
SH
RP
HE
VY
HEAVY
Set
Notes:
¡If no keys have been pressed for more than
10 seconds, the display returns to the normal
operation mode.
¡To return to the normal operation mode.
: Press
CLOCK
DISPLAY
DISP
: Heavy bass
: Light bass
: Sharp treble
: Soft treble
Positioning Image
❏ Memorize (GEQ Preset Memory)
❏ Calling Back the Preset Tone Quality
❏ Adjustment
¡Selected frequency blinks.
¡After adjusting, EQ indicator will light.
¡Frequency band changes as follows.
Adjust the level for each frequency
band
to : Press and hold for
more than 2 seconds
6
1
Note: New levels are overwritten on existing saved
level after following this procedure.
¡The display blinks once, and adjusted levels
are saved in the memory.
to : Press
6
1
After changing to the GEQ adjusting display
80 160 320 640 1.6 k 4 k 10 k (Hz)
F
D
SEL
TUNE
TRACK
VOL
DISC
AM
REVERSE RANDOM
CQ-VX1300W
INTEGRATED CD/CASSETTE RECEIVER WITH DSP
MTL B NR TPS SKIP REPEAT
SCAN REPEAT CLOCK
SOURCE
DISPLAY
A
P
M
MUTE
D
IR
E
C
T
M
E
M
O
R
Y
PWR
S
·
ANALYZER
E
Q
•
A
U
D
IO
•
P
O
S
I
•
S
P
A
C
E
S
PC
D
·
M
S
·
A DISP
123456
OPEN
OPEN
H
u
m
a
n
E
q
u
a
liz
e
r
FM
DISC
S
E
L
DISP
: Press to select
S
E
L
Tone Quality
(HEQ: Human Equalizer)
There are 49 ready patterns to make
presetting easier.
Default : FLAT
Setting range : 0 - 3 for each patterns
(49 patterns)
Select
HUMAN EQ
Select
GRAPHIC EQ
Save Your Tone Quality
Preference
(GEQ: Graphic Equalizer)
You can adjust the level from bass to treble in
each of 7 frequency bands. Up to 6 tone quali-
ty preferences can be saved in memory.
Default : 0 dB for each frequency band
Setting range : –12 to +12 in 2 dB step
Sound Setting
Select the Item
SDBB SELECT
POSITION SELSUPER BASS
BAL // FAD
HUMAN EQ
Regular Mode
GRAPHIC EQ
DISP (Display)
}{
SEL (Selection)
][

35
CQ-VX1300W
1
E
N
G
L
I
S
H
34
CQ-VX1300W
21
E
N
G
L
I
S
H
: All seats
: Front right
: Front left
LEFT
RIGHT
OFF
22
dB
12
8
0
300Hz
OFF
Frequency
TYPE1(Variable: low)
TYPE2(Variable: high)
TYPE3(Fixed: low)
TYPE4(Fixed: high)
Boost level
SDBB TYPE4
Example:
POSI FRONT
¡After setting, POSI indicator
will light.
Set
B:R 2 F:R 1
Notes:
¡If no keys have been pressed for more than
10 seconds, the display returns to the normal
operation mode.
¡To return to the normal operation mode.
: Press
CLOCK
DISPLAY
DISP
: Front
: Rear
REAR
FRONT
: Regular output (stereo)
OFF
200 Hz150 Hz100 HzFLAT
¡Adjust the Sub-Woofer output level. It is also interlocked with the preout (rear).
¡BAL//FAD, POSI, SDBB and SPACE settings for rear speaker output will be invalid.
Bass Enhancement (monaural)
(Does not cut the treble)
Note: Set to FLAT when using the cutoff frequency adjustment function built in an optional amplifier.
: Normal output
: Variable, low
: Variable, high
TYPE 2
TYPE 1
OFF
: Fixed, low
: Fixed, high
TYPE 4
TYPE 3
¡Variable : Bass enhancement along with the volume
¡Fixed : Bass enhancement with fixed range
¡After setting, SDBB indicator
will light.
Example:
❏ Balance
❏ Fader
: Front enhanced
: Rear enhanced
: Right enhanced
: Left enhanced
Selected side arrow
and : Press to select and
adjust
SEL
TUNE
TRACK
VOL
DISC
AM
REVERSE RANDOM
CQ-VX1300W
INTEGRATED CD/CASSETTE RECEIVER WITH DSP
MTL B NR TPS SKIP REPEAT
SCAN REPEAT CLOCK
SOURCE
DISPLAY
A
P
M
MUTE
D
IR
E
C
T
M
E
M
O
R
Y
PWR
S
·
ANALYZER
E
Q
•
A
U
D
IO
•
P
O
S
I
•
S
P
A
C
E
S
PC
D
·
M
S
·
A DISP
123456
OPEN
OPEN
H
u
m
a
n
E
q
u
a
liz
e
r
FM
DISC
S
E
L
DISP
Select
SUPER BASS
Rear Speakers as Sub-Woofers
(SBC-SW: Super Base Control Sub-Woofer)
You can utilize the rear speaker connected to
the built-in amplifier as Sub-Woofers that
output only bass.
Default : OFF
Bass Enhancement
(SDBB: Super Dynamic Bass Boost)
The bass of the 4 speakers connected to the
built-in amplifier is enhanced, so that you
can enjoy heavy bass sound.
Default : OFF
Select
SDBB SELECT
Select
POSITION SEL
Sound Image (Position)
You can adjust the sound image in accor-
dance with a listener's position.
Default : OFF
SDBB SELECT
POSITION SELSUPER BASS
BAL // FAD
HUMAN EQ
Regular Mode
: Press to select
S
E
L
Select the Item
Sound Setting
(continued)
Select
BAL//FAD
Balance and Fader
Default : Center
Setting range : 15 levels each
GRAPHIC EQ
DISP (Display)
}{
SEL (Selection)
][

37
CQ-VX1300W
1
E
N
G
L
I
S
H
36
CQ-VX1300W
23
E
N
G
L
I
S
H
24
Set
Notes:
¡If no keys have been pressed for more than
10 seconds, the display returns to the normal
operation mode.
¡To return to the normal operation mode.
: Press
CLOCK
DISPLAY
DISP
: Press to select and adjust
SEL
TUNE
TRACK
VOL
DISC
AM
REVERSE RANDOM
CQ-VX1300W
INTEGRATED CD/CASSETTE RECEIVER WITH DSP
MTL B NR TPS SKIP REPEAT
SCAN REPEAT CLOCK
SOURCE
DISPLAY
A
P
M
MUTE
D
IR
E
C
T
M
E
M
O
R
Y
PWR
S
·
ANALYZER
E
Q
•
A
U
D
IO
•
P
O
S
I
•
S
P
A
C
E
S
PC
D
·
M
S
·
A DISP
123456
OPEN
OPEN
H
u
m
a
n
E
q
u
a
liz
e
r
FM
DISC
S
E
L
DISP
MUTE
: Press and hold for more
than 2 seconds and then
press again
S
E
L
Select the Item
Other Setting
DISP
(Display)
SPEANA SPEED
Regular Mode
MUTE KEY SEL AUX IN SET
CLOCK DISP
DIMMER SEL
MUTE
SEL (Selection)
][
: Faster
: Slower
SLOW
FAST
Example:
HIGHMIDLOW
Darker
Medium
Brighter
¡Display brightness can be set with the side-marker lamps on or off.
Note: Be sure to connect the illumination lead.
(
a page 40)
DIMMER MID
Example:
F
ST
Example:
: Non-scrolling clock display
: Scrolling clock display
: Non-scrolling clock display and non-scrolling dot spectrum
analyzer display (like 7-band spectrum analyzer)
SPEANA
SCROLL
NORMAL
: No sound
: Decrease the volume 10 steps
Decreasing range by pressing button can be selected.
A
M
U
T
E
ATT
MUTE
MUTE KEY
Example:
Example:
UX IN ON
: External input (AUX-IN) is selectable as a source.
: External input (AUX-IN) is not selectable as a source.
OFF
ON
Select
CLOCK DISP
Clock Display
Default : NORMAL
Spectrum Analyzer Speed
Default : SPEANA FAST
Select
SPEANA SPEED
Select
DIMMER SEL
Dimmer
Default : MID (When side-marker lamps are on)
HIGH (When side-marker lamps are off)
Excluding AUX-IN from
Source Selection
Default : ON
Select
AUX IN SET
Select
MUTE KEY SEL
Mute/ATT (Attenuator)
Default : Mute

39
CQ-VX1300W
1
E
N
G
L
I
S
H
38
CQ-VX1300W
25
E
N
G
L
I
S
H
26
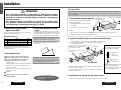
❏ Precautions
Be sure to remove the bracket for transportation
before use (installation).
CUse
Binding-Head Screws
(5 mm φ x 8 mm)
for installation.
Be careful not to lose any of these
screws.
Transportation Bracket x 2
CQ-VX1300W
Binding-Head Screw
(5 mm
φ ×
8 mm) x 4
¡We strongly recommend that you wear gloves for installation work to protect yourself from injuries.
¡When bending the mounting tab of the mounting collar with a screwdriver, be careful not to injure your
hands and fingers.
CQ-VX1300W
❏ Typical Installation (For cars with double-DIN size)
1. Remove car radio or little object box from the car and the stopping brackets.
2. Use the appended screws w or e to install the brackets on this unit.
3. Install this unit into the car.
¡If a special kit (option) is necessary for a certain year’s, model or grade of
car, please consult your dealer.
¡For simple electrical connection to your car, you can buy a prepared power
connector from your dealer.
Transportation bracket removal
Notes:
¡The screw holes on the right side are
not tapped. Please only use screws provided to mount the unit.
¡To tighten the screws, press its head down straight forward.
❏ Installation for except for the above types
For general use kit (option) or motor’s special kit (option), please consult your dealer.
Note: Use pliers to bend the fingers
on the bracket vertically.
Bracket (L)
Bracket (R)
Appended Screws (w or e).
Select appropriate ones matching
the hole shape of the bracket.
Note: Binding-Head Screws (5 mmφ
x 8 mm) w are appended four
pieces, the other four pieces are fixed
on the transportation bracket.
w Binding-Head
Screw x 8
(5 mmφ x 8 mm)
e Flat-Head Screw
x 8
(5 mmφ x 8 mm)
Installation
❏ Check the supplied items
against the table
If there is a difference between them, please inform the
dealer where you purchased the unit.
❏ Installation dimensions and
angle
● The unit cannot be installed in some car types (due to
the shape and dimensions of a dashboard), and the unit
may interfere with a gearshift lever or other objects in
some car types. Ask the dealer for further information.
Consult the dealer if space for an audio system is not
designed for 2-DIN (180 (W) mm x 100 (H) mm).
● Install the unit at 30 degrees or less with respect to a
horizontal axis.
30°
Caution: Do not disconnect the battery terminals of a
car with trip or navigational computer since all user set-
tings stored in memory will be lost. Instead take extra
care with installing the unit to prevent shorts.
❏ Installation Flow
1
Disconnect the cable from the negative
@
battery terminal (see caution on the right).
First complete the electrical connections,
and then check them for correctness.
(a page 40-42)
●
Please carefully read the operating and installation
instructions of the respective equipment before con-
necting it to this unit.
●
Please connect the power lead (red) after all other
connections are made.
Install.
After installation reconnect the negative
@
battery terminal.
2
3
4
Note: Binding-Head Screws (5 mmφ x 8 mm) w are
appended four pieces, the other four pieces are fixed on the
transportation bracket.
We strongly recommended that you wear
gloves for installation work to protect your-
self from injuries.
WARNING
This installation information is designed for experienced installers
and is not intended for non-technical individuals. It does not contain
warnings or cautions of potential dangers involved in attempting to
install this product.
Any attempt to install this product in a motor car by anyone other
than qualified installer could cause damage to the electrical system
and could result in serious personal injury or death.
●Supplied Hardware
No. Item Q'ty
q
Power Connector
1
w
Binding-Head Screws (5 mm
φ ×
8 mm)
8
e
Flat-Head Screws (5 mm
φ ×
8 mm) 8

41
CQ-VX1300W
1
E
N
G
L
I
S
H
40
CQ-VX1300W
27
E
N
G
L
I
S
H
28
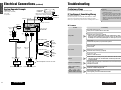
Cautions:
¡This product is designed for use in a car having a 12 V DC, negative ground battery system.
¡To prevent damage to the unit, be sure to follow the connection diagram below.
¡Remove approx.
1
/4” (5 mm) of protective covering from the ends of the leads before connecting.
¡Be sure to insulate any exposed wires from a possible short-circuit from the car chassis. Bundle all cables and keep
cable terminals free from touching any metal parts.
¡Remember, if your car has a drive computer or a navigation computer, the data of its memory may be erased when
the battery terminals are disconnected.
¡Connect the power cord after completion of other connections to prevent from shortings.
Electrical Connections
(White) : Audio (Left)
(Red) : Audio (Right)
!
@
!
@
!
@
!
@
CD Changer
Control Connector
CD Changer
Input Connector
Power Connector q
Illumination Lead
To the power line connected to
the side-marker lamps of the car
(Orange/white stripe)
External Amplifier Control Power Lead
To an external amplifier (Max. 0.1 A)
(Blue/white stripe)
ACC Power Lead
To ACC power, +12V DC
(Red)
Resistor (1kΩ)
Battery Lead
To the car battery, continuous
+12V DC
Ground Lead
To a clean, bare metallic part of
the car chassis
(Yellow)
Fuse (10A)
(Black)
Antenna Control Lead
To the auto antenna control power
lead of the car (Max. 0.1 A)
(Blue)
Front Speaker Lead
(Gray)
(Gray/black stripe)
(Green)
(Green/black stripe)
(Violet)
(Violet/black stripe)
(White)
(White/black stripe)
Rear Speaker Lead
Front Speakers
Rear Speakers
(Left)
(Right)
(Left)
(Right)
Antenna Terminal
AUX-IN Connector
Pre-out Connector (Rear)
Pre-out Connector (Front)
Power Connector
CQ-VX1300W
Note: If your car does not have a power line connected to the side-marker lamps of the car,
leave the illumination lead disconnected.
❏ Wiring Diagram

43
CQ-VX1300W
1
E
N
G
L
I
S
H
42
CQ-VX1300W
29
E
N
G
L
I
S
H
30
Preliminary Steps
Check and take steps as described in the tables below.
If You Suspect Something Wrong
Immediately switch power off.
Disconnect the power connector and check that there is neither
smoke nor heat coming from the unit before asking for repairs.
Never try to repair the unit yourself because it is dangerous to do so.
Cautions:
¡Do not use the unit if it malfunctions or
something is wrong.
¡Do not use the unit in abnormal conditions,
for example, without sound, or if it emits
smoke or a foul smell, which can cause
ignition or electric shock. Immediately stop
using the unit and call the store where you
purchased it.
Troubleshooting
CD Changer
CX-DP88
CD Changer Connector
CQ-VX1300W
(White) (L)
(Red) (R)
RCA Cord
(Option)
RCA Cord
(Option)
Power
Amplifier
Power
Amplifier
Speakers for system upgrade Speakers for system upgrade
Fuse (3A)
(Yellow)
Rear
Front
(Red)
(R)
(Red)
(R)
(White)
(L)
(Red)
(R)
(White)
(L)
(Red)
(R)
(White)
(L)
(White)
(L)
RCA Cord
(Option)
To AUX
(White)(L)
(Red)
(R)
(White)
(L)
(Red)
(R)
(White)
(L)
(Red) (R)
Car TV etc.
CD • C IN
Power Connector
Ground lead
Battery Lead
Antenna
!
@
!
@
!
@
!
@
Front Speaker Lead
Rear Speaker Lead
Front
Speaker
Rear
Speaker
(Left)
(Right)
(Left)
(Right)
External Amplifier Control Power Lead
Extension Cord (DIN/RCA/BATT/GND)
(Supplied for an optional CD changer)
System Upgrade Example
Combination
¡CD changer (CX-DP88)
¡A car TV
¡8 Speakers
Electrical Connections
(continued)
Trouble Cause/Step
No power.
No sound.
Noise.
Volume nonadjustable
Only sound, nothing
displayed
Demonstration mode is ON.
aPress [DISP] to cancel the demonstration mode.
The spectrum analyzer is set to be turned off.
aSwitch to a different display mode.
The audio cords of the changer or external devices are connected to the pre-out
connector (front or rear).
aVerify the connection.
aCheck that there is nothing causing radio interference with the machine.
Check the point where it is installed. Make sure that the ground lead is
properly grounded.
Condensation (dew)
aWait for a while before use.
Cables are not correctly connected.
aConnect cables correctly
(
a page 40).
Mute is set to ON.
aSet it to OFF.
Fuse is burnt.
aContact
the shop where you purchased this product
.
Cables are not correctly connected.
aConnect cables correctly
(
a page 40).
Battery cable: Connect the battery cable to the terminal that is always live.
Accessory cable: Connect the accessory cable to your car's ACC source.
Grounding wire: Connect the grounding wire to a metal part of your car.
Car’s engine switch is not on.
aTurn your car’s ignition switch to ACC or ON.
■ Common
Audio sound is output
but the display shows
demonstration message.

45
CQ-VX1300W
1
E
N
G
L
I
S
H
44
CQ-VX1300W
31
E
N
G
L
I
S
H
32
Time is counted but no
sound comes out.
■ CD (continued)
Trouble Cause/Step
When the first track contains other than CD-DA data, silent playback continues
for a while.
aSelect the next track.
High tones are improp-
erly emphasized.
Reproduction of high
tones is poor.
Wow and flutter level
is very high.
Trouble Cause/Step
Tape running mechanism is dirty or out of order.
aClean tape running mechanism, or repair it. (Ask a service representative
for advice.)
Heads are magnetized.
aDemagnetize heads. (Ask a service representative for advice.)
Normal type tape plays with Metal mode.
aChange Metal mode to Normal mode.
Non-Dolby B NR tape plays with Dolby B NR on.
aSet Dolby B NR to OFF.
Metal type tape plays with normal mode.
aChange Normal mode to Metal mode.
Dolby B NR tape plays with Dolby B NR off.
aSet Dolby B NR to ON.
Poor quality tape.
aUse better quality tape.
Heads are dirty.
aClean heads. (Ask a service representative for advice.)
Blank tape is inserted in the unit.
aInsert recorded tape into the unit.
No sound.
Tape sound quality is
poor.
■ Cassette Tape
Troubleshooting(continued)
Trouble Cause/Step
Battery cable is not correctly connected.
aConnect the battery cable to the terminal that is always live.
aCheck that the antenna was installed and grounded properly.
Station is too far, or signals are too weak.
aSelect other stations of higher signal level.
Too much noise in FM
stereo and monaural
broadcasts.
Preset station is reset.
■ Radio
Trouble Cause/Step
¡Disc is defective.
¡Mechanical trouble.
a
Press [u] (EJECT). If normal operation is not restored, please consult the
shop where you purchased the unit.
Unstable mounting.
aMount the unit securely with the mounting parts, referring to the section
on Installation (
a page 38).
Mounting angle is over 30°.
a Adjust mounting angle to less than 30° (a page 38).
aSome CD-R/RWs can not be played back successfully due to
incompatibility among writing software, a CD recorder (CD-R/RW drive)
and the discs. Refer to instructions for the concerned devices for details.
Disc is dirty.
a Clean disc, referring to the section on “Notes on Discs” (a page 48).
aSome CD-R/RWs can not be played back successfully due to
incompatibility among writing software, a CD recorder (CD-R/RW drive)
and the discs. Refer to instructions for the concerned devices for details.
A disc that has data other than CD-DA type is loaded.
a Discs that have CD-DA type data should be used.
Disc is dirty.
a Clean disc, referring to the section on “Notes on Discs” (a page 48)
Disc is upside down.
a Place disc in the correct direction with the label side up.
Disc is in the CD
compartment but no
sound is heard, or disc
is ejected automatically.
Sound skips, bad
sound quality. (e.g.
caused by noise)
Sound skip due to
vibration.
Disc is not ejected.
■ CD

47
CQ-VX1300W
34
E
N
G
L
I
S
H
46
CQ-VX1300W
33
E
N
G
L
I
S
H
Error Display Messages
■ CD
Display Cause/Step
Troubleshooting(continued)
Trouble Cause/Step
No sound from left,
right, front, or rear
speaker.
Left and right sounds
are reversed in stereo
listening.
Only bass or monaural
sound from rear speaker.
SBC-SW is set to ON.
aSet SBC-SW to OFF
(a page 34).
The right speaker wire is connected to the left speaker and the left speaker wire
to the right speaker.
aConnect the speaker wires to the correct one
(a page 40).
Cables are not correctly connected.
aConnect the cables correctly
(a page 40).
Left and right balance, or front and rear balance is off on one side.
aAdjust BAL//FAD as appropriate.
■ Sound Setting
Trouble Cause/Step
Buttons are invalid for
operation.
Remote control is in the wrong direction.
aDirect the remote control at sensor (REMOTE) on the panel.
Battery has run down.
aReplace the battery.
Wrong battery.
aCheck the battery.
Battery poles (+) (–) are reversed.
aInsert the battery correctly.
■ Remote Control
Disc is dirty, or is upside down.
a Open the panel and press [u] (CD EJECT) button. Check disc.
No operation by some cause.
a Open the panel and press [u] (CD EJECT) button. If failure per-
sists, press the reset switch. If normal operation is not restored yet,
contact the shop where you purchased this product to ask for repairs.
Disc has scratches.
a Open the panel and press [u] (CD EJECT) button. Check disc.
Display Cause/Step
■ Cassette Tape
No operation by some cause.
a Open the panel and press [u] (CST EJECT) button.
Display Cause/Step
■ CD Changer
Disc is dirty, or is upside down.
a Select the next available compact disc. Check disc.
Disc has scratches.
a Select the next available compact disc. Check disc.
No operation by some cause.
a Eject the magazine. If failure persists, press the reset switch. If nor-
mal operation is not restored yet, contact the shop where you pur-
chased this product to ask for repairs.
No disc is in the changer (magazine).
a Insert discs into the changer (magazine).
No CD changer magazine
a Insert CD changer magazine.
No disc is in the deck.
a Insert a disc.
Action was taken to start playing before disc is fully ejected.
a Open the panel and press [u] (CD EJECT) button.

49
CQ-VX1300W
1
E
N
G
L
I
S
H
48
CQ-VX1300W
35
E
N
G
L
I
S
H
36
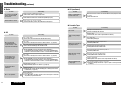
Maintenance
Your product is designed and manufactured to ensure a minimum of maintenance. Use a dry soft cloth for routine exterior
cleaning. Never use benzine, thinner or other solvents.
Product Servicing
If the suggestions in the charts do not solve the problem, we recommend that you take the product to the shop where you
purchased it. The product should be serviced only by a qualified technician.
Replacing the Fuse
Use fuses of the same specified rating (10 A). Using different substitutes or fuses with a higher rating, or connecting the
product directly without a fuse, could cause fire or damage to this unit.
If the replacement fuse fails, contact the shop where you purchased this product.
Notes on Cassette Tape
Tape Slack:
Use a pencil or similar object to take up the
slack as shown. If a loose tape is used, this
may result in the tape becoming tangled in the
rotating parts of the unit.
Exposed tape end
(Open end)
Pencil
Do not touch or
pull out the tape.
Maintenance
Notes on Discs
How to hold the disc
¡Do not touch the underside of the disc.
¡Do not make scratches on the disc.
¡Do not bend disc.
¡When not in use, keep disc in the case.
Do not use irregularly shaped discs
Do not leave discs in the following places:
¡Direct sunlight
¡Near car heaters
¡Dirty, dusty and damp areas
¡Seats and dashboards
Disc Cleaning
Use a dry, soft cloth to wipe from the center
outward.
Label side
<Right>
Notes on CD-Rs/RWs
¡You may have trouble playing back some CD-R/RW discs recorded on CD recorders (CD-R/RW drives), either due to
their recording characteristics or dirt, fingerprints, scratches, etc. on the disc surface.
¡CD-R/RW discs are less resistant to high temperatures and high humidity than ordinary music CDs. Leaving them
inside a car for extended periods may damage and make playback impossible.
¡The unit may not successfully play back a CD-R/RW that was made by the combination of writing software, a CD
recorder (CD-R/RW drive) and a disc if they are incompatible with one another.
¡This player cannot play CD-R/RW discs if the session is not closed.
¡This player cannot play CD-R/RW discs which contain other than CD-DA data (MP3/WMA, Video CD, etc.).
¡Be sure to observe the handling instructions of CD-R/RW discs.
<Wrong>
If you use commercial CDs, they must have either of these
labels shown at right.
Copyright
It is prohibited by copyright laws to copy, distribute and deliver copyrighted materials such as music without the approval
of copyright holder except for personal use.
Note : To maintain in your cassette player in top condition, avoid using tapes that are longer than 90 minutes (C-90).

51
CQ-VX1300W
1
E
N
G
L
I
S
H
50
CQ-VX1300W
37
E
N
G
L
I
S
H
38
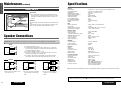
Specifications
General
Power Supply : 12 V DC (11 V - 16 V), test voltage 14.4 V, negative ground
Current Consumption : Less than 8.5 A (CD play mode)
Rated Output : 16 W x 4 ch (1 kHz, 1%, 4 Ω)
Maximum Power Output : 41 W x 4 ch
Suitable Speaker Impedance : 4 Ω
Audio Input Impedance : 10 kΩ (AUX IN)
Audio Input Voltage : Max. 2 V (AUX IN)
Pre-out Output Voltage : 1.8 V
Pre-out Output Impedance : 600 Ω
Dimensions (W x H x D) : 178 x 100 x 160 mm
Weight : 2.4 kg
DSP
Number of Channels : 2 input channels, 4 output channels
Space mode : 7 mode
Equalizer Center Frequency : 80, 160, 320, 640, 1.6 k, 4 k, 10 k (Hz)
Variable Range of Equalizer : –12 to +12 dB (13 steps)
FM Stereo Radio
Frequency Range : 87.50 - 108.00 MHz
Usable Sensitivity : 12 dBf.
Total harmonic distortion (mono) : 0.3 % (1 kHz)
Weighted S/N ratio (mono) : 70 dB
Frequency Response : 20 Hz – 15 kHz (± 3 dB)
Stereo Separation : 42 dB (at 1 kHz)
Image response ratio : 75 dB
AM Radio
Frequency Range : 531 kHz - 1,602 kHz
Usable Sensitivity : 27 dB/µV
Image response ratio : 65 dB
CD Player
Channel : 2 channels
Quantization : 16-bit linear
Frequency Response : 5 Hz - 20 kHz
Dynamic range : 90 dB (IHF, A)
Wow and Flutter : Below measurable limits
Cassette Tape Player
Reproduction system : 4-track, 2-program stereo
Tape Speed : 4.76 cm/sec
Fast Forward Time : 100 sec (C-60)
Rewind Time : 100 sec (C-60)
Wow and Flutter : 0.07 % (WRMS)
Signal/Noise Ratio : Dolby B NR OFF 56 dB (IHF, A)
Dolby B NR ON 66 dB (IHF, A)
Frequency Response : 30 Hz - 18 kHz (normal tape)
30 Hz - 20 kHz (metal tape)
Note : Specifications and the design are subject to modification without notice due to improvements in technology.
Dolby noise reduction manufactured under license from Dolby Laboratories Licensing Corporation.
“DOLBY” and the double-D symbol B are trademarks of Dolby Laboratories Licensing Corporation.
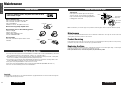
Reset Switch
Reset switch
Insert a hard, slender stick into the hole and push the switch.
The unit returns to the default state when the trouble is reset.
Remember, the data and settings stored in the memory are
deleted.
Important
Push the switch only when the unit fails to operate with any but-
tons.
If the unit fails to return to normal condition, contact the shop
where you purchased this product and ask for repairs.
CD EJECT
CST EJECT
CD IN
CST IN
G
INTEGRATED CD/CASSETTE RECEIVER WITH
u
u
RESET
Maintenance(continued)
Speaker Connections
Caution: Please follow the instructions given below. Failure to do so will cause damage to the unit and speakers.
L
R
-
-
-
-
-
-
-
-
-
-
+
+
+
+
+
+
+
+
+
+
-
+
-
+
-
+
-
+
-
+
-
+
-
+
-
+
L
R
L
R
L
R
<Right>
<Wrong>
(White)
(White
w/black stripe)
Chassis
(Gray
w/black stripe)
(Gray)
Chassis
¡Use ungrounded speaker only.
¡The maximum speaker output should be 41 W or more. (If used with
the optional power amplifier, the speaker output should be higher than
the maximum amplifier output.)
¡The speaker impedance should be 4 - 8 Ω.
¡This unit uses the BTCL circuit, so each speaker should be connected
separately using parallel vinyl insulated cords.
¡The speaker cords and the power amplifier unit should be kept away
(about 30 cm apart) from the antenna and antenna extension cord.
¡Never connect the speaker cord to
the body of the car.
¡Do not use a 3-wire type speaker
system having a common earth
lead.
¡Do not connect more than one
speaker to one set of speaker
leads.
-
 1
1
-
 2
2
-
 3
3
-
 4
4
-
 5
5
-
 6
6
-
 7
7
-
 8
8
-
 9
9
-
 10
10
-
 11
11
-
 12
12
-
 13
13
-
 14
14
-
 15
15
-
 16
16
-
 17
17
-
 18
18
-
 19
19


Panasonic CQVX1300W Operating instructions
- Category
- CD players
- Type
- Operating instructions
Ask a question and I''ll find the answer in the document
Finding information in a document is now easier with AI
Related papers
-
Panasonic CQDF203W Operating instructions
-
-
-
-
-
-
-
-
-
Other documents
-
Samlexpower BE 24-1 Owner's manual
-
Aiwa CT-X428M Operating instructions
-
Curtis RCD335 Owner's manual
-
Kenwood DPX-6030 User manual
-
-
-
-
-
-