Page is loading ...

Publication 245B.1-EN – November 2016
Setup and Operating Instructions
MPT Electric Fire Pump Controller
Modbus Setup Instructions
This manual provides general information, installation, and configuration
information for Modbus communications for Metron MPT Electric Fire Pump
Controllers and Metron MPT Electric Fire Pump Controllers with Metron
Transfer Switch.
Section
Page
Introduction
3
Hardware Setup
4
Set Point Configuration
6
Modbus Registers
7
Replacement Parts & Technical Support
12


MPT Electric Fire Pump Controller Modbus Setup Instructions 3 MPT Electric Fire Pump Controller with MTS Modbus Setup 3
Publication 245B.1-EN – November 2016
Introduction
Modbus is a simple and open serial communication protocol that enables
communication between a master device and one or more slave devices all
connected to the same network. The MPT Electric Fire Pump Controller
operates as a slave device.
For more information about Modbus, refer to www.modbus.org.
NOTICE
Read these instructions thoroughly before
installing and operating the controller. If there
are still questions, contact your Metron factory
representative for assistance.

4 MPT Electric Fire Pump Controller Modbus Setup Instructions
Publication 245B.1-EN – November 2016
Hardware Setup
Precautions
CAUTION
To avoid risk of SERIOUS INJURY or DEATH, and to
avoid damage to the controller, READ THIS SECTION
CAREFULLY. If questions or concerns still exist,
contact the Metron factory for further
clarification.
If work must be carried out on the motor or controller, ensure the controller is
ISOLATED AND LOCKED OFF from the AC mains supply before work
commences. Lockout/Tag out procedures should be followed in accordance
with NFPA standard and any local standards that may apply.
During installation and maintenance, to prevent automatic starting of the motor
press and hold the ST O P key. The system will be in a configuration mode and
will not start the motor. Configuration mode will last for five (5) minutes, unless
the on-screen "Exit Config Mode" button is pressed.
RS-485 Connections
The Modbus option uses a 2-wire (half-duplex) RS-485 port, which is located on
the backside of the OID stackup. The OID has a panel covering the CPU board,
but the RS-485 port is accessible. Figure 1 below shows the location of the port,
which is labeled J9. The plug for the connector is provided and should be
removed while connecting your wires.
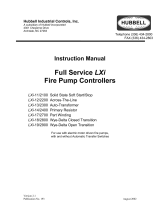
Figure 2 below shows the wiring diagram for the RS-485 port.
Pin 1 is the A pin, also known as ‘+’, ‘D+’, and ‘TxD+/RxD+’
Pin 2 is the Ground pin
Pin 3 is the B pin, also known as ‘–‘, ‘D-‘, and ‘TxD-/RxD-‘
The voltage tolerance for Pin1 and Pin 3 is –9V to +14V

MPT Electric Fire Pump Controller Modbus Setup Instructions 5 MPT Electric Fire Pump Controller with MTS Modbus Setup 5
Publication 245B.1-EN – November 2016
Figure 1: Back view of the OID (located on the cabinet door).
Item
Description
1
USB Port
2
Pressure Transducer Cable
3
RS-485 Port and Connector
4
Horn cable
5
Power cable
Figure 2: RS-485 Wiring Diagram
RS-485
Half-Duplex
J9
1
1
23
5
Drawing not to scale
4
32
Master TxD+
TxD-
RxD+
RxD-
1
2
3
J9
MPT
Controller

6 MPT Electric Fire Pump Controller Modbus Setup Instructions
Publication 245B.1-EN – November 2016
Set Point Configurations
To configure the Modbus set points: press the Main Menu button on the OID,
then touch the Devices icon, and then touch the Modbus icon. The Modbus
configuration screen will be displayed, listing the set points on the right-side and
the Modbus enable/disable button on the lower-left.
The Modbus option must be disabled in order the modify settings. Refer to
Publication 245 (Setup and Operating Instructions for MPT Electric Fire Pump
Controllers) for general instructions on navigating the menu system and
configuring set points.
The Address set point is used to set the Modbus address for the MPT controller.
All Modbus devices on a network must have a unique address.
The Protocol, Baud Rate, and Parity set points must be configured to match the
settings of all other Modbus devices on the network.

MPT Electric Fire Pump Controller Modbus Setup Instructions 7 MPT Electric Fire Pump Controller with MTS Modbus Setup 7
Publication 245B.1-EN – November 2016
Modbus Registers
All registers are 16-bit word. Maps of registers are summarized in Table 1 and
Table 2. Italisized text indicates value that are only for controllers equipted with
MTS. For non-MTS controllers, these values are always set to zero.
Input Register (Function Code 4)
Register
Name
Value
40001
Pressure
0 – 600 PSI
40002
Normal Source
AB Voltage
Normal source AB voltage rounded to the
nearest volt.
40003
Normal Source
BC Voltage
Normal source BC voltage rounded to the
nearest volt.
40004
Normal Source
AC Voltage
Normal source AC voltage rounded to the
nearest volt.
40005
Emergency Source
AC Voltage
Emergency source AB voltage rounded to the
nearest volt.
40006
Emergency Source
BC Voltage
Emergency source BC voltage rounded to the
nearest volt.
40007
Emergency Source
AC Voltage
Emergency source AC voltage rounded to the
nearest volt.
40008
Phase A Current
Phase A current rounded to the nearest amp
40009
Phase B Current
Phase B current rounded to the nearest amp
40010
Phase C Current
Phase C current rounded to the nearest amp
40011
System Status
Bit 0 Normal Source Power Available
Bit 1 Emergency Source Power Available
Bit 2 Phase Reversal
Bit 3 Phase Failure
Bit 4 Pump Running
Bit 5 Pump On Demand
Bit 6 Emergency Source Isolation Switch Open
Bit 7 Transfer Switch Connected to Emergency
Bit 8 System Fault
Bit 9 Not in Auto
Bit 10 Lockout
Bit 11 Interlock
Bit 12 System Idle
Bit 13 Automatic Shutdown Enabled

8 MPT Electric Fire Pump Controller Modbus Setup Instructions
Publication 245B.1-EN – November 2016
Register
Name
Value
40012
Pressure Status
Bit 0 Low Pressure Alarm
Bit 1 High Pressure Alarm
Bit 2 Pressure Transducer Fault
40013
Normal Source
Alarms
Bit 0 Phase AB Failure
Bit 1 Phase BC Failure
Bit 2 Phase AC Failure
Bit 3 Phase Reversal
Bit 4 Phase AB Over Voltage
Bit 5 Phase BC Over Voltage
Bit 6 Phase AC Over Voltage
Bit 7 Phase AB Under Voltage
Bit 8 Phase BC Under Voltage
Bit 9 Phase AC Under Voltage
Bit 10 Phase AB Over Frequency
Bit 11 Phase BC Over Frequency
Bit 12 Phase AC Over Frequency
Bit 13 Phase AB Under Frequency
Bit 14 Phase BC Under Frequency
Bit 15 Phase AC Under Frequency
40014
Emergency Source
Alarms
Bit 0 Phase AB Failure
Bit 1 Phase BC Failure
Bit 2 Phase AC Failure
Bit 3 Phase Reversal
Bit 4 Phase AB Over Voltage
Bit 5 Phase BC Over Voltage
Bit 6 Phase AC Over Voltage
Bit 7 Phase AB Under Voltage
Bit 8 Phase BC Under Voltage
Bit 9 Phase AC Under Voltage
Bit 10 Phase AB Over Frequency
Bit 11 Phase BC Over Frequency
Bit 12 Phase AC Over Frequency
Bit 13 Phase AB Under Frequency
Bit 14 Phase BC Under Frequency
Bit 15 Phase AC Under Frequency

MPT Electric Fire Pump Controller Modbus Setup Instructions 9 MPT Electric Fire Pump Controller with MTS Modbus Setup 9
Publication 245B.1-EN – November 2016
Register
Name
Value
40015
Motor Alarms
Bit 0 Soft Start Fault
Bit 1 Run Contact Fault
Bit 2 Start Contact Fault
Bit 3 No Load
Bit 4 Fail to Start
Bit 5 Fail to Stop
Bit 6 Locked Rotor
Bit 7 Motor Overload
40016
Transfer Switch
Alarms
Bit 0 Transfer Switch Fault
Bit 1 Genset Fail to Start
Bit 2 Emergency Source Power Failure
40017
Other Alarms
Bit 0 Supervisory Power Failure
Bit 1 Low Suction Alarm
Bit 2 Low Suction Motor Shutdown
Bit 3 Low Zone Fail to Start
Bit 4 Low Zone Quit
40018
Start Conditions
Bit 0 Low Pressure Start
Bit 1 Emergency Start
Bit 2 Manual Start
Bit 3 Remote Start
Bit 4 Remote Test Start
Bit 5 Deluge Start
Bit 6 Aux Program Start
Bit 7 RESERVED
Bit 8 High Zone Start
Bit 9 Pressure Transducer Failure Start
Bit 10 Supervisory Power Failure Start
Bit 11 Manual Test Start
Bit 12 Automatic Weekly Test Start
40019
Diagnostics
Bit 0 Low Clock Battery
Bit 1 Clock not set
Bit 2 12-Channel I/O PCB Fault
Bit 3 Power Monitor PCB Fault
Bit 4 Transfer Switch PCB Fault

10 MPT Electric Fire Pump Controller Modbus Setup Instructions
Publication 245B.1-EN – November 2016
Register
Name
Value
40020
12-Channel I/O
PCB Inputs
Bit Input 1 Closed (40/41)
Bit Input 2 Closed (42/43)
Bit Input 3 Closed (44/45)
Bit Input 4 Closed (46/47)
Bit Input 5 Closed (48/49)
Bit Input 6 Closed (50/51)
Bit Input 7 Closed (52/53)
Bit Input 8 Closed (54/55)
Bit Input 9 Closed (56/57)
Bit Input 10 Closed (58/59)
Bit Input 11 Closed (60/61)
Bit Input 12 Closed (62/63)
40021
12-Channel I/O
PCB Outputs
Bit 0 Relay K1 Energized
…
Bit 11 Relay K12 Energized
40022
Power Monitor
PCB I/O
Bit 0 Relay K1 Energized (Emergency Measure)
Bit 1 Relay K2 Energized (Emergency Measure)
Bit 2 Relay K3 Energized (Shunt Trip)
Bit 3 Relay K4 Energized (Dump Valve)
Bit 4 Relay K5 Energized (CR71 Run)
Bit 5 Relay K6 Energized (Soft Start)
Bit 6 Relay K7 Energized (CR72 Start)
Bit 7-9 RESERVED
Bit 10 Relay K10 Energeized (Phase Reversal)
Bit 11-15 RESERVED
40023
Transfer Switch
PCB I/O
Bit 0 Relay K1 Energized (Trip to Normal)
Bit 1 Relay K2 Energized (Trip to Emergency)
Bit 2 Relay K3 Energized (Shunt Trip)
Bit 3 Relay K4 Energized (Engine Crank)
Bit 4 Input 1,2 Closed
Bit 5 Input 3/4 Closed
40024
Aux Program 1–16
Bit 0 Aux Program 1 running
…
Bit 15 Aux Program 16 running
40025
Aux Program 17–32
Bit 0 Aux Program 17 running
…
Bit 15 Aux Program 32 running
40026
Aux Program 33–48
Bit 0 Aux Program 33 running
…
Bit 48 Aux Program 48 running

MPT Electric Fire Pump Controller Modbus Setup Instructions 11 MPT Electric Fire Pump Controller with MTS Modbus Setup 11
Publication 245B.1-EN – November 2016
Register
Name
Value
40027
RESERVED
0
40028
RESERVED
0
40029
RESERVED
0
40030
RESERVED
0
40031
RESERVED
0
40032
RESERVED
0
Table 1: Input Registers
Read Device ID Register (Function Code 43)
The controller supports only Read Device ID code 4, individual access.
Objects 0x00–0x02 (basic identification) and 0x80–0x82 (extended
identification) are supported.
Object
ID
Object
Name
Type
Value
0x00
Vendor Name
ASCII string
“Metron”
0x01
Product Code
ASCII string
“MPTxxx”
0x02
MajorMinorRevision
ASCII string
Major.Minor
i.e. “V1.00”
0x80
Memory Map Version
ASCII string
“01”
0x81
Firmware Version
ASCII string
Major.Minor.Build.Revision
i.e. “1.0.1284.3”
0x82
Controller Serial Number
ASCII string
i.e. “12345678”
Table 2: Read Device ID Registers

12 MPT Electric Fire Pump Controller Modbus Setup Instructions
www.metroninc.com www.metroneledyne.com.uk
Hubbell Industrial Controls, Inc.
Metron Fire Pump Controls Division
4301 Cheyenne Drive, Archdale NC 27263 USA, Tel: (336) 434-2800, Fax: (336) 434-2809
Metron Eledyne,
a Division of Hubbell Ltd.
18 Autumn Park, Dysart Rd, Grantham Lincolnshire, NG31 7DD, United Kingdom
Tel: +44 (0) 1476 516120, Fax: +44 (0) 1476 516121
Publication 245B.1-EN – November 2016 Printed in USA
Replacement Parts
For replacement parts, contact your local Metron sales office or the Metron
factory at:
United States
Telephone: +1 (336) 434-2800 ext. 202
FAX: +1 (336) 434-2809
Email: salesmail@metroninc.com
Europe
Telephone: +44 (0) 1476 516130
Email: jmcivor@metroninc.com
Technical Support
United States
For 24-hour technical support:
Telephone: +1 (336) 434-2800 ext. 183
Email: fpctechsupport@metroninc.com
Europe
Service & Commissioning
Telephone: +44 (0) 1476 516129
Email: wrichardson@metroninc.com
Emergency Contact:
Telephone: +44 (0) 7730 050100
/