SPEEDLINK Bullfrog Blue Touch Edition User guide
- Category
- Gaming controls
- Type
- User guide
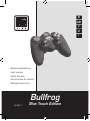
SPEEDLINK Bullfrog Blue Touch Edition
With the SPEEDLINK Bullfrog Blue Touch Edition, you have acquired a highly functional gamepad that allows you to enjoy your favourite games to the fullest. It features 12 firing buttons, auto-fire, dual-force vibration, 2 analogue control sticks, a blue illuminated analogue D-pad, and a rubberised surface for enhanced grip. The Bullfrog Blue Touch Edition is compatible with Windows 98/ME/2000/XP systems and connects via USB.
This gamepad offers two distinct modes: digital and analogue. In digital mode, the D-pad and control sticks function digitally, providing precise control for fast-paced games. In analogue mode, the D-pad serves as a point-of-view hat, while the left control stick offers analogue functionality for smooth movement, and the right control stick provides analogue control for camera and weapon handling.


-
 1
1
-
 2
2
-
 3
3
-
 4
4
-
 5
5
-
 6
6
-
 7
7
-
 8
8
-
 9
9
-
 10
10
-
 11
11
-
 12
12
-
 13
13
-
 14
14
-
 15
15
-
 16
16
-
 17
17
-
 18
18
-
 19
19
-
 20
20
-
 21
21
-
 22
22


SPEEDLINK Bullfrog Blue Touch Edition User guide
- Category
- Gaming controls
- Type
- User guide
SPEEDLINK Bullfrog Blue Touch Edition
With the SPEEDLINK Bullfrog Blue Touch Edition, you have acquired a highly functional gamepad that allows you to enjoy your favourite games to the fullest. It features 12 firing buttons, auto-fire, dual-force vibration, 2 analogue control sticks, a blue illuminated analogue D-pad, and a rubberised surface for enhanced grip. The Bullfrog Blue Touch Edition is compatible with Windows 98/ME/2000/XP systems and connects via USB.
This gamepad offers two distinct modes: digital and analogue. In digital mode, the D-pad and control sticks function digitally, providing precise control for fast-paced games. In analogue mode, the D-pad serves as a point-of-view hat, while the left control stick offers analogue functionality for smooth movement, and the right control stick provides analogue control for camera and weapon handling.
Ask a question and I''ll find the answer in the document
Finding information in a document is now easier with AI
in other languages
Related papers
-
SPEEDLINK First Strike User guide
-
-
-
-
-
Speed-Link XEOX Pro Analog Gamepad Wireless black User manual
-
Speed-Link XEOX Pro Analog Gamepad - USB User manual
-
SPEEDLINK TORID Installation guide
-
-
Other documents
-
Thrustmaster DUAL TRIGGER 2-IN-1 Owner's manual
-
-
-
TRUSTMASTER DUAL TRIGGER WIRELESS RECHARGEABLE Owner's manual
-
-
-
-
Trust Dual Stick Owner's manual
-
-