Page is loading ...

PERSONAL PROTECTIVE EQUIPMENT:
Safety glasses with side shields are recommended to keep dust out of the
eyes. Use ear protection (earplugs, hood, or earmuffs) to prevent airborne
dust or fibers from entering the ear, if necessary. Leather or cotton gloves
should be worn to protect against mechanical abrasion. Optional: wear a
NIOSH-certified disposable or reusable particulate respirator with efficiency
rating of N95 or higher (per 42 CFR 84) except required when dust or fiber
concentrations exceed the applicable exposure limits of dust 15 mg/m
3
.
Wear a cap, a loose-fitting, long-sleeved shirt and long pants to protect skin
from irritation. Exposed skin areas should be washed with soap and water
after handling or working with fiberglass.
SITE PREPARATION:
Other trades, including but not limited to, electrical, plumbing, and mechan-
ical should have already installed their required materials prior to loose-fill
blown-in fiberglass being installed. Proper air sealing should be complete
prior to loose-fill fiberglass installation to insure full performance of the
thermal insulation. Verify all holes and seams between drywall ceiling and
any penetrations through the ceiling are sealed with durable caulk, tape,
and/or foam sealants.
Installation Instructions For
Attic Protector
®
B-785 Blown-In Fiberglass
Visit our website at www.JM.com or call 800-654-3103
|
Building Insulation Division P.O. Box 5108 | Denver, CO 80217-5108
ENERGY STAR CERTIFICATION FOR PRODUCTS ORDER #6881100
PROJECT #12CA35908

Ceilings and Attics
INSULATING CEILINGS:
Ceiling insulation provides essential sound control between floors in your home. Properly insulating the ceilings will
make your home a more peaceful and quiet place because it will ensure that footsteps and other sounds do not
migrate to other rooms.
HOW TO INSTALL BLOWN-IN INSULATION:
1. Remove any objects from the attic that might interfere with the proper application of the insulation.
2. Make sure that any eave or soffit vents are not blocked. Verify 1” ventilation baffles/vent chutes are installed
at eave vents and they extend above the new level of insulation.
3. Verify can lights are IC rated. IC rated can lights may have insulation in contact; non-IC rated can lights must have
shields to maintain/block 3” clearance around the fixture, electrical box, and ballast. See section on “Special
Considerations, Critical Details & Tips.”
4. Barriers of batt insulation will be installed to prevent loose-fill insulation from falling into soffits, scuttle entrance,
damming for unconditioned spaces (porches or garages), or from contacting hot surfaces. Unfaced batts are
the preferred blocking material. Metal flashing and fire-rated caulk are the preferred materials for protecting hot
surfaces.
5. Verify attic floor is air sealed from the living space below. Seal all shafts for pipe, duct and the flue penetrations
using fire-rated caulk when required. Seal sheetrock to top plate seam at all attic/ wall surfaces. Seal all wire
penetrations through the top plate. Seal around all ceiling openings for surface lighting, ceiling fans, bathroom
fans, etc., seal air barriers above all open soffits and dropped/coved ceilings. Ensure that the attic hatch or
drop-down stair opening is sealed with weather stripping and seal the dry wall to can light connection for all
recess lighting using fire-rated caulk when required.
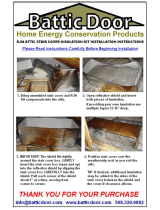
6. Place one or more attic rulers in each quadrant of the attic space. This will help you know when you have
achieved the correct depth of insulation.
7. Load the blowing machine hopper with insulation. The hopper should be kept nearly full so the insulation flow
is smooth and even.
8. Hold the hose parallel to the floor with the insulation falling 10’ - 12’ away. Begin at the far wall and work toward
the center. Always blow in the direction of the joists. Be careful to step only on floor joists, or else you might
accidentally put your foot through the finished ceiling below.
9. Fill three or four joist cavities by moving the hose to the right and left. Where possible back away from the work
to avoid packing the insulation. Be sure to get insulation to the top of the walls and low places. Don’t cover eave
vents.
10. Avoid using your hand as a baffle to direct the insulation as it exits the hose. Do this only when necessary to
avoid packing.
11. Keep the hose close to the floor where insulation must go under obstructions like cross bracing and wiring.
Insulation must be blown on both sides of these kinds of obstructions. If an obstruction has caused a low spot
to occur, fill in the area.
12. Check the thickness of the insulation, and check that you have used the correct number of bags per 1,000 sq. ft.
INSULATING AROUND RECESSED LIGHTS IN CEILINGS:
Recessed lighting fixtures, as well as fan motors and other heat sources protruding into the ceiling, are a potential
fire hazard. Building and fire codes require that there be at least a 3” clearance from any heat-generating source—
including chimneys—unless the fixture is IC rated. This rating will be clearly marked on the fixture.
To ensure that this 3” clearance is maintained, you can install a baffle made with metal, cardboard or sheet metal
around the heat source. If there are facing materials, trim them around the baffle to ensure adequate clearance from
the fixture.

ATTIC PROTECTOR CHART
†
R-VALUE
MINIMUM INSTALLED
THICKNESS
‡
(in.)
SETTLED
THICKNESS
(in.)
BAGS PER
1,000 Sq. Ft.
MAXIMUM NET
COVERAGE in Sq. Ft.
MINIMUM WT.
in Lbs. per Sq. Ft.
11 5.0 4.9 5.1 192 0.131
13 5.8 5.7 6.0 162 0.155
19 8.2 8.1 9.0 109 0.231
22 9.4 9.2 10.5 93 0.270
26 10.9 10.8 12.7 78 0.324
30 12.4 12.3 14.9 66 0.379
38 15.3 15.2 19.4 51 0.494
44 17.4 17.3 22.9 43 0.583
49 19.1 18.9 25.9 38 0.658
60 22.6 22.5 32.6 30 0.827
† Coverage without framing.
‡ The manufacturer recommends that the insulation be installed at these minimum thicknesses and maximum coverages to provide the levels of insulation thermal resistance (R-value) shown
(based on 25 lb. average net weight per bag).
BID-367 4/2019 © 2019 Johns Manville. All Rights Reserved.
Special Considerations,
Critical Details & Tips
INSULATING SCUTTLES & PULL-DOWN STAIRWAYS:
A scuttle is the opening for accessing the attic. Scuttles, pull-down stairways and other attic access holes should also
be insulated to the same R-value as your attic.
Many attics are filled with loose-fill insulation. However, that does not work for scuttles or pull-down stairways. Batt
insulation, however, can be glued directly to a scuttle hatch. Pull-down stairways may require a build-up framework to
lay batts on and around.
If you have pull-down attic stairs or an attic door, seal these similarly: Weatherstrip the edges and put a piece of rigid
foam board insulation on the back of the door.
RECOMMENDED EQUIPMENT:
Please see the retailer for machine rental and use. The small blowing machine will consist of a base and a hopper;
50’ power cord with twist/lock end; two sections of 50’ 2-1/2” blowing hose with quick-connect coupler set attached;
and wireless remote attached to the end of the hose.
PERFORMANCE DATA:
ASTM C1320 Standard Practice for Installing mineral
Fiber Batt and Blanket Thermal Insulation for Light
Frame Construction
RE-ENTRY/RE-OCCUPANCY TIMES:
The area during and after installation of fiberglass
batts may be used by other trades or occupants.
There are no time restrictions for re-entry into the area.
/