Page is loading ...

5 to 10
5 a 10 minutos
5 à 10 minutes
2×2×2×2×2×2×2×2×2×2×2×2×2×2×2×2×2×2×2×2×2×2×2×
2×2×2×2×2×2×2×2×2×2×
1×1×1×1×1×1×1×1×1×1×1×1×1×1×1×1×1×1×1×1×1×1×1×
1×1×1×1×1×1×1×1×1×1×
4×4×4×4×4×4×4×4×4×4×4×4×4×4×4×4×4×4×4×4×4×4×4×
4×4×4×4×4×4×4×4×4×4×
4×4×4×4×4×4×4×4×4×4×4×4×4×4×4×4×4×4×4×4×4×4×4×
4×4×4×4×4×4×4×4×4×4×
4×4×4×4×4×4×4×4×4×4×4×4×4×4×4×4×4×4×4×4×4×4×4×
4×4×4×4×4×4×4×4×4×4×
6×35M6×35M6×35M6×35M6×35M6×35M6×35M6×35M6×35M6×35M6×35M6×35M6×35M6×35M6×35M6×35M6×35M6×35M6×35M6×35M6×35M6×35M6×35
M6×35M6×35M6×35M6×35M6×35M6×35M6×35M6×35M6×35M6×35
M6
M6
4
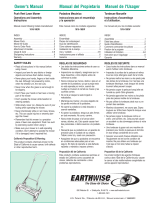
M6×35 Bolt / M6×35 Perno / M6×35Boulon
4
Wing Nut / Tuerca mariposa / Ecrou à oreilles
4
M6 Washer / M6 Arondela / M6 Rondelle
n
s
n s
Hopper bottom frame connectors / Conector del marco inferior del saco recogedor/
Connecteurs de l' armature inférieure de trémie
7
7
7
2×
1× 4× 4×4×4×4×4×4×4×4×4×4×4×4×4×4×4×4×4×4×4×4×4×4× 4×4×4×4×4×4×4×4×4×4×4×4×4×4×4×4×4×4×4×4×4×4×
M6×35
2× 1× 4× 4× 4×
M6×35
LSW70021

ê
ê
CLICK!
CLICK!CLICK!CLICK!CLICK!CLICK!CLICK!CLICK!CLICK!CLICK!CLICK!
CLICK!CLICK!CLICK!CLICK!CLICK!CLICK!CLICK!
2x
g
h
n
n
s
s
n
s
q
m
Push the assembled handle into the connecting tubes
located on the sides of main Sweeper body. Then insert
the bolt through the slot from side and secure the
c
handle with washer and wing nut to lock in place.
n
s
Presione la manija ensamblada hacia dentro de los tubos de
conexión, ubicados a los lados del cuerpo de la cortadora.
Luego inserte el perno en la ranura lateral y asegure
la manija con la arandela y con la tuerca mariposa
para bloquearla en su lugar.
s
n
c
Poussez la poignée assemblé dans les tubes de
raccordement situés sur les cotés de la partie principale
de la trémie. Puis insérez le boulon à travers la
fente depuis le coté et verrouillez la poignée en place
à l'aide de la rondelle et de l’écrou à ailette .
c
n
s
Insert the beveled hook on the left side support leg
into the slot positioned on the top of the side housing.
Slide the bottom beveled hook into the groove on housing.
Secure the bottom hook by clicking the buckle into the
hole positioned on the housing as pointed by the arrow.
Inserte el gancho biselado en la ranura ubicada en la
parte superior de la carcasa lateral. Deslice el gancho
biselado inferior dentro de la ranura de la carcasa y
presione hacia abajo para bloquear la palanca.
Insérez le crochet biseauté dans la fente positionnée
sur le haut du bo tier latéral. Glissez le crochet
biseauté inférieur dans la rainure située sur le
bo tier et poussez pour verrouiller le levier en place.
ê
l
ê
l
CLICK!

k
At top of the hopper bag, insert the smooth
ends of the two rods in to the connector
and secure the two collars in the direction
showing in 4c. To connect the bottom left of
the hopper bag, use connector and screw
it onto the threaded end of left side frame
rod. Make sure the bent end of the connector
j
k
is facing outward. Slightly unscrew the collar
on the connector by inserting the bottom
frame rod and secure it counter clockwise.
repeat the same to connect the bottom right
side of the hopper bag.
En la parte superior del saco recogedor,
inserte los extremos lisos de las dos vigas
dentro del conector y asegure los dos
collares en la direcci n que se muestra en 4c.
Para conectar la parte inferior izquierda del
saco recogedor, use el conector y
atorn llelo en el extremo roscado de la viga
izquierda del armaz n. Aseg rese de que el
extremo doblado del conector esté orientado
hacia afuera. Desatornille ligeramente el
collar del conector insertando la viga
inferior del armaz n y asegúrela atornillá
ndola en sentido contrario a las agujas del
reloj. Repita la operaci n para conectar la
parte inferior derecha del saco recogedor.
j
k
En haut du sac de tr mie, ins rez les
extr mit s lisses des deux tiges dans le
connecteur , et fixez les deux collets
selon le sens indiqué en 4c. Pour raccorder
la partie inférieure gauche du sac de tr mie,
vissez le connecteur dans l’extr mité
gauche. Assurez-vous que l’extr mité pli e
du connecteur fait face vers l'ext rieur.
D vissez l g rement le collet sur le connecteur
en ins rant la tige d’armature inf rieure,
puis fixez-le en place en tournant dans le sens
antihoraire. R p tez la meme proc dure pour
tr mie.
j
k
ê
raccorder le coté inf rieur droit du sac de
ê
filetée de la tige d’armature située du coté
é
é é
é
é
é
é
è
é
é
é
é
é
é
é
é
é
ó
ó
ó
ú
í
ó
é
é

REV.07/18/2017
1-800-633-1501, 830 Webster St, Shelbyville, IN 46176, www.earthwisetools.com
1-800-633-1501, 830 Webster St, Shelbyville, IN 46176, www.earthwisetools.com
1-800-633-1501, 830 Webster St, Shelbyville, IN 46176, www.earthwisetools.com
/