Page is loading ...

Litokol spa - via G. Falcone, 13/1 42048 Rubiera (RE) - Italy
Tel.+39.0522.622811 - Fax +39.0522.620150
[email protected] - www.litokol.it
LITOLEVEL
3-12 mm
1/8”-1/2”
1,5 mm
1/6”
02.03-2019
Product
Code Pack
LITOLEVL KIT
LTLVKIT0000
Bucket:
150 bases + 150 cones
+ 150 nuts
LITOLEVEL
CONES + NUTS
LTLVDC0250
Box:
250 cones + 250 nuts
LITOLEVEL
BASES
LTLVBAS0250
Box: 250 pcs
LTLVBAS0500
Box: 500 pcs
Tile levelling
spacers
EN
1. After applying the adhesive, insert the base under each side of the tile.
Depending on the size of the tile and the selected installation design, insert one
or more bases on each side of the tile.
In the case of large tiles and thin slabs, back-buttering is necessary (application
of glue on substrate and back of tile) to ensure total coverage of the back of the
tile, combined with perfect joining by tapping with a white rubber mallet on tiles,
or using a specific tile vibrator on thin slabs.
2. Position the second row of tiles and level it using a white rubber mallet.
3. Insert the cone onto the base. Screw down the nut, applying the necessary
force to level the tiles.
4. Once the adhesive has dried, to recover the reusable parts (cone and nut)
the nuts should be unscrewed and removed together with the hoods, before
breaking the bases.
The bases can be removed using a white rubber mallet or your foot.
The base must be struck in the same direction as the tile joint line.
Tile thickness: 3 - 12 mm (1/8” - 1/2”)
Joint: 1.5 mm (1/16”).
Wider joints are possible through the combined use of LITOLEVEL
and spacers ( Cross and T shape ).

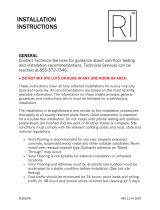
*
B
1 4"
186
1 6"
124 83
1 8"
93 62 46
1 10"
74 50 37 30
2 12"
93 62 46 37 41
2 13"
84 56 42 34 38 34
2 16"
70 46 35 28 31 28 23
2 18"
62 41 31 25 28 25 21 18
2 20"
56 37 28 22 25 23 19 17 15
2 22"
51 34 25 20 23 20 17 15 14 12
2 24"
46 31 23 19 21 19 15 14 12 11 10
3 30"
50 33 25 20 21 19 15 14 12 11 10 10
3 32"
46 31 23 19 19 18 15 13 12 11 10 9 9
3 36"
41 28 21 17 17 16 13 11 10 9 9 8 8 7
3 40"
37 25 19 15 15 14 12 10 9 8 8 7 7 6 6
4 48"
39 26 19 15 15 14 12 10 9 8 8 7 7 6 5 5
5 60"
37 25 19 15 14 13 11 10 9 8 7 7 6 6 5 5 4
6 70"
36 24 18 14 14 13 10 9 8 8 7 6 6 5 5 4 4 3
7 80"
37 25 19 15 14 13 10 9 8 8 7 6 6 5 5 4 4 3 3
8 95"
35 23 17 14 13 12 10 9 8 7 6 6 5 5 4 4 3 3 3 3
10 120"
34 23 17 14 12 11 9 8 7 7 6 5 5 4 4 4 3 3 3 2 2
PCS INCH
4" 6" 8" 10" 12" 13" 16" 18" 20" 22" 24" 30" 32" 36" 40" 48" 60" 70" 80" 95"
120"
A
PCS
1 1 1 1 2 2 2 2 2 2 2 3 3 3 3 4 5 6 7 8 10
*
Tile pcs/side
pcs
10 SQ.FT.
24”x24” 2 10
Tile pcs/side
A - B
pcs
10 SQ.FT.
24”X48” 2-4 8
Tile pcs/side
A - B
pcs
10 SQ.FT.
24”x48” 2-4 8
Tile pcs/side
A - B
pcs
10 SQ.FT.
6”x48” 1-4 26
8”x48” 1-4 19
Tile pcs/side
A - B
pcs
10 SQ.FT.
60”x120” 5-10 3
A
B
INDICATIVE CONSUMPTION FOR
10
SQ. FT.
LITOLEVEL guarantees simple and fast tile laying, eliminating
lippage between tiles, thus ensuring perfectly level floors and
coverings.
LITOLEVEL is recommended for the laying of large porcelain
stoneware, ceramic and natural stone tiles, as well as thin porcelain
stoneware or agglomerate stone slabs (thickness 3/6 mm, 1/8”-
1/4”).
The system is composed of 3 elements: base, cone and nut.
It does not require the use of pliers or tools of any type.
NUT
The nut is made of rigid plastic and has been
designed for easy insertion into the base. The nut
too is reusable and can be used hundreds of times.
CONE
The cone is practical and easy to insert. It is made
of rigid plastic, allowing efficient tile levelling. It is
reusable and can be used hundreds of times.
BASE
The bases are designed to level tiles with thickness
from 3 mm to 12 mm (1/8” - 1/2”), creating narrow
joints measuring 1.5 mm (1/16”). Wider joints are
possible through the combined use of LITOLEVEL and
cross or “T” tile spacers in the preferred size and in
any case greater than 1.5 mm (1/16”).
This system has been designed to apply pressure through the screwing of the nut onto the cone, which is free.
The system is therefore able to efficiently level tiles without causing any twisting phenomena between tiles and without rubbing against the tile
surface.
The nut produces vertical pressure on the cone, which is free, thus preventing any undesired horizontal movement of the tiles, which would
otherwise create incorrect tile alignment and therefore inconsistent joint sizes.
The cone does not rub against the surface of the tiles, which would otherwise be stained or marked.
The system is able to level tiles gradually, increasing or decreasing the applied pressure by simply rotating the nut, thus allowing the installer the
possibility to make any small adjustments that might be needed during installation.
This system also allows fast removal in the event joints need to be cleaned of any fresh glue, which in certain situations may fall between the
tiles during laying. Immediately after the cleaning phase, the system can easily be reinserted to keep the tiles level until the glue has hardened.
* pcs per side
/