Page is loading ...

English
Ɋɭɫɫɤɢɣ
GB
RU
Operating Instructions
COOKER AND OVEN
Contents
Operating Instructions,1
WARNING,2
Description of the appliance-Overall view,5
Description of the appliance-Control Panel,6
Installation,7
Start-up and use,11
Cooking modes,12
Precautions and tips,15
Care and maintenance,16
Assistance,16
Ɋɭɤɨɜɨɞɫɬɜɨ ɩɨ ɷɤɫɩɥɭɚɬɚɰɢɢ
ɄɍɏɈɇɇȺə ɉɅɂɌȺ ɋ ȾɍɏɈȼɕɆ ɒɄȺɎɈɆ
ɋɨɞɟɪɠɚɧɢɟ
Ɋɭɤɨɜɨɞɫɬɜɨ ɩɨ ɷɤɫɩɥɭɚɬɚɰɢɢ,1
ȼɇɂɆȺɇɂȿ,3
Ɉɩɢɫɚɧɢɟ ɢɡɞɟɥɢɹ-Ɉɛɳɢɣ ɜɢɞ,5
Ɉɩɢɫɚɧɢɟ ɢɡɞɟɥɢɹ-ɉɚɧɟɥɶ ɭɩɪɚɜɥɟɧɢɹ,6
Ɇɨɧɬɚɠ,19
ȼɤɥɸɱɟɧɢɟ ɢ ɷɤɫɩɥɭɚɬɚɰɢɹ,24
ɉɪɨɝɪɚɦɦɵ ɩɪɢɝɨɬɨɜɥɟɧɢɹ,25
ɉɪɟɞɨɫɬɨɪɨɠɧɨɫɬɢ ɢ ɪɟɤɨɦɟɧɞɚɰɢɢ,28
Ɍɟɯɧɢɱɟɫɤɨɟ ɨɛɫɥɭɠɢɜɚɧɢɟ ɢ ɭɯɨɞ,29
Ɍɟɯɧɢɱɟɫɤɨɟ ɨɛɫɥɭɠɢɜɚɧɢɟ,29
H6TMH4AF RU
KZ
ɉɚɣɞɚɥɚɧɭ ɧԝɫԕɚɭɥɵԑɵ
ɉȿɒ ɉȿɇ ȺɋɌɕԘԐɕ ɉȿɒ
Ɇɚɡɦԝɧɵ
ɉɚɣɞɚɥɚɧɭ ɧԝɫԕɚɭɥɵԑɵ, 1
ȿɋɄȿɊɌɍ,4
Ԕԝɪɵɥԑɵ ɫɢɩɚɬɬɚɦɚɫɵ-Ȼɚɫԕɚɪɭ ɬɚԕɬɚɫɵ, 5
Ԕԝɪɵɥԑɵ ɫɢɩɚɬɬɚɦɚɫɵ-ɀɚɥɩɵ ɤԧɪɿɧɿɫɿ, 6
Ɉɪɧɚɬɭ, 32
Ԕɨɫɭ ɠԥɧɟ ɩɚɣɞɚɥɚɧɭ, 36
Ʉɨɧɮɨɪɤɚɧɵ ɩɚɣɞɚɥɚɧɭ, 37
ɋɚԕɬɚɧɞɵɪɭɥɚɪ ɦɟɧ ɤɟԙɟɫɬɟɪ, 40
Ʉԛɬɿɦ ɠԥɧɟ ɬɟɯɧɢɤɚɥɵԕ ԕɵɡɦɟɬ ɤԧɪɫɟɬɭ, 42
Ʉԧɦɟɤ, 42
Ԕɚɡɚԕɲɚ

2
GB
WARNING: The appliance and its
accessible parts become hot during
use.
Care should be taken to avoid touching
heating elements.
Children less than 8 years of age shall
be kept away unless continuously
supervised.
This appliance can be used by children
aged from 8 years and above and
persons with reduced physical,
sensory or mental capabilities or lack of
experience and knowledge if they have
been given supervision or instruction
concerning use of the appliance in a
safe way and understand the hazards
involved. Children shall not play with
the appliance. Cleaning and user
maintenance shall not be made by
children without supervision.
WARNING: Unattended cooking on a
hob with fat or oil can be dangerous
and may result in fire.
NEVER try to extinguish a fire with
water, but switch off the appliance and
then cover flame e.g. with a lid or a fire
blanket.
Do not use harsh abrasive cleaners or
sharp metal scrapers to clean the oven
door glass since they can scratch the
surface, which may result in shattering
of the glass.
The internal surfaces of the compartment
(where present) may become hot.
Never use steam cleaners or pressure
cleaners on the appliance.
WARNING
Remove any liquid from the lid before
opening it
Do not close the glass cover (if present)
when the gas burners or electric
hotplates are still hot.
WARNING: Ensure that the appliance
is switched off before replacing the
lamp to avoid the possibility of electric
shock.
CAUTION: the use of inappropriate
hob guards can cause accidents
WARNING: Ensure that the appliance
is switched off before replacing the
lamp to avoid the possibility of electric
shock.
!When you place the rack inside, make
sure that the stop is directed upwards
and in the back of the cavity

GB
3
RU
ВНИМАНИЕ: Данное изделие и
его доступные комплектующие
сильно нагреваются в процессе
эксплуатации.
Будьте осторожны и не касайтесь
нагревательных элементов.
Не разрешайте детям младше 8
лет приближаться к изделию без
контроля.
Данное изделие может быть
использовано детьми старше 8
лет и лицами с ограниченными
физическими, сенсорными или
умственными способностями или
без опыта и знания
о правилах
использования изделия при условии
надлежащего контроля или обучения
безопасному использованию изделия
с учетом соответствующих рисков.
Не разрешайте детям играть с
изделием. Не разрешайте детям
осуществлять чистку и уход за
изделием без контроля взрослых.
ВНИМАНИЕ: Опасно оставлять
включенную конфорку с маслом или
жиром без присмотра, так как это
может
привести к пожару.
НИКОГДА не пытайтесь погасить
пламя/пожар водой. Прежде всего
выключите изделие и накройте
пламя крышкой или огнеупорной
тканью.
Не используйте абразивные вещества
или режущие металлические скребки
для чистки стеклянной дверцы
духового шкафа, так как они могут
поцарапать поверхность, что может
привести к разбиванию стекла.
ВНИМАНИЕ
Внутренняя поверхность ящика (
если
он имеется) может сильно нагреться.
Никогда не используйте паровые
чистящие агрегаты или агрегаты
под высоким давлением для чистки
изделия.
Если на крышку пролита жидкость,
удалите ее перед тем, как открыть
крышку. Не закрывайте стеклянную
крышку варочной панели (если
она имеется), если газовые или
электрические конфорки еще
горячие.
ВНИМАНИЕ: Проверьте, чтобы
изделие было выключено, перед
заменой лампочки во избежание
возможных ударов током.
ВНИМАНИЕ: использование
ненадлежащих предохранений
варочной панели может привести к
пожару.
Проверьте, чтобы изделие было
выключено, перед заменой лампочки
во избежание возможных ударов
током.
! При установке решетки проверить,
чтобы фиксатор был повернут вверх
с задней стороны выемки.

4
ЕСКЕРТУ: Құрылғы мен оның қол
жететін бөліктері жұмыс кезінде
қызуы мүмкін.
Қыздыру элементтеріне тимеуге
назар аударыңыз.
8-ге толмаған балаларға үздіксіз
бақылау болмаса, құрылғыдан
аулақ ұстау керек. Бұл құрылғыны
қауіпсіз түрде қолдану бойынша
кеңес не нұсқау берілген жəне
ықтимал қауіп-қатерлерді түсінетін
жағдайда, оны 8-ге толған балалар
мен дене, сезіну немесе
ой қабілеті
төмен немесе тəжірибесі мен білімі
жеткіліксіз адамдар қолдана алады.
Балаларға құрылғымен ойнауға
болмайды.
Балаларға бақылаусыз құрылғыны
тазалауға жəне оған қызмет
көрсетуге болмайды.
ЕСКЕРТУ: Плитада майға тамақ
пісірген кезде бақылап тұрмау
қауіпті болуы жəне өрт шығуға əкелуі
мүмкін.
Өртті ЕШҚАШАН сумен өшіруші
болмаңыз, оның орнына құрылғыны
өшіріп, жалынды жабыңыз, мысалы
қақпақпен немесе өртенбейтін
матамен.
Пеш есігінің шынысын тазалау
үшін қатты ысқыш тазалағыштарды
немесе өткір метал ысқыштарды
пайдаланбаңыз, себебі олар
шыныны сызып, оның шағылуына
əкелуі мүмкін.
Бөліктің (бар болса) ішкі беттері
қызып кетуі мүмкін.
Құрылғыда ешқашан бу
тазартқышты немесе шаңсорғышты
пайдаланбаңыз.
Қақпақты ашпас бұрын ондағы
сұйықтықты сүртіп алыңыз. Шыны
қақпақты (бар
болса) газ оттықтары
немесе электр плиталар əлі ыстық
болған кезде жаппаңыз.
ЕСКЕРТУ: Тоқ соғу мүмкіндігінің
алдын алу үшін шамды ауыстырмас
бұрын құрылғы өшірілгеніне көз
жеткізіңіз.
ЕСКЕРТУ АБАЙ БОЛЫҢЫЗ: сəйкес
келмейтін конфоркалардың қорғану
құралдарын пайдалану жазатайым
оқиғаларға себеп болуы мүмкін.
! Тартпаны ішке салған кезде
шектегіш жоғары қарап, қуыстың
артқы жағында тұрғанына
көз
жеткізіңіз
KZ
ЕСКЕРТУ

GB
5
1 Hob burner
2 Hob Grid
3.Control panel
4.Sliding grill rack
5.DRIPPING pan
6.Adjustable foot
7.Containment surface for spills
8.GUIDE RAILS for the sliding racks
9.position 5
10.position 4
11.position 3
12.position 2
13.position 1
14. Glass Cover
Description of the appliance
Overall view
GB
1 Газовые горелки
2 Рабочая поверхность
3 Панель управления
4 Решетка духовки
5 Противень или жарочный лист
6 Регулируемые ножки
7 Электрические конфорки
8
HAПPABЛЯЮЩИE для противеней решеток
9 Положение 5
10 Положение 4
11 Положение 3
12 Положение 2
13 Положение 1
14
Cтеклянная крышка
Ɉɩɢɫɚɧɢɟ ɢɡɞɟɥɢɹ
Ɉɛɳɢɣ ɜɢɞ
RU
2
14
3
4
5
8
11
12
13
1
7
6
6
9
10
KZ
1. Плита оттығы
2. Плита торы
3. Басқару тақтасы
4. Сырғымалы гриль тартпасы
5. МАЙ ЖИНАЙТЫН таба
6. Реттелмелі аяқ
7. Төгілген сұйықтықтарды ұстайтын бет
8. Сырғымалы тартпаларға арналған БАҒЫТТАУЫШ
9. 5-позиция
10. 4-позиция
11. 3-позиция
12. 2-позиция
13. 1-позиция
14. Шыны қақпақ (тек кейбір модельдерде)
Ԕԝɪɵɥԑɵ ɫɢɩɚɬɬɚɦɚɫɵ
ɀɚɥɩɵ ɲɨɥɭ
6
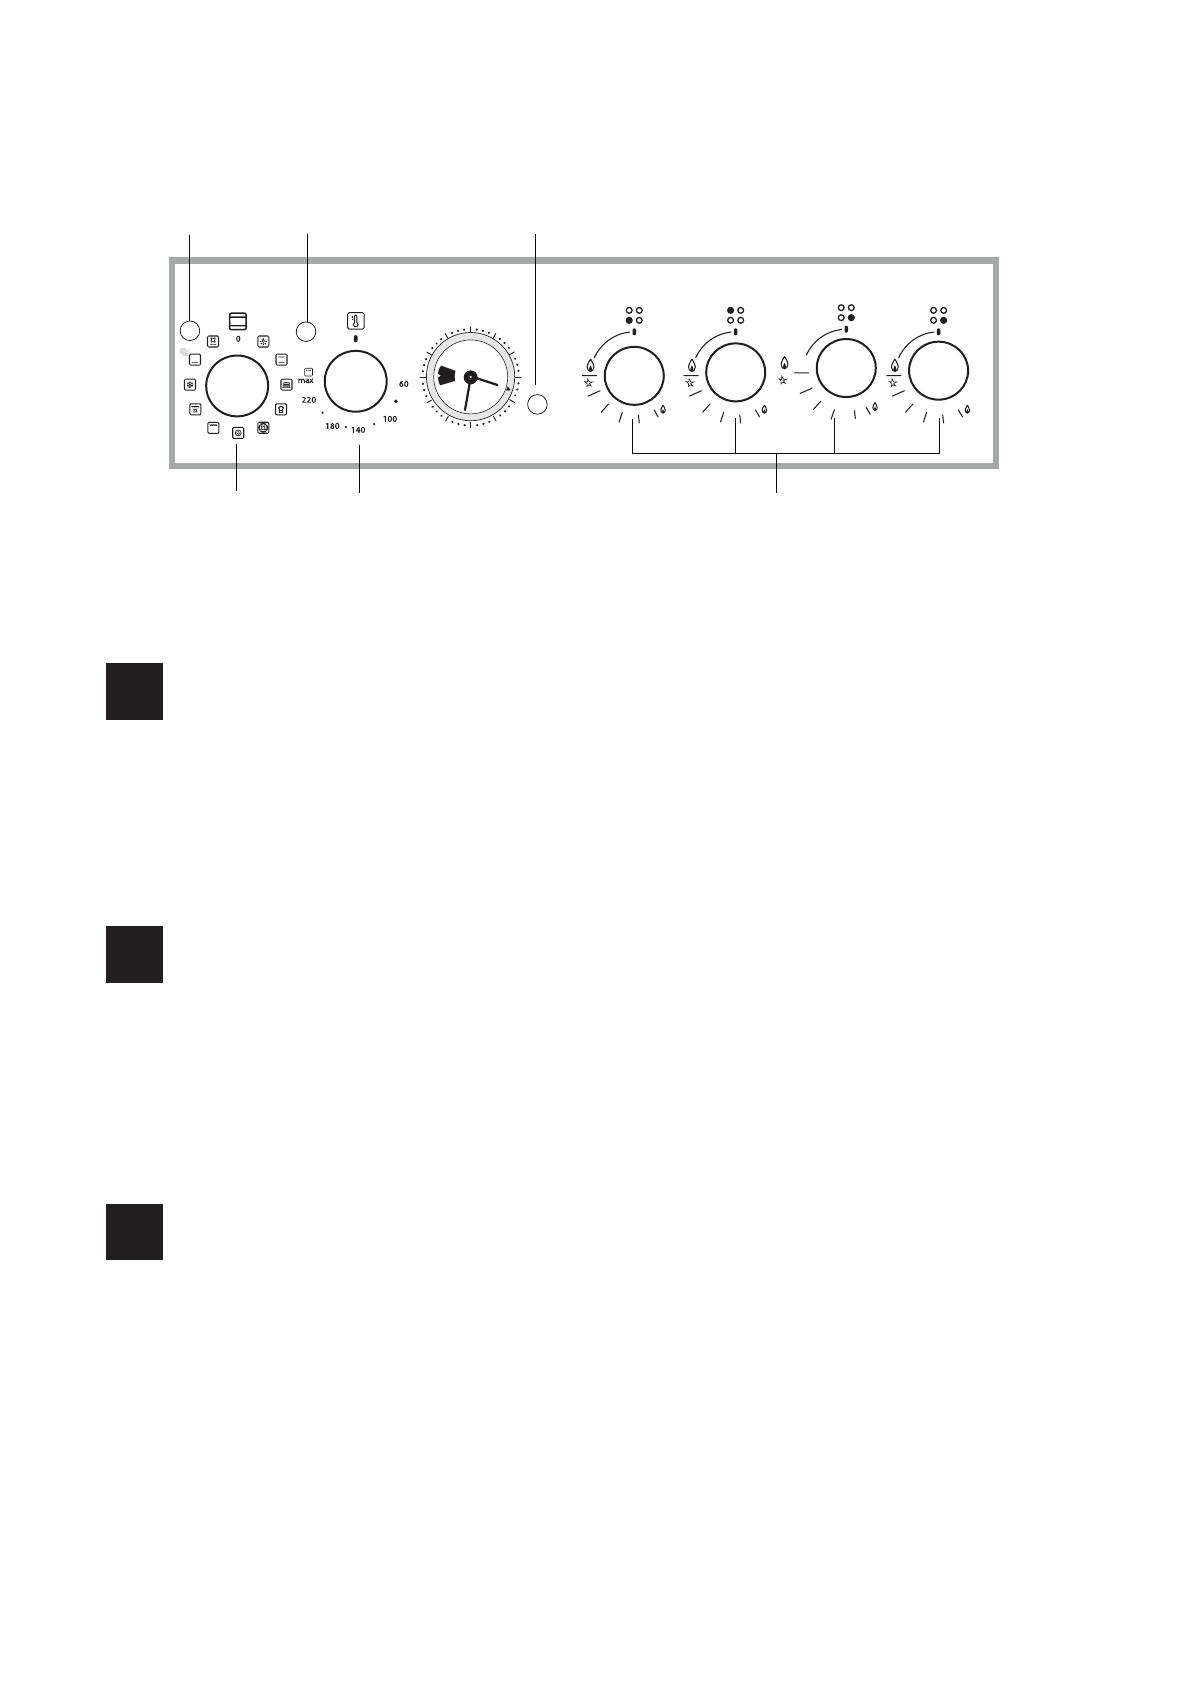
Description of the appliance
Control panel
GB
1.Oven Indicator light
2.SELECTOR knob
3.THERMOSTAT indicator light
4.THERMOSTAT knob
5.TIMER knob
6. Hob BURNER control knob
Ɉɩɢɫɚɧɢɟ ɢɡɞɟɥɢɹ
ɉɚɧɟɥɶ ɭɩɪɚɜɥɟɧɢɹ
RU
1. Световой индикатор
2.Рукоятка выбора функций духового шкафа
3.Световой индикатор термостата духового шкафа
4.Рукоятка выбора температуры
5.Таймер
6. Рукоятки включения газовых конфорок варочной
панели
4
5
3
2
1
12
3
6
9
6
1. ПЕШ индикатор шамы
3.ТЕРМОСТАТ индикатор шамы
2. ТАҢДАУ тұтқасы
4. ТЕРМОСТАТ тұтқасы
5. ТАЙМЕР тұтқасы
6. Плита ОТТЫҒЫН басқару тұтқасы
Ԕԝɪɵɥԑɵ ɫɢɩɚɬɬɚɦɚɫɵ
Ȼɚɫԕɚɪɭ ɬɚԕɬɚɫɵ KZ
KZ
7
GB
! Before operating your new appliance please read
this instruction booklet carefully. It contains important
information concerning the safe installation and operation
of the appliance.
! Please keep these operating instructions for future
reference. Make sure that the instructions are kept with
the appliance if it is sold, given away or moved.
! The appliance must be installed by a qualified
professional according to the instructions provided.
! Any necessary adjustment or maintenance must be
performed after the cooker has been disconnected from
the electricity supply.
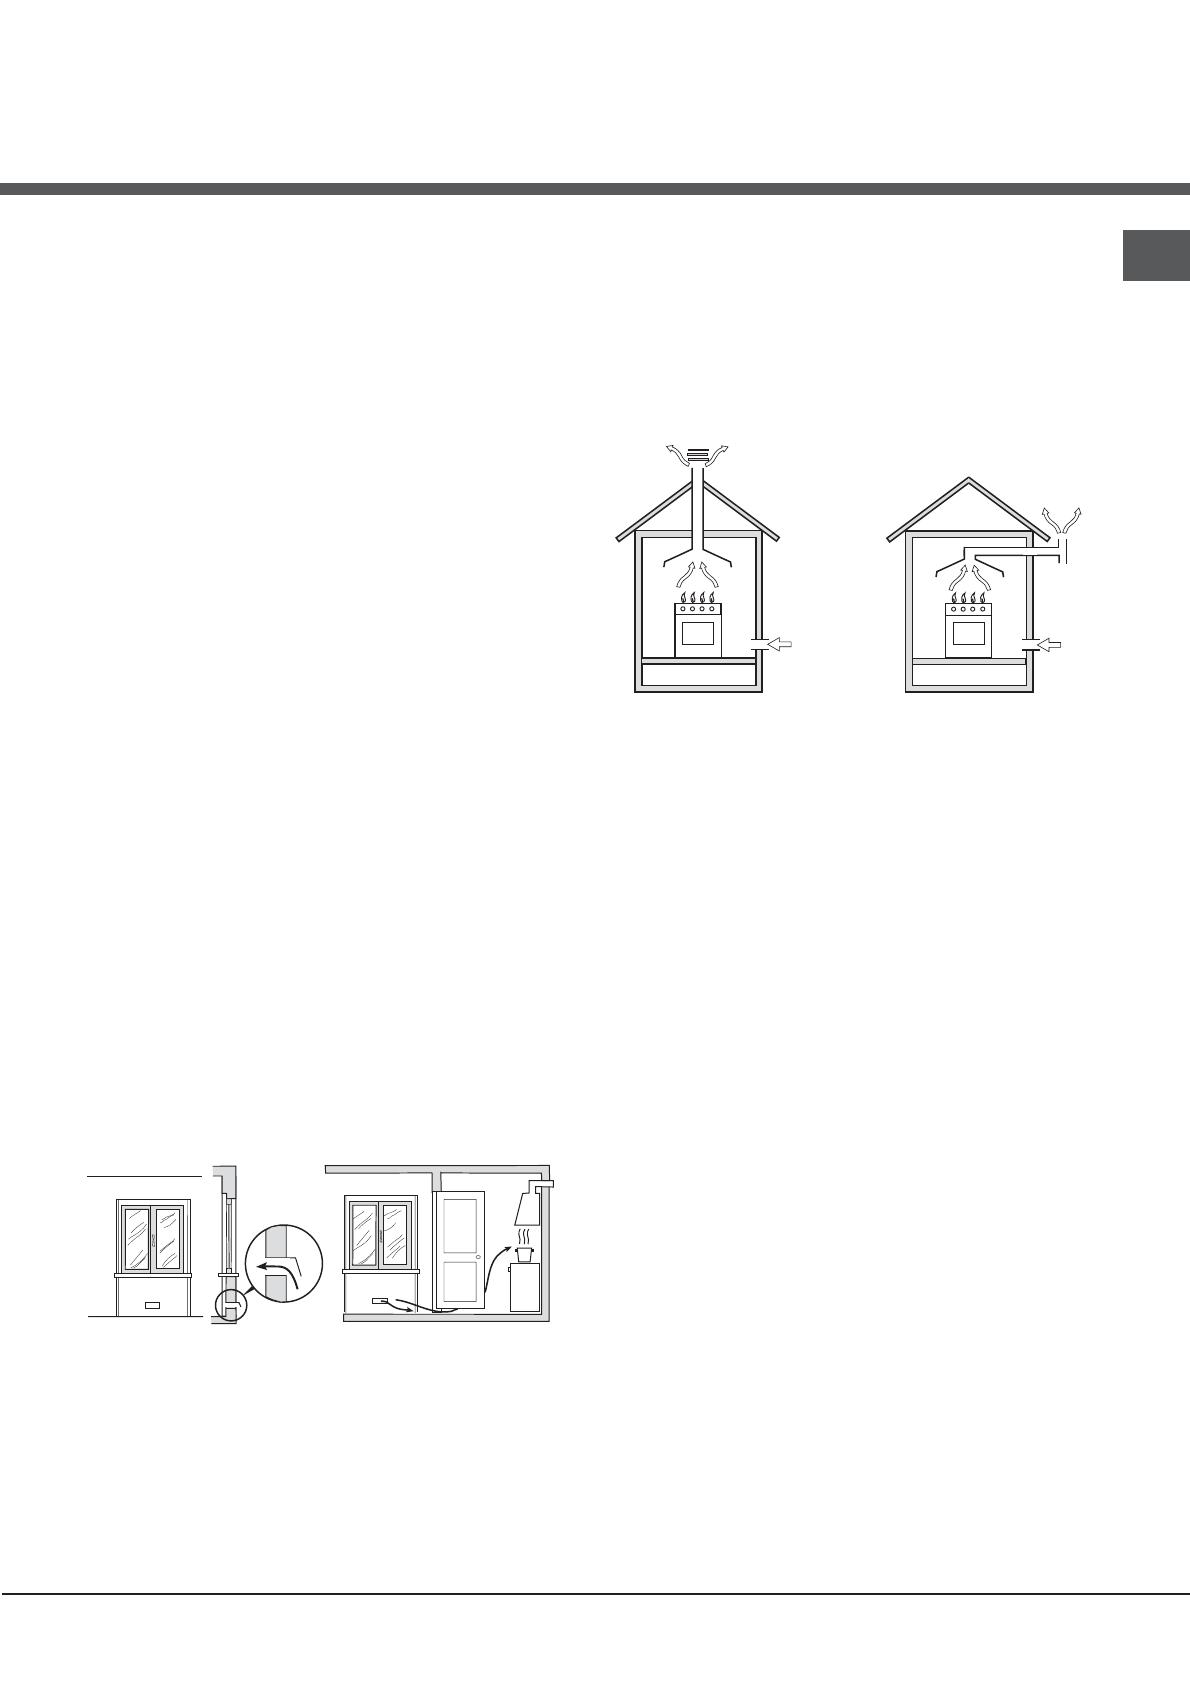
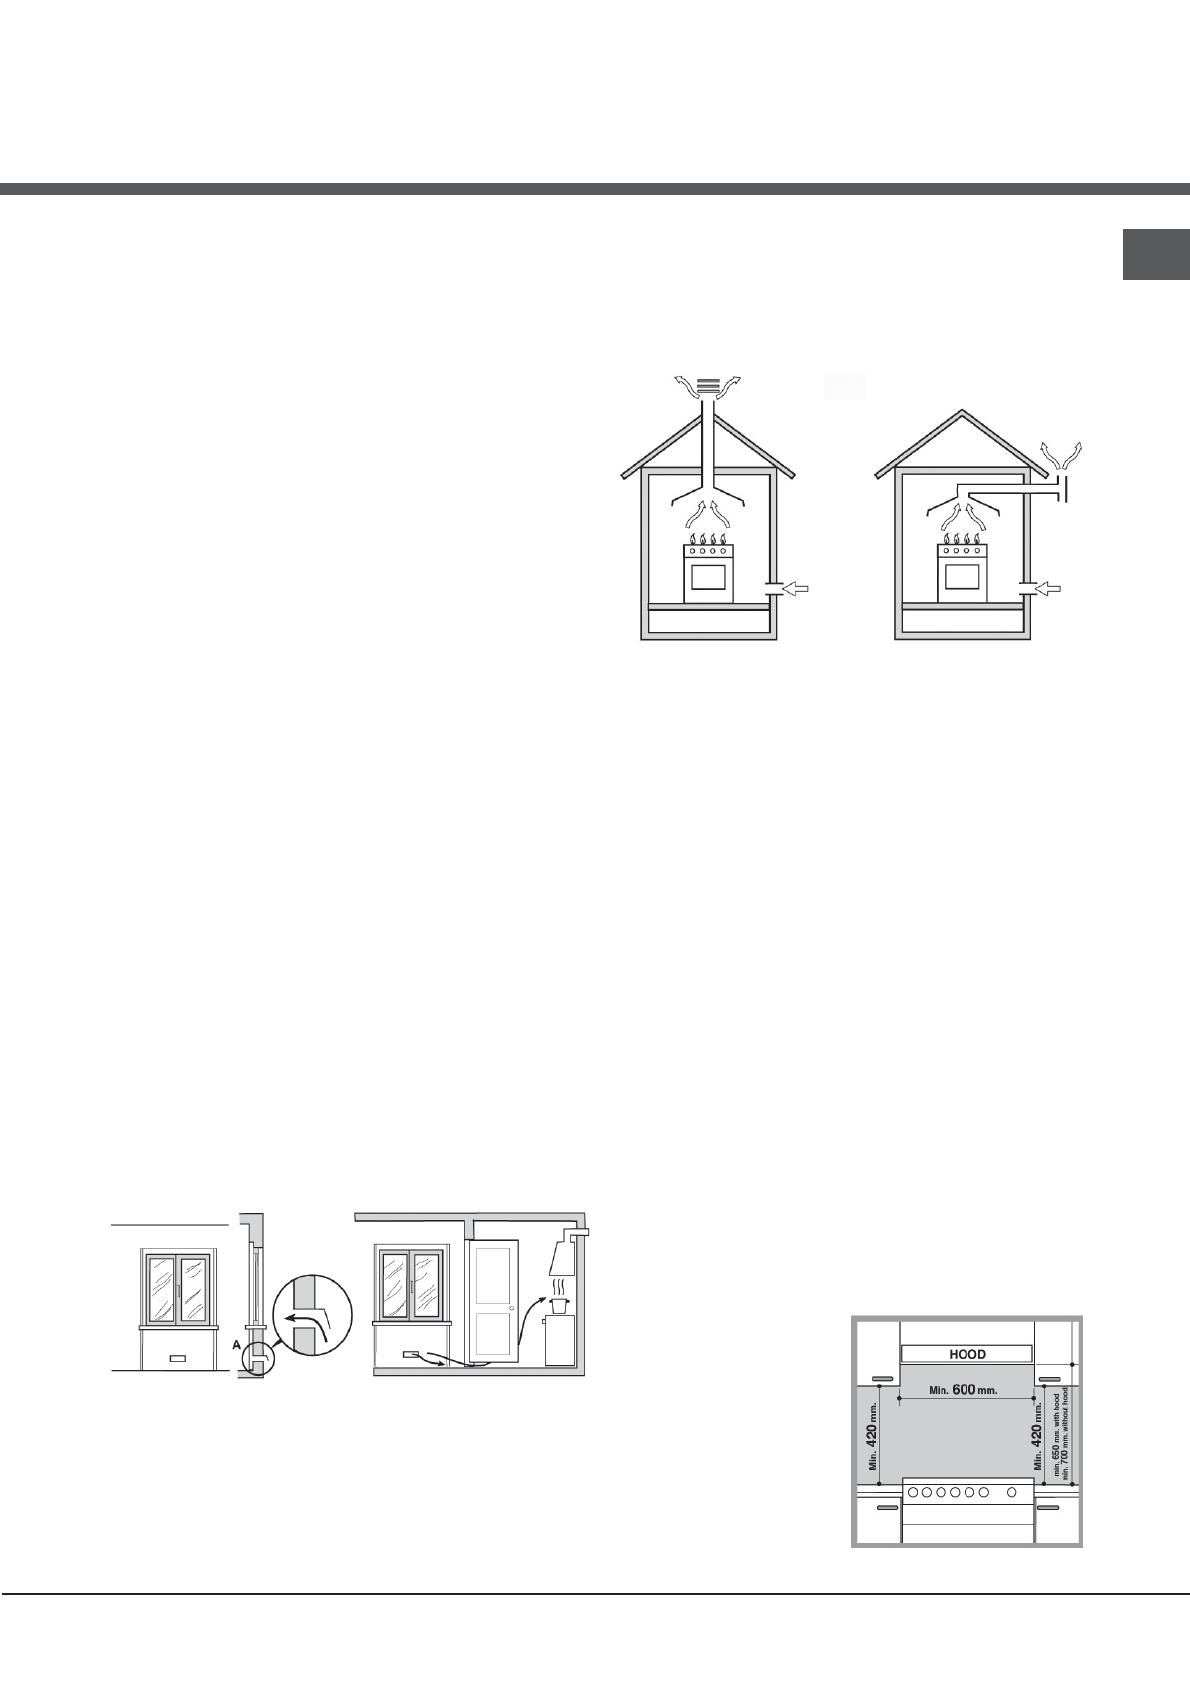
Room ventilation
The appliance may only be installed in permanently-
ventilated rooms, in accordance with current national
legislation. The room in which the appliance is installed
must be ventilated adequately so as to provide as much
air as is needed by the normal gas combustion process
(the flow of air must not be lower than 2 m
3
/h per kW of
installed power).
The air inlets, protected by grilles, should have a duct
with an inner cross section of at least 100 cm
2
and should
be positioned so that they are not liable to even partial
obstruction (see gure A).
These inlets should be enlarged by 100% - with a
minimum of 200 cm
2
- whenever the surface of the hob
is not equipped with a flame failure safety device. When
the flow of air is provided in an indirect manner from
adjacent rooms (see gure B), provided that these are
not communal parts of a building, areas with increased
fire hazards or bedrooms, the inlets should be fitted with
a ventilation duct leading outside as described above.
Adjacent room Room requiring ventilation
suction chimney, or using an electric fan that begins
to operate automatically every time the appliance is
switched on (see gure).
Fumes channelled Fumes channelled through
straight outside a chimney or a branched
flue system (reserved for
cooking appliances)
Installation
A
A B
! After prolonged use of the appliance, it is advisable to
open a window or increase the speed of any fans used.
Disposing of combustion fumes
The disposal of combustion fumes should be guaranteed
using a hood connected to a safe and efficient natural
! The liquefied petroleum gases are heavier than air and
collect by the floor, therefore all rooms containing LPG
cylinders must have openings leading outside so that
any leaked gas can escape easily.
LPG cylinders, therefore, whether partially or completely
full, must not be installed or stored in rooms or storage
areas that are below ground level (cellars, etc.). Only
the cylinder being used should be stored in the room;
this should also be kept well away from sources of
heat (ovens, chimneys, stoves) that may cause the
temperature of the cylinder to rise above 50°C.
Positioning and levelling
! It is possible to install the appliance alongside
cupboards whose height does not exceed that of the
hob surface.
! Make sure that the wall in contact with the back of the
appliance is made from a non-flammable, heat-resistant
material (T 90°C).
To install the appliance correctly:
• Place it in the kitchen, the dining room or the bed-sit
(not in the bathroom).
• If the top of the hob is higher than the cupboards, the
appliance must be installed at least 600 mm away from
them.
• If the cooker is installed underneath a wall cabinet,
there must be a minimum distance of 420 mm
between this cabinet and the top of the hob.
This distance should be increased to 700 mm if the
wall cabinets are flammable (see gure).
• Do not position blinds behind the cooker or less than
200 mm away from its sides.
Ventilation opening for
comburent air
Increase in the gap between the
door and the flooring

8
GB
• Any hoods must be
installed according to
the instructions listed in
the relevant operating
manual.
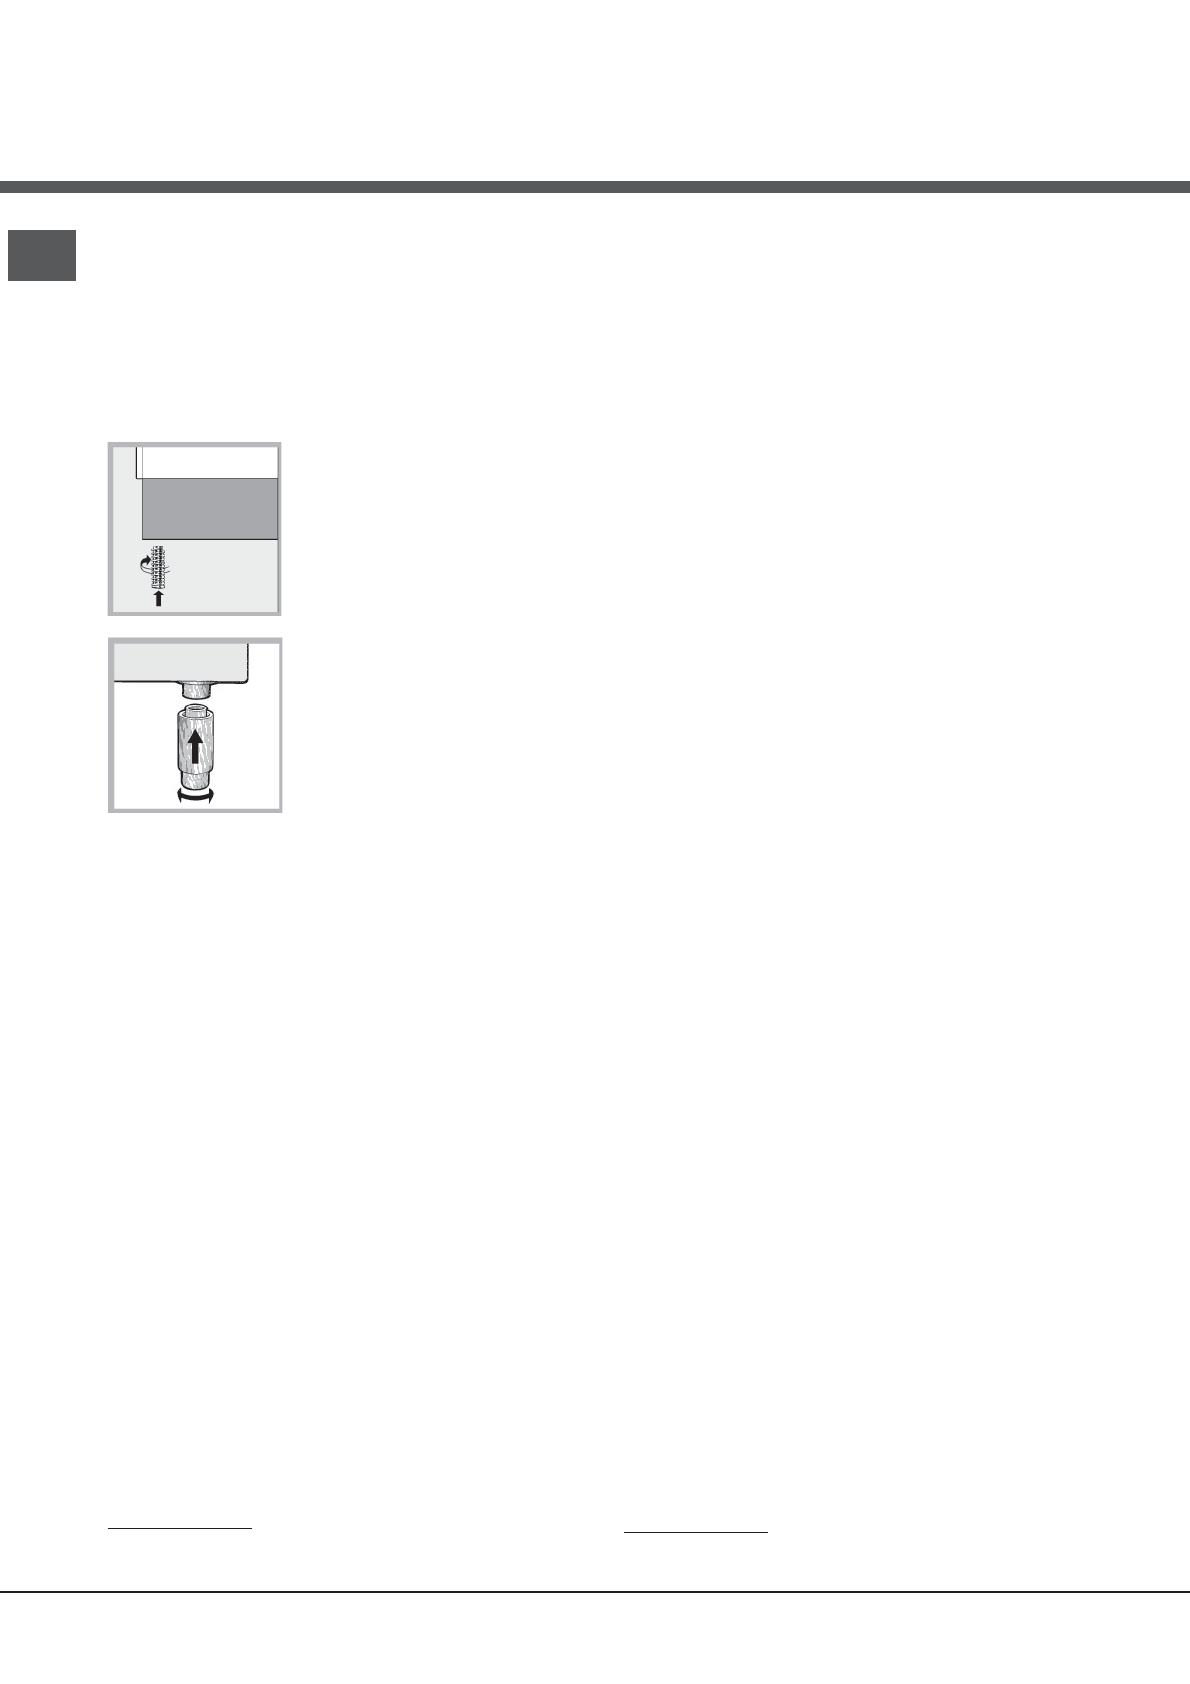
Levelling
If it is necessary to level the
appliance, screw the adjustable
feet into the places provided on
each corner of the base of the
cooker (see gure).
The legs* fit into the slots on the
underside of the base of the
cooker.
Electrical connection
Install a standardised plug corresponding to the load
indicated on the appliance data plate (see Technical data
table).
The appliance must be directly connected to the mains using
an omnipolar circuit-breaker with a minimum contact opening
of 3 mm installed between the appliance and the mains. The
circuit-breaker must be suitable for the charge indicated and
must comply with current electrical regulations (the earthing
wire must not be interrupted by the circuit-breaker). The
supply cable must be positioned so that it does not come
into contact with temperatures higher than 50°C at any point.
Before connecting the appliance to the power supply,
make sure that:
• The appliance is earthed and the plug is compliant with
the law.
• The socket can withstand the maximum power of the
appliance, which is indicated by the data plate.
• The voltage is in the range between the values
indicated on the data plate.
• The socket is compatible with the plug of the appliance.
If the socket is incompatible with the plug, ask
an authorised technician to replace it. Do not use
extension cords or multiple sockets.
! Once the appliance has been installed, the power
supply cable and the electrical socket must be easily
accessible.
HOOD
420
Min.
min.
650
mm. with hood
min.
700
mm. without hood
mm.
600
Min. mm.
420
Min. mm.
! The cable must not be bent or compressed.
! The cable must be checked regularly and replaced by
authorised technicians only.
! The manufacturer declines any liability should these
safety measures not be observed.
Gas connection
Connection to the gas network or to the gas cylinder
may be carried out using a flexible rubber or steel hose,
in accordance with current national legislation and after
making sure that the appliance is suited to the type of gas
with which it will be supplied (see the rating sticker on
the cover: if this is not the case see below). When using
liquid gas from a cylinder, install a pressure regulator
which complies with current national regulations. To
make connection easier, the gas supply may be turned
sideways*: reverse the position of the hose holder with
that of the cap and replace the gasket that is supplied
with the appliance.
! Check that the pressure of the gas supply is consistent
with the values indicated in the Table of burner and
nozzle specifications (see below). This will ensure the
safe operation and durability of your appliance while
maintaining efficient energy consumption.
Gas connection using a flexible rubber hose
Make sure that the hose complies with current national
legislation. The internal diameter of the hose must
measure: 8 mm for liquid gas supply; 13 mm for methane
gas supply.
Once the connection has been performed, make sure
that the hose:
• Does not come into contact with any parts that reach
temperatures of over 50°C.
• Is not subject to any pulling or twisting forces and that
it is not kinked or bent.
• Does not come into contact with blades, sharp corners
or moving parts and that it is not compressed.
• Is easy to inspect along its whole length so that its
condition may be checked.
• Is shorter than 1500 mm.
• Fits firmly into place at both ends, where it will be fixed
using clamps that comply with current regulations.
! If one or more of these conditions is not fulfilled or if
the cooker must be installed according to the conditions
9
GB
listed for class 2 - subclass 1 appliances (installed
between two cupboards), the flexible steel hose must
be used instead (see below).
Connecting a flexible jointless stainless steel pipe to
a threaded attachment
Make sure that the hose and gaskets comply with current
national legislation.
To begin using the hose, remove the hose holder on the
appliance (the gas supply inlet on the appliance is a
cylindrical threaded 1/2 gas male attachment).
! Perform the connection in such a way that the hose
length does not exceed a maximum of 2 metres, making
sure that the hose is not compressed and does not come
into contact with moving parts.
Checking the tightness of the connection
When the installation process is complete, check the
hose fittings for leaks using a soapy solution. Never use
a flame.
Adapting to different types of gas
It is possible to adapt the appliance to a type of gas other
than the default type (this is indicated on the rating label
on the cover).
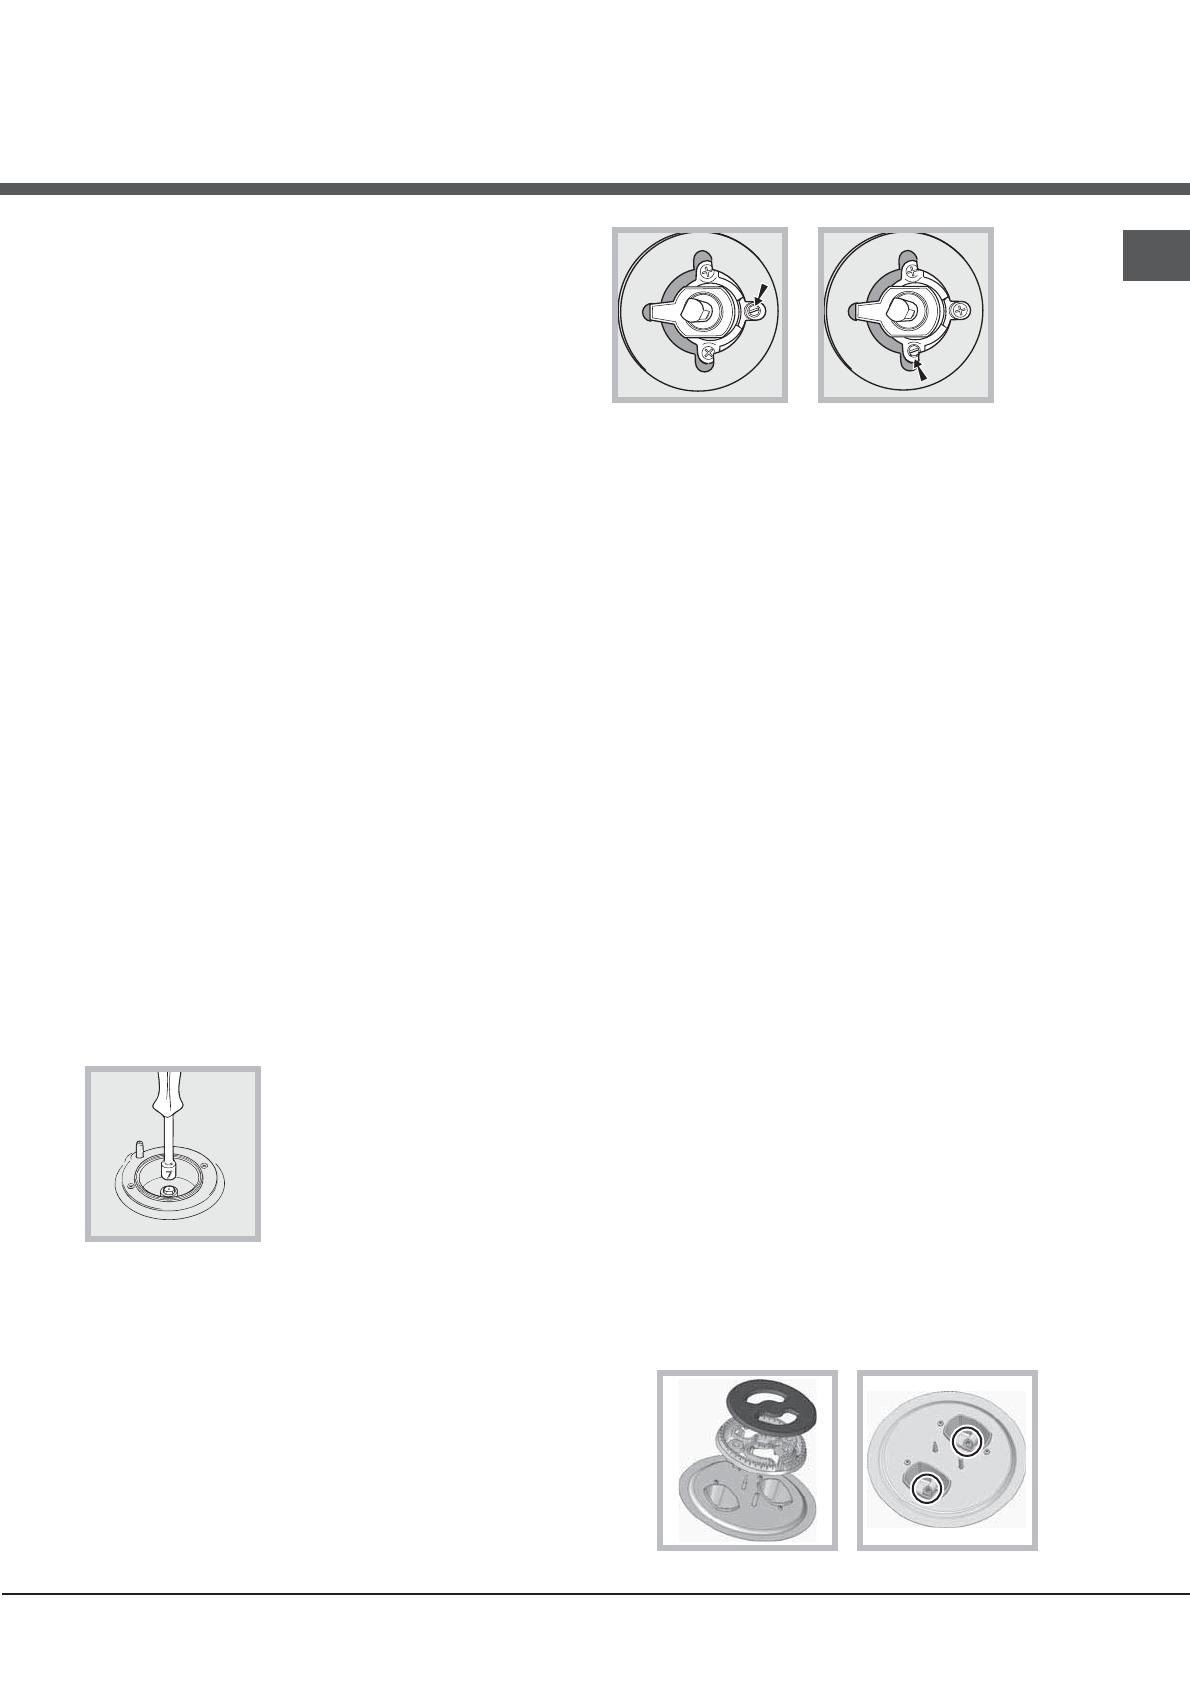
Adapting the hob
Replacing the nozzles for the hob burners:
1. Remove the hob grids and slide the burners off their
seats.
2. Unscrew the nozzles using a 7
mm socket spanner (see gure),
and replace them with nozzles
suited to the new type of gas (see
Burner and nozzle specifications
table).
3. Replace all the components by
following the above instructions in reverse.
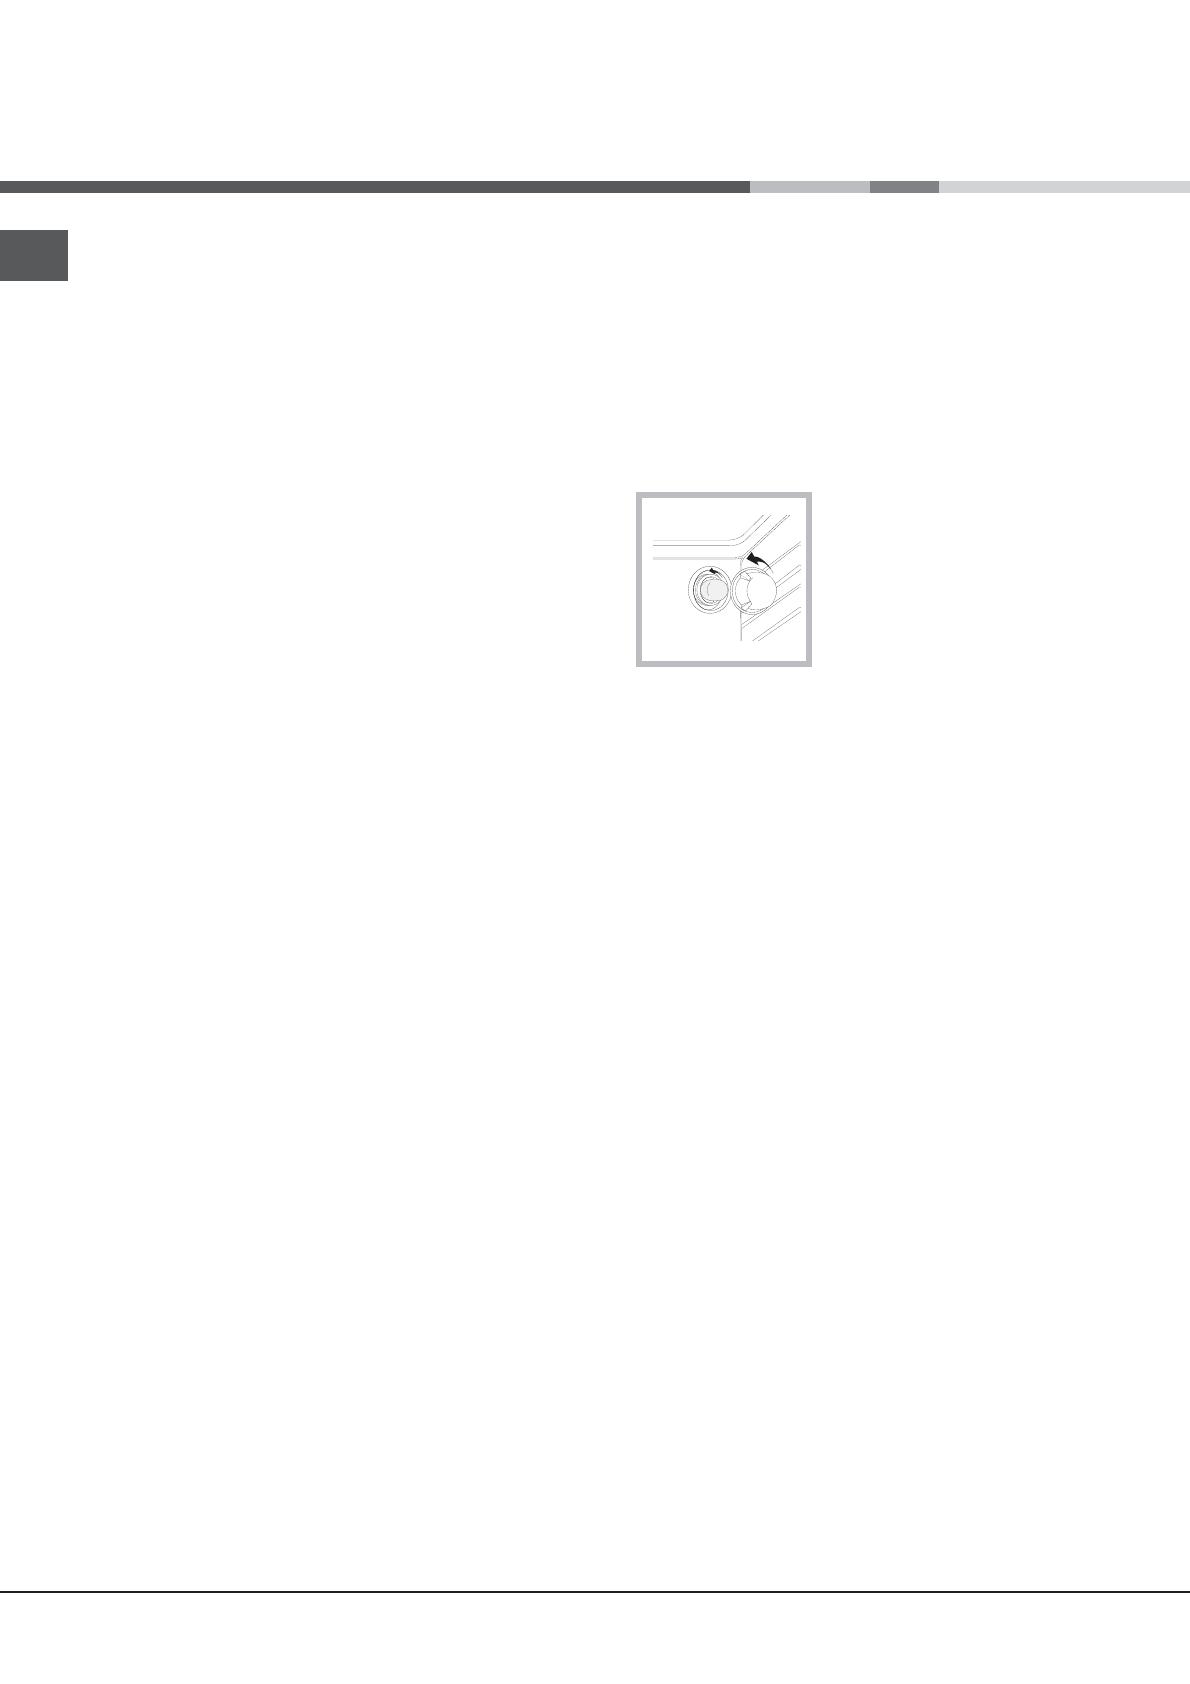
Adjusting the hob burners’ minimum setting:
1. Turn the tap to the minimum position.
2. Remove the knob and adjust the regulatory screw,
which is positioned inside or next to the tap pin, until the
flame is small but steady.
! If the appliance is connected to a liquid gas supply, the
regulatory screw must be fastened as tightly as possible:
3. While the burner is alight, quickly change the position
of the knob from minimum to maximum and vice versa
several times, checking that the flame is not extinguished.
! The hob burners do not require primary air adjustment.
! After adjusting the appliance so it may be used with a
different type of gas, replace the old rating label with a
new one that corresponds to the new type of gas (these
labels are available from Authorised Technical Assistance
Centres).
! Should the gas pressure used be different (or vary
slightly) from the recommended pressure, a suitable
pressure regulator must be fitted to the inlet hose in
accordance with current national regulations relating to
“regulators for channelled gas”.
We recommend cleaning the oven before using it for the
first time, following the instructions provided in the “Care
and maintenance” section.
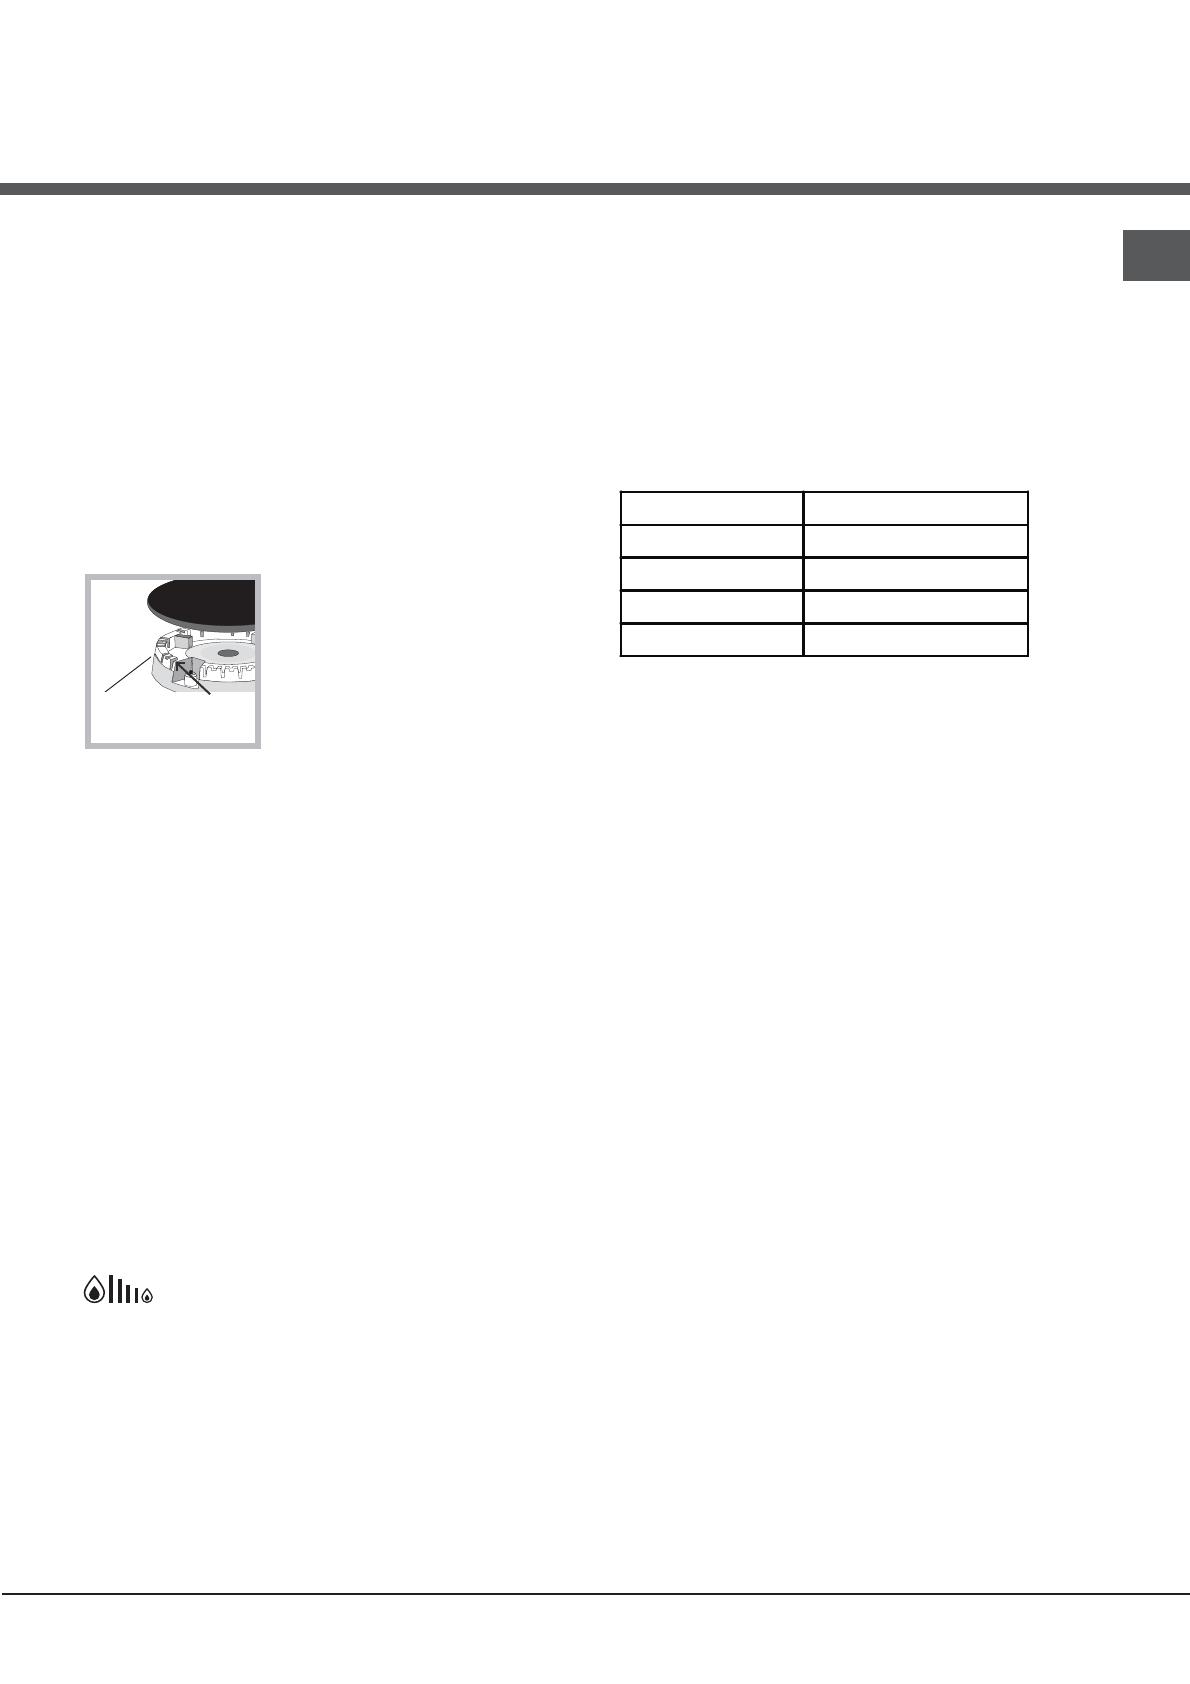
Replacing the Triple ring burner nozzles
1. Remove the pan supports and lift the burners out of
their housing. The burner consists of two separate
parts (see pictures).
2. Unscrew the nozzles using a 7 mm socket spanner.
Replace the nozzles with models that are configured
for use with the new type of gas (see Table 1). The two
nozzles have the same hole diameter.
3. Replace all the components by completing the above
operations in reverse order.
• Adjusting the burners’ primary air :
Does not require adjusting.
1. Turn the tap to the low flame position.
2. Remove the knob and adjust the adjustment screw,
which is positioned in or next to the tap pin, until the
flame is small but steady.
3. Having adjusted the flame to the required low setting,
while the burner is alight, quickly change the position

10
GB
Table of burner and nozzle specifications
of the knob from minimum to maximum and vice versa
several times, checking that the flame does not go out.
4. Some appliances have a safety device (thermocouple)
fitted. If the device fails to work when the burners are
set to the low flame setting, increase this low flame
setting using the adjusting screw.
5. Once the adjustment has been made, replace the seals
on the by-passes using sealing wax
! If the appliance is connected to liquid gas, the regulation
screw must be fastened as tightly as possible.
! Once this procedure is finished, replace the old rating
sticker with one indicating the new type of gas used.
Stickers are available from any of our Service Centres.
! Should the gas pressure used be different (or vary
slightly) from the recommended pressure, a suitable
pressure regulator must be fitted to the inlet pipe (in order
to comply with current national regulations).
Safety Chain
! In order to prevent
accidental tipping
of the appliance,
for example by a
child climbing onto
the oven door, the
supplied safety
chain MUST be
installed!
The cooker is fitted
with a safety chain
to be fixed by means of a screw (not supplied with the
cooker) to the wall behind the appliance, at the same
height as the chain is attached to the appliance.
Choose the screw and the screw anchor according to
the type of material of the wall behind the appliance. If
the head of the screw has a diameter smaller than 9mm,
a washer should be used. Concrete wall requires the
screw of at least 8mm of diameter, and 60mm of length.
Ensure that the chain is fixed to the rear wall of the cooker
and to the wall, as shown in figure, so that after installation
it is tensioned and parallel to the ground level.
87
69
50
128
104
78
51
Tripple Ring (TC)
236 232 2x99 309
130
3.25 1.50 2x65
63
H6TMH4AF RU
S
R
TC A
57
11
GB
Start-up and useStart-up and use
Using the hob
Lighting the burners
For each BURNER knob there is a complete ring showing
the strength of the flame for the relevant burner.
To light one of the burners on the hob:
1. Bring a flame or gas lighter close to the burner.
2. Press the BURNER knob and turn it in an anticlockwise
direction so that it is pointing to the maximum flame
setting (.
3. Adjust the intensity of the flame to the desired level by
turning the BURNER knob in an anticlockwise direction. This
may be the minimum setting &, the maximum setting ( or
any position in between the two.
If the appliance is fitted with an
electronic lighting device* (see
gure), press the ignition button,
marked with the symbol
, then
hold the BURNER knob down
and turn it in an anticlockwise
direction, towards the maximum
flame setting, until the burner
is lit.The burner may be extinguished when the knob is
released. If this occurs, repeat the operation, holding the
knob down for a longer period of time.
! If the flame is accidentally extinguished, switch off the
burner and wait for at least 1 minute before attempting
to relight it.
If the appliance is equipped with a flame failure
safety device*, press and hold the BURNER knob for
approximately 2-3 seconds to keep the flame alight and
to activate the device.
To switch the burner off, turn the knob until it reaches
the stop position •.
Flame adjustment according to levels
the burner flame intensity can be adjusted with the
knob according to 6 power levels, from maximum
to minimum with 4 intermediate positions:
a click will indicate the change from one level to
another when turning the knob. The system
guarantees a more precise adjustment, allows
to replicate the flame intensity and to identify
easily the preferred level for different cooking
operations.
Practical advice on using the burners
For the burners to work in the most efficient way possible
and to save on the amount of gas consumed, it is
recommended that only pans that have a lid and a flat
base are used. They should also be suited to the size of
the burner:
To identify the type of burner, please refer to the diagrams
contained in the “Burner and nozzle specifications”.
! For models equipped with a reducer grid, the latter must
be used only for the auxiliary burner, when pans with a
diameter of less than 12 cm are used.
Using the oven
! The first time you use your appliance, heat the empty
oven with its door closed at its maximum temperature
for at least half an hour. Ensure that the room is well
ventilated before switching the oven off and opening the
oven door. The appliance may emit a slightly unpleasant
odour caused by protective substances used during the
manufacturing process burning away.
! Before operating the product, remove all plastic film
from the sides of the appliance.
! Never put objects directly on the bottom of the oven; this
will avoid the enamel coating being damaged.
1. Select the desired cooking mode by turning the
SELECTOR knob.
2. Select the recommended temperature for the
cooking mode or the desired temperature by turning the
THERMOSTAT knob.
A list detailing cooking modes and suggested cooking
temperatures can be found in the relevant table (see Oven
cooking advice table).
During cooking it is always possible to:
• Change the cooking mode by turning the SELECTOR
knob.
• Change the temperature by turning the THERMOSTAT
knob.
Burner Cookware Diameter (cm)
Fast (R) 24 - 26
Semi Fast (S) 16 - 20
Auxiliary (A) 10 - 14
Triple Crown (TC) 24 - 26

12
GB
• Stop cooking by turning the SELECTOR knob to the
“0” position.
! Always place cookware on the rack(s) provided.
THERMOSTAT indicator light
When this is illuminated, the oven is generating heat.
It switches off when the inside of the oven reaches the
selected temperature. At this point the light illuminates
and switches off alternately, indicating that the thermostat
is working and is maintaining the temperature at a
constant level.
Oven light
This is switched on by turning the SELECTOR knob to
any position other than “0”. It remains lit as long as the
oven is operating. By selecting
with the knob, the
light is switched on without any of the heating elements
being activated.
Cooking modes
! A temperature value can be set for all cooking modes
between 60°C and Max, except for the following modes
• GRILL (recommended: set only to MAX power level)
• GRATIN (recommended: do not exceed 200°C).
; TRADITIONAL OVEN mode
Both the top and bottom heating elements will come on.
When using this traditional cooking mode, it is best to use
one cooking rack only. If more than one rack is used, the
heat will be distributed in an uneven manner.
X
BAKING mode
The rear heating element and the fan are switched on,
thus guaranteeing the distribution of heat in a delicate and
uniform manner throughout the entire oven. This mode is
ideal for baking and cooking temperature sensitive foods
(such as cakes that need to rise) and for the preparation
of pastries on 3 shelves simultaneously.
FAST COOKING mode
The heating elements and the fan come on, guaranteeing
the distribution of heat consistently and uniformly
throughout the oven.
Preheating is not necessary for this cooking mode. This
mode is particularly suitable for cooking pre-packed
food quickly (frozen or pre-cooked). The best results are
achieved using one cooking rack only.
< MULTI-COOKING mode
All the heating elements (top, bottom and circular) switch
on and the fan begins to operate. Since the heat remains
constant throughout the oven, the air cooks and browns
food in a uniform manner. A maximum of two racks may
be used at the same time.
= PIZZA mode
The circular heating elements and the elements at
the bottom of the oven are switched on and the fan is
activated. This combination heats the oven rapidly by
producing a considerable amount of heat, particularly
from the element at the bottom. If you use more than one
rack at a time, switch the position of the dishes halfway
through the cooking process.
G
GRILL mode
The central part of the top heating element is switched
on. The high and direct temperature of the grill is
recommended for food that requires a high surface
temperature (veal and beef steaks, fillet steak and
entrecôte). This cooking mode uses a limited amount of
energy and is ideal for grilling small dishes. Place the food
in the centre of the rack, as it will not be cooked properly
if it is placed in the corners.
GRATIN
mode
The top heating element and the rotisserie (where
present) are activated and the fan begins to operate.
This combination of features increases the effectiveness
of the unidirectional thermal radiation provided by the
heating elements through forced circulation of the air
throughout the oven. This helps prevent food from burning
on the surface and allows the heat to penetrate right into
the food.
! The GRILL and GRATIN cooking modes must be
performed with the oven door shut.
DEFROSTING mode
The fan located on the bottom of the oven makes the air
circulate at room temperature around the food. This is
recommended for the defrosting of all types of food, but in
particular for delicate types of food which do not require
heat, such as for example: ice cream cakes, cream or
custard desserts, fruit cakes. By using the fan, the
defrosting time is approximately halved. In the case of
meat, fish and bread, it is possible to accelerate the
process using the “multi-cooking” mode and setting the
temperature to 80° - 100°C.
;

13
GB
BOTTOM VENTILATED mode
The bottom heating element and the fan is activated,
which allows for the heat distribution within the whole
cavity of the oven. This combination is useful for light
cooking of vegetables and fish.
BOTTOM mode :
The lower heating element is activated. This position
is recommended for perfecting the cooking of dishes
(in baking trays) which are already cooked on the
surface but require further cooking in the centre, or
for desserts with a covering of fruit or jam, which only
require moderate colouring on the surface. It should
be noted that this function does not allow the maximum
temperature to be reached inside the oven (250°C)
and it is therefore not recommended that foods are
cooked using only this setting, unless you are baking
cakes (which should be baked at a temperature of
180°C or lower).
Practical cooking advice
! In the GRILL cooking mode, place the dripping pan in
position 1 to collect cooking residues (fat and/or grease).
GRILL
• Insert the rack in position 3 or 4. Place the food in the
centre of the rack.
• We recommend that the power level is set to maximum.
The top heating element is regulated by a thermostat
and may not always operate constantly.
PIZZA
• Use a light aluminium pizza pan. Place it on the rack
provided.
For a crispy crust, do not use the dripping pan as it
prevents the crust from forming by extending the total
cooking time.
• If the pizza has a lot of toppings, we recommend
adding the mozzarella cheese on top of the pizza
halfway through the cooking process.
WARNING! The oven is provided with
a stop system to extract the racks and
prevent them from coming out of the
oven.(1)
As shown in the drawing, to extract
them completely, simply lift the racks,
holding them on the front part, and
pull (2).
WARNING! The glass lid can break
in if it is heated up. Turn off all the
burners and the electric plates before
closing the lid. *Applies to the models
with glass cover only.
Setting the time
Press the PROGRAMMER
knob and turn it in an
anticlockwise direction to
set the correct time.
! The clock can only be set if
the oven is connected to the
electricity mains.
In case of a power failure, the
PROGRAMMER will stop: the
correct time will need to be
reset once the power has returned
12
3
6
9
,
.
;
;

14
GB
Oven cooking advice table
Cooking
modes
Foods Weight
(in kg)
Rack Position Pre-heating
time
(minutes)
Recommended
temperature
Cooking
time
(minutes)
Traditional
Oven
Duck
Roast veal or beef
Pork roast
Biscuits (short pastry)
Tarts
1
1
1
-
1
3
3
3
3
3
15
15
15
15
15
200
200
200
180
180
65-75
70-75
70-80
15-20
30-35
Baking
Mode
Tarts
Fruit cakes
Plum cake
Sponge cake
Stuffed pancakes (on 2 racks)
Small cakes (on 2 racks)
Cheese puffs (on 2 racks)
Cream puffs (on 3 racks)
Biscuits (on 3 racks)
Meringues (on 3 racks)
0.5
1
0.7
0.5
1.2
0.6
0.4
0.7
0.7
0.5
3
2 or 3
3
3
2 and 4
2 and 4
2 and 4
1 and 3 and 5
1 and 3 and 5
1 and 3 and 5
15
15
15
15
15
15
15
15
15
15
180
180
180
160
200
190
210
180
180
90
20-30
40-45
40-50
25-30
30-35
20-25
15-20
20-25
20-25
180
Frozen food
Pizza
Courgette and prawn pie
Country style spinach pie
Turnovers
Lasagne
Golden Rolls
Chicken morsels
0.3
0.4
0.5
0.3
0.5
0.4
0.4
2
2
2
2
2
2
2
-
-
-
-
-
-
-
250
200
220
200
200
180
220
12
20
30-35
25
35
25-30
15-20
Pre-cooked food
Golden chicken wings
0.4
2
-
200
20-25
Fast
cooking
Fresh Food
Biscuits (short pastry)
Plum cake
Cheese puffs
0.3
0.6
0.2
2
2
2
-
-
-
200
180
210
15-18
45
10-12
Multi-
cooking
Pizza (on 2 racks)
Lasagne
Lamb
Roast chicken + potatoes
Mackerel
Plum cake
Cream puffs (on 2 racks)
Biscuits (on 2 racks)
Sponge cake (on 1 rack)
Sponge cake (on 2 racks)
Savoury pies
1
1
1
1+1
1
1
0.5
0.5
0.5
1
1.5
2 and 4
3
2
2 and 4
2
2
2 and 4
2 and 4
2
2 and 4
3
15
10
10
15
10
10
10
10
10
10
15
230
180
180
200
180
170
190
180
170
170
200
15-20
30-35
40-45
60-70
30-35
40-50
20-25
10-15
15-20
20-25
25-30
Pizza Mode
Pizza
Roast veal or beef
Chicken
0.5
1
1
3
2
2 or 3
15
10
10
220
220
180
15-20
25-30
60-70
Grill
Soles and cuttlefish
Squid and prawn kebabs
Cuttlefish
Cod filet
Grilled vegetables
Veal steak
Sausages
Hamburgers
Mackerels
Toasted sandwiches (or toast)
0.7
0.6
0.6
0.8
0.4
0.8
0.6
0.6
1
4 and 6
4
4
4
4
3 or 4
4
4
4
4
4
-
-
-
-
-
-
-
-
-
-
Max
Max
Max
Max
Max
Max
Max
Max
Max
Max
10-12
8-10
10-15
10-15
15-20
15-20
15-20
10-12
15-20
3-5
Gratin
Grilled chicken
Cuttlefish
1.5
1.5
2
2
10
10
200
200
55-60
30-35
Bottom
Ventilated
Bottom For perfecting cooking

15
GB
Precautions and tips
! This appliance has been designed and manufactured
in compliance with international safety standards.
The following warnings are provided for safety reasons
and must be read carefully.
General safety
• The appliance was designed for domestic use inside
the home and is not intended for commercial or
industrial use.
• The appliance must not be installed outdoors, even in
covered areas. It is extremely dangerous to leave the
appliance exposed to rain and storms.
• Do not touch the appliance with bare feet or with wet
or damp hands and feet.
• The appliance must be used by adults only for
the preparation of food, in accordance with the
instructions outlined in this booklet. Any other
use of the appliance (e.g. for heating the room)
constitutes improper use and is dangerous.
The manufacturer may not be held liable for any
damage resulting from improper, incorrect and
unreasonable use of the appliance.
• The instruction booklet accompanies a class 1
(insulated) or class 2 - subclass 1 (recessed between
2 cupboards) appliance.
• Do not touch the heating elements or certain parts
of the oven door when the appliance is in use;
these parts become extremely hot. Keep children
well away from the appliance.
• Make sure that the power supply cables of other
electrical appliances do not come into contact with
the hot parts of the oven.
• The openings used for the ventilation and dispersion
of heat must never be covered.
• Always use oven gloves when placing cookware in the
oven or when removing it.
• Do not use flammable liquids (alcohol, petrol, etc...)
near the appliance while it is in use.
• Do not place flammable material in the lower storage
compartment or in the oven itself. if the appliance is
switched on accidentally, they could catch fire.
• The internal surfaces of the compartment (where
present) may become hot.
• Always make sure the knobs are in the
• position when
the appliance is not in use.
• When unplugging the appliance, always pull the plug
from the mains socket; do not pull on the cable.
• Never perform any cleaning or maintenance work
without having disconnected the appliance from the
electricity mains.
• If the appliance breaks down, under no circumstances
should you attempt to perform the repairs yourself.
Repairs carried out by inexperienced persons may
cause injury or further malfunctioning of the appliance.
Contact Assistance.
• Do not rest heavy objects on the open oven door.
• Do not let children play with the appliance.
• The appliance should not be operated by people
(including children) with reduced physical, sensory
or mental capacities, by inexperienced individuals or
by anyone who is not familiar with the product. These
individuals should, at the very least, be supervised
by someone who assumes responsibility for their
safety or receive preliminary instructions relating to
the operation of the appliance.
Disposal
• When disposing of packaging material: observe local
legislation so that the packaging may be reused.
• The European Directive 2002/96/EC relating to Waste
Electrical and Electronic Equipment (WEEE) states
that household appliances should not be disposed of
using the normal solid urban waste cycle. Exhausted
appliances should be collected separately in order to
optimise the cost of re-using and recycling the materials
inside the machine, while preventing potential damage
to the atmosphere and to public health. The crossed-
out dustbin is marked on all products to remind the
owner of their obligations regarding separated waste
collection.
For further information relating to the correct disposal of
exhausted household appliances, owners may contact
the public service provided or their local dealer.
Respecting and conserving the
environment
• You can help to reduce the peak load of the electricity
supply network companies by using the oven in the
hours between late afternoon and the early hours of
the morning.
• Always keep the oven door closed when using the
GRILL and GRATIN modes: This will achieve improved
results while saving energy (approximately 10%).
• Check the door seals regularly and wipe them clean
to ensure they are free of debris so that they adhere
properly to the door, thus avoiding heat dispersion.
16
GB
Switching the appliance off
Disconnect your appliance from the electricity supply
before carrying out any work on it.
Cleaning the appliance
! Never use steam cleaners or pressure cleaners on the
appliance.
• The stainless steel or enamel-coated external parts and
the rubber seals may be cleaned using a sponge that
has been soaked in lukewarm water and neutral soap.
Use specialised products for the removal of stubborn
stains. After cleaning, rinse well and dry thoroughly.
Do not use abrasive powders or corrosive substances.
• The hob grids, burner caps, flame spreader rings and
burners may be removed to make cleaning easier;
wash them in hot water and non-abrasive detergent,
making sure all burnt-on residue is removed before
drying them thoroughly.
• Clean the terminal part of the flame failure safety
devices* frequently.
• The inside of the oven should ideally be cleaned after
each use, while it is still lukewarm. Use hot water and
detergent, then rinse well and dry with a soft cloth. Do
not use abrasive products.
• Clean the glass part of the oven door using a sponge
and a non-abrasive cleaning product, then dry
thoroughly with a soft cloth. Do not use rough abrasive
material or sharp metal scrapers as these could
scratch the surface and cause the glass to crack.
• The accessories can be washed like everyday
crockery, and are even dishwasher safe.
• Do not close the cover when the burners are alight or
when they are still hot.
Inspecting the oven seals
Check the door seals around the oven regularly. If
the seals are damaged, please contact your nearest
Authorised After-sales Service Centre. We recommend
that the oven is not used until the seals have been
replaced.
Replacing the oven light bulb
1. After disconnecting the oven
from the electricity mains, remove
the glass lid covering the lamp
socket (see gure).
2. Remove the light bulb and
replace it with a similar one:
voltage 230 V, wattage 25 W,
cap E 14.
3. Replace the lid and reconnect the oven to the electricity
supply.
Gas tap maintenance
Over time, the taps may become jammed or difficult to
turn. If this occurs, the tap must be replaced.
! This procedure must be performed by a qualified
technician authorised by the manufacturer.
Assistance
! Never use the services of an unauthorised technician.
Please have the following information to hand:
• The type of problem encountered.
• The appliance model (Mod.).
• The serial number (S/N).
The latter two pieces of information can be found on the
data plate located on the appliance.
Care and maintenance

17
GB
Removing and fitting the oven door:
1.Open the door
2.Make the hinge clamps of the oven door rotate
backwards completely (see photo)
3.Close the door until the clamps stop (the door will
remain open for 40° approx.) (see photo)
40°
4.Press the two buttons on the upper profile and
extract the profile (see photo)
5.Remove the glass sheet and do the cleaning as
indicated in chapter: "Care and maintenance".
6.Replace the glass.
WARNING! Oven must not be operated with inner
door glass removed!
WARNING! When reassembling the inner door
glass insert the glass panel correctly so that the
text written on the panel is not reversed and
can be easily legible.
7.Replace the profile, a click will indicate that the
part is positioned correctly.
8.Open the door completely.
9.Close the supports (see photo).
10.Now the door can be completely closed and the
oven can be started for normal use.
18
GB
Steam-Assisted Oven Cleaning
This method of cleaning is recommended especially after
cooking very fatty (roasted)meats.
This cleaning process allows to facilitate the removal of
dirt of the walls of the oven by the generation of steam
that is created inside the oven cavity for easier cleaning.
! Important! Before you start steam -cleaning:
-Remove any food residue and grease from the bottom
of the oven.
- Remove any oven accessories (grids and drip pans).
Perform the above operations according to the following
procedure:
1. pour 300ml of water into the baking tray in the oven,
placing it in the bottom shelf. In the models where the
drip pan is not present, use a baking sheet and place it
on the grill at the bottom shelf;
2. select the function of the oven :
and set the temperature to 100 ° C;
3. keep it in the oven for 15min;
4. turn off the oven;
5. Once cooled the oven, you can open the door to
complete the cleaning with water and a damp cloth;
6. eliminate any residual water from the cavity after
finishing cleaning
When the steam –cleaning is done, after cooking
especially fatty foods, or when grease is difficult to
remove, you may need to complete the cleaning with the
traditional method, described in the previous paragraph.
! Perform cleaning only in the cold oven!
BOTTOM mode
;
RU
19
! ɉɟɪɟɞ ɭɫɬɚɧɨɜɤɨɣ ɢ ɩɨɞɤɥɸɱɟɧɢɟɦ ɜɚɲɟɝɨ ɧɨɜɨɝɨ
ɨɛɨɪɭɞɨɜɚɧɢɹ ɜɧɢɦɚɬɟɥɶɧɨ ɩɪɨɱɢɬɚɣɬɟ ɞɚɧɧɨɟ ɪɭ-
ɤɨɜɨɞɫɬɜɨ: ɜ ɧɟɦ ɫɨɞɟɪɠɚɬɫɹ ɜɚɠɧɵɟ ɫɜɟɞɟɧɢɹ ɩɨ
ɭɫɬɚɧɨɜɤɟ, ɛɟɡɨɩɚɫɧɨɣ ɷɤɫɩɥɭɚɬɚɰɢɢ ɢ ɨɛɫɥɭɠɢɜɚɧɢɸ
ɨɛɨɪɭɞɨɜɚɧɢɹ.
! ɋɨɯɪɚɧɢɬɟ ɪɭɤɨɜɨɞɫɬɜɨ ɤɚɤ ɢɫɬɨɱɧɢɤ ɫɩɪɚɜɨɱɧɨɣ
ɢɧɮɨɪɦɚɰɢɢ ɩɨ ɨɛɨɪɭɞɨɜɚɧɢɸ ɢ ɞɥɹ ɩɟɪɟɞɚɱɢ ɜɨɡ-
ɦɨɠɧɵɦ ɧɨɜɵɦ ɜɥɚɞɟɥɶɰɚɦ.
! ɍɫɬɚɧɨɜɤɚ ɨɛɨɪɭɞɨɜɚɧɢɹ ɞɨɥɠɧɚ ɩɪɨɢɡɜɨɞɢɬɶɫɹ
ɤɜɚɥɢɮɢɰɢɪɨɜɚɧɧɵɦ ɩɟɪɫɨɧɚɥɨɦ ɜ ɫɨɨɬɜɟɬɫɬɜɢɢ
ɫ ɩɪɢɜɨɞɢɦɵɦɢ
ɢɧɫɬɪɭɤɰɢɹɦɢ.
! ɉɟɪɟɞ ɪɟɝɭɥɢɪɨɜɤɨɣ ɢɥɢ ɨɛɫɥɭɠɢɜɚɧɢɟɦ ɨɛɨɪɭɞɨ-
ɜɚɧɢɹ ɟɝɨ ɫɥɟɞɭɟɬ ɨɬɤɥɸɱɢɬɶ ɨɬ ɷɥɟɤɬɪɨɫɟɬɢ.
ȼɟɧɬɢɥɹɰɢɹ ɩɨɦɟɳɟɧɢɹ
ȼ ɫɨɨɬɜɟɬɫɬɜɢɢ ɫ ɞɟɣɫɬɜɭɸɳɢɦɢ ɫɬɚɧɞɚɪɬɚɦɢ ɩɨ
ɭɫɬɚɧɨɜɤɟ ɝɚɡɨɜɨɝɨ ɨɛɨɪɭɞɨɜɚɧɢɹ ɩɥɢɬɚ ɦɨɠɟɬ ɛɵɬɶ
ɭɫɬɚɧɨɜɥɟɧɚ ɬɨɥɶɤɨ ɜ ɩɨɦɟɳɟɧɢɹɯ ɫ ɩɨɫɬɨɹɧɧɨɣ ɜɟɧ-
ɬɢɥɹɰɢɟɣ. ɉɨɦɟɳɟɧɢɟ ɞɨɥɠɧɨ ɢɦɟɬɶ ɜɟɧɬɢɥɹɰɢɨɧɧɭɸ
ɫɢɫɬɟɦɭ, ɨɛɟɫɩɟɱɢɜɚɸɳɭɸ ɭɞɚɥɟɧɢɟ ɩɪɨɞɭɤɬɨɜ ɫɝɨ-
ɪɚɧɢɹ (ɩɪɢɬɨɤ ɜɨɡɞɭɯɚ ɞɨɥɠɟɧ ɫɨɫɬɚɜɥɹɬɶ ɧɟ ɦɟɧɟɟ
2
ɦ
3
/ɱ ɧɚ ɤɚɠɞɵɣ ɤɢɥɨɜɚɬɬ ɦɨɳ ɧɨɫɬɢ ɭɫɬɚɧɚɜɥɢɜɚ-
ɟɦɨɝɨ ɨɛɨɪɭɞɨɜɚɧɢɹ). Ɍɪɭɛɚ, ɢɞɭɳɚɹ ɤ ɜɯɨɞɧɨɦɭ
ɜɟɧɬɢɥɹɰɢɨɧɧɨɦɭ ɨɬɜɟɪɫɬɢɸ, ɡɚɳɢɳɟɧɧɨɦɭ ɪɟɲɟɬ-
ɤɨɣ, ɞɨɥɠɧɚ ɢɦɟɬɶ ɜɧɭɬɪɟɧɧɟɟ ɩɨɩɟɪɟɱɧɨɟ ɫɟɱɟɧɢɟ
100 ɫɦ
2
ɢ ɩɪɨɥɨɠɟɧɚ ɬɚɤ, ɱɬɨɛɵ ɢɫɤɥɸɱɢɬɶ ɡɚɫɨɪɟɧɢɟ
ɜ ɥɸɛɨɣ ɟɟ ɱɚɫɬɢ (ɪɢɫ. A).
ȿɫɥɢ ɪɚɛɨɱɚɹ ɩɨɜɟɪɯɧɨɫɬɶ ɩɥɢɬɵ ɧɟ ɨɫɧɚɳɟɧɚ ɭɫ-
ɬɪɨɣɫɬɜɨɦ ɛɟɡɨɩɚɫɧɨɫɬɢ, ɜɯɨɞɧɨɟ ɜɟɧɬɢɥɹɰɢɨɧɧɨɟ
ɨɬɜɟɪɫɬɢɟ ɞɨɥɠɧɨ ɛɵɬɶ ɭɜɟɥɢɱɟɧɨ ɧɚ 100% (ɫ ɦɢɧɢ-
ɦɚɥɶɧɵɦ ɩɨɩɟɪɟɱɧɵɦ ɫɟɱɟɧɢɟɦ ɬɪɭɛɵ 200 ɫɦ
2
).
Ʉɨɝɞɚ ɩɨɬɨɤ ɜɨɡɞɭɯɚ ɩɨɫɬɭɩɚɟɬ ɢɡ ɫɦɟɠɧɵɯ ɩɨɦɟɳɟɧɢɣ
(ɩɪɢ ɭɫɥɨɜɢɢ, ɱɬɨ ɨɧɢ ɧɟ ɹɜɥɹɸɬɫɹ ɤɨɦɦɭɧɚɥɶɧɵɦɢ
ɱɚɫɬɹɦɢ ɡɞɚɧɢɹ, ɩɨɠɚɪɨɨɩɚɫɧɵɦɢ ɩɨɦɟɳɟɧɢɹɦɢ ɢɥɢ
ɫɩɚɥɶɧɹɦɢ), ɢɯ ɜɯɨɞɧɵɟ ɜɟɧɬɢɥɹɰɢɨɧɧɵɟ ɨɬɜɟɪɫɬɢɹ
ɬɚɤɠɟ ɞɨɥɠɧɵ ɛɵɬɶ ɨɫɧɚɳɟɧɵ ɧɚɪɭɠɧɨɣ ɜɨɡɞɭɯɨɨɬ-
ɜɨɞɧɨɣ ɬɪɭɛɨɣ, ɤɚɤ ɨɩɢɫɚɧɨ ɜɵɲɟ (ɪɢɫ. B).
Ɉɬɜɨɞ ɨɬɪɚɛɨɬɚɧɧɨɝɨ ɜɨɡɞɭɯɚ
ɗɮɮɟɤɬɢɜɧɨɟ ɭɞɚɥɟɧɢɟ ɩɪɨɞɭɤɬɨɜ ɫɝɨɪɚɧɢɹ ɛɭɞɟɬ
ɨɛɟɫɩɟɱɟɧɨ ɩɪɢ ɢɫɩɨɥɶɡɨɜɚɧɢɢ ɜɵɬɹɠɤɢ, ɩɨɞɤɥɸɱɟɧ-
ɧɨɣ
ɤ ɧɚɪɭɠɧɨɦɭ ɞɵɦɨɨɬɜɨɞɭ, ɢɥɢ ɷɥɟɤɬɪɢɱɟɫɤɨɝɨ
ɜɟɧɬɢɥɹɬɨɪɚ, ɚɜɬɨɦɚɬɢɱɟɫɤɢ ɜɤɥɸɱɚɸɳɟɝɨɫɹ ɤɚɠɞɵɣ
ɪɚɡ, ɤɨɝɞɚ ɨɛɨɪɭɞɨɜɚɧɢɟ ɪɚɛɨɬɚɟɬ (cɦ. ɪɢɫ.).
ɉɪɢɦɟɪ ɨɛɟɫɩɟɱɟɧɢɹ
ɩɪɢɬɨɤɚ ɜɨɡɞɭɯɚ
ɋɦɟɠɧɨɟ
ɩɨɦɟɳɟɧɢɟ
ɉɨɦɟɳɟɧɢɟ,
ɬɪɟɛɭɸ ɳɟɟ
ɜɟɧɬɢɥɹɰɢɢ
ɍɜɟɥɢɱɟɧɢɟ ɡɚɡɨɪɚ
ɦɟɠɞɭ ɞɜɟɪɶɸ ɢ ɩɨɥɨɦ
ɞɥɹ ɫɜɨɛɨɞɧɨɝɨ ɩɪɨɯɨɞɚ
ɩɪɢɬɨɱɧɨɝɨ ɜɨɡɞɭɯɚ
AB
! ɉɨɫɥɟ ɩɪɨɞɨɥɠɢɬɟɥɶɧɨɝɨ ɢɫɩɨɥɶɡɨɜɚɧɢɹ ɨɛɨɪɭɞɨɜɚ-
ɧɢɹ ɠɟɥɚɬɟɥɶɧɨ ɨɬɤɪɵɬɶ ɨɤɧɨ ɢɥɢ ɭɜɟɥɢɱɢɬɶ ɫɤɨɪɨɫɬɶ
ɪɚɛɨɬɚɸɳɟɝɨ ɜɟɧɬɢɥɹɬɨɪɚ.
ɉɪɹɦɚɹ ɜɵɬɹɠɤɚ ɧɚɪɭɠɭ
ȼɵɬɹɠɤɚ ɩɪɢ ɧɚɥɢɱɢɢ
ɞɵɦɨɯɨɞɚ (ɬɨɥɶɤɨ
ɞɥɹ ɤɭɯɨɧɧɨɝɨ ɨɛɨɪɭɞɨɜɚɧɢɹ)
!
ɋɠɢɠɟɧɧɵɣ ɝɚɡ ɬɹɠɟɥɟɟ ɜɨɡɞɭɯɚ, ɢ ɩɨɷɬɨɦɭ ɫɤɚɩɥɢ-
ɜɚɟɬɫɹ ɜɧɢɡɭ. ɉɨɦɟɳɟɧɢɹ, ɜ ɤɨɬɨɪɵɯ ɭɫɬɚɧɚɜɥɢɜɚɸɬɫɹ
ɛɚɥɥɨɧɵ ɫɨ ɫɠɢɠɟɧɧɵɦ ɝɚɡɨɦ, ɞɨɥɠɧɵ ɛɵɬɶ ɨɫɧɚ-
ɳɟɧɵ ɧɚɪɭɠɧɨɣ ɜɟɧɬɢɥɹɰɢɟɣ, ɱɬɨɛɵ ɱɟɪɟɡ ɧɟɟ ɦɨɝ
ɭɯɨɞɢɬɶ ɝɚɡ ɜ ɫɥɭɱɚɟ ɭɬɟɱɤɢ. ɇɟɥɶɡɹ ɭɫɬɚɧɚɜɥɢɜɚɬɶ ɢ
ɯɪɚɧɢɬɶ ɛɚɥɥɨɧɵ ɫ ɝɚɡɨɦ ɜ ɩɨɦɟɳɟɧɢɹɯ, ɪɚɫɩɨɥɨɠɟɧ-
ɧɵɯ ɧɢɠɟ ɭɪɨɜɧɹ ɩɨɥɚ (ɜ ɩɨɞɜɚɥɚɯ ɢ ɩɨɥɭɩɨɞɜɚɥɚɯ).
Ɋɟɤɨɦɟɧɞɭɟɦ ɞɟɪɠɚɬɶ ɜ ɤɭɯɧɟ ɬɨɥɶɤɨ ɢɫɩɨɥɶɡɭɟɦɵɣ
ɛɚɥɥɨɧ ɢ ɭɫɬɚɧɚɜɥɢɜɚɬɶ ɟɝɨ ɩɨɞɚɥɶɲɟ ɨɬ ɢɫɬɨɱɧɢɤɨɜ
ɬɟɩɥɚ (ɞɭɯɨɜɨɤ, ɤɚɦɢɧɨɜ, ɩɟɱɟɣ ɢ ɬ.ɩ.), ɫɩɨɫɨɛɧɵɯ
ɧɚɝɪɟɬɶ ɛɚɥɥɨɧ ɞɨ ɬɟɦɩɟɪɚɬɭɪɵ ɜɵɲɟ 50°ɋ.
Ɋɚɡɦɟɳɟɧɢɟ ɢ ɜɵɪɚɜɧɢɜɚɧɢɟ
!
ɉɥɢɬɚ ɦɨɠɟɬ ɛɵɬɶ ɭɫɬɚɧɨɜɥɟɧɚ ɪɹɞɨɦ ɫ ɥɸɛɨɣ
ɤɭɯɨɧɧɨɣ ɦɟɛɟɥɶɸ, ɧɟ ɩɪɟɜɵɲɚɸɳɟɣ ɨɛɨɪɭɞɨɜɚɧɢɟ
ɩɨ ɜɵɫɨɬɟ.
!
ɋɬɟɧɚ, ɫɨɩɪɢɤɚɫɚɸɳɚɹɫɹ ɫ ɡɚɞɧɟɣ ɱɚɫɬɶɸ ɨɛɨɪɭɞɨ-
ɜɚɧɢɹ, ɞɨɥɠɧɚ ɛɵɬɶ ɫɞɟɥɚɧɚ ɢɡ ɧɟɜɨɫɩɥɚɦɟɧɹɸɳɢɯ-
ɫɹ, ɬɟɪɦɨɫɬɨɣɤɢɯ ɦɚɬɟɪɢɚɥɨɜ (ɜɵɞɟɪɠɢɜɚɬɶ ɧɚɝɪɟɜ
ɞɨ 90 °C).
Ⱦɥɹ ɩɪɚɜɢɥɶɧɨɣ ɭɫɬɚɧɨɜɤɢ:
Ɋɚɡɦɟɫɬɢɬɟ ɨɛɨɪɭɞɨɜɚɧɢɟ ɜ ɤɭɯɧɟ, ɫɬɨɥɨɜɨɣ, ɧɨ ɧɟ
ɜ ɜɚɧɧɨɣ ɤɨɦɧɚɬɟ.
ȿɫɥɢ ɪɚɛɨɱɚɹ ɩɨɜɟɪɯɧɨɫɬɶ ɩɥɢɬɵ ɜɵɲɟ ɪɹɞɨɦ
ɫɬɨɹɳɟɣ ɤɭɯɨɧɧɨɣ ɦɟɛɟɥɢ, ɩɨɫɥɟɞɧɹɹ ɞɨɥɠɧɚ ɧɚɯɨ-
ɞɢɬɶɫɹ ɧɚ ɪɚɫɫɬɨɹɧɢɢ
ɧɟ ɦɟɧɟɟ 200 ɦɦ ɨɬ
ɨɛɨɪɭɞɨɜɚɧɢɹ.
Ɇɢɧɢɦɚɥɶɧɨɟ ɪɚɫɫɬɨɹ-
ɧɢɟ ɦɟɠɞɭ ɪɚɛɨɱɟɣ
ɩɨɜɟɪɯ ɧɨɫɬɶɸ ɩɥɢɬɵ
ɢ ɧɚɜɟɫɧɵɦɢ ɲɤɚɮɚ-
ɦɢ (ɩɨɥɤɚɦɢ) ɞɨɥɠɧɨ
ɫɨɫɬɚɜɥɹɬɶ 420 ɦɦ.
ɗɬɨ ɪɚɫɫɬɨɹɧɢɟ ɫɥɟ-
x
x
x
ɍɫɬɚɧɨɜɤɚ
20
RU
ɞɭɟɬ ɭɜɟɥɢɱɢɬɶ ɞɨ 700 ɦɦ, ɟɫɥɢ ɧɚɜɟɫɧɵɟ ɲɤɚɮɵ
ɫɞɟɥɚɧɵ ɢɡ ɝɨɪɸɱɢɯ ɦɚ ɬɟ ɪɢɚɥɨɜ (ɫɦ. ɪɢɫ.).
ɒɬɨɪɵ / ɠɚɥɸɡɢ ɧɟ ɞɨɥɠɧɵ ɧɚɯɨɞɢɬɶɫɹ ɩɨɡɚɞɢ
ɩɥɢɬɵ ɢɥɢ ɧɚ ɪɚɫɫɬɨɹɧɢɢ ɦɟɧɟɟ 200 ɦɦ ɨɬ ɟɟ ɛɨ-
ɤɨɜɵɯ ɫɬɨɪɨɧ.
ȼɵɬɹɠɤɢ ɭɫɬɚɧɚɜɥɢɜɚɸɬɫɹ ɫɨɝɥɚɫɧɨ ɢɯ ɢɧɫɬɪɭɤɰɢ-
ɹɦ ɩɨ ɭɫɬɚɧɨɜɤɟ.
ȼɵɪɚɜɧɢɜɚɧɢɟ
ɉɥɢɬɚ ɫɧɚɛɠɟɧɚ ɪɟɝɭɥɢɪɭɟɦɵɦɢ
ɧɨɠɤɚɦɢ, ɤɨɬɨɪɵɟ ɫɥɭɠɚɬ ɞɥɹ
ɟɟ ɜɵɪɚɜɧɢɜɚɧɢɹ. ɉɪɢ ɧɟɨɛɯɨ-
ɞɢɦɨɫɬɢ, ɧɨɠɤɢ ɜɤɪɭɱɢ ɜɚɸɬɫɹ
ɜ ɨɬɜɟɪɫɬɢɹ ɩɨ ɭɝɥɚɦ ɨɫɧɨɜɚɧɢɹ
ɩɥɢɬɵ (ɫɦ. ɪɢɫ.).
ɉɥɢɬɚ ɤɨɦɩɥɟɤɬɭɟɬɫɹ ɧɚɞɫɬɚɜ-
ɧɵɦɢ ɨɩɨɪɚɦɢ*, ɤɨɬɨɪɵɟ ɭɫɬɚ-
ɧɚɜɥɢɜɚɸɬɫɹ ɜ ɨɬɜɟɪɫɬɢɹ ɩɨɞ
ɨɫɧɨɜɚɧɢɟɦ ɩɥɢɬɵ.
ɉɨɞɤɥɸɱɟɧɢɟ ɤ ɷɥɟɤɬɪɨɫɟɬɢ
Ɉɫɧɚɫɬɢɬɟ ɩɢɬɚɸɳɢɣ ɤɚɛɟɥɶ ɫɬɚɧɞɚɪɬɧɨɣ ɜɢɥɤɨɣ,
ɫɨɨɬɜɟɬɫɬɜɭɸɳɟɣ ɧɚɝɪɭɡɤɟ, ɭɤɚɡɚɧɧɨɣ ɜ ɬɚɛɥɢɱɤɟ
ɬɟɯɧɢɱɟɫɤɢɯ ɞɚɧɧɵɯ ɨɛɨɪɭɞɨɜɚɧɢɹ.
Ɉɛɨɪɭɞɨɜɚɧɢɟ ɦɨɠɟɬ ɧɚɩɪɹɦɭɸ ɩɨɞɫɨɟɞɢɧɹɬɶɫɹ
ɤ ɫɟɬɢ ɫ ɢɫɩɨɥɶɡɨɜɚɧɢɟɦ ɦɧɨɝɨɥɢɧɟɣɧɨɝɨ ɚɜɬɨɦɚɬɢ-
ɱɟɫɤɨɝɨ ɜɵɤɥɸɱɚɬɟɥɹ (ɫɨɨɬɜɟɬɫɬɜɭɸɳɟɝɨ ɬɟɯɧɢɱɟɫɤɢɦ
ɧɨɪɦɚɦ ɢ ɧɚɝɪɭɡɤɟ ɨɛɨɪɭɞɨɜɚɧɢɹ), ɪɚɫɫɬɨɹ ɧɢɟ ɦɟɠɞɭ
ɪɚɡɜɟɞɟɧɧɵɦɢ ɤɨɧɬɚɤɬɚɦɢ ɤɨɬɨɪɨɝɨ ɧɟ ɦɟɧɟɟ 3 ɦɦ,
ɥɢɧɢɹ ɡɚɡɟɦɥɟɧɢɹ ɧɟ ɞɨɥɠɧɚ ɩɪɟɪɵɜɚɬɶɫɹ ɜɵɤɥɸɱɚ-
ɬɟɥɟɦ. ɉɢɬɚɸɳɢɣ ɤɚɛɟɥɶ ɫɥɟɞɭɟɬ ɪɚɫɩɨɥɨɠɢɬɶ ɬɚɤ,
ɱɬɨɛɵ ɩɨ ɜɫɟɣ ɞɥɢɧɟ ɨɧ ɧɢɤɨɝɞɚ ɧɟ ɧɚɝɪɟɜɚɥɫɹ ɞɨ
ɬɟɦɩɟɪɚɬɭɪɵ, ɩɪɟɜɵɲɚɸɳɟɣ ɧɚ 50 °ɋ ɬɟɦɩɟɪɚɬɭɪɭ
ɜ ɩɨɦɟɳɟɧɢɢ.
ɉɟɪɟɞ ɩɨɞɫɨɟɞɢɧɟɧɢɟɦ ɩɪɨɜɟɪɶɬɟ, ɱɬɨ:
x Ɉɛɨɪɭɞɨɜɚɧɢɟ ɡɚɡɟɦɥɟɧɨ ɢ ɜɢɥɤɚ ɫɨɨɬɜɟɬɫɬɜɭɟɬ
ɫɬɚɧɞɚɪɬɚɦ.
x Ɋɨɡɟɬɤɚ ɦɨɠɟɬ ɜɵɞɟɪɠɚɬɶ ɦɚɤɫɢɦɚɥɶɧɭɸ ɧɚɝɪɭɡɤɭ
ɨɬ ɭɫɬɚɧɚɜɥɢɜɚɟɦɨɝɨ ɨɛɨɪɭɞɨɜɚɧɢɹ (ɫɦ. ɬɚɛɥɢɱɤɭ
ɬɟɯɧɢɱɟɫɤɢɯ ɞɚɧɧɵɯ ɨɛɨɪɭɞɨɜɚɧɢɹ).
x ɗɥɟɤɬɪɢɱɟɫɤɨɟ ɧɚɩɪɹɠɟɧɢɟ ɫɨɨɬɜɟɬɫɬɜɭɟɬ ɞɢɚɩɚ-
ɡɨɧɭ ɡɧɚɱɟɧɢɣ, ɭɤɚɡɚɧɧɵɯ ɜ
ɬɚɛɥɢɱɤɟ ɬɟɯɧɢɱɟɫɤɢɯ
ɞɚɧɧɵɯ ɨɛɨɪɭɞɨɜɚɧɢɹ.
x Ɋɨɡɟɬɤɚ ɩɨɞɯɨɞɢɬ ɤ ɜɢɥɤɟ ɨɛɨɪɭɞɨɜɚɧɢɹ, ɜ ɩɪɨɬɢɜ-
ɧɨɦ ɫɥɭɱɚɟ — ɨɛɪɚɬɢɬɟɫɶ ɤ ɤɜɚɥɢɮɢɰɢɪɨɜɚɧɧɨɦɭ
ɫɩɟɰɢɚɥɢɫɬɭ ɞɥɹ ɡɚɦɟɧɵ ɪɨɡɟɬɤɢ. ɇɟ ɢɫɩɨɥɶɡɭɣɬɟ
ɭɞɥɢɧɢɬɟɥɢ ɢ ɦɧɨɝɨɝɧɟɡɞɨɜɵɟ ɪɨɡɟɬɤɢ.
* Ɍɨɥɶɤɨ ɞɥɹ ɧɟɤɨɬɨɪɵɯ ɦɨɞɢɮɢɤɚɰɢɣ ɦɨɞɟɥɟɣ.
x
x
! ɉɨɫɥɟ ɭɫɬɚɧɨɜɤɢ ɨɛɨɪɭɞɨɜɚɧɢɹ ɞɨɥɠɟɧ ɛɵɬɶ ɨɛɟɫ-
ɩɟɱɟɧ ɫɜɨɛɨɞɧɵɣ ɞɨɫɬɭɩ ɤ ɩɢɬɚɸɳɟɦɭ ɤɚɛɟɥɸ ɢ ɪɨ-
ɡɟɬɤɟ.
! Ʉɚɛɟɥɶ ɧɟ ɞɨɥɠɟɧ ɛɵɬɶ ɩɟɪɟɤɪɭɱɟɧ ɢɥɢ ɩɟɪɟɠɚɬ.
! Ʉɚɛɟɥɶ ɫɥɟɞɭɟɬ ɪɟɝɭɥɹɪɧɨ ɩɪɨɜɟɪɹɬɶ, ɟɝɨ ɡɚɦɟɧɚ
ɞɨɥɠɧɚ ɩɪɨɢɡɜɨɞɢɬɶɫɹ ɬɨɥɶɤɨ ɫɩɟɰɢɚɥɢɫɬɚɦɢ ɫɟɪ-
ɜɢɫɧɨɝɨ ɰɟɧɬɪɚ.
ɉɪɨɢɡɜɨɞɢɬɟɥɶ ɧɟ ɧɟɫɟɬ ɨɬɜɟɬɫɬɜɟɧɧɨɫɬɢ
ɜ ɫɥɭɱɚɟ ɧɟɫɨɛɥɸɞɟɧɢɹ ɭɤɚɡɚɧɧɵɯ ɦɟɪ ɛɟɡɨɩɚɫ-
ɧɨɫɬɢ.
ɉɨɞɤɥɸɱɟɧɢɟ ɤ ɝɚɡɭ
ɉɨɞɤɥɸɱɟɧɢɟ ɞɚɧɧɨɝɨ ɨɛɨɪɭɞɨɜɚɧɢɹ ɤ ɝɚɡɨɜɨɣ ɫɟɬɢ
ɦɨɠɟɬ ɛɵɬɶ ɜɵɩɨɥɧɟɧɨ ɩɪɢ ɩɨɦɨɳɢ ɝɢɛɤɨɝɨ ɪɟɡɢɧɨ-
ɜɨɝɨ ɢɥɢ ɫɬɚɥɶɧɨɝɨ ɲɥɚɧɝɚ, ɫɨɝɥɚɫɧɨ ɞɟɣɫɬɜɭɸɳɢɦ
ɧɨɪɦɚɦ ɩɨɞɤɥɸɱɟɧɢɹ ɢ ɩɨɫɥɟ ɩɪɨɜɟɪɤɢ ɫɨɨɬɜɟɬɫɬɜɢɹ
ɬɢɩɚ ɩɨɞɤɥɸɱɚɟɦɨɝɨ ɝɚɡɚ ɬɨɦɭ, ɧɚ ɤɨɬɨɪɵɣ ɧɚɫɬɪɨ-
ɟɧɨ ɨɛɨɪɭɞɨɜɚɧɢɟ (ɫɦ. ɦɚɪɤɢɪɨɜɤɭ ɧɚ ɤɨɪɩɭɫɟ ɨɛɨ-
ɪɭɞɨɜɚɧɢɹ): ɜ ɢɧɨɦ ɫɥɭɱɚɟ ɫɥɟɞɭɣɬɟ ɢɧɫɬɪɭɤɰɢɹɦ
§ «ɇɚɫɬɪɨɣɤɚ ɧɚ ɪɚɡɥɢɱɧɵɟ ɬɢɩɵ ɝɚɡɚ». ȿɫɥɢ ɩɥɢɬɚ
ɩɨɞɫɨɟɞɢɧɹɟɬɫɹ ɤ ɛɚɥɥɨɧɭ ɫɨ ɫɠɢɠɟɧɧɵɦ ɝɚɡɨɦ, ɧɚ
ɛɚɥɥɨɧ ɫ ɝɚɡɨɦ ɧɟɨɛɯɨɞɢɦɨ ɭɫɬɚɧɨɜɢɬɶ ɪɟɝɭɥɹɬɨɪ
ɞɚɜɥɟɧɢɹ (ɪɟɞɭɤɬɨɪ), ɨɬɜɟɱɚɸɳɢɣ ɞɟɣɫɬɜɭɸɳɢɦ ɫɬɚɧ-
ɞɚɪɬɨɦ ɩɨɞɤɥɸɱɟɧɢɹ ɝɚɡɨɜɨɝɨ ɨɛɨɪɭɞɨɜɚɧɢɹ.
ɑɬɨɛɵ ɨɛɥɟɝɱɢɬɶ ɩɨɞɤɥɸɱɟɧɢɟ, ɩɨɞɜɨɞ ɝɚɡɚ ɦɨɠɟɬ
ɛɵɬɶ ɨɫɭɳɟɫɬɜɥɟɧ ɫ ɨɛɟɢɯ ɫɬɨɪɨɧ ɨɛɨɪɭɞɨɜɚɧɢɹ**:
ɩɨɦɟɧɹɣɬɟ ɩɨɥɨɠɟɧɢɟ ɞɟɪɠɚɬɟɥɹ ɲɥɚɧɝɚ ɢ ɡɚ ɝɥɭɲɤɢ
ɢ ɡɚɦɟɧɢɬɟ ɭɩɥɨɬɧɢɬɟɥɶɧɭɸ ɩɪɨɤɥɚɞɤɭ (ɩɨɫɬɚɜɥɹɟɬɫɹ
ɫ ɨɛɨɪɭɞɨɜɚɧɢɟɦ).
!
ɍɛɟɞɢɬɟɫɶ, ɱɬɨ ɞɚɜɥɟɧɢɟ ɝɚɡɚ ɫɨɨɬɜɟɬɫɬɜɭɟɬ ɡɧɚɱɟ-
ɧɢɹɦ, ɭɤɚɡɚɧɧɵɦ ɜ ɬɚɛɥɢɰɟ «ɏɚɪɚɤɬɟɪɢɫɬɢɤɢ ɝɨɪɟɥɨɤ
ɢ ɠɢɤɥɟɪɨɜ». ɗɬɨ ɨɛɟɫɩɟɱɢɬ ɛɟɡɨɩɚɫɧɭɸ ɪɚɛɨɬɭ ɢ ɞɨɥ-
ɝɢɣ ɫɪɨɤ ɫɥɭɠɛɵ ɨɛɨɪɭɞɨɜɚɧɢɹ ɩɪɢ ɷɮɮɟɤɬɢɜɧɨɦ
ɷɧɟɪɝɨɩɨɬɪɟɛɥɟɧɢɢ.
ɉɨɞɤɥɸɱɟɧɢɟ ɝɢɛɤɢɦ ɪɟɡɢɧɨɜɵɦ ɲɥɚɧɝɨɦ
ɉɨɞɫɨɟɞɢɧɢɬɟ ɝɚɡɨɜɵɣ ɲɥɚɧɝ, ɯɚɪɚɤɬɟɪɢɫɬɢɤɢ ɤɨɬɨ-
ɪɨɝɨ ɨɬɜɟɱɚɸɬ ɞɟɣɫɬɜɭɸɳɢɦ ɫɬɚɧɞɚɪɬɚɦ. ȼɧɭɬɪɟɧɧɢɣ
ɞɢɚɦɟɬɪ ɲɥɚɧɝɚ ɞɨɥɠɟɧ ɫɨɫɬɚɜɥɹɬɶ: 8 ɦɦ — ɞɥɹ
ɫɠɢɠɟɧɧɨɝɨ ɝɚɡɚ; 13 ɦɦ— ɞɥɹ
ɦɟɬɚɧɚ
ɉɨɫɥɟ ɩɨɞɤɥɸɱɟɧɢɹ ɭɞɨɫɬɨɜɟɪɶɬɟɫɶ, ɱɬɨ ɲɥɚɧɝ:
ɩɨ ɜɫɟɣ ɞɥɢɧɟ ɧɟ ɤɚɫɚɟɬɫɹ ɱɚɫɬɟɣ ɩɥɢɬɵ, ɤɨɬɨɪɵɟ
ɦɨɝɭɬ ɧɚɝɪɟɜɚɬɶɫɹ ɞɨ ɬɟɦɩɟɪɚɬɭɪɵ ɜɵɲɟ 50 °ɋ;
ɧɟ ɧɚɬɹɧɭɬ, ɧɟ ɩɟɪɟɤɪɭɱɟɧ, ɧɟ ɨɛɪɚɡɭɟɬ ɩɟɬɟɥɶ
ɢ ɢɡɝɢɛɨɜ, ɧɟ ɩɟɪɟɠɚɬ;
ɧɟ ɤɚɫɚɟɬɫɹ ɩɨɞɜɢɠɧɵɯ ɨɛɴɟɤɬɨɜ ɢ ɩɪɟɞɦɟɬɨɜ
ɫ ɨɫɬɪɵɦɢ ɭɝɥɚɦɢ;
ɩɨ ɜɫɟɣ ɞɥɢɧɟ ɞɨɫɬɭɩɟɧ ɞɥɹ ɨɫɦɨɬɪɚ ɢ ɤɨɧɬɪɨɥɹ
ɟɝɨ ɫɨɫɬɨɹɧɢɹ;
ɞɥɢɧɨɣ ɦɟɧɟɟ 1500 ɦɦ;
ɩɪɨɱɧɨ ɡɚɮɢɤɫɢɪɨɜɚɧ ɧɚ ɦɟɫɬɟ ɫ ɨɛɨɢɯ ɤɨɧɰɨɜ ɡɚ-
ɠɢɦɚɦɢ, ɫɨɨɬɜɟɬɫɬɜɭɸɳɢɦɢ ɧɨɪɦɚɦ ɩɨɞɤɥɸɱɟɧɢɹ
ɝɚɡɨɜɨɝɨ ɨɛɨɪɭɞɨɜɚɧɢɹ.
** Ɍɨɥɶɤɨ ɞɥɹ ɧɟɤɨɬɨɪɵɯ ɦɨɞɢɮɢɤɚɰɢɣ ɦɨɞɟɥɢ.
x
x
x
x
x
x
/