Page is loading ...

Sash unit
After dispensing plain tablets, a small amount of powder may remain inside
the packing machine. Maintain the packing machine periodically to ensure
that such powder is not mixed with other drugs.
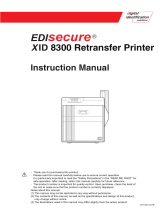
1. Open the upper door.
Open the upper door while • holding its handle.
2. Remove the cassette.
Remove the cassette while • pressing the lock of the cassette
until you hear a click sound.
Remove two cassettes from the • top and the bottom respectively.
3. Lift the sash- fixing lever.
Lift and hold the fixing lever.•
78

4. Open the sash.
Lower the sash- fixing bar to fix the sash. •
CAUTION
Do not open the sash swiftly. Failing to obey this
instruction will lower the fixing bar suddenly, resulting in
injury.
5. Clean the inside of the sash.
gnipiw yb ecafrus eht morf trid evomeR • it with a soft water-moistened cloth.
morf erutsiom evomer ,trid gnivomer retfA • the surface by wiping it with a dry soft cloth.
6. Lift the sash- fixing bar.
After lifting the fixing bar, close the sash. •
CAUTION
Be careful not to pinch your fingers.
yllacitamotua lliw hsas eht gnisolC • lower the fixing lever. (Make sure
that the sash is securely locked.)
79

7. Attach the cassettes.
Attach two cassettes to the top • and the bottom respectively.
Insert them all the way.•
8.
Close the upper door.
Close the upper door while • holding its handle.
80

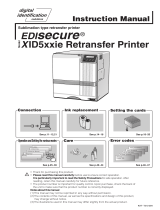
Printer head
If the print is so light even after ink ribbon replacement, clean the printer
head.
*Turn [OFF] the breaker of the packing machine in advance.
1. Remove the ink ribbon.
2. Clean the printer head.
Wipe the surface of the printer • head with an alcohol-moistened
printer head cleaner (provided).
CAUTION
Be sure to turn off the breaker of the packing machine
before using alcohol.
3. Attach an ink ribbon.
See Page 57 for the removal • of the ink ribbon.
See Page 59 for the attachment • of the ink ribbon.
Ribbon tension bar
Ribbon guide
81

Heater roller
If the paper twists around the heater roller, its laminate may stick to the
heater roller. If this happens, clean the heater roller to remove the attached
laminate.
1. Open the heater roller.
2. Clean the heater roller.
Remove dirt from the heater roller • using the heater roller cleaning brush
(provided). Clean it while rotating it by
pressing the [Heater Roller RW] switch.
CAUTION
Do not touch the surface of the heater roller as its
surface becomes very hot.
3. Close the heater roller.
Open the heater roller and then • remove the packing paper.
Then remove the last hopper.•
Then attach the last hoper. •
Route the packing paper before • closing the heater roller.
82

83
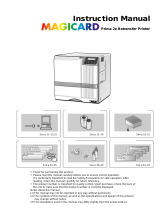
Tablet feed pipe
.
Open the slide unit bottom left door.
Fold the door along the joint and pull
•
Lightly press the part indicated with
•
Open the left door (acrylic).
•
Periodically clean the tablet feed pipe interior since a minute amount of
powder is left within the pipe when the medicine is packaged
PUSH on the left door (acrylic).
it toward this side.

84
.
Open the slide unit bottom right door.
•
•
.
Remove the tablet feed pipe from the
•
Press the hook on the right door top.
Open the right door.
standby unit.
Hold the lever on the standby case
base and press the standby socket
lock pin.

•
Move the standby unit to the left,
while pressing the standby socket
lock pin, and remove the pipe.
.
Open the body bottom left door.
Fold the door along the joint and pull
•
•
Open the left door (acrylic).
•
it toward this side.
Lightly press the part indicated with
PUSH on the left door (acrylic).
85

86
.
Open the body bottom right door.
•
•
.
Remove the tablet feed pipe from the
•
Press the hook on the right door top.
Open the right door.
box
unit.
Move and remove the suction socket
toward the left, while pressing the
lock pin.

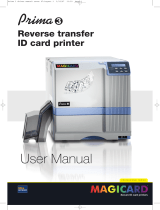
.
Clean the tablet feed pipe.
•
.
Install the tablet feed pipe on the box unit.
Clean the tablet feed pipe interior using
the attached pipe cleaning tool.
tablet feed pipe
pipe cleaning tool
.
Return the tablet feed pipe to the
•
Pass the tablet feed pipe to the body
unit through the slide unit bottom.
previous position.
.
Carrier the tablet feed pipe.
87

88
.Install the tablet feed pipe on the standby
unit.
.
Close the body bottom right door.

.Close the slide unit bottom right door.
.Close the slide unit bottom left door.
.
Close the body bottom left door.
89

Box unit
.
Open the slide unit bottom left door.
Fold the door along the joint and pull
•
Lightly press the part indicated with
•
Open the left door (acrylic).
•
Minutes when the drug packaging, a small amount of powder inside the
unit willremain BOX, please clean regularly.
PUSH on the left door (acrylic).
it toward this side.
90

.
Open the slide unit bottom right door.
•
•
.
Remove the tablet feed pipe from the
•
Press the hook on the right door top.
Open the right door.
standby unit.
Hold the lever on the standby case
base and press the standby socket
lock pin.
91

92
•
Move the standby unit to the left,
while pressing the standby socket
lock pin, and remove the pipe.
.
Open the body bottom left door.
Fold the door along the joint and pull
•
•
Open the left door (acrylic).
•
it toward this side.
Lightly press the part indicated with
PUSH on the left door (acrylic).

.
Open the body bottom right door.
•
•
.
Remove the tablet feed pipe from the
•
Press the hook on the right door top.
Open the right door.
box
unit.
Move and remove the suction socket
toward the left, while pressing the
lock pin.
93

94
.
Carrier the tablet feed pipe.
. Pull the packing base.
• Pull the packing base while
holding its handle.
• Lock the packing base.
. Pull the large hopper.
Pull the large hopper while • holding its frame.

.
Pull out the suction base unit.
•
.
Remove the case split valve.
Hold the suction base unit handle and pull
out the suction base unit toward this side.
.
Open the box cover.
•
Hold the box cover knob and open the cover.
. Pull the revolver unit.
Hold the revolver unit handle and pull out
•
the revolver unit toward this side.
95

96
.
Clean the case split valve .
.
Close the box cover.
.
Replace the case split valve .
. Clean the case and split suction
Wipe soil away from the suction case
•
interior using soft cloth soaked with water.
valve
Then securely wipe water away from the
case interior with soft dry cloth.
Wipe soil away from the split flap interior
•
using soft cloth soaked with water.
Then securely wipe water away from the
case interior with soft dry cloth.
Wipe soil away from the case split valve
•
interior using soft cloth soaked with water.
Then securely wipe water away from the
case interior with soft dry cloth.
Hold the box cover knob and close the cover.
•

.
Return the revolver unit to the previous
.
Return the packaging table to the previous
.
Return the large hopper to the previous
. Return the suction base unit to the
previous position.
Hold the revolver unit handle and return
•
the revolver unit to the previous position,
while slowly pushing the unit until it clicks.
Unlock the packaging table.
•
position.
position.
Slowly push the large hopper securely into
•
the innermost position.
position.
97
/