

i
VECTOR
Copyright © 2012 Compulite Systems (2000) Ltd. All rights reserved.
This documentation is delivered subject to the following conditions and
restrictions:
This document is protected by copyright and distributed under licenses
restricting its use, copying, distribution and decompilation. No part of this
product or document may be reproduced in any form by any means without
the prior express written authorization of Compulite and its licensors (if any).
The content of this document is furnished for informational use only and is
subject to change without notice. Compulite assumes no responsibility or
liability for errors or inaccuracies that may appear in this book.
Document Revision History
Document Version 4.2 September 2012
Document Version 4.1 December 2010
Document Version 4.0 February 2010
Document Version 3.0 November 2008
This document was set up for two sided printing. So conserve trees and print on both
sides

iii
Table of Contents
Chapter 1: Setting Up and Overview . . . . . . . . . . . . . . . . . . . . . . . . . . 3
Setting up Vector . . . . . . . . . . . . . . . . . . . . . . . . . . . . . . . . . . . . . 4
Vector Violet - Configuring a DVI Monitor . . . . . . . . . . . . . . . . . . . . 5
Vector operation modes and programming syntax . . . . . . . . . . . . . . 7
Tracking mode operation . . . . . . . . . . . . . . . . . . . . . . . . . . . . . 7
Compulite mode operation . . . . . . . . . . . . . . . . . . . . . . . . . . . . 7
Programming syntax . . . . . . . . . . . . . . . . . . . . . . . . . . . . . . . . 8
Basic display layouts . . . . . . . . . . . . . . . . . . . . . . . . . . . . . . . . . . 9
Screen elements . . . . . . . . . . . . . . . . . . . . . . . . . . . . . . . . . . 10
Pointing and navigating . . . . . . . . . . . . . . . . . . . . . . . . . . . . . . . 12
Using the trackball . . . . . . . . . . . . . . . . . . . . . . . . . . . . . . . . . 12
Scrolling and navigating displays . . . . . . . . . . . . . . . . . . . . . . . 12
Using console keys in window mode . . . . . . . . . . . . . . . . . . . . 13
Setting up displays . . . . . . . . . . . . . . . . . . . . . . . . . . . . . . . . . . . 14
Opening new windows . . . . . . . . . . . . . . . . . . . . . . . . . . . . . . 14
Opening new view panes . . . . . . . . . . . . . . . . . . . . . . . . . . . . 14
Setting Up Soft Keys . . . . . . . . . . . . . . . . . . . . . . . . . . . . . . . . . 16
Defining soft keys . . . . . . . . . . . . . . . . . . . . . . . . . . . . . . . . . 17
Paging soft keys . . . . . . . . . . . . . . . . . . . . . . . . . . . . . . . . . . 17
Workspaces . . . . . . . . . . . . . . . . . . . . . . . . . . . . . . . . . . . . . . . . 18
Using the Workspace tree . . . . . . . . . . . . . . . . . . . . . . . . . . . . . . 20
Show node . . . . . . . . . . . . . . . . . . . . . . . . . . . . . . . . . . . . . . 21
Editor Tools node . . . . . . . . . . . . . . . . . . . . . . . . . . . . . . . . . 22
Live node . . . . . . . . . . . . . . . . . . . . . . . . . . . . . . . . . . . . . . . 23
Saving and loading display layouts . . . . . . . . . . . . . . . . . . . . . . . . 24
Menus and toolbars . . . . . . . . . . . . . . . . . . . . . . . . . . . . . . . . . . 26
Chapter 2: Starting a New Show and Patching . . . . . . . . . . . . . . . . . 27
Opening a new show file . . . . . . . . . . . . . . . . . . . . . . . . . . . . . . . 28
The Patch Manager . . . . . . . . . . . . . . . . . . . . . . . . . . . . . . . . . . . 29
Importing devices . . . . . . . . . . . . . . . . . . . . . . . . . . . . . . . . . 29
Creating and Patching Fixtures . . . . . . . . . . . . . . . . . . . . . . . . 30
Creating and patching fixtures with scrollers . . . . . . . . . . . . . . . 32
Deleting fixtures and clearing patch assignments . . . . . . . . . . . 32
Applying the patch and exiting the patch manager . . . . . . . . . . 34
Patching using console keys . . . . . . . . . . . . . . . . . . . . . . . . . . . . 35
Chapter 3: Selecting and Controlling Fixtures . . . . . . . . . . . . . . . . . . 39
About selecting fixtures and setting values . . . . . . . . . . . . . . . . . . 40
Live fixture display . . . . . . . . . . . . . . . . . . . . . . . . . . . . . . . . . . . 41
Selecting fixtures . . . . . . . . . . . . . . . . . . . . . . . . . . . . . . . . . . . . 42
Using console keys for fixture selection . . . . . . . . . . . . . . . . . . 42
Using the Editor tool bar to filter fixture selection . . . . . . . . . . . 44

iv
Storing Fixture Groups . . . . . . . . . . . . . . . . . . . . . . . . . . . . . . . . 45
Automatic groups . . . . . . . . . . . . . . . . . . . . . . . . . . . . . . . . . 45
User-defined groups . . . . . . . . . . . . . . . . . . . . . . . . . . . . . . . 47
Clearing the command line . . . . . . . . . . . . . . . . . . . . . . . . . . . . . 50
Resetting the editor . . . . . . . . . . . . . . . . . . . . . . . . . . . . . . . . . . 51
Output color code . . . . . . . . . . . . . . . . . . . . . . . . . . . . . . . . . . . . 52
Spot ignition . . . . . . . . . . . . . . . . . . . . . . . . . . . . . . . . . . . . . . . 53
Setting parameter values . . . . . . . . . . . . . . . . . . . . . . . . . . . . . . 54
Using the wheels and wheel banks . . . . . . . . . . . . . . . . . . . . . 54
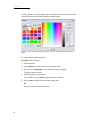
Setting values using pickers . . . . . . . . . . . . . . . . . . . . . . . . . . 57
Setting values using the keypad . . . . . . . . . . . . . . . . . . . . . . . 59
Storing Libraries . . . . . . . . . . . . . . . . . . . . . . . . . . . . . . . . . . . . 61
Automatic libraries . . . . . . . . . . . . . . . . . . . . . . . . . . . . . . . . 61
User-programmed libraries . . . . . . . . . . . . . . . . . . . . . . . . . . . 62
Using libraries for programming cues . . . . . . . . . . . . . . . . . . . . 64
Chapter 4: Programming and Updating Cues . . . . . . . . . . . . . . . . . . 67
QLists . . . . . . . . . . . . . . . . . . . . . . . . . . . . . . . . . . . . . . . . . . . . 68
Cues . . . . . . . . . . . . . . . . . . . . . . . . . . . . . . . . . . . . . . . . . . . . . 69
Storing QLists and cues . . . . . . . . . . . . . . . . . . . . . . . . . . . . . 69
Deleting cues . . . . . . . . . . . . . . . . . . . . . . . . . . . . . . . . . . . . 73
Assigning fade times to cues . . . . . . . . . . . . . . . . . . . . . . . . . . 74
Multiple QLists . . . . . . . . . . . . . . . . . . . . . . . . . . . . . . . . . . . . . . 77
Updating cues . . . . . . . . . . . . . . . . . . . . . . . . . . . . . . . . . . . . . . 79
Blind Mode . . . . . . . . . . . . . . . . . . . . . . . . . . . . . . . . . . . . . . . . 82
Using the blind editor . . . . . . . . . . . . . . . . . . . . . . . . . . . . . . . 82
Blind editing for incoming cues . . . . . . . . . . . . . . . . . . . . . . . . 83
Chapter 5: Playback . . . . . . . . . . . . . . . . . . . . . . . . . . . . . . . . . . . . . . 85
Playback devices . . . . . . . . . . . . . . . . . . . . . . . . . . . . . . . . . . . . 86
Faders . . . . . . . . . . . . . . . . . . . . . . . . . . . . . . . . . . . . . . . . . 86
Fader playback controls . . . . . . . . . . . . . . . . . . . . . . . . . . . . . 86
Fader modes . . . . . . . . . . . . . . . . . . . . . . . . . . . . . . . . . . . . . 87
Qkeys . . . . . . . . . . . . . . . . . . . . . . . . . . . . . . . . . . . . . . . . . 87
Paging faders and Qkeys . . . . . . . . . . . . . . . . . . . . . . . . . . . . 88
Loading and releasing playback devices . . . . . . . . . . . . . . . . . . . . 89
Vector Violet Playback and Q-Key functionality . . . . . . . . . . . . . . . 91
The Q-Key Mode key . . . . . . . . . . . . . . . . . . . . . . . . . . . . . . . 91
The Playback Select key . . . . . . . . . . . . . . . . . . . . . . . . . . . . . 92
The Playback/Q-Key LEDS . . . . . . . . . . . . . . . . . . . . . . . . . . . 92
Master Playback . . . . . . . . . . . . . . . . . . . . . . . . . . . . . . . . . . . . 94
Running a QList on the master playback . . . . . . . . . . . . . . . . . 94
Master playback color code . . . . . . . . . . . . . . . . . . . . . . . . . . . 95
Releasing Playback Devices . . . . . . . . . . . . . . . . . . . . . . . . . . . . . 96
Viewing the Playback Displays . . . . . . . . . . . . . . . . . . . . . . . . . . . 97
Snaps . . . . . . . . . . . . . . . . . . . . . . . . . . . . . . . . . . . . . . . . . . . . 99
Active snaps . . . . . . . . . . . . . . . . . . . . . . . . . . . . . . . . . . . . . 99
Updating snaps . . . . . . . . . . . . . . . . . . . . . . . . . . . . . . . . . . . 99
Storing a new snap . . . . . . . . . . . . . . . . . . . . . . . . . . . . . . . 101
Snap Trigger modes . . . . . . . . . . . . . . . . . . . . . . . . . . . . . . 101
Triggering snaps . . . . . . . . . . . . . . . . . . . . . . . . . . . . . . . . . 102
Temporary Cues . . . . . . . . . . . . . . . . . . . . . . . . . . . . . . . . . . . . 103

v
VECTOR
Chapter 6: Chasers, Loops, and Fans . . . . . . . . . . . . . . . . . . . . . . . . 105
Programming chasers . . . . . . . . . . . . . . . . . . . . . . . . . . . . . . . . 106
Programming loops in QLists . . . . . . . . . . . . . . . . . . . . . . . . . . . 108
Fan . . . . . . . . . . . . . . . . . . . . . . . . . . . . . . . . . . . . . . . . . . . . . 110
Setting the fan spread . . . . . . . . . . . . . . . . . . . . . . . . . . . . . 111
Fan timing . . . . . . . . . . . . . . . . . . . . . . . . . . . . . . . . . . . . . 112
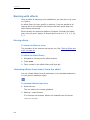
Chapter 7: Programming Effects . . . . . . . . . . . . . . . . . . . . . . . . . . . 115
About Effects . . . . . . . . . . . . . . . . . . . . . . . . . . . . . . . . . . . . . . 116
Effects editor . . . . . . . . . . . . . . . . . . . . . . . . . . . . . . . . . . . . 116
Fixture selection order . . . . . . . . . . . . . . . . . . . . . . . . . . . . . 116
Pre-built effects . . . . . . . . . . . . . . . . . . . . . . . . . . . . . . . . . . 116
Working with effects . . . . . . . . . . . . . . . . . . . . . . . . . . . . . . . . . 118
Storing effects . . . . . . . . . . . . . . . . . . . . . . . . . . . . . . . . . . . 118
Releasing effects from cues or from the editor . . . . . . . . . . . . 118
Chapter 8: Opening and Saving Show Files . . . . . . . . . . . . . . . . . . . 121
Saving Shows . . . . . . . . . . . . . . . . . . . . . . . . . . . . . . . . . . . . . 122
Opening a show file . . . . . . . . . . . . . . . . . . . . . . . . . . . . . . . . . 123
Importing objects and patch . . . . . . . . . . . . . . . . . . . . . . . . . . . 124
Chapter 9: Troubleshooting . . . . . . . . . . . . . . . . . . . . . . . . . . . . . . . 125
Vector Violet . . . . . . . . . . . . . . . . . . . . . . . . . . . . . . . . . . . . . . 125
Black Screen Problems . . . . . . . . . . . . . . . . . . . . . . . . . . . . . 125
Ultra Violet . . . . . . . . . . . . . . . . . . . . . . . . . . . . . . . . . . . . . . . 125
Main Screen Appears on 7’’ Monitor . . . . . . . . . . . . . . . . . . . . 125
The 7’’ Monitor Appears Black . . . . . . . . . . . . . . . . . . . . . . . . 126

vi
Compulite

1
VECTOR
TEXT CONVENTIONS
Text conventions
Panel KEYS are in BOLD CAPS.
Touch Screen BUTTONS are BOLD, ITALICIZED CAPS.
Dialog box captions, menus, submenus, and field names are in this font.
Command line refers to area at the bottom of the screen where the
command chain is displayed and error messages appear.
Messages and command line text are in italics.
# refers to numbers entered on the numeric keypad.
PBD stands for playback device.
SK refers to Soft Keys.
Desk, console, and system are used interchangeably.
In operation sequences, optional keys or buttons appear in
parentheses. Example: SPOT # (#) ACTIVE.
In operation sequences written in a single line, the key presses are
separated by commas. Example: SPOT, #,,#, ACTIVE
When + appears between key or button names, it means: Press
THIS (and) THAT at the same time. Example: SHIFT + FREE.
Generally used in conjunction with shift pairs.
The term Tap is to be understood as referring to touch screen
buttons. Tap and click may be used interchangeably.
Cells refer to the smallest information unit, such as one parameter
of a moving device.
Tip! The online manual is available through the Vector help menu.

2
Compulite

3
Chapter 1 Setting Up and Overview
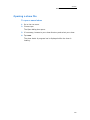
In this chapter you learn about:
Setting up and turning on Vector
Vector Violet - Configuring a DVI Monitor as the Primary Display
Operation modes and syntax
About the user interface
Basic display layout
Using the trackball as a pointer device
Using the vertical wheel as a scroll wheel
Setting up displays
Setting up soft keys
Using the Workspace tree
Menus

4
Compulite
Chapter 1
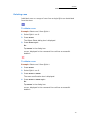
Setting up Vector
1. Place the console on a clean, stable, and level surface.
2. Make sure the voltage selection switch, located on the power supply,
is correctly set to 230V AC or 110V AC.
3. Connect the Vector to the mains supply using the cable supplied.
4. Connect any peripherals to their connectors on the back panel. All
connectors are labeled with names and standard icons.
5. Switch on the power, using the switch located on the power supply
on Vector’s back panel. The soft switch located on the front of the
console is lit.
6. Open the door protecting the soft switch, on the front of the
console, and press the switch once. Wait for Vector to complete boot
up.
7. Connect the DMX cables to the appropriate ports.
IMPORTANT! It is strongly recommended to use a UPS (minimum
600VA) to protect your work and the console.
To shutdown Vector
1. Press the soft switch located on the front of the console.
2. Tap Turn Off in the Turn Off Computer dialog box.
Vector shuts down.

5
VECTOR
SETTING UP AND OVERVIEW
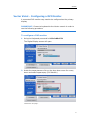
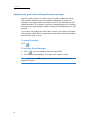
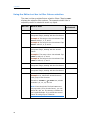
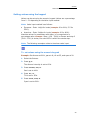
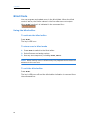
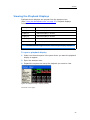
Vector Violet - Configuring a DVI Monitor
A connected DVI monitor may need to be configured as the primary
display.
IMPORTANT! Connect a keyboard to the Vector console in order to
use the following procedure.
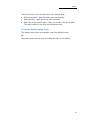
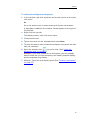
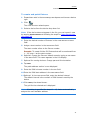
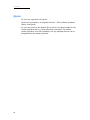
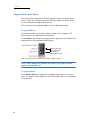
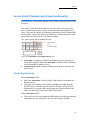
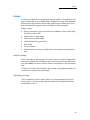
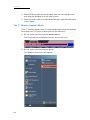
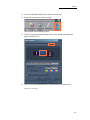
To configure a DVI monitor
1. Using the Keyboard press and hold Ctrl+Alt+F12.
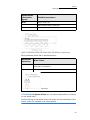
The Digital Display screen will open:
2. Under the Display Selection click on the drop down menu for Primary
Device and select Digital Display. (DVI Monitor)
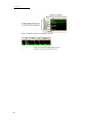
Continued on next page...

6
Compulite
Chapter 1
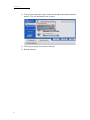
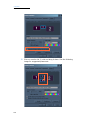
3. Click on the drop down menu under Operating Mode and select Extended
Desktop. This will activate all the screens.
4. Click Apply to apply the monitor settings.
5. Reboot System.

7
VECTOR
SETTING UP AND OVERVIEW
Vector operation modes and programming syntax
Vector has two operation modes:
Track ing mode
Compulite mode
Vector offers two syntaxes for programming procedures.
Action syntax
Enter syntax
The operation mode and programming syntax are set in the System
Settings dialog boxEditing tab.
Tracking mode operation
In tracking mode, Vector stores only the changes or moves from one
cue to the next. Parameter levels that do not change are tracked
through cues following the cue where the level was originally set. Levels
that are being tracked are not stored again in each cue. Thus there are
two types of parameter values:
Hard values (new or changed values) - values that are stored in the
current cue.
Tracked values - unchanged values that are tracked from an earlier
cue.
After storing a cue, the editor is released.
Sometimes you want to cancel all tracking values, for instance, when
starting a new scene. Block cues are used to reset the tracking,Vector
automatically maintains the cue state when playing back cues out of
sequence, as often happens during rehearsals.
Compulite mode operation
Compulite mode is a cue only mode, where all fixtures and values that
comprise the lighting state are stored in each cue.
The editor is not released after storing a cue. You can continue
programming cues based on the editor group or reset the editor.
See:“Resetting the editor” on page 51.

8
Compulite
Chapter 1
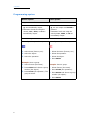
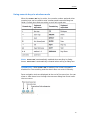
Programming syntax
Action syntax Enter syntax
Output convention
• Parameter levels that are set using
@, are immediately output.
• Parameter levels set using the
wheels, FULL, ZERO, or ON are
immediately output.
• Parameter levels that are set using
@, are not output until ENTER is
pressed.
• Parameter levels set using the
wheels, FULL, ZERO, or ON are
immediately output.
Procedure syntax
Generally, action procedure syntax is:
1. Select items (fixtures, etc).
2. Select the object.
3. Select the operation.
Example: Store a group.
1. Select fixtures (the items).
2. Press GROUP and choose a group
number (the object).
3. Press STORE (the operation). The
group is stored.
Generally, enter procedure syntax is:
1. Select the items (fixtures, etc.).
2. Select the operation.
3. Select the object.
4. Press ENTER.
Example: Store a group.
1. Select fixtures (the items).
2. Press STORE (the operation).
3. Press GROUP and choose a group
number (the object).
4. Press ENTER.

9
VECTOR
SETTING UP AND OVERVIEW
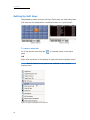
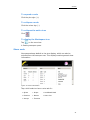
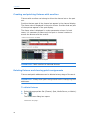
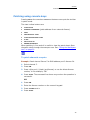
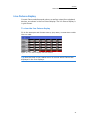
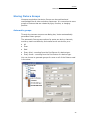
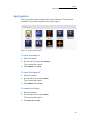
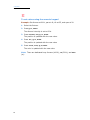
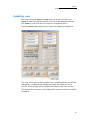
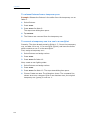
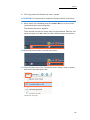
Basic display layouts
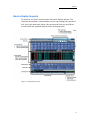
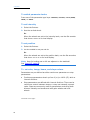
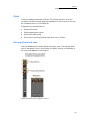
On start up, the touch screens open with basic display layouts. The
layouts are completely customizable and you can change the layouts to
suit your show and work habits. We recommend that you familiarize
yourself with the supplied layouts before changing them.
Figure 1: Typical basic layout

10
Compulite
Chapter 1
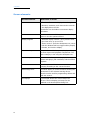
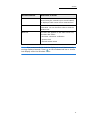
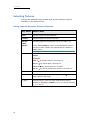
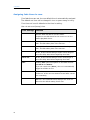
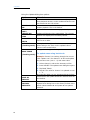
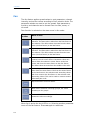
Screen elements
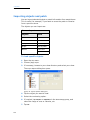
Screen element What does it show?
Window title bar • The show file name is displayed on the right.
• Minimize, maximize, and close window controls
are displayed on the left.
The title bar can be hidden to maximize display
real estate.
Menu bar Seven menus are available on the menu bar. Tap a
menu to view the options offered.
Display navigation • Standard display controls: go to previous view,
go to last view, go up on level.
• Vector icons to: open the Workspace tree, show/
hide the Window title bar, toggle soft key display
formats, and lock the display.
Tabs for soft keys Tabs, which are added to panes, display soft keys
for show objects and playback components. The
object category is set using the Workspace tree.
Tabs for displays Current status of output on the playback wings
(faders and QKeys), AB crossfader, and the master
playback.
Editor tool bar Vector’s system tool bar is context sensitive,
changing according to the current function.
Wheel Assignments The wheel display is context sensitive showing the
parameters for the selected moving device.
Wheels are also used for programming effects and
fade rate control.
Live displays A grid format shows the current output for
fixtures. The live display grid setup can be
modified in the Grid Properties dialog box.

11
VECTOR
SETTING UP AND OVERVIEW
Note: It is recommended to lock the displays to avoid inadvertently
moving display elements. Press on the windows tool bar or choose
Lock Display under the Windows menu.
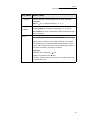
Command line The command line is the area where commands,
entered using the console keys or touch buttons,
are displayed. Each screen has a command line.
Indications bar The Indications bar shows system status
information. You can choose to show or hide the
Indications bar.
Status bar The status bar appears on the main screen only.
The status bar shows:
• Real time connection verification
•System clock
• General master status
Screen element What does it show?

12
Compulite
Chapter 1
Pointing and navigating
Vector's user interface will be familiar to computer users (and that is
just about everyone).
Menus, toolbars, file trees, and dialog boxes make it easy to find your
way around and get things done.
Your pointing device can be an external mouse, connected at the mouse
port on the back panel, or the trackball set to mouse function.
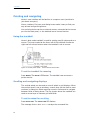
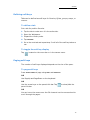
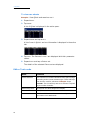
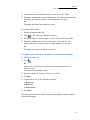
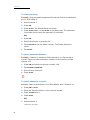
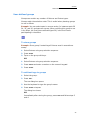
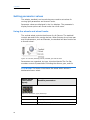
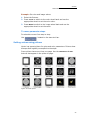
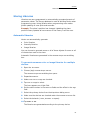
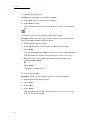
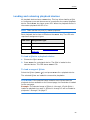
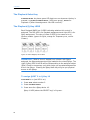
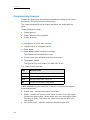
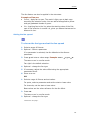
Using the trackball
Vector's dual mode trackball is used for setting pan/tilt values and as a
mouse. The keys located at the lower left of the trackball function as
right and left mouse buttons when the trackball is set to mouse.
Figure 2: Console panel detail - Vector Red and Vector Blue
To set the trackball for mousing
Press MOUSE. The MOUSE LED flashes. The trackball now serves as a
pointer device.
Scrolling and navigating displays
The vertical wheel can be used as a scroll wheel in grid displays. When
the vertical wheel is set to windows, console keys can be used to enter
numbers in dialog box fields requiring numeric entries and to navigate
between fields in dialog boxes. The key cluster above the trackball are
used as arrow keys to traverse grid and fields.
To set the wheel for scrolling
Press SCROLL WIN. The SCROLL WIN LED flashes.
The message Windows Mode Active!!! overlays the command line.

13
VECTOR
SETTING UP AND OVERVIEW
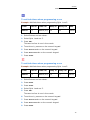
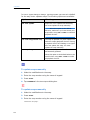
Using console keys in window mode
When the SCROLL WIN key is active, the console number pad and other
console keys can be used to enter numbers and traverse dialog box
fields. Console keys that are active in scroll win mode are:
Note: SCROLL WIN is automatically enabled when working in dialog
boxes. SCROLL WIN is automatically released when exiting a dialog box.
IMPORTANT! When SCROLL WIN is enabled, the numeric keypad is
disabled for fixture editing and the wheel does not control intensity.
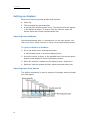
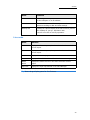
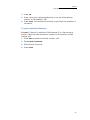
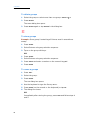
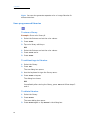
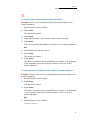
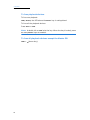
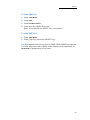
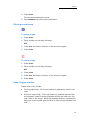
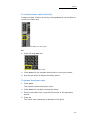
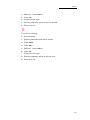
Pane navigation tools are displayed at the end of the menu bar. You can
show or hide these icons through the Customize dialog box found under
the Too ls menu.
Figure 3: Basic pane navigation

14
Compulite
Chapter 1
Setting up displays
Each screen has one general window that includes:
Menu bar
The command line and status bar.
A title bar with window control icons. The title bar does not appear
in the default windows. To show or hide the title bar: Open the
Window menu and choose Show/Hide Window Title.
Opening new windows
New windows always open, in reduced size, on the main screen. You
then move them, using a mouse or stylus, to an empty display screen.
To open and place a window:
1. Go to the Window menu and tap New Window.
A new window opens on the main display screen.
2. Using the mouse, a stylus, or the trackball set to the mouse option,
drag the new window to one of the display screens.
3. When the window is located on the display screen, maximize it.
4. Optional: hide the window title bar: Window>Show/hide window Title.
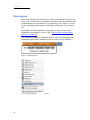
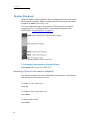
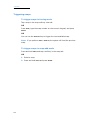
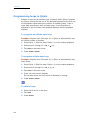
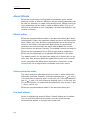
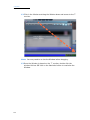
Opening new view panes
The splitter mechanism is used to segment the display area and create
new view panes.
Figure 4: Display Setup toolbar
Page is loading ...
Page is loading ...
Page is loading ...
Page is loading ...
Page is loading ...
Page is loading ...
Page is loading ...
Page is loading ...
Page is loading ...
Page is loading ...
Page is loading ...
Page is loading ...
Page is loading ...
Page is loading ...
Page is loading ...
Page is loading ...
Page is loading ...
Page is loading ...
Page is loading ...
Page is loading ...
Page is loading ...
Page is loading ...
Page is loading ...
Page is loading ...
Page is loading ...
Page is loading ...
Page is loading ...
Page is loading ...
Page is loading ...
Page is loading ...
Page is loading ...
Page is loading ...
Page is loading ...
Page is loading ...
Page is loading ...
Page is loading ...
Page is loading ...
Page is loading ...
Page is loading ...
Page is loading ...
Page is loading ...
Page is loading ...
Page is loading ...
Page is loading ...
Page is loading ...
Page is loading ...
Page is loading ...
Page is loading ...
Page is loading ...
Page is loading ...
Page is loading ...
Page is loading ...
Page is loading ...
Page is loading ...
Page is loading ...
Page is loading ...
Page is loading ...
Page is loading ...
Page is loading ...
Page is loading ...
Page is loading ...
Page is loading ...
Page is loading ...
Page is loading ...
Page is loading ...
Page is loading ...
Page is loading ...
Page is loading ...
Page is loading ...
Page is loading ...
Page is loading ...
Page is loading ...
Page is loading ...
Page is loading ...
Page is loading ...
Page is loading ...
Page is loading ...
Page is loading ...
Page is loading ...
Page is loading ...
Page is loading ...
Page is loading ...
Page is loading ...
Page is loading ...
Page is loading ...
Page is loading ...
Page is loading ...
Page is loading ...
Page is loading ...
Page is loading ...
Page is loading ...
Page is loading ...
Page is loading ...
Page is loading ...
Page is loading ...
Page is loading ...
Page is loading ...
Page is loading ...
Page is loading ...
Page is loading ...
Page is loading ...
Page is loading ...
Page is loading ...
Page is loading ...
Page is loading ...
Page is loading ...
Page is loading ...
Page is loading ...
Page is loading ...
Page is loading ...
Page is loading ...
Page is loading ...
Page is loading ...
Page is loading ...
Page is loading ...
Page is loading ...
-
 1
1
-
 2
2
-
 3
3
-
 4
4
-
 5
5
-
 6
6
-
 7
7
-
 8
8
-
 9
9
-
 10
10
-
 11
11
-
 12
12
-
 13
13
-
 14
14
-
 15
15
-
 16
16
-
 17
17
-
 18
18
-
 19
19
-
 20
20
-
 21
21
-
 22
22
-
 23
23
-
 24
24
-
 25
25
-
 26
26
-
 27
27
-
 28
28
-
 29
29
-
 30
30
-
 31
31
-
 32
32
-
 33
33
-
 34
34
-
 35
35
-
 36
36
-
 37
37
-
 38
38
-
 39
39
-
 40
40
-
 41
41
-
 42
42
-
 43
43
-
 44
44
-
 45
45
-
 46
46
-
 47
47
-
 48
48
-
 49
49
-
 50
50
-
 51
51
-
 52
52
-
 53
53
-
 54
54
-
 55
55
-
 56
56
-
 57
57
-
 58
58
-
 59
59
-
 60
60
-
 61
61
-
 62
62
-
 63
63
-
 64
64
-
 65
65
-
 66
66
-
 67
67
-
 68
68
-
 69
69
-
 70
70
-
 71
71
-
 72
72
-
 73
73
-
 74
74
-
 75
75
-
 76
76
-
 77
77
-
 78
78
-
 79
79
-
 80
80
-
 81
81
-
 82
82
-
 83
83
-
 84
84
-
 85
85
-
 86
86
-
 87
87
-
 88
88
-
 89
89
-
 90
90
-
 91
91
-
 92
92
-
 93
93
-
 94
94
-
 95
95
-
 96
96
-
 97
97
-
 98
98
-
 99
99
-
 100
100
-
 101
101
-
 102
102
-
 103
103
-
 104
104
-
 105
105
-
 106
106
-
 107
107
-
 108
108
-
 109
109
-
 110
110
-
 111
111
-
 112
112
-
 113
113
-
 114
114
-
 115
115
-
 116
116
-
 117
117
-
 118
118
-
 119
119
-
 120
120
-
 121
121
-
 122
122
-
 123
123
-
 124
124
-
 125
125
-
 126
126
-
 127
127
-
 128
128
-
 129
129
-
 130
130
-
 131
131
-
 132
132
-
 133
133
-
 134
134
-
 135
135
-
 136
136


