Note: This bulletin contains only a general description
of the products shown. While uses and performance
capabilities are described, under no circumstances
shall the products be used by untrained or unqualified
individuals and not until the product instructions
including any warnings or cautions provided have
been thoroughly read and understood.
Only they contain the complete and
detailed information concerning proper
use and care of these products.
ID 0600-37-MC / Dec. 2010
© MSA 2010 Printed in U.S.A.
Corporate Center
1000 Cranberry Woods Drive,
Cranberry Township, PA 16066 USA
Phone 412-967-3000
www.MSAnet.com
U.S. Customer Service Center
Phone 1-800-MSA-2222
Fax 1-800-967-0398
MSA Canada
Phone 1-800-672-2222
Fax 1-800-967-0398
MSA Mexico
Phone 01 800 672 7222
Fax 52-44 2227 3943
MSA International
Phone 412-967-3354
FAX 412-967-3451
Offices and representatives worldwide
For further information:
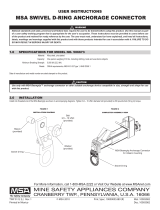
Inspection:
Before and after each use, inspect the helmet for
wear and damage:
Shell
• Inspect the shell for breakage, cracks, craze
pattern, discoloration, chalky appearance, or
any other unusual condition.
• If any of these conditions exist, replace shell
immediately, as these conditions can indicate
that helmet has lost its capacity to protect
from impact, penetration, and/or electrical
shock.
Suspension
• Check suspension for loss of exibility.
• Check suspension for cracks, breaks, frayed
straps, or damaged stitching.
• If any of these conditions exist, replace
suspension before wearing helmet.
Helmet Care:
• Clean helmet assembly regularly with MSA’s
Condence Plus® Cleaning Solution (P/Ns
10009971 or 10032737) or mild soap (no
detergents) and warm water.
• Helmets must be cleaned regularly in order to
be adequately inspected. A clean suspension
also helps to oset skin irritation.
• Do not throw, drop, or use helmet as support.
As with any piece of specialized equipment,
this helmet must not be abused.
• Store helmet in clean, dry environment, not
over 49° C (120°F).
Useful Service Life Guidelines:
This helmet was made with high-quality, wear-
resistant materials, but it will not last forever.
Inspect your helmet before and after each use and
replace any part(s) as required. Always replace your
helmet after it has withstood an impact or
penetration. As the manufacturer of your helmet,
we recommend that you replace the following:
• Suspension - replace after no more than
12 months of use.
• Shell - replace after no more than ve years
of use.
Warning:
Failure to follow these warnings can result in
serious personal injury or death.
• This helmet provides limited impact and
penetration protection to top of head.
• This helmet is not specically designed to
protect against front, side, or rear (that is,
“lateral”) blows.
• As an Industrial Protective Type I helmet, this
helmet should be eective against small tools,
bolts, rivets, and similar hazards. Some
conditions can exceed this helmet’s capacity to
protect against serious injury or death. Avoid
areas where chance of severe impact or
penetration exists.
• CLASS E and G helmets provide limited
electrical protection as outlined in ANSI/ISEA
Z89.1-2009 and CSA Z94.1-2005. Class C
helmets provide no electrical protection.
• This helmet must t securely on head to
provide maximum protection.
• Never store gloves, cigarettes, earplugs,
etc., between suspension and helmet shell,
as objects in this space can transmit large
forces to head and neck resulting in serious
injury or death.
• Never use this helmet as a vehicular or
sports helmet.
• Never alter or modify this helmet in any way.
• Never use paint, solvents, or hydrocarbon-type
cleaners (M.E.K., thinner, gasoline, kerosene)
on this helmet, as these substances may cause
unnoticeable damage.
Figure 4 Figure 7Figure 6Figure 5
Adjusting Fas-Trac, Staz-On, or 1-Touch Suspensions (4- and 6-point models):
• For Fas-Trac Suspensions, turn knob counter-clockwise to open ratchet
band to its maximum size. Turn knob clockwise to tighten and t (Figure 4).
• For Staz-On Suspensions, tighten nape strap while sliding tab to your left
until headband ts comfortably (Figure 5 & 6).
• For 1-Touch Suspensions, squeeze lock on nape strap to loosen, and
squeeze nger tabs together to tighten (Figure 7 & 8).
Place helmet on your head and push down on its top until headband and
shell are at comfortable height. Be sure to leave air space between your head
and helmet crown; your head should not touch crown. Air space provides a
shock cushion to help protect your head.
Figure 8