Grandstream Networks GXP1625 Installation guide

Type
Installation guide

This manual is also suitable for

Grandstream Networks, Inc.
126 Brookline Ave, 3rd Floor
Boston, MA 02215 USA
Tel : +1 (617) 566 – 9300
Fax: +1 (617) 249 – 1987
www.grandstream.com
For Warranty and RMA information, please visit
www.grandstream.com
GXP1620/1625
Small Business HD IP Phone
Quick Installation Guide
GXP1620/1625 is a Small Business HD IP phone that fea-
tures 2 lines with 2 SIP accounts, 132x48 backlit graphical
LCD, 3 XML programmable context-sensitive soft keys, dual
network ports with PoE (GXP1625 only) and 3-way confer-
ence. The GXP1620/1625 delivers HD wideband audio,
superb full-duplex hands-free speakerphone with advanced
acoustic echo cancellation, advanced security protection for
privacy, and compatible with Grandstream UCM Features.
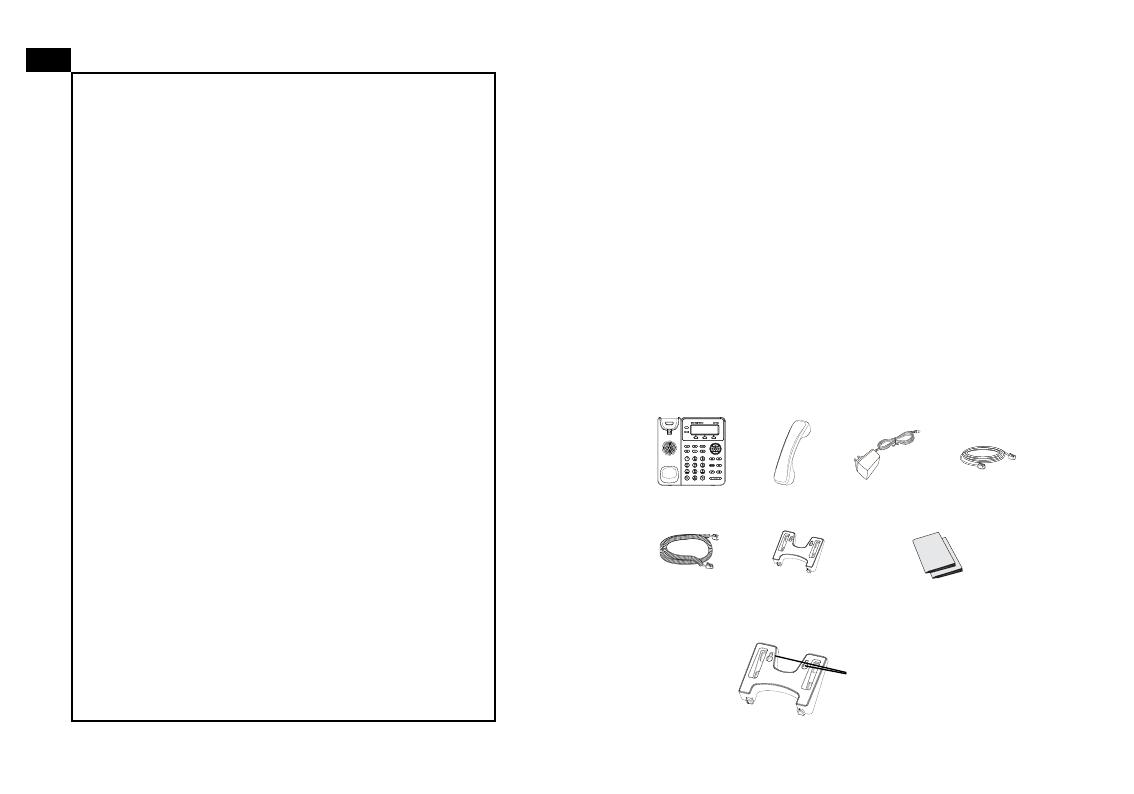
PACKAGE CONTENTS:
OVERVIEW:
WARNING:
Please DO NOT power cycle the GXP1620/1625
when the LED lights are ashing during system boot up or
rmware upgrade. You may corrupt rmware images and
cause the unit to malfunction.
PRECAUTIONS:
WARNING:
Use only the power adapter included in the
GXP1620/1625 package. Using an alternative non-qualied
power adapter may possibly damage the unit.
The GXP1620/1625 is not pre-congured to sup-
port or carry emergency calls to any type of hospital,
law enforcement agency, medical care unit (“Emer-
gency Service(s)”) or any other kind of Emergency
Service. You must make additional arrangements to
access Emergency Services. It is Your responsibility
to purchase SIP-compliant Internet telephone ser-
vice, properly congure the GXP1620/1625 to use
that service, and periodically test your conguration
to conrm that it works as You expect. If You do not
do so, it is Your responsibility to purchase traditional
wireless or landline telephone services to access
Emergency Services.
GRANDSTREAM DOES NOT PROVIDE CON-
NECTIONS TO EMERGENCY SERVICES VIA THE
GXP1620/1625. NEITHER GRANDSTREAM NOR
ITS OFFICERS, EMPLOYEES OR AFFILIATES MAY
BE HELD LIABLE FOR ANY CLAIM, DAMAGE, OR
LOSS, AND YOU HEREBY WAIVE ANY AND ALL
SUCH CLAIMS OR CAUSES OF ACTION ARISING
FROM OR RELATING TO YOUR INABILITY TO USE
THE GXP1620/1625 TO CONTACT EMERGENCY
SERVICES, AND YOUR FAILURE TO MAKE AD-
DITIONAL ARRANGEMENTS TO ACCESS EMER-
GENCY SERVICES IN ACCORDANCE WITH THE
IMMEDIATELY PRECEDING PARAGRAPH.
EN
1 2
1 x Phone Main
Case
1 x Handset
1 x Phone Cord
1 x Ethernet
Cable
1 x Phone Stand
1 x 5V Power
Adapter
1 x Quick Installation Guide /
1 x GPL License
5 V
PHONE SETUP:
Wall mount holes
are available on
stand
To setup the GXP1620/1625, follow the steps below:
1. Connect the handset and main phone case with the
phone cord.
2. Connect the LAN port of the phone to the RJ-45 socket
of a hub/switch or a router (LAN side of the router) using the
Ethernet cable.
3. Connect the 5V DC output plug to the power jack on the
phone; plug the power adapter into an electrical outlet.
4. The LCD will display provisioning or rmware upgrade in-
formation. Before continuing, please wait for the date/time
display to show up.
5. Using the phone embedded web server or keypad con-
guration menu, you can further congure the phone using
either a static IP or DHCP.
4
CONNECTING THE PHONE:
Tips For Using the Keypad:
Line Key
Message Waiting
Indicator
Message
Standard Keypad
Phonebook
Page/Intercom
Home Button
Hold
Softkey
Menu/OK key
Navigation keys
Record
Headset
Speaker
Volume
Send
Transfer
Mute
Conference
1. To access the MENU, press the round MENU button.
2. Navigate the menu by using the UP/DOWN and LEFT/
RIGHT buttons.
3. Press the round MENU button to conrm a menu selec-
tion.
4. The phone automatically exits MENU mode when there
is an incoming call, the phone goes off-hook, or when the
MENU mode is left idle for 60 seconds.
3
Installing the Phone (Phone Stand):
1. Insert the hooks on top of the stand into a slots, you have options
to use either upper OR lower slots.
2. Firmly slide the stand upward to lock it in place.
Installing the Phone (Wall Mount):
UPPER
LOWER
OR
1. Insert all 4 hooks located in the front of wall mount into the slots.
2. Firmly slide the wall mount upward to lock it in place.
3. Pull out and rotate the tab from handset rest to hold the handset
while the phone is mounted on the wall.
LAN Port
Power
Handset Port
PC Port Headset Port
Note: For the detailed user manual, please download from:
http://www.grandstream.com/support
1. Make sure the phone is idle.
2. Press the MENU button to access the keypad MENU to
congure the phone.
3. Select MENU->Cong, to congure settings for SIP Proxy,
Outbound Proxy, SIP User ID, SIP Auth ID and SIP Pass-
word.
4. Follow MENU options to congure the basic features of
the phone. For example: the IP address if using a static IP.
For details, please check GXP1620/1625 User Manual.
5. Please contact your ITSP (Internet Telephony Service
Provider) for additional settings that may be necessary to
congure the phone.
5. The default administrator username and password are
“admin”; the default end-user username is “user“ and the
password is “123”.
Congure the GXP1620/1625 using the Keypad:
5
6
GXP1620/1625不预设对医院,执法机构,医
疗中心(急救服务)以及各种紧急服务的紧急通话
服务。用户必须自行设定紧急通话功能。用户必
须自行购买SIP兼容的网络电话服务,正确地设
定GXP1620/1625使用该服务,并定期测试您
的配置以确保GXP1620/1625如预期工作,否
则请购买传统无线或有线电话服务来拨打紧急通
话。
Grandstream Networks 公司的GXP1620/1625
不支持紧急通话服务。Grandstream Networks
公司、其管理者和员工以及其相关机构对此所造
成的任何索赔、损失或者损害都不负有任何法律
追究责任。在此,您将无权对任何以及所有由于
无法通过GXP1620/1625拨打紧急电话以及没
有遵照前段文字描述而造成紧急通话失败的事件
提出诉讼。
ZH
1. Ensure your phone is powered up and connected to the
Internet.
2. Press MENU button to go into menu of the phone.
3. Press the “down” arrow button to “Status” and press
MENU button to check the IP address.
4. Type the phone’s IP address in your PC browser. (See
gure below).
PHONE CONFIGURATION:
Congure the GXP1620/1625 Using Web Browser:
GXP1625 is covered by one or more of the U.S. patents
(and any foreign patent counterparts thereto) identied at
www.cmspatents.com.
  • Page 1 1
  • Page 2 2
  • Page 3 3
  • Page 4 4
  • Page 5 5
  • Page 6 6
  • Page 7 7
  • Page 8 8
  • Page 9 9
  • Page 10 10
  • Page 11 11
  • Page 12 12
  • Page 13 13
  • Page 14 14
  • Page 15 15
  • Page 16 16
  • Page 17 17
  • Page 18 18
  • Page 19 19
  • Page 20 20
  • Page 21 21
  • Page 22 22
  • Page 23 23
  • Page 24 24
  • Page 25 25

Grandstream Networks GXP1625 Installation guide

Type
Installation guide
This manual is also suitable for

Ask a question and I''ll find the answer in the document

Finding information in a document is now easier with AI