Design House 545889 Installation guide
- Category
- Faucets
- Type
- Installation guide

INSTALLATION PROCEDURE
1. Shut off hot and cold water supplies under sink. Plug sink drain with cloth to avoid losing small
parts. Remove old faucet.
7. Attach sprayer hose to adapter on copper pipe. Hold hose fitting tight
while turning adapter in a clockwise direction. Use two wrenches to avoid
twisting pipe. Use plumber's tape on all male threads. BE SURE WATER
SUPPLY LINE DOES NOT INTERFERE WITH SPRAY HOSE.
10. Attach spray wand,
hand tighten and turn
water on. CHECK ALL
HOOKUPS FOR LEAKS.
11. Attach metal counterweight
to the sprayer hose by placing
the two halves together using
the 2 screws provided. Adjust
the position of the weight as
desired to prevent hose kinking
and to facilitate hose retraction.
8. Attach new or existing water supply hose to the hot and cold inlet fittings
on the faucet. Cone washers and supply nuts have been included with this
faucet for your convenience. Refer to specific manufacturer's
recommendations when installing water supply hoses to your new faucet.
9. Pull sprayer hose out of spout and hold into sink. Flush both water lines
by turning handle to a full mixed position, allowing water to run for one
minute.
3. Position faucet assembly over sink top, carefully feeding supply tubes
through the hole in the sink. Make certain the supply hose indicated HOT
is positioned on the left side. Position the swivel spout and handle so that
they are properly centered over the sink.
4. Thread mounting bolts to bottom of deck plate through key-hole slots
located on gasket. Slide cover plate onto bottom of faucet. Secure with
rubber washer and locknut. Attach faucet assembly to sink by threading
on plastic wing nuts and tightening. PROCEED TO STEP 7.
ONE HOLE SINK INSTALLATION
5. Install collar to faucet.
6. Position faucet assembly over sink top,
carefully feeding supply hoses through hole
in sink. Make sure the supply hose
indicated HOT is positioned on left side.
Position swivel spout and handle so that
they are properly centered over sink. Place
rubber washer and thread locknut onto
mounting body and tighten locknut with
supplied socket wrench.
INSTALLATION PROCEDURE
THREE HOLE SINK INSTALLATION
(Proceed to step 6 for one hole installation)
2. Fit gasket onto bottom of deck plate.
HOT
5
6
9
10
11
2
7,8
Design House is a registered
brand of DHI Corp.
Mequon, WI 53092
1-800-558-8700
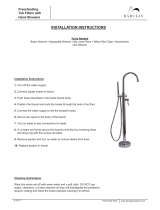
MILANO SINGLE
HANDLE PULL-OUT
KITCHEN FAUCET
For Single Hole or Tri Hole Sinks
Models 545889, 545871, 545897
HOT
COLD
COMPLETED
ASSEMBLY
TROUBLE SHOOTING
Problem: Faucet leaks from under handle.
Cause: Adjusting ring or cap nut is loose.
Action:
1. Remove handle by loosening set screw with
allen wrench.
2. Tighten the adjusting ring by turning it
clockwise with a small screwdriver. Move ball
stem to the on position and continually tighten
the adjusting ring until the leak stops draining
out from around the ball stem.
3. If the leak does not stop, loosen the adjusting
ring and tighten the entire cap assembly by
turning it clockwise. Retighten the adjusting ring
as before.
4. Replace the handle and tighten the set screw.
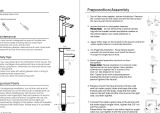
Many of these
parts come
preassembled.
This exploded
diagram is to
assist in trouble
shooting.
Problem: Faucet leaks around aerator or has an
improper flow pattern.
Cause: Aerator incorrectly fitted or dirty.
Action:
1. Unscrew the aerator. Make sure all internal
parts are laying flat.
2. If there is debris, gently flush all parts inside.
3. Reinstall aerator.
Problem: Water does not completely shut off.
Cause: Rubber valve seat is dirty or worn or
adjusting ring or cap has loosened.
Action:
1. Turn off the water under the sink.
2. Remove handle by removing hot/cold indicator
and loosening set screw with allen wrench.
3. Unscrew the cap nut. Remove the cam assembly
and ball assembly.
4. Inspect the two rubber valve seats for debris or
damage. Replace if necessary.
5. Push the rubber seats and springs back in with
smaller ends up. Take care when replacing the
metal ball to align the metal peg on the side of the
body with the oblong slot on the ball.
6. Reassemble the faucet taking care to fit the small
alignment tab on the cam into the slot. Make sure
cap nut is tight and fits flush with faucet body before
reattaching handle.
7. Retighten the adjusting ring. Replace the handle
and tighten the set screw.
8. Turn on the water under the sink.
MAINTENANCE
Your new Design House faucet is designed to give you years of trouble free performance. Keep it looking new by cleaning
it periodically with a soft cloth. Avoid abrasive cleaners, steel wool and harsh chemicals that will dull the finish and void
your warranty.
Brass finishes are polished, then protected with a lacquer coating to help prevent tarnishing. Clean these surfaces only
with a damp, soft cloth.
CONSUMER PROTECTION WARNING
Under the Safe Drinking Water Act, the U.S. Environmental Protection Agency restricts the amount of lead used
in brass and solder. Your new faucet is made in strict compliance with all government standards. The materials
used in the manufacture of this faucet are of industry standard quality and are similar to other plumbing
products having brass fittings.
To reduce the amount of lead in your drinking water, allow the water to run for a moment before filling your glass
and remember to always use cold water for drinking purposes.
Handle
Screw
Color button
Cover
Adjusting nut
Block
Ball valve seal
Ball valve
Sealing gasket
Sealing Spring
Bush
Tee
Extraction shower head
Check valves
Sprayer hose
Washer
Washer
Compling nut
Body
Snap ring
O-ring
O-ring
Threaded pipe
Washer
Comling nut
Screw
Flange
Washer
Hose
Hose
Clump weight
Pin
Escutcheon
Gasket
Bolt
Compling nut
3,4
HOT
Your new Design House faucet will give you years of trouble free performance. Thank you for
choosing our product for your home. Please read all of these instructions carefully before
installing your new faucet.
Helpful tools to install this faucet:
IMPORTANT POINTS
When installing your new faucet, hand tighten the connector nuts, then use one wrench to
anchor the fitting and a second wrench to tighten the nut one additional turn. Connections that are
too tight will reduce the integrity of the system.
Wrap all threaded connections (except aerator thread in spout) with Teflon tape available from
your local hardware or plumbing supply store. Always wrap in a counter-clockwise direction.
If replacing an old faucet: Prior to installation, turn off the cold and hot water lines and open the
old faucet to release built up pressure. Then cut both water supply pipes approximately 15" below
the bottom of the old faucet taking care that pipes remain circular. Remove burrs or rough edges
from cut ends with fine grit sandpaper.
SAFETY TIPS
ALWAYS protect your eyes with safety glasses when cutting supply lines.
basin wrench
Teflon tape
(2) crescent wrenches
silicon sealer
flashlight
faucet supply tubes
-
 1
1

Design House 545889 Installation guide
- Category
- Faucets
- Type
- Installation guide
Ask a question and I''ll find the answer in the document
Finding information in a document is now easier with AI
Related papers
-
Design House 584037 User manual
-
-
-
-
-
-
-
-
-
Other documents
-
ISPRING L8110BN Installation guide
-
 Barclay Products 7922-ORB Installation guide
-
-
Fontaine 81H13-BN-SDO Installation guide
-
Ancona AN-4355 Installation guide
-
ANZZI KAZ36203AS-102 Installation guide
-
 Boyel Living RB0707 Installation guide
-
Ultra Faucets 15720493 Installation guide
-
ANZZI K36203A-044 Operating instructions
-

