Page is loading ...

2 VELUX
®
ENGLISH: Index
Page 2 Important installation requirements
Page 5 Warnings
Pages 7-8 Planning
Pages 9-10 Installing underlayment
Page 11 Flashing
Page 12 Mounting skylight
Pages 13-14 Electrical connection (VCE only)
ESPAÑOL: Índice
Página 3 Requisitos importantes de instala-
ción
Página 5 Advertencia
Páginas 7-8 Planificación
Páginas 9-10 Instalación de la lámina de soporte
Página 11 Tapajuntas
Página 12 Montaje del tragaluz
Páginas 13-14 Conexión eléctrica
(VCE solamente)
FRANÇAIS : Index
Page 4 Spécifications d'installation impor-
tantes
Page 5 Avertissement
Pages 7-8 Planification
Pages 9-10 Installation de la membrane de
toiture
Page 11 Solin
Page 12 Installation du puits de lumière
Pages 13-14 Connexion électrique
(VCE seulement)
ENGLISH: Installation check list
Installer should verify:
• Curb mounted skylights VCM/VCE are installed on roof pitches from 0° to
60°.
• Skylight curb is constructed correctly according to dimensions in these
installation instructions.
• Skylight/skylight curb is properly wrapped in VELUX adhesive skylight
underlayment according to installation instructions supplied with skylight,
flashing or underlayment.
• Proper VELUX flashing for the actual roofing material is installed accord
-
ing to installation instructions supplied with the flashing.
• Curb mounted skylight is properly secured to curb and installed over all
flashing on the skylight curb.
• Skylight and accessories operate properly.
• Customer is informed of the required maintenance of the product as
found at www.velux.com.
• Customer is informed of the warranty claim procedure. For full VELUX
warranty, go to www.velux.com.
IMPORTANT: Failure to install the skylight, flashing and blinds in strict ac
-
cordance with these VELUX instructions shall void the VELUX warranty.
Important installation requirements
Roof pitch
Skylights VCM/VCE are designed for roof pitches 0° - 60° (0:12 - 21:12).
VELUX "No Leak" installation warranty applies only to VELUX curb
mounted skylights VCM/VCE with VELUX flashing ECL properly installed
on roof pitches 10° - 60° or VELUX flashing ECW properly installed on roof
pitches 14° - 60°.
Special consideration for applications below roof pitch 15°:
• Any condensation that forms on the glass due to high humidity may
drip.
• Standing water and dirt left on the glass may over time cause smudging
and corrosion of the glass.
Neither of the two above stated occurrences are covered under the VELUX
warranty.
Importance of proper installation
Satisfactory product performance depends on proper installation.
Seller accepts no responsibility whatsoever for failure of an installer to
install VELUX
®
roof windows and skylights in accordance with these
installation instructions. Although VELUX roof windows and skylights are
designed and manufactured to the highest standards, severe climatic ex
-
posure as well as adverse indoor conditions (ie high humidity) may produce
temperature conditions which exceed product performance standards. In
these cases, special preventive measures may be necessary.
Seller reserves the right to implement product changes for improvement
without prior notification.
Operation and accessories
VCM: Curb mounted skylight VCM is designed for manual operation and
prepared for solar accessories.
VCE: Curb mounted skylight VCE is designed for electrical operation and
prepared for electrical accessories.
Refer to instructions for accessory type in question or contact your VELUX
sales company for further information.
Vapor barrier
Where a vapor barrier is part of the roof construction, this barrier must be
extended and connected to the skylight curb.
Consult local jurisdictions and authorities for recycling and proper
disposal of removed skylights and materials.
NOTICE
Skylights and interior surfaces in older homes may have been painted with
lead-based paint, and removal of the skylights may disturb this paint. Take
proper precautions to minimize exposure to dust and debris.
For more information on the proper removal of lead paint, go to
www.epa.gov/lead.
Seller assumes no obligation whatsoever for failure of an architect,
installer or building owner to comply with all applicable laws, ordi
-
nances, building codes and safety requirements.
NOTICE
In rare circumstances, all glass may be subject to unexpected and spontane
-
ous breakage due to imperfections in the glass that are undetectable durin g
the manufacturing and inspection process by the manufacturer of the glass
and the VELUX factory.
Your VELUX sales company oers the choice of laminated or tempered glass
skylights. Laminated glass is a combination of two or more glass sheets with
one or more interlayers of plastic (PVB) or resin. In case of breakage, the
interlayer is designed to hold the fragments together. Tempered glass does
not contain an interlayer to hold the fragments together. Instead, tempered
glass is designed to break into small, pebble-like pieces. When tempered
glass breaks, pieces of glass come loose and may strike an individual.
Consult local regulations and/or building material consultants to
determine which type of glass is right for you or if laminated glass is
required in your application.
Important installation requirements for the USA
VELUX
®
series A21 skylights are designed and engineered to be installed
with VELUX flashing systems. VELUX flashing systems include VELUX
adhesive skylight underlayment in a quantity sufficient to install one skylight
of the size for which the flashing system was designed.
The VELUX "No Leak" installation warranty is based upon installation strictly
in accordance with VELUX deck or curb mounted skylight and related deck
or curb mounted flashing installation instructions, which specify the use and
proper installation of the VELUX adhesive skylight underlayment packaged
with the flashing system.
If VELUX adhesive skylight underlayment is not used or is not properly
installed and a service issue occurs related to underlayment omission, failure,
or its proper installation as detailed in the VELUX deck or curb mounted sky
-
light and deck or curb mounted flashing installation instructions, the VELUX
"No Leak" installation warranty is void.
VELUX America Inc. understands that there are other types of adhesive
underlayment that are of equal or higher quality than what is provided
by VELUX America Inc. However, VELUX America Inc. cannot approve or
validate that any specific type of adhesive underlayment is better or worse.
Thus, VELUX America Inc. places the risk of using an alternative adhesive un
-
derlayment onto the specifier by stating that if the alternative underlayment
becomes a failure point for the skylight or flashing system even if installed
according to our instructions, then the VELUX "No Leak" installation war
-
ranty cannot be honored. Further, the alternative underlayment must not in
any way obstruct, alter or prevent the proper functioning of the complete
skylight and flashing installation, such as increasing the overall flashing
system thickness beyond prescribed dimensions.
VELUX America Inc. affirms that if a high quality alternative adhesive
underlayment, installed per our instructions, does not fail but a leak occurs in
some other VELUX skylight or flashing component due to no cause from the
alternative underlayment, then such a leak would be covered under the terms
of the VELUX "No Leak" installation warranty.

2
VELUX
®
5
ENGLISH:
WARNING
Electrical connection
It is customer's responsibility:
• To contact a qualified electrical installer.
• To assure that the electrical installation is ad-
equate and in conformity with National Electric
Code, ANSI/NFPA 70 - latest edition*, and all
local codes and ordinances.
Failure to do so could result in fire, electrical
shock, other serious personal injury or death.
Curb mounted skylight VCE is designed for use in
both in-reach and out-of-reach places. To reduce
the risk of fire, personal injury and death:
• Do not install it in a location or at a height
where unsupervised children may be present.
• Always switch off power to the skylight
operator at the service panel when connecting
the skylight, when installing accessories and
whenever the operator cover is removed.
• On suspicion of malfunction, switch off power
and call for service.
• Observe that the rain sensor activates closing
function when getting wet.
• Never let children play with the skylight. Keep
remote control away from children.
• Beware of potential for serious personal injury
or death.
• There are no serviceable parts inside the sky-
light operator. Accessories are to be connected
according to VELUX installation instructions.
Electrical Shock Hazard
• The skylight operator is a class I product.
• Disconnect power to the junction or outlet box
before servicing the skylight.
• Do not have a fuse in the neutral circuit. This
could result in a fire, electrical shock or other
personal injury.
*National Fire Protection Association, Battery-
march Park, Quincy Massachusetts 02269.
Save these installation instructions. Consult
user manual for important safety warnings.
io-homecontrol
®
provides advanced and secure radio technology that is easy to install.
io-homecontrol
®
labelled products communicate with each other, improving comfort,
security and energy savings.
www.io-homecontrol.com
ESPAÑOL:
ADVERTENCIA
Conexión eléctrica
Es responsabilidad del cliente:
• Ponerse en contacto con un instalador eléctrico
calificado.
• Asegurarse de que la instalación eléctrica sea
adecuada y cumpla con las normas del Código
Eléctrico Nacional, ANSI/ NFPA 70
- última edición*, y con todas las re-
glamentaciones y ordenanzas locales.
En caso de no hacerlo, puede producirse un
incendio, electrocución u otras lesiones serias
o muerte.
El tragaluz VCE montado en brocal está diseñado
para usarse en lugares de fácil alcance y lugares
que no son de fácil alcance. Para reducir los peli-
gros de incendio, lesiones personales y muerte:
• No instalar en lugares o a una altura que los
niños puedan alcanzar sin supervisión.
• Siempre desconecte la alimentación eléctrica
del motor de apertura del tragaluz en el panel
de servicio al conectar el tragaluz, instalar los
accesorios y cada vez que se retire la cubierta
del motor.
• Si el motor de apertura del tragaluz no funcio-
na normalmente, desconecte la alimentación y
llame al servicio de reparación.
• Verifique que el sensor de lluvia active la fun-
ción de cierre al mojarse.
• Nunca permita que los niños jueguen con el
tragaluz. Mantenga el control remoto fuera del
alcance de los niños.
• Esté atento por el potencial de lesiones graves
o muerte.
• El motor de apertura del tragaluz no contie-
ne partes reparables. Los accesorios deben
conectarse de acuerdo con las instrucciones de
instalación VELUX.
Peligro de descarga eléctrica
• El motor de apertura del tragaluz es un produc-
to de clase I.
• Desconecte la alimentación de la caja de empal-
mes o distribución antes se realizar reparacio-
nes en el tragaluz.
• No coloque un fusible en el circuito neutro. Esto
podría provocar un incendio, descarga eléctrica
u otras lesiones personales.
*Asociación Nacional de Protección contra Incen-
dios, Batterymarch Park, Quincy Massachusetts
02269.
Conserve estas instrucciones de instalación.
Consulte el manual del usuario para verificar
advertencias de seguridad importantes.
io-homecontrol
®
proporciona tecnología avanzada de radio frecuencia, segura y fácil de
i
nstalar. Los productos etiquetados io-homecontrol
®
se comunican entre sí, mejorando
el confort, la seguridad y el ahorro de energía.
www.io-homecontrol.com
FRANÇAIS :
AVERTISSEMENT
Connexion électrique
Il incombe aux clients :
• De communiquer avec un installateur électrique
compétent.
• De s'assurer que l'installation électrique est
adéquate et conforme aux normes du National
Electric Code, ANSI/NFPA 70 - dernière édi-
tion*, ainsi qu'aux normes et aux règlements
locaux en vigueur.
Le défaut de suivre ces directives pourrait oc-
casionner un incendie, une décharge électrique,
des blessures graves ou la mort.
Le puits de lumière VCE monté sur cadre a été
conçu pour une installation à portée ou hors de
portée. Pour réduire les risques d'incendie, de
blessures ou de mort :
• Ne pas installer dans un endroit ou à hauteur
accessible aux enfants non supervisés.
• Coupez toujours l'alimentation électrique du
moteur d'ouverture du puits de lumière sur le
panneau de service au moment de la con-
nexion au puits de lumière, de l'installation
d'accessoires et du retrait du couvercle du
moteur.
• Si le moteur d'ouverture ne fonctionne pas
comme il se doit, coupez l'alimentation et ap-
pelez un représentant de service.
• Vérifiez si le détecteur de pluie entraîne la fer-
meture du puits de lumière lorsqu'il est mouillé.
• Ne laisser jamais des enfants jouer avec le puits
de lumière. Gardez la télécommande hors de
portée des enfants.
• Méfiez-vous des risques de blessures corpo-
relles graves ou pouvant causer la mort.
• Le moteur d'ouverture du puits de lumière ne
contient aucune pièce pouvant être réparée.
Les accessoires doivent être raccordés selon les
instructions d'installation VELUX.
Risque d'électrocution
• Le moteur d'ouverture du puits de lumière est
un produit de classe I.
• Coupez l'alimentation au boîtier de raccorde-
ment avant de faire l'entretien du puits de
lumière.
• Il ne faut pas de fusible dans le conducteur neu-
tre, car cela pourrait occasionner un incendie,
des décharges électriques ou des blessures.
*National Fire Protection Association, Battery-
march Park, Quincy Massachusetts 02269.
Conservez ces instructions d'installation.
Consultez le manuel de l'utilisateur pour des
avertissements importants de sécurité.
io-homecontrol
®
repose sur une technologie avancée, sécurisée et sans-fil, facile à
installer. Les produits io-homecontrol
®
communiquent entre eux pour offrir plus de
confort, de sécurité et d'économies d'énergie.
www.io-homecontrol.com

6 VELUX
®
TOOLS
•
HERRAMIENTAS
•
OUTILS

2
VELUX
®
7
18" / 450 mm
18" / 450 mm
12"
300 mm
12"
300 mm
24" / 600 mm
24" / 600 mm
12"
300 mm
12"
300 mm
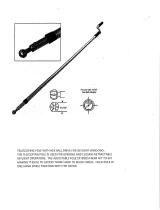
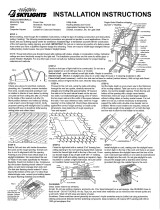
ENGLISH: Maintain illustrated clearances
between skylight frame and critical areas such as
valleys, ridges, slope changes and roof-to-wall-
intersections.
ESPAÑOL: Respete los espacios libres ilustrados
entre el marco del tragaluz y áreas críticas como
limahoyas, cumbreras, cambios de inclinación e
intersecciones de techo y pared.
FRANÇAIS : Respectez le dégagement illustré
entre le cadre du puits de lumière et les endroits
critiques tels que noue, faîtage, variation d'inclinai-
son et intersection de toiture et mur.
ENGLISH: Clearance around installations ESPAÑOL: Espacio libre alrededor de las
instalaciones
FRANÇAIS : Dégagement requis autour
de l'installation
ENGLISH: Light shaft application ESPAÑOL: Aplicación del hueco de luz FRANÇAIS : Pourtour du puits de lumière
Roof rafter
Viga
Chevron
Framing
Armazón
Renforcement
Drywall
Tablaroca
Finition
Vapor barrier
Barrera de vapor
Coupe-vapeur
Insulation
Aislamiento
Isolation

8 VELUX
®
1½"/
38 mm
H
W
min 3½"
min 90 mm
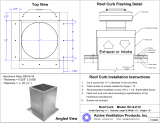
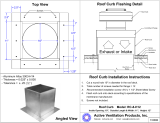
ENGLISH: Build curb according to measure-
ments in the chart. Use lumber with an actual
thickness of 1½" (38 mm) and a minimum
height of 3½" (90 mm). Curb height and
attachment should comply with building
codes and regulations and be secure enough
to transfer the skylight loads to the framing
members.
Note: Skylight VCM/VCE cannot be rotated.
The skylight operator has to be installed at
the bottom of skylight curb.
ESPAÑOL: Construya el brocal de acuerdo
con las mediciones de la tabla. Use madera
con un grosor real de 1½" (38 mm) y una
altura mínima de 3½" (90 mm). La altura y
sujeción del brocal deben respetar los códigos
y normas de construcción y estar bien fijados
para transferir las cargas del tragaluz a los
elementos del armazón.
Nota: Los tragaluces VCM/VCE no pueden
rotarse.
El motor de apertura del tragaluz debe
instalarse en la parte inferior del brocal del
tragaluz.
FRANÇAIS : Construisez un cadre selon les
dimensions indiquées au diagramme. Utilisez
du bois de 1½" (38 mm) de largeur réelle et
d'une hauteur minimale de 3½" (90 mm).
La hauteur du cadre et les raccordements
doivent respecter les exigences de la
réglementation du Code du bâtiment et être
suffisamment sécuritaires pour recevoir le
poids de la structure du puits de lumière.
Note : Les puits de lumière VCM/VCE ne
peuvent être inversés.
Le moteur d'ouverture doit être installé sur la
partie inférieure du cadre.
1
Skylight size
Tamaño del
tragaluz
Taille du puits
de lumière
Outside curb
dimensions
Dimensiones exte-
riores del brocal
Dimensions exté-
rieures du cadre
2222
25
1
⁄2" x 25
1
⁄2"
648 mm x 648 mm
2234
25
1
⁄2" x 37
1
⁄2"
648 mm x 952 mm
2246
25
1
⁄2" x 49
1
⁄2"
648 mm x 1257 mm
3030
33
1
⁄2" x 33
1
⁄2"
851 mm x 851 mm
3046
33
1
⁄2" x 49
1
⁄2"
851 mm x 1257 mm
3434
37
1
⁄2" x 37
1
⁄2"
952 mm x 952 mm
4646
49
1
⁄2" x 49
1
⁄2"
1257 mm x 1257 mm
H
W

10 VELUX
®
ENGLISH: Wrap the sides and the corners of
the skylight curb with VELUX adhesive skylight
underlayment and create water-shedding laps over
roofing underlayment.
Note: Observe the measurements stated.
ESPAÑOL: Envuelva los lados y esquinas del
brocal del tragaluz con la lámina de soporte
autoadhesiva para tragaluz VELUX para crear
solapas impermeabilizantes sobre la lámina de
soporte del techo.
Nota: Respete las medidas especificadas.
FRANÇAIS : Enveloppez les côtés et les coins du
cadre du puits de lumière avec la membrane de
toiture autocollante pour puits de lumière VELUX
et formez des rebords pour l'évacuation de l'eau
par-dessus la membrane de toiture.
Note : Respectez les dimensions illustrées.
ENGLISH: Wrap the top and the corners of the
skylight curb with VELUX adhesive skylight under-
layment and create proper water-shedding lap.
ESPAÑOL: Envuelva las esquinas y parte superior
del brocal del tragaluz con lámina de soporte
autoadhesiva para tragaluz VELUX para crear
solapas impermeabilizantes apropiadas.
FRANÇAIS : Enveloppez la partie supérieure et les
coins du cadre du puits de lumière avec la mem-
brane de toiture autocollante pour puits de lumière
VELUX et formez des rebords pour l'évacuation
de l'eau.
ENGLISH: To allow for proper drainage, inter-
weave VELUX adhesive skylight underlayment as
shown in
6a
for new construction applications.
For retrofit applications, interweave VELUX adhe-
sive skylight underlayment as shown in
6b
.
ESPAÑOL: Para lograr un drenaje adecuado,
intercale la lámina de soporte autoadhesiva para
tragaluz VELUX como se indica en
6a
para con-
strucciones nuevas. Para aplicaciones posteriores,
intercale la lámina de soporte autoadhesiva para
tragaluz VELUX como se indica en
6b
.
FRANÇAIS : Pour assurer un drainage adéquat,
entrecroisez avec la membrane de toiture autocol-
lante pour puits de lumière VELUX tel qu'illustré à
la figure
6a
dans le cas d'une installation sur une
nouvelle construction. Pour une installation sur
une toiture existante, entrecroisez avec la mem-
brane de toiture autocollante pour puits de lumière
VELUX, tel qu'illustré à la figure
6b
.
4
5
6a
6b
1
2
½"
13 mm
6"
150 mm
6"
150 mm
½"
13 mm
6"
150 mm
6"
150 mm
3"
/
75 mm

2
VELUX
®
11
7
ECW
ECW
ECW
ENGLISH: For thin roofing materials, use flashing
ECL. ECL is designed for roof pitches 10° - 60°
(2:12 - 21:12).
For profiled roofing materials, use flashing ECW.
ECW is designed for roof pitches 14° - 60°
(3:12 - 21:12).
ESPAÑOL: Para materiales de cubierta delga-
dos, use tapajuntas ECL. ECL está diseñado para
techos con inclinación de 10° - 60° (2:12 - 21:12).
Para materiales de cubierta ondulados, use
tapajuntas ECW. ECW está diseñado para techos
con inclinación de 14° - 60° (3:12 - 21:12).
FRANÇAIS : En présence de matériel de toiture
mince, utilisez les solins ECL conçus pour inclinai-
son de toiture de 10° - 60° (2:12 - 21:12).
Pour matériel de toiture profilé, utilisez les solins
ECW conçus pour inclinaison de toiture 14° - 60°
(3:12 - 21:12).

14 VELUX
®
A
B
10
A
ENGLISH: Cable (sup-
plied with skylight):
20 ft (6 m)
ESPAÑOL: Cable
(suministrado con el
tragaluz): 20 pies (6 m)
FRANÇAIS : Câble
(fourni avec le puits de
lumière) : 20 pi (6 m)
B
ENGLISH: Junction
or outlet box (not pro-
vided with skylight)
ESPAÑOL: Caja de
empalmes o distribu-
ción (no suministrada
con el tragaluz)
FRANÇAIS : Boîtier
de raccordement (non
fourni avec le puits de
lumière)
VCE
ENGLISH: A junction box or an outlet box (not
provided with skylight) is required for permanent
connection of the 20 ft (6 m) skylight power cable.
A single phase 120 V, 60 Hz, 40 W branch circuit
(continuous electrical feed) is required. The branch
circuit must be protected by a 15 A circuit breaker
or time delay fuse.
The junction or outlet box in which the skylight
power cable is terminated must be accessible for
inspection after installation is complete. A listed
junction or outlet box and listed wire nuts must be
used for the connection to the branch circuit.
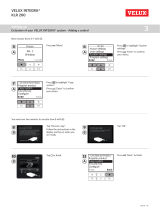
Refer to KLR 200 quick start guide for registra-
tion and operation of skylight.
ESPAÑOL: Para conectar el cable de alimentación
permanente de 20 pies (6 m) del tragaluz hace
falta una caja de empalmes o distribución (no
suministrada con el tragaluz).
Se requiere un circuito derivado monofásico de
120 V, 60 Hz, 40 W (alimentación eléctrica con-
tinua). El circuito derivado debe estar protegido
por un disyuntor de 15 amperios o un fusible
temporizado.
La caja de empalmes o distribución donde se
conecta el cable de alimentación del tragaluz debe
estar en un lugar accesible para su inspección una
vez completada la instalación. Debe usarse una
caja de empalmes o distribución listada y tuercas
para alambre listadas para la conexión al circuito
derivado.
Consulte la guía rápida de KLR 200 para registrar
y operar el tragaluz.
FRANÇAIS : Un boîtier de raccordement (non
fourni avec le puits de lumière) est nécessaire pour
la connexion permanente du câble électrique du
puits de lumière de 20 pi (6 m).
Un circuit de dérivation monophasé de 120 V,
60 Hz, 40 W d'alimentation électrique continue
est nécessaire. Le circuit de dérivation doit être
protégé par un mécanisme à retardement ou un
disjoncteur de 15 ampères.
Le boîtier de raccordement auquel câble électrique
du puits de lumière est connecté doit pouvoir être
inspecté lorsque l'installation est terminée. Il faut
utiliser le boîtier de raccordement et les écrous
de câble énumérés pour la connexion au circuit de
dérivation.
Veuillez vous référer au guide de démarrage rapide
du KLR 200 pour la synchronisation et le fonc-
tionnement du puits de lumière.

VCM/VCE CURB MOUNTED SKYLIGHT INSTALLATION INSTRUCTIONS. ©2011, 2016 VELUX GROUP ®VELUX AND THE VELUX LOGO ARE REGISTERED TRADEMARKS USED UNDER LICENSE BY THE VELUX GROUP
INSTRUCTIONS D'INSTALLATION DU PUITS DE LUMIÈRE VCM/VCE MONTÉ SUR CADRE. ©2011, 2016 VELUX GROUP ®VELUX ET LE LOGO VELUX SONT DES MARQUES DE COMMERCE DÉPOSÉES ET EMPLOYÉES SOUS LICENCE DE VELUX GROUP
US: VELUX America LLC
1-800-88-VELUX
CA: VELUX Canada Inc.
1 800 88-VELUX (888-3589)
www.velux.com
ENGLISH:
Home owner information
Please complete and give to home owner
Date: ...................................................................................................................................................................................................................................................................
Product number: ............................................................................................................................................................................................................................................
(stamped on product exterior)
Quantity: ...........................................................................................................................................................................................................................................................
Flashing: ............................................................................................................................................................................................................................................................
Accessories installed: ...................................................................................................................................................................................................................................
Model ................ Size ............... Variant code ..........................
Roofing material: ...........................................................................................................................................................................................................................................
Installation contractor: ................................................................................................................................................................................................................................
Dealer purchased from: ...............................................................................................................................................................................................................................
ESPAÑOL:
Información del propietario
Completar y entregar al propietario
Fecha: ................................................................................................................................................................................................................................................................
Número de producto: ....................................................................................................................................................................................................................................
(impreso en la parte externa del producto)
Cantidad: ..........................................................................................................................................................................................................................................................
Tapajuntas: ......................................................................................................................................................................................................................................................
Accesorios instalados: ..................................................................................................................................................................................................................................
Modelo ............... Tamaño .............. Código de variante ..........................
Material de cubierta: ..................................................................................................................................................................................................................................
Instalador: ........................................................................................................................................................................................................................................................
Distribuidor al que se compró el producto: ...........................................................................................................................................................................................
FRANÇAIS :
Information pour le propriétaire occupant
Veuillez compléter et remettre au propriétaire occupant
Date : ..................................................................................................................................................................................................................................................................
Numéro de produit : .....................................................................................................................................................................................................................................
(étampé sur la partie extérieure du produit)
Quantité : ..........................................................................................................................................................................................................................................................
Solin : .................................................................................................................................................................................................................................................................
Accessoires installés : ..................................................................................................................................................................................................................................
Modèle ................ Dimension ............... Code ..........................
Matériel de toiture : .....................................................................................................................................................................................................................................
Entrepreneur en installation : ...................................................................................................................................................................................................................
Détaillant : .......................................................................................................................................................................................................................................................
/