
WARNING:
TO REDUCE THE RISK OF FIRE, ELECTRICAL SHOCK, OR INJURY TO PERSONS, OBSERVE
FOLLOWING:
WARNING:
TO
REDUCE THE RISK OF FIRE, ELECTRICAL SHOCK, OR INJURY TO PERSONS, OBSERVE
FOLLOWING:
READ AND SAVE THESE INSTRUCTIONSREAD AND SAVE THESE INSTRUCTIONS
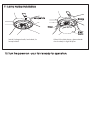
1. Use this unit only in manner intended by the manufacturer. If you have questions, contact the
manufacturer at the address or telephone number listed in warranty.
2. Before servicing or cleaning unit, or installing a light kit, switch power off at service panel and look
service panel to prevent power from being switched on accidentally. When the service disconnecting
means cannot be locked, securely fasten a prominent warning device, such as a tag, to the service
panel.
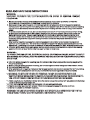
5. If the fan will be mounted to ceiling box, the box and its support must be able to support the moving
weight of the fan (at least 40 lbs.) The box must not twist or work loose.
1. Use this unit only in manner intended by the manufacturer. If you have questions, contact the
manufacturer
at the address or telephone number listed in warranty.
2.
Before servicing or cleaning unit, or installing a light kit, switch power off at service panel and look
service
panel to prevent power from being switched on accidentally. When the service disconnecting
means
cannot be locked, securely fasten a prominent warning device, such as a tag, to the service
panel.
5.
If the fan will be mounted to ceiling box, the box and its support must be able to support the moving
weight
of the fan (at least 40 lbs.) The box must not twist or work loose.
WARNING :
TO REDUCE THE RISK OF FIRE, ELECTRICAL SHOCK, OR PERSONAL INJURY, MOUNT TO OUTLET
BOX MARKED ACCEPTABLE FOR FAN SUPPORT AND USE MOUNTING SCREWS PROVIDED WITH
OUTLET BOX.
WARNING :
TO
REDUCE THE RISK OF FIRE, ELECTRICAL SHOCK, OR PERSONAL INJURY, MOUNT TO OUTLET
BOX
MARKED ACCEPTABLE FOR FAN SUPPORT AND USE MOUNTING SCREWS PROVIDED WITH
OUTLET
BOX.
6. If the fan will be mounted to a ceiling joist, the joist must be able to support the moving weight of the
fan (at least 40 lbs.)
7. When cutting or drilling into wall or ceiling, do not damage electrical wiring and other hidden utilities.
8. This unit must be grounded.
9. After installation is complete, make sure that all connections are secure to prevent the fan from falling.
Make sure all wire connections are secure, and that there are no exposed conductor strands.
10.
11. Make sure that your installation will not allow the fan to come into contact with any adjacent obstacles
such as doors, hanging lamps, etc.
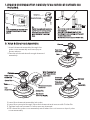
12. If you are installing more than one ceiling fan, do not mix the blade sets.
13. The fan must be mounted with at least 7 feet of clearance between fan blades and floor.
14. This fan is suitable for INDOOR locations.
6. If the fan will be mounted to a ceiling joist, the joist must be able to support the moving weight of the
fan
(at least 40 lbs.)
7.
When cutting or drilling into wall or ceiling, do not damage electrical wiring and other hidden utilities.
8.
This unit must be grounded.
9.
After installation is complete, make sure that all connections are secure to prevent the fan from falling.
Make
sure all wire connections are secure, and that there are no exposed conductor strands.
10.
11.
Make sure that your installation will not allow the fan to come into contact with any adjacent obstacles
such
as doors, hanging lamps, etc.
12.
If you are installing more than one ceiling fan, do not mix the blade sets.
13.
The fan must be mounted with at least 7 feet of clearance between fan blades and floor.
14.
This fan is suitable for INDOOR locations.
WARNING: TO REDUCE THE RISK OF PERSONAL INJURY, DO NOT BEND THE BLADE
BRACKETS WHEN INSTALLING THE BRACKETS, BALANCING THE BLADES, OR CLEANING THE
FAN. DO NOT INSERT FOREIGN OBJECTS IN BETWEEN ROTATING FAN BLADES.
WARNING: TO REDUCE THE RISK OF PERSONAL INJURY, DO NOT BEND THE BLADE
BRACKETS
WHEN INSTALLING THE BRACKETS, BALANCING THE BLADES, OR CLEANING THE
FAN.
DO NOT INSERT FOREIGN OBJECTS IN BETWEEN ROTATING FAN BLADES.
WARNING: THE USE OF ANY SPEED CONTROL NOT SPECIFICALLY APPROVED FOR THIS FAN
COULD RESULT IN FIRE, ELECTRICAL SHOCK, OR PERSONAL INJURY.
WARNING: THE USE OF ANY SPEED CONTROL NOT SPECIFICALLY APPROVED FOR THIS FAN
COULD
RESULT IN FIRE, ELECTRICAL SHOCK, OR PERSONAL INJURY.
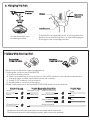
3. To avoid possible electric shock, be sure electricity is turned off at the main power box before wiring.
All electrical connections must be made in accordance with local codes, ordinances and/or the
National Electric Code. If you are unfamiliar with the methods of installing electrical wiring and
products, secure the services of a qualified and licensed electrician as well as someone who can
check the strength of the supportive ceiling members and make the proper installations and
connections.
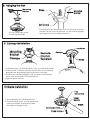
4. After making electrical connections, spliced conductors should be turned upward and pushed
carefully up into outlet box. The wires should be spread apart with the grounded conductor and the
equipment - grounding conductor on one side of the outlet box and the " HOT " wires on the other side.
3. To avoid possible electric shock, be sure electricity is turned off at the main power box before wiring.
All
electrical connections must be made in accordance with local codes, ordinances and/or the
National
Electric Code. If you are unfamiliar with the methods of installing electrical wiring and
products,
secure the services of a qualified and licensed electrician as well as someone who can
check
the strength of the supportive ceiling members and make the proper installations and
connections.
4.
After making electrical connections, spliced conductors should be turned upward and pushed
carefully
up into outlet box. The wires should be spread apart with the grounded conductor and the
equipment
- grounding conductor on one side of the outlet box and the " HOT " wires on the other side.


 1
1
 2
2
 3
3
 4
4
 5
5
 6
6


 Yosemite ZEPHYR-ORB Owner's manual
Yosemite Home Decor LINDSEY-RB Operating instructions
 Yosemite Home Decor 845805052546 Operating instructions
 Yosemite Home Decor HURRICANE-ORB Installation guide
 Yosemite Home Decor ASHLEY-BBN Operating instructions
 Yosemite Home Decor LK498AP Operating instructions


TroposAir 88404 Operating instructions