Page is loading ...

INST SSTM2011
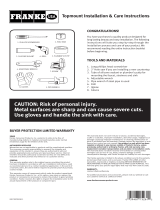
CAUTION: Risk of personal injury.
Metal surfaces are sharp and can cause severe cuts.
Use gloves and handle the sink with care.
1. PHILLIPS SCREWDRIVER
3. SILICONE SEALANT
2. HOLE SAW
4. ADJUSTABLE WRENCH
3. PLUMBER’S PUTTY
6. DRILL
7. JIGSAW
5. PIPE WRENCH
CONGRATULATIONS!
You have purchased a quality product designed for
long lasting beauty and easy installation. The following
instructions will take you step-by-step through the
installation process and care of your product. We
recommend reading the entire instruction booklet
before beginning.
TOOLS AND MATERIALS
1. Long phillips head screwdriver
2. 2" Hole saw if you are installing a new countertop
3. Tube of silicone sealant or plumber’s putty for
mounting the faucet, strainers and sink
4. Adjustable wrench
5. Pipe wrench if steel pipe is used
6. Drill
7. Jigsaw
8. Gloves
8. GLOVES
SINKS
Franke Consumer Products, Inc. warrants its sinks to be free of
manufacturing defects in material and workmanship under normal
residential usage for the lifetime of the sink.
AUTHORIZED RESELLERS
Warranties are not applicable to products sold by unauthorized resellers.
The consumer accepts responsibility to research the integrity and
reputation of the reseller to ensure they are authorized to sell and
provide appropriate pre purchase and post purchase service. Internet
resellers should be particularly scrutinized as they are very difficult to
evaluate and often provide very limited or no customer service.
GENERAL
This warranty applies only to the original owner, providing the product
has been installed in accordance with our installation instructions, used
as recommended and in a normal residential application. In the event of
a warranty claim, the owner will be required to provide proof of purchase,
a sales receipt.
This warranty covers all components which make the product operational.
Franke Consumer Products, Inc., at its option, may repair or replace the
product or components necessary to restore the product to good working
condition. Franke reserves the right to inspect the installation prior to the
actual replacement of the product or component part.
This warranty does not cover misuse or abuse, accidental damages,
scuffs or scratches, improper installation, abnormal usage, negligence or
damage caused by improper maintenance or cleaning. Normal wear of
parts is excluded from the warranty. Damage caused by impurities or acts
beyond our control are not covered. Any product or part which has been
repaired or altered in any manner outside of Franke's factory, unless
previously authorized in writing by Franke, will void warranty. Any
replacement excludes transportation and any labor re-installation costs.
This warranty does not allow recovery of incidental or consequential
damages such as loss of use, delay, property damage or other
consequential damage, and Franke accepts no liability for such damages.
The Franke warranty is limited to the above conditions and to the warranty
period specified herein and is exclusive. Franke DISCLAIMS all other
warranties, expressed or implied, including IMPLIED WARRANTIES OF
MERCHANTABILITY AND/OR FITNESS FOR AS PARTICULAR PURPOSE. This
warranty gives you specific legal rights that may vary from state to state.
WARRANTY:
Limited Lifetime Warranty
For additional products and accessories, please visit our website or call
our customer service at 1.800.637.6485
www.frankeconsumerproducts.com
BUYER PROTECTION LIMITED WARRANTY
Topmount Installation & Care Instructions

LENGTH
WIDTH
USING A 2" HOLE
SAW, DRILL A HOLE
ON THE INSIDE OF
THE LINE THAT WAS
TRACED USING THE
CUT-OUT TEMPLATE.
COUNTERTOP
COUNTERTOP
USING A JIGSAW, CUT ALONG OUTLINE
TRACED ON COUNTERTOP.
4.
5.
3.
2.
1.
Step 2
PREPARING AN EXISTING COUNTERTOP
1. Make sure existing countertop cutout opening is the
proper size. Set the new sink into opening. The sink rim
should rest evenly on the countertop. (Slight adjustments
can be made using a file or a saber saw)
2. Use caution not to chip or crack the counter top when filing or
sawing.
3. After final fitting, remove the new sink from cut-out.
4. For new countertop instructions see the following
instructions.
PREPARING A NEW COUNTERTOP
USING THE SINK AS A TEMPLATE
1. Carefully place the sink upside down on
the countertop at the desired position.
Trace the sink outline on the countertop.
(Do not cut along this line)
2. Draw a line 1/4" (6mm) inside the sink
outline. Measure the cut-out line you just
drew and compare to all sink dimensions.
The cut-out line should be approximately
1/2" (13mm) smaller than the overall
sink dimensions.
3. Double check both measurements.
4. Drill a pilot hole inside the cutting line.
5. Using a jigsaw, cut along the inside line
to cut the opening in the countertop.
SUPPLY VALVES
WASTE TRAP
SUPPLY
LINES
Step 1
REMOVING EXISTING SINK
1. Leave the faucet and drain outlet in place.
2. Shut off water supply valves. (Usually under sink)
3. Relieve pressure by opening hot and cold faucet valves.
Let water run until it stops flowing.
4. Disconnect the supply lines from the water supply valves.
5. Disconnect the drain fitting from the waste trap.
6. Remove frame or rim fasteners around underside of old sink.
7. Lift sink out with faucet and drain fitting still in place.

CUT ALONG DOTTED LINE OF
TEMPLATE PATTERN FOUND
ON SINK PACKAGING.
1.
COUNTERTOP CUT-OUT PATTERN
COUNTERTOP
TRACE COMPLETELY AROUND
EDGE OF CUT-OUT TEMPLATE
USING A 2" HOLE
SAW, DRILL A HOLE
ON THE INSIDE OF
THE LINE THAT WAS
TRACED USING THE
CUT-OUT TEMPLATE.
COUNTERTOP
COUNTERTOP
USING A JIGSAW, CUT ALONG OUTLINE
TRACED ON COUNTERTOP.
3.
4.
5.
PREPARING A NEW COUNTERTOP
USING THE CUT-OUT TEMPLATE
PROVIDED
(Included in or on the carton)
1. If template is located on the outside of
the carton cut along dotted line.
2. If template is not located on the outside of
the carton use template provided in the
carton. Measure the cutout line and
compare to all sink dimensions. The
cutout line should be 1/2" smaller than
overall sink dimension.
3. Trace on the countertop completely
around the edge of the template.
4. Drill a pilot hole inside the cutting line.
5. Using a jigsaw, cut along the inside line
to cut the opening in the countertop.
2.
INTEGRATED
INSTALLATION
RAIL
FRONT RIM
CLIP
CLIP
CLIP
CLIP
CLIP
CLIP
COUNTERTOP
Step 3
APPLYING MOUNTING CLIPS
In some cases, sink may have clips pre-attached
1. Turn sink upside down onto a clean, soft surface.
2. Six clips are recommended for installation. Two extra
clips are included if required.
3. Slide the clips over the pre-drilled mounting slot
in the sink rim. (See diagram for clip placement)
Make sure clip jaws are facing towards outside
edge of sink.
4. Make sure the clip snaps are fully seated into the
mounting slot.
5. Turn all clip jaws parallel to the sink rim.
Step 4
INSTALLING ACCESSORIES
Now is the time to attach your faucet and drains to
your new stainless steel sink. Use plumber’s putty or
silicone sealant under the faucet base and under the
top flange of the drain to provide a leak proof seal.
FAUCET BASE
TOP FLANGE
OF DRAIN

COUNTERTOP
SLOWLY
TIGHTEN
THE CLIP
WITH A
SCREW
DRIVER
PUSH
UP
SINK
SINK
DROP IN
POSITION
APPLY A BEAD OF
SILICONE SEALANT
AROUND THE RIM
COUNTERTOP
5.
1.
2.
1. With sink in the upside down position, place
a continuous and generous bead of silicone
sealant or plumber’s putty around the entire
perimeter of the rim. This serves as a
watertight seal.
2. Turn clips back as noted in diagram, to prepare
for sink positioning in countertop.
3. Lift sink, turn face up, and lower into the
countertop cutout opening.
4. Line up front rim with the front edge of the
counter.
5. Turn clips back to original position for
tightening.
6. Underneath the countertop begin tightening
clips with a screwdriver in an even fashion,
alternating sides while tightening, until the
entire rim is sealed.
7. Do not over tighten. It is only necessary to
draw the rim down snugly to the countertop.
8. Wipe excess sealant from perimeter with a
wet cloth.
6.
COUNTERTOP
COUNTERTOP
Step 6
FINISHING
1. Re-connect and tighten hot and cold faucet supply
lines, strainer, drain, and trap assembly.
NOTE: Depending on the location of sink drain
holes it may be necessary to adjust the drain pipe
fittings under the sink to accommodate the new
sink installation.
2. Turn on water supply, check all connections for
leaks. If leak appears, tighten joint slightly. Do not
over tighten.
3. With stopper in place fill sink and check for leaks
under sink and around drain flange.
4. Remove stopper and let water drain while checking
drain connections.
Step 5
INSERTING SINK AND TIGHTENING MOUNTING CLIPS
CARE INSTRUCTIONS
To insure long-lasting beauty the best preventative
maintenance is to ensure that the sink is clean, dry
and exposed to room atmosphere when not in use.
Rinse and towel dry to keep it shining and relatively
free of water spots, especially if you have hard water.
To clean your sink, use the mildest procedure that
will do the job, generally liquid detergent and water.
Rinse and dry.
STAINS. On mirror finish surfaces use a metal polish
recommended for stainless steel. Peek
®
, Maas
®
,
Flitz
®
are suitable examples. All other finishes can
be cleaned with products such as Bon Ami
®
or Soft
Scrub
®
. Always rub with the grain where applicable.
To avoid hard water spots wipe sink dry with clean
soft towel after use.
CAUTION. Steel wool pads leave tiny particles that
may cause rust spots. Rubber mats are acceptable if
removed after each use. Chlorine bleach can cause
corrosion and pitting. Drain cleaners with sulfuric or
hydrochloric acid can attack stainless steel.

Only use natural stone or solid surface countertops, such as acrylic, granite, marble
and other composite material, for undermount installations. Franke Consumer
Products accepts no liability for damage to solid surface countertops or sink xtures
during installation. Because the mounting of undermount sinks to any countertop
material is a specialized procedure, we recommend that it be performed by a trained,
professional installer.
A cutting mistake will be costly. We recommend comparing the template provided to
the sink before cutting the countertop.
Solo se deben usar encimeras de super cie sólida o piedra natural, como super cies
acrílicas, de granito, mármol y de otros materiales compuestos para realizar
instalaciones empotradas. Franke Consumer Products no se responsabiliza por los
daños provocados en las encimeras de super cies sólidas o en los accesorios de los
fregaderos durante la instalación. Dado que la instalación de fregaderos empotrados
en cualquier material de encimera es un procedimiento especializado, recomendamos
que la realice un instalador profesional capacitado.
Un error de corte será costoso. Recomendamos comparar la plantilla incluida con el
fregadero antes de cortar la encimera.
CAUTION: This sink may contain sharp edges. Please handle with care.
Gloves are recommended.
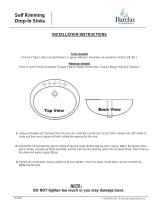
1 Step 1: Determine Position of Sink
Locate the position of the sink using the
template provided and make the cutout from
the countertop.
NOTE: This template will align the edge of the
counter top to the tangent of the top radius
of the bowl. (SEE ILLUSTRATION) Therefore,
the enclosed template is not suitable if you
wish to see more sink ange (lip). This type
of installation should be performed by a
trained, professional installer.
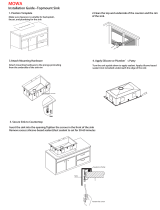
2 Step 2: Determine Position of
Mounting Brackets
Align the bowl under the countertop cutout
and determine the location for the mounting
brackets.
Type of fasteners and attachment method
to be recommended by countertop supplier.
Brackets have been supplied.
3 Step 3: Attach the Mounting
Brackets
Attach the mounting brackets loosely to
the countertop from underneath, using
the fastener and attachment method
recommended by the coutertop supplier.
4 Step 4: Apply Silicone Sealant
Apply a continuous bead of silicone sealant
around the top ange (lip) of the sink.
5 Step 5: Sink Alignment and
Mounting
Align the bowl with the countertop cutout
from underneath and fully tighten the
brackets against the sink ange (lip).
6 Step 6: Remove Any Excess Sealant
NATURAL STONE OR SOLID SURFACE
UNDERMOUNT SINK INSTALLATION INSTRUCTIONS
INSTRUCCIONES DE INSTALACIÓN DE FREGADEROS
EMPOTRADOS DE SUPERFICIE SÓLIDA O PIEDRA NATURAL
Mounting Clip
(furnished)
Abrazadera de montaje
(incluido)
Fastener
(not furnished)
Sujetador
(no incluido)
Countertop
Encimera
Silicone Sealant
(not furnished)
Sellador de silicona
(no incluido)
Sink
Fregadero
600 Franke Drive. Ruston, LA 71270
Customer Service # 1.800.626.5771
Installation Instructions
PRECAUCIÓN: este fregadero puede contener bordes losos. Manipúlelo
con cuidado. Se recomienda usar guantes.
Instrucciones de instalación
PROFESSIONAL INSTALLATION RECOMMENDED
|
SE RECOMIENDA LA INSTALACIÓN POR PARTE DE UN PROFESIONAL
1 Paso 1: Determinar la posición
del fregadero
Calcule la posición del fregadero usando la
plantilla incluida y realice un recorte de la
encimera.
NOTA: esta plantilla alineará el borde de la
encimera con la tangente del radio superior
del recipiente. (VEA LA ILUSTRACIÓN). Por lo
tanto, la plantilla incluida no es adecuada si
desea ver más reborde ( lo) del fregadero.
Este tipo de instalación debe estar a cargo de
un instalador profesional capacitado.
2 Paso 2: Determine la posición de los
soportes de montaje
Encuadre el recipiente debajo del recorte de
la encimera y determine la ubicación de los
soportes de montaje.
El proveedor de la encimera puede
recomendarle tipos de selladores y métodos
de jación. Se incluyen los soportes.
3 Paso 3: Coloque los soportes
de montaje
Coloque los soportes de montaje sin
ajustarlos a la encimera desde la parte
inferior, usando el sellador y el método de
jación recomendado por el proveedor de
la encimera.
4 Paso 4: Aplique sellador de silicona
Aplique una línea continua de sellador de
silicona alrededor del borde ( lo) superior
del fregadero.
5 Paso 5: Encuadre y montaje del
fregadero
Encuadre el recipiente con el recorte de la
encimera desde la parte inferior y ajuste
completamente los soportes contra el borde
( lo) del fregadero.
6 Paso 6: Retire el excedente
del sellador
INST UND2011
Stainless_Install_Insert_prod.indd 1Stainless_Install_Insert_prod.indd 1 2/25/11 4:59 PM2/25/11 4:59 PM
/