Franke EOOX33229-1 User manual

Type
User manual
1. Pipe wrench if steel pipe used
2. Punch
3. Drill
4. (2) Adjustable wrenches
5. Long thin screwdriver
6. File
Caution: Do not use Plumbers Putty! Plumbers Putty can stain your sink.
2: Punch
3: Drill
7:Jigsaw
1: Pipe Wrench
4: Adjustable Wrenches
5: Long Thin Screwdriver 6: File
8: Yardstick
9: Hammer 10: Flashlight
11: Silicone Sealant
REQUIRED TOOLS
The few tools required are not specialized or expensive. All are probably in your
tool box or your neighbors. Here is what you will need:
7. Jigsaw
8. Yardstick
9. Hammer
10. Flashlight
11. Tube of silicone sealant for mounting sink
2
Length
Width
For new countertop go to
NEW COUNTERTOP INSTALLATION
1
Supply
Lines
Supply
Valves
Waste
Trap
Installation Instructions
Gather the tools listed at the top of this page
that are required for replacing a sink.
Caution: Do not use Plumbers Putty! Plumbers
Putty can stain your sink.
1 Step One: Remove the Old Sink
Leave the faucet and drain outlet in place for
now.
1. Shut o the water supply valves (usually
under the sink).
2. Relieve pressure by opening faucet.
3. Disconnect the water supply  ttings from
the outlet of the water supply valves.
4. Disconnect the drain  tting from the
waste trap.
5. Remove frame or rim fasteners around
underside of old sink.
6. Lift out sink with faucet and drain  tting
in place.
7. If you are installing a new countertop, go
to NEW COUNTERTOP FOR TOPMOUNT
INSTALLATION and follow the instructions
provided.
2 Step Two: Check Countertop Opening
Make sure the existing countertop cutout
opening is the proper size. Simply set the new
sink into the opening. The sink rim should
rest evenly on the countertop. If not, a slight
adjustment can be made by using a  le or
a greater adjustment by using a jigsaw or
keyhole saw. Care should be taken not to
chip or crack the laminated top by aggressive
ling or sawing. After  nal  tting, remove the
new sink from cutout.
TOPMOUNT INSTALLATION
continues on next page—
NOTE: The illustrations are a representation of a
sink and may di er from the style of your sink.
The instructions still apply to your installation.
INST GRA2011
Granite_Install_Broch_EN_prod.indd 1Granite_Install_Broch_EN_prod.indd 1 2/25/11 4:43 PM2/25/11 4:43 PM
3 Step Three: Knocking Out Faucet/
Accessory Holes (Must be done before
installing sink)
If your sink already has the proper number of
holes needed, you can proceed to Step Four.
If additional holes need to be knocked out,
place the sink upright on a stable workstation
(a workbench or the  oor). Do NOT place the
sink in the countertop to knock out the holes,
as damage could occur such as cracking or
breakage. Locate the round stickers on the ledge
of the sink. These stickers represent the locations
of the partially drilled holes. With a hammer and
punch or nailset, you can knock out the partially
drilled holes needed for faucet and accessories.
You will then use a  le (ex: rattail type) to
smooth away any rough surface in the holes.
Note: any additional holes beyond the partially
drilled ones noted on this sink are considered
modi cations and any problems associated with
these holes are not covered by the warranty.
4 Step Four: Seal Countertop
Place a thin bead of silicone sealant around
the perimeter of countertop cutout. This will
ensure that the sink is completely sealed to
the countertop.
Caution: Do not use Plumbers Putty! Plumbers
Putty can stain your sink.
5 Step Five: Attach Faucet and
Accessories
To simplify installation, we recommend
the installer attach faucets, strainers and
accessories at this time.
When  tting the drain to the sink, take extra
care not to overtighten. Overtightening can add
a mechanical stress in the region of the drain
hole which could damage or crack the sink. We
recommend the screw  tting be hand tight plus
one eighth turn.
Caution: Do not use Plumbers Putty! Plumbers
Putty can stain your sink.
6 Step Six : Mounting Brackets
Assemble the mounting clips and bolts as
shown in the diagram. Our tests have shown
that the six clips provided are more than
adequate to hold your sink in place until the
sealant applied in Step Four is dry.
7 Step Seven: Hook up plumbing, check
for leaks.
4
Countertop
Top ange
of the
drain
Faucet base
Silicone Sealant
Sink bottom
Hand tighten
plus 1/8th of a turn
5
Countertop
Mounting Clip
(furnished)
Fastener
(not furnished)
Sink
Silicone Sealant
(not furnished)
6
TOPMOUNT
INSTALLATION
continued from page 1
Marks partially drilled holes
Carefully knock out
only the required holes
3
NOTE: The illustrations
are a representation
of a sink and may
di er from the style
of your sink. The
instructions still apply
to your installation.
Granite_Install_Broch_EN_prod.indd 2Granite_Install_Broch_EN_prod.indd 2 2/25/11 4:43 PM2/25/11 4:43 PM
Countertop
Trace completely around
edge of sink. Hold pencil vertical.
2a
Countertop
Topmount template
Trace outline
of template
3b
Countertop
Cut Line
Traced outline of sink
4a
Using a 2" Hole Saw, drill a
hole on the inside edge of
the cut line.
Countertop
Cut Line
Traced outline of template
Using a 2" Hole Saw, drill a
hole on the inside edge of
the cut line.
4b
Countertop
Using a Jigsaw, cut along the
inside edge of the cut line.
Cut Line
3/8” Space
Traced outline of sink
5a
Countertop
Using a Jigsaw, cut along the
inside edge of the cut line.
Cut Line
Traced outline of template
5b
NEW COUNTERTOP FOR TOPMOUNT INSTALLATION
If you are installing a new countertop along
with your new sink, it is easier to cut out and
adjust  tting prior to securing countertop to
the base cabinets. We recommend comparing
the template provided to the sink before
cutting the countertop. (For natural stone or
a solid surface material like granite, marble,
Corian® or Quartz; sink opening should be cut
by a professional.)
Before marking or cutting countertop, use
the sink and template to determine sink
position. A cutting mistake will be costly.
Corian® is a registered trademark of DuPont™
Cut Line
Draw second line 3/8"
inside sink outline.
Cut Line
3/8"
3/8" Space
1-1/2" Radius at Corners
1-1/2" Radius
3a
Traced outline
of sink
Con rm your cut line with the topmount cut template
provided with your sink.
2b
Place template on
countertop & conrm
where to cut hole.
Countertop
Cabinet
Template
SINK AS TEMPLATE
1a
Place sink on
countertop to conrm
where to cut hole.
Countertop
Cabinet
Sink
USING TEMPLATE
Cut out topmount template
1b
NOTE: The illustrations are a
representation of a sink and may
di er from the style of your sink.
The instructions still apply to
your installation.
Granite_Install_Broch_EN_prod.indd 3Granite_Install_Broch_EN_prod.indd 3 2/25/11 4:43 PM2/25/11 4:43 PM
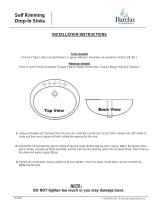
CARE AND MAINTENANCE
Your new Granite sink is an extremely tough and resilient material that will last
a lifetime of normal usage. To keep its good looks and sparkling  nish follow
these simple guidelines.
Cleaning
Most stains incurred during normal daily use can be washed away with water
and a mild cleaner such as COMET®, AJAX®, BON AMI®, BAR KEEPERS FRIEND®,
SOFT SCRUB® and a green SCOTCH BRITE™ pad.
Some very stubborn stains may require a dilute solution of bleach. DO NOT leave
concentrated bleach soaking in your sink. (This could cause your sink to discolor).
Aluminum kitchen utensils and pots and pans may leave a silver mark on your
sink. These marks can easily be removed with an abrasive cleaner or a SCOTCH
BRITE™ pad. Hard water deposits can be removed with an abrasive cleaner,
vinegar or lemon juice.
To prevent staining and discoloration of your sink always rinse your sink after
use with clean warm water.
Maintenance
Your Granite sink is resistant to normal household detergents. However, avoid
prolonged exposure to paint strippers, caustic soda, descalers and nail varnish.
These items could cause your sink to discolor.
Do not use wire wool or steel soap pads as steel particles can become
embedded in your sink and rust.
Your sink will withstand temperatures of up to 550 degrees F. Most accessories such
as wire baskets will not withstand temperatures that extreme and may melt.
Always rinse your sink with warm clean water after use. If you have hard
water, you should also wipe your sink dry.
Periodically wipe down sink with vegetable oil to repel mineral and
calcium deposits.
LIMITED LIFETIME WARRANTY
Products are warranted to be free from defects in materials and workmanship for the
following period: from the date of sale to the user.
This warranty does not cover:
1. Any obligation other than the replacement of defective parts when presented to the
selling distributor, together with proof of purchase during the warranty period.
2. Any labor charges, removal and reinstallation expense, freight or postage, or any
incidental or consequential damages resulting from any defective product.
3. Products classi ed as “accessories.
This warranty shall be voided by any of the following:
1. Modi cation to this product.
2. Improper installation, care or maintenance of the product.
3. Use of product for any purpose other than that for which speci cally intended.
This warranty supersedes all other warranties, expressed or implied.
The foregoing warranties are exclusive and made only to the Buyer. NO OTHER
WARRANTY, WHETHER EXPRESSED, IMPLIED, OR STATUTORY INCLUDING ANY WARRANTY
OF MERCHANTABILITY OF FITNESS FOR A PARTICULAR PURPOSE SHALL EXIST IN
CONNECTION WITH ANY OF THE GOODS OR SERVICES SUPPLIED HEREUNDER, AND ALL
SUCH WARRANTIES ARE HEREBY EXPRESSLY EXCLUDED. No employee, agent or other
person is authorized to give any warranties in addition to or di erent from those
herein given to assume any other liability in connection with any of its products except
in writing which is signed by an o cer and expressly and intentionally gives such
warranties or assumes such liability.
Comet® is a registered trademark of Prestige Brands Holdings, Inc. AJAX® is a registered trademark of Colgate-Palmolive Company. Bon Ami®
is a registered trademark of The Faultless Starch / Bon Ami Company. Bar Keepers Friend® is a registered trademark of Servaas Laboratories.
Soft Scrub® is a registered trademark of The Dial Corporation, A Henkel Company. Scotch Brite™ is a registered trademark of 3M.
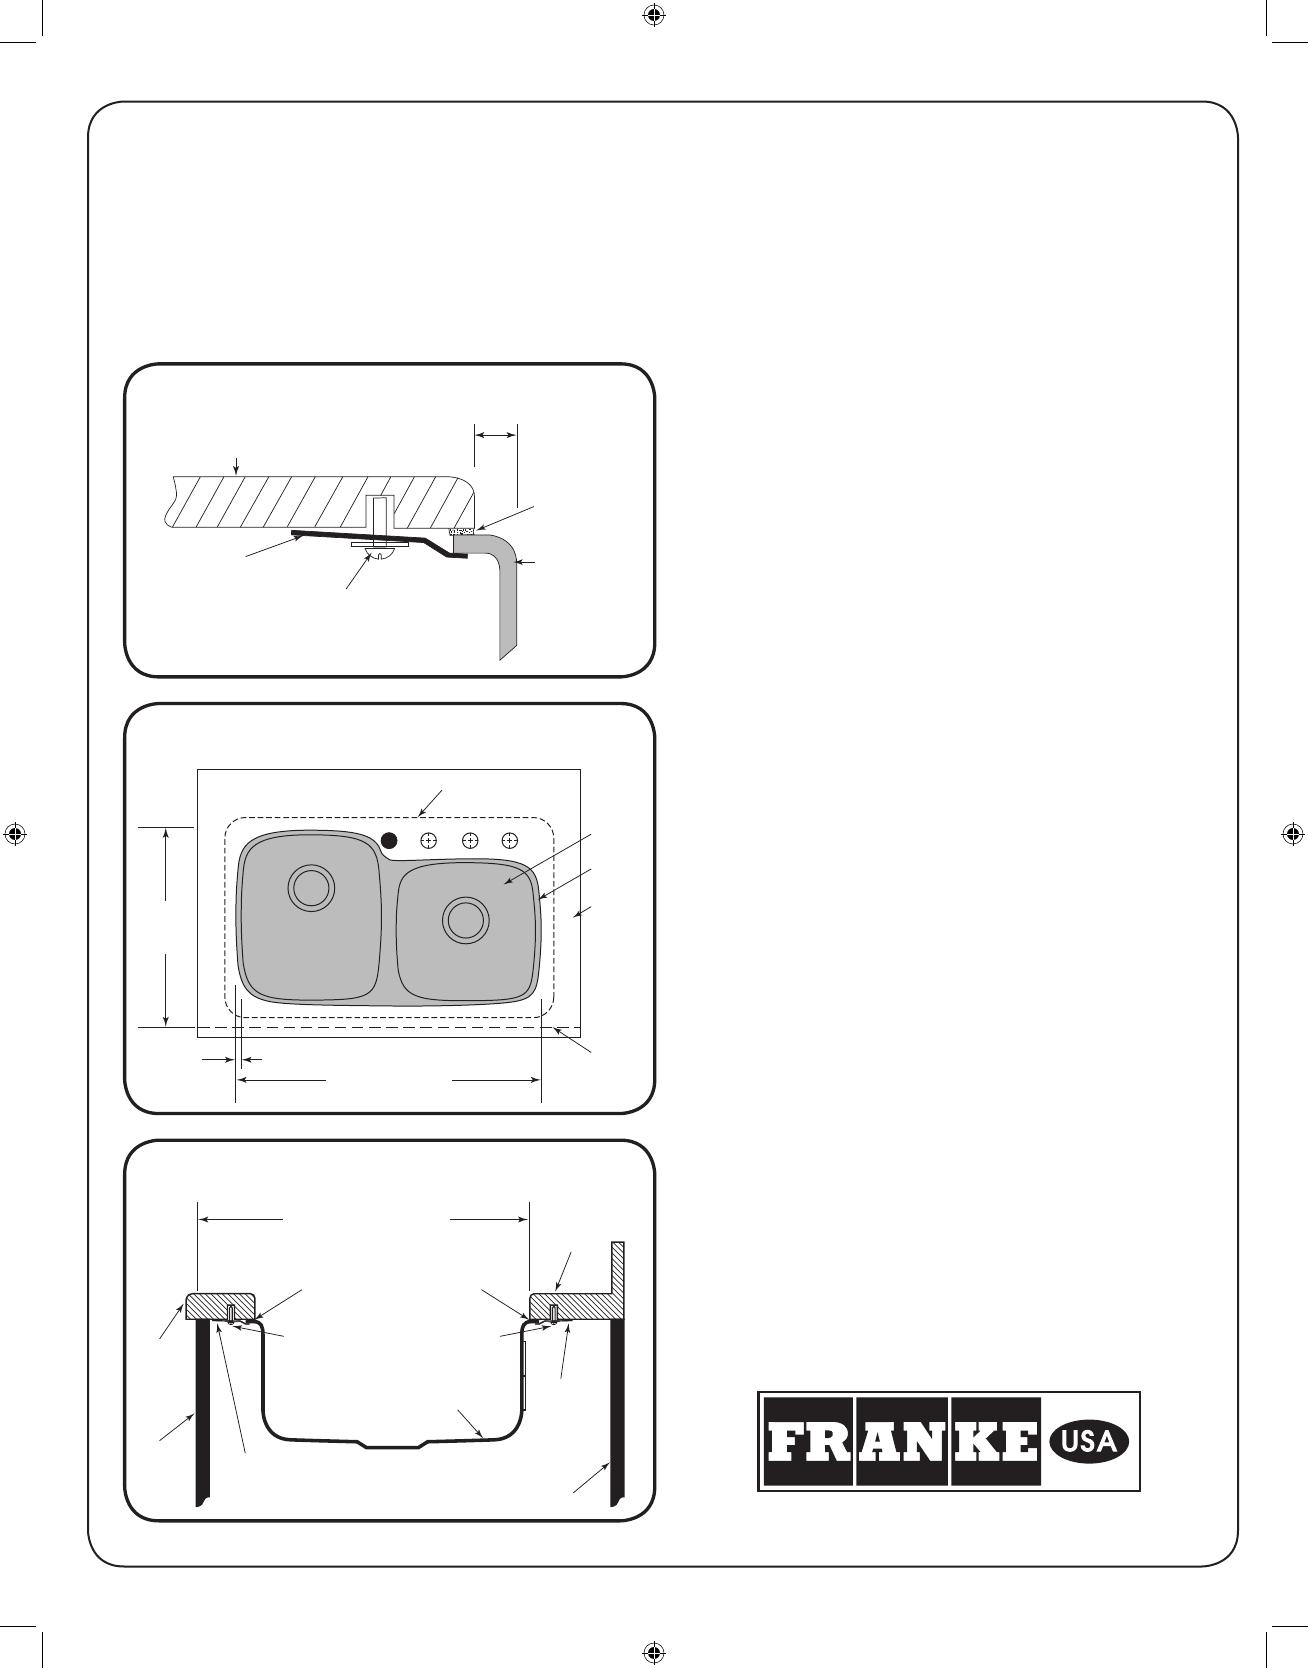
UNDERMOUNT INSTALLATION
Professional Installation Recommended: Only use natural stone or a solid surface
material like granite, marble, Corian® or Quartz. Have sink and accessory openings
cut by a professional. A cutting mistake will be costly. (We recommend comparing the
template provided to the sink before cutting the countertop.)
Minimal Gap
Front
of Cabinet
Cabinet
Sink Prole
Fastener
(not furnished)
Fastener
(not furnished)
Mounting Clip
(furnished)
Mounting Clip
(furnished)
Countertop
Depth from cabinet front for 3/8" reveal.
Minimal Gap
Countertop
FIGURE 3
FIGURE 3
Sink Prole
Opening in
countertop
Visible sink
Countertop
Cabinet
Base
Depth from
cabinet front
for 3/8" reveal.
Countertop
recessed 3/8"
Width for 3/8" reveal.
FIGURE 2
FIGURE 2
Mounting Clip
(furnished)
Fastener
(not furnished)
Counter Top
FIGURE 1
3/8" Sink Rim Reveal
Countertop recessed
approx. 3/8"
Silicone Sealant
(not furnished)
Sink
FIGURE 1
Corian® is a registered trademark of DuPont™.
ww w.frankeconsumerproducts.com
NOTE: The illustrations are a representation of a sink and may di er from the
style of your sink. The instructions still apply to your installation.
Granite_Install_Broch_EN_prod.indd 4Granite_Install_Broch_EN_prod.indd 4 2/25/11 4:43 PM2/25/11 4:43 PM
  • Page 1 1
  • Page 2 2
  • Page 3 3
  • Page 4 4

Franke EOOX33229-1 User manual

Type
User manual

Ask a question and I''ll find the answer in the document

Finding information in a document is now easier with AI