JVC KD-G421 User manual

Category
Receiver
Type
User manual
ENGLISHDEUTSCH
РУCCKИЙ
CD RECEIVER
CD-RECEIVER
РЕСИВЕР С ПРОИГРЫВАТЕЛЕМ КОМПАКТ-ДИСКОВ
KD-G421
For installation and connections, refer to the separate manual.
Für den Einbau und die Anschlüsse siehe das eigenständige Handbuch.
Указания по установке и выполнению соединений приводятся в отдельной инструкции.
INSTRUCTIONS
BEDIENUNGSANLEITUNG
ИНСТРУКЦИИ ПО ЭКСПЛУАТАЦИИ
GET0352-006A
[EY]
For canceling the display demonstration, see page 5.
Zum Abbrechen der Displaydemonstration siehe Seite 5.
Информацию об отмене демонстрации функций дисплея см. на стр. 5.
Cover_KD-G421[EY]006A_f.indd 2Cover_KD-G421[EY]006A_f.indd 2 11/26/05 2:34:29 PM11/26/05 2:34:29 PM
2
ENGLISH
How to use the MODE button
If you press MODE, the unit goes into functions
mode, then the number buttons and 5/
buttons work as different function buttons.
Ex.: When number button 2 works as
MO (monaural) button.
To use these buttons for their original
functions again after pressing MODE, wait for
5 seconds without pressing any of these buttons
until the functions mode is cleared or press
MODE again.
How to reset your unit
Your preset adjustments will also be erased.
How to forcibly eject a disc
If this does not work, reset your unit.
Be careful not to drop the disc when it ejects.
How to detach/attach the control panel
Time countdown indicator
Thank you for purchasing a JVC product.
Please read all instructions carefully before operation, to ensure your complete understanding and to
obtain the best possible performance from the unit.
IMPORTANT FOR LASER PRODUCTS
1. CLASS 1 LASER PRODUCT
2. CAUTION: Do not open the top cover. There are no user serviceable parts inside the unit; leave
all servicing to qualified service personnel.
3. CAUTION: Visible and invisible laser radiation when open and interlock failed or defeated.
Avoid direct exposure to beam.
4. REPRODUCTION OF LABEL: CAUTION LABEL, PLACED OUTSIDE THE UNIT.
Detaching...
Attaching...
EN02-05KD-G421[EX_EU]f.indd 2EN02-05KD-G421[EX_EU]f.indd 2 11/22/05 5:43:33 PM11/22/05 5:43:33 PM
ENGLISH
3
How to read this manual
Button operations are mainly explained with
the illustrations in the table below.
Some related tips and notes are explained in
“More about this unit” (see pages 21 – 23).
Press briefly.
Press repeatedly.
Press either
one.
Press and hold until your
desired response begins.
Press and hold both
buttons at the same time.
The following marks are used to indicate...
: Built-in CD player operations.
: External CD changer operations.
: Indicator displayed for the
corresponding operation.
Warning:
If you need to operate the unit while driving,
be sure to look ahead carefully or you may be
involved in a traffic accident.
For security reasons, a numbered ID card
is provided with this unit, and the same ID
number is imprinted on the unit’s chassis.
Keep the card in a safe place, as it will help the
authorities to identify your unit if stolen.
CONTENTS
Control panel ................................... 4
Getting started ................................. 5
Basic operations .................................................... 5
Radio operations .............................. 6
FM RDS operations ............................ 7
Searching for your favorite FM RDS programme ... 7
Disc operations ................................. 9
Playing a disc in the unit ....................................... 9
Playing discs in the CD changer ............................. 9
Sound adjustments ........................... 12
General settings — PSM ................... 13
DAB tuner operations ........................ 16
iPod®/D. player operations ................ 17
Other external component operations
... 19
Remote controller —
RM-RK60 ............. 20
More about this unit ......................... 21
Maintenance .................................... 24
Troubleshooting ............................... 24
Specifications ................................... 27
For safety...
Do not raise the volume level too much, as
this will block outside sounds, making driving
dangerous.
Stop the car before performing any
complicated operations.
Temperature inside the car...
If you have parked the car for a long time in hot
or cold weather, wait until the temperature in
the car becomes normal before operating the
unit.
EN02-05KD-G421[EY]f.indd 3EN02-05KD-G421[EY]f.indd 3 11/26/05 4:33:11 PM11/26/05 4:33:11 PM
4
ENGLISH
1 (standby/on attenuator) button
2 5 (up) / (down) and 4
/¢
buttons
3 Remote sensor
You can control this unit with an
optionally purchased remote controller. For
details, see page 20.
DO NOT expose the remote sensor to
strong light (direct sunlight or artificial
lighting).
4 Loading slot
5 Display window
6 0 (eject) button
7 T/P (traffic programme/programme type)
button
8 SRC (source) button
9 BAND button
p Control dial
q SEL (select) button
w EQ (equalizer) button
e MO (monaural) button
r SSM (Strong-station Sequential Memory)
button
t Number buttons
y RPT (repeat) button
u RND (random) button
i MODE button
o DISP (display) button
;
(control panel release) button
Display window
a Disc type indicators—WMA, MP3
s Playback source indicators—
CH: Lights up only when CD-CH is selected
as the playback source.
DISC: Lights up for the built-in CD player.
d Playback mode / item indicators—
RND (random),
(disc), (folder),
RPT (repeat)
f LOUD (loudness) indicator
g EQ (equalizer) indicator
h Sound mode (C-EQ: custom equalizer)
indicators—JAZZ, CLASSIC, HIP HOP
POPS, ROCK, USER
j Tr (track) indicator
k Disc information indicators—TAG (ID3
Tag),
(folder), (track/file)
l Source display / Volume level indicator
/ Main display
z RDS indicators—TP, PTY, AF, REG
x Tuner reception indicators—ST (stereo),
MO (monaural)
Control panel
Display window
Parts identification
EN02-05KD-G421[EX_EU]f.indd 4EN02-05KD-G421[EX_EU]f.indd 4 11/22/05 5:43:40 PM11/22/05 5:43:40 PM
ENGLISH
5
@ Adjust the sound as you want. (See
pages 12 and 13.)
To drop the volume in a
moment (ATT)
To restore the sound, press
it again.
To turn off the power
Basic settings
See also “General settings — PSM” on pages
13 – 15.
1
2
1 Canceling the display
demonstrations
Select “DEMO,” then “DEMO OFF.”
2 Setting the clock
Select “CLOCK H” (hour), then adjust
the hour.
Select “CLOCK M” (minute), then
adjust the minute.
Select “24H/12H,” then “24H” (hour) or
“12H” (hour).
3 Finish the procedure.
To check the current clock
time when the power is
turned off
Getting started
Basic operations
~ Turn on the power.
Ÿ
* You cannot select these sources if they
are not ready or not connected.
!
For FM/AM tuner
For DAB tuner
Adjust the volume.
Caution on volume setting:
Discs produce very little noise compared
with other sources. Lower the volume
before playing a disc to avoid damaging
the speakers by the sudden increase of the
output level.
Volume level appears.
Volume level indicator
EN02-05KD-G421[EX_EU]f.indd 5EN02-05KD-G421[EX_EU]f.indd 5 11/22/05 5:43:41 PM11/22/05 5:43:41 PM
6
ENGLISH
When an FM stereo broadcast is hard to
receive
Reception improves, but stereo effect will be
lost.
To restore the stereo effect, repeat the same
procedure. “MONO OFF” appears and the MO
indicator goes off.
Storing stations in memory
You can preset six stations for each band.
FM station automatic presetting
SSM (Strong-station Sequential
Memory)
1 Select the FM band (FM1 – FM3) you
want to store into.
2
3
“SSM” flashes, then disappears when
automatic presetting is over.
Local FM stations with the strongest signals are
searched and stored automatically in the FM
band.
Radio operations
~
Ÿ
!
Start searching for a station.
When a station is received, searching
stops.
To stop searching, press the same button
again.
To tune in to a station manually
In step ! above...
1
2 Select a desired station frequency.
Lights up when receiving an FM stereo
broadcast with sufficient signal strength.
Selected band appears.
Lights up when monaural mode is activated.
EN06-11KD-G421[EX_EU]f.indd 6EN06-11KD-G421[EX_EU]f.indd 6 11/22/05 5:44:13 PM11/22/05 5:44:13 PM
7
ENGLISH
Manual presetting
Ex.: Storing FM station of 92.5 MHz into preset
number 4 of the FM1 band.
1
2
3
Listening to a preset station
1
2 Select the preset station (1 – 6) you
want.
To check the current clock time while
listening to an FM (non-RDS) or AM station
For FM RDS stations, see page 9.
FM RDS operations
What you can do with RDS
RDS (Radio Data System) allows FM stations
to send an additional signal along with their
regular programme signals.
By receiving the RDS data, this unit can do the
following:
Programme Type (PTY) Search (see the
following)
TA (Traffic Announcement) and PTY
Standby Receptions (see pages 8 and 14)
Tracing the same programme automatically
—Network-Tracking Reception (see page 9)
Programme Search (see page 14)
Searching for your favorite
FM RDS programme
You can tune in to a station broadcasting your
favorite programme by searching for a PTY
code.
To store your favorite programme types, see
page 8.
~
The last selected PTY code appears.
Ÿ Select one of your favorite preset
programme types.
or
Select one of the PTY codes (see
page 9).
Frequency Ô Clock
To be continued....
Preset number flashes for a while.
EN06-11KD-G421[EX_EU]f.indd 7EN06-11KD-G421[EX_EU]f.indd 7 11/22/05 5:44:21 PM11/22/05 5:44:21 PM
8
ENGLISH
Using the standby receptions
TA Standby Reception
TA Standby Reception allows the unit to switch
temporarily to Traffic Announcement (TA)
from any source other than AM.
The volume changes to the preset TA volume
level if the current level is lower than the preset
level (see page 14).
To activate TA Standby Reception
The TP (Traffic Programme)
indicator either lights up or
flashes.
If the TP indicator lights up, TA Standby
Reception is activated.
If the TP indicator flashes, TA Standby
Reception is not yet activated. (This occurs
when you are listening to an FM station
without the RDS signals required for TA
Standby Reception.)
To activate TA Standby Reception, tune in to
another station providing these signals. The
TP indicator will stop flashing and remain lit.
To deactivate the TA Standby Reception
The TP indicator goes off.
PTY Standby Reception
PTY Standby Reception allows the unit to
switch temporarily to your favorite PTY
programme from any source other than AM.
To activate and select your favorite PTY code
for PTY Standby Reception, see page 14.
The PTY indicator either lights up or flashes.
If the PTY indicator lights up, PTY Standby
Reception is activated.
If the PTY indicator flashes, PTY Standby
Reception is not yet activated.
To activate PTY Standby Reception, tune in
to another station providing these signals. The
PTY indicator will stop flashing and remain
lit.
To deactivate the PTY Standby Reception,
select “OFF” for the PTY code (see page 14).
The PTY indicator goes off.
! Start searching for your favorite
programme.
If there is a station broadcasting a
programme of the same PTY code as you
have selected, that station is tuned in.
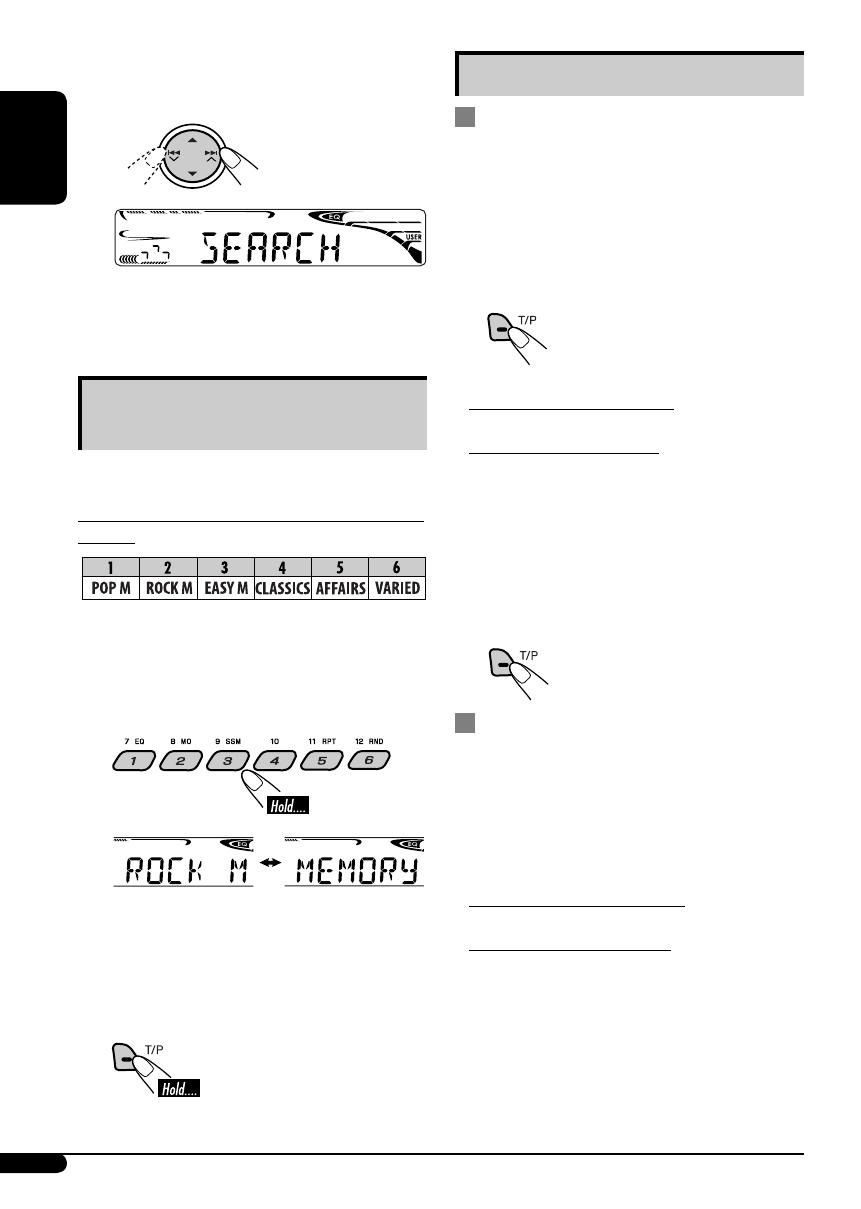
Storing your favorite programme
types
You can store six favorite programme types.
Preset programme types in the number buttons
(1 to 6):
1 Select a PTY code (see page 7).
2 Select the preset number (1 – 6) you
want to store into.
3 Repeat steps 1 and 2 to store other
PTY codes into other preset numbers.
4 Finish the procedure.
Ex.: When “ROCK M” is selected
EN06-11KD-G421[EX_EU]f.indd 8EN06-11KD-G421[EX_EU]f.indd 8 11/22/05 5:44:21 PM11/22/05 5:44:21 PM
9
ENGLISH
Tracing the same programme—
Network-Tracking Reception
When driving in an area where FM reception
is not sufficient enough, this unit automatically
tunes in to another FM RDS station of the
same network, possibly broadcasting the same
programme with stronger signals (see the
illustration below).
When shipped from the factory, Network-
Tracking Reception is activated.
To change the Network-Tracking Reception
setting, see “AF-REG” on page 14.
To check the current clock time while
listening to an FM RDS station
PTY codes
NEWS, AFFAIRS, INFO, SPORT, EDUCATE, DRAMA, CULTURE,
SCIENCE, VARIED, POP M (music), ROCK M (music), EASY
M (music), LIGHT M (music), CLASSICS, OTHER M (music),
WEATHER, FINANCE, CHILDREN, SOCIAL, RELIGION, PHONE
IN, TRAVEL, LEISURE, JAZZ, COUNTRY, NATION M (music),
OLDIES, FOLK M (music), DOCUMENT
Disc operations
Playing a disc in the unit
All tracks will be played repeatedly until you
change the source or eject the disc.
To stop play and eject the
disc
Playing discs in the CD changer
All discs in the magazine will be played
repeatedly until you change the source.
Ejecting the magazine will also stop playing.
~
* If you have changed the external input
setting to “EXT IN” (see page 15), you
cannot select the CD changer.
Ÿ Select a disc.
For disc number from 01 – 06:
For disc number from 07 – 12:
Station name (PS) = Station
Frequency = Programme type
(PTY) = Clock = (back to the
beginning)
To be continued....
Programme A broadcasting on different frequency areas
(01 – 05)
EN06-11KD-G421[EX_EU]f.indd 9EN06-11KD-G421[EX_EU]f.indd 9 11/22/05 5:44:22 PM11/22/05 5:44:22 PM
10
ENGLISH
About MP3 and WMA discs
MP3 and WMA “tracks” (words “file” and
“track” are used interchangeably) are recorded
in “folders.”
About the CD changer
It is recommended to use a JVC MP3-
compatible CD changer with your unit.
You can also connect other CH-X series CD
changers (except CH-X99 and CH-X100).
These units are not compatible with MP3
discs.
You cannot play any WMA disc in the CD
changer.
You cannot use the KD-MK series CD
changers with this unit.
Disc text information recorded in the CD
Text can be displayed when a JVC CD Text
compatible CD changer is connected.
For connection, see Installation/Connection
Manual (separate volume).
To fast-forward or reverse the track
To go to the next or previous tracks
To go to the next or previous folders (only for
MP3 or WMA discs)
For MP3 discs:
For WMA discs:
To locate a particular track (for CD) or folder
(for MP3 or WMA discs) directly
To select a number from 01 – 06:
To select a number from 07 – 12:
To use direct folder access on MP3/WMA
discs, it is required that folders are assigned
with 2-digit numbers at the beginning of their
folder names—01, 02, 03, and so on.
To select a particular track in a folder (for
MP3 or WMA discs):
EN06-11KD-G421[EX_EU]f.indd 10EN06-11KD-G421[EX_EU]f.indd 10 11/22/05 5:44:23 PM11/22/05 5:44:23 PM
11
ENGLISH
Other main functions
Skipping tracks quickly during play
Only possible on JVC
MP3-compatible CD changer
For MP3 or WMA discs, you can skip tracks
within the same folder.
Ex.: To select track 32 while playing a track
whose number is a single digit (1 to 9)
1
2
Each time you press the button, you can
skip 10 tracks.
After the last track, the first track will be
selected and vice versa.
3
Prohibiting disc ejection
You can lock a disc in the loading slot.
To cancel the prohibition, repeat the same
procedure.
Changing the display information
While playing an audio CD or a CD Text
While playing an MP3 or a WMA
*
2
disc
When “TAG DISP” is set to
“TAG ON” (see page 15)
When “TAG DISP” is set to
“TAG OFF”
: Elapsed playing time with the current
track number
: Clock with the current track number
*
1
If the current disc is an audio CD,
“NO NAME” appears.
*
2
Only for the built-in CD player.
*
3
If an MP3/WMA file does not have Tag
information, folder name and file name
appear. In this case, the TAG indicator will
not light up.
EN06-11KD-G421[EX_EU]f.indd 11EN06-11KD-G421[EX_EU]f.indd 11 11/22/05 5:44:24 PM11/22/05 5:44:24 PM
12
ENGLISH
Selecting the playback modes
You can use only one of the following playback
modes at a time.
1
2 Select your desired playback mode.
7 Repeat play
Mode Plays repeatedly
TRK RPT : The current track.
FLDR RPT*
1
: All tracks of the current
folder.
DISC RPT*
2
: All tracks of the current disc.
RPT OFF : Cancels.
7 Random play
Mode Plays at random
FLDR RND*
1
: All tracks of the current
folder, then tracks of the next
folder and so on.
DISC RND : All tracks of the current disc.
MAG RND*
2
: All tracks of the inserted
discs.
RND OFF : Cancels.
*
1
Only while playing an MP3 or a WMA
disc.
*
2
Only while playing discs in the CD
changer.
Sound adjustments
You can select a preset sound mode suitable to
the music genre (C-EQ: custom equalizer).
1
2
Indication (For)
BAS TRE LOUD
(bass) (treble)
(loudness)
USER
(Flat sound)
00 00 OFF
ROCK
(Rock or disco music)
+03 +01 ON
CLASSIC
(Classical music)
+01 –02 OFF
POPS
(Light music)
+04 +01 OFF
HIP HOP
(Funk or rap music)
+02 00 ON
JAZZ
(Jazz music)
+02 +03 OFF
Adjusting the sound
You can adjust the sound characteristics to your
preference.
1
Preset values
EN12-15KD-G421[EX_EU]f.indd 12EN12-15KD-G421[EX_EU]f.indd 12 11/22/05 5:44:43 PM11/22/05 5:44:43 PM
ENGLISH
13
2
Indication [Range]
BAS*
1
(bass)
Adjust the bass. [–06 to +06]
TRE*
1
(treble)
Adjust the treble. [–06 to +06]
FAD*
2
(fader)
Adjust the front and rear speaker balance.
[R06 to F06]
BAL (balance)
Adjust the left and right speaker balance.
[L06 to R06]
LOUD*
1
(loudness)
Boost low and high frequencies to produce a
well-balanced sound at low volume level.
[LOUD ON or LOUD OFF]
VOL (volume)
Adjust the volume. [00 to 30 or 50*
3
]
*
1
When you adjust the bass, treble, or loudness,
the adjustment you have made is stored for
the currently selected sound mode (C-EQ)
including “USER.”
*
2
If you are using a two-speaker system, set the
fader level to “00.”
*
3
Depending on the amplifier gain control
setting. (See page 15 for details.)
General settings — PSM
You can change PSM (Preferred Setting Mode)
items listed in the table that follows.
1
2 Select a PSM item.
3 Adjust the PSM item selected.
4 Repeat steps 2 and 3 to adjust the
other PSM items if necessary.
5 Finish the procedure.
To be continued....
Ex.: When “TRE” is selected
Ex.: When “DIMMER” is selected
EN12-15KD-G421[EX_EU]f.indd 13EN12-15KD-G421[EX_EU]f.indd 13 11/22/05 5:44:49 PM11/22/05 5:44:49 PM
14
ENGLISH
Indications Selectable settings, [reference page]
DEMO
Display demonstration
DEMO ON : [Initial]; Display demonstration will be activated
automatically if no operation is done for about
20 seconds, [5].
DEMO OFF : Cancels.
CLOCK H
Hour adjustment
0 – 23 (1 – 12), [5]
[Initial: 0 (0:00)]
CLOCK M
Minute adjustment
00 – 59, [5]
[Initial: 00 (0:00)]
24H/12H
Time display mode
12H O 24H, [5]
[Initial: 24H]
CLK ADJ*
1
Clock adjustment
AUTO : [Initial]; The built-in clock is automatically adjusted
using the CT (clock time) data in the RDS signal.
OFF : Cancels.
AF-REG*
1
Alternative frequency/
regionalization reception
When the received signals from the current FM RDS station or DAB
service become weak...
AF : [Initial]; Switches to another station (or service)
(the programme may differ from the one currently
received), [9, 17].
The AF indicator lights up.
AF REG : Switches to another station broadcasting the same
programme.
The AF and REG indicators light up.
OFF : Cancels (not selectable when “DAB AF” is set to
“AF ON”).
PTY-STBY*
1
PTY standby
Activates PTY Standby Reception with one of the PTY codes, [8].
OFF [Initial] = PTY codes, [9] = (back to the beginning)
TA VOL*
1
Traffic announcement
volume
[Initial: VOL 15]; VOL 00 — VOL 30 or 50*
2
, [8, 21]
P-SEARCH*
1
Programme search
ON : Using the AF data, the unit tunes in to another
frequency broadcasting the same programme as the
original preset RDS station is if the preset station
signals are not sufficient.
OFF : [Initial]; Cancels.
*
1
Only for FM RDS stations.
*
2
Depends on the amplifier gain control.
EN12-15KD-G421[EY]f.indd 14EN12-15KD-G421[EY]f.indd 14 11/28/05 3:50:15 PM11/28/05 3:50:15 PM
ENGLISH
15
Indications Selectable settings, [reference page]
DAB AF*
3
Alternative frequency
reception
AF ON : [Initial]; Traces the programme among DAB services
and FM RDS stations, [9, 17].
AF OFF : Cancels.
DAB VOL*
3
DAB volume adjustment
You can adjust the volume level (VOL –12 — VOL +12) of DAB
tuner to match the FM sound level and store it in memory.
[Initial: VOL 00]
DIMMER
Dimmer
ON : Dims the display illumination of this unit.
OFF : [Initial]; Cancels.
TEL
Telephone muting
MUTING 1/MUTING 2 : Select either one which mutes the sounds
while using a cellular phone.
OFF : [Initial]; Cancels.
SCROLL*
4
Scroll
ONCE : [Initial]; Scrolls the disc information once.
AUTO : Repeats scrolling (5-second intervals in between).
OFF : Cancels.
Pressing DISP for more than one second can scroll the display
regardless of the setting.
EXT IN*
5
External input
CHANGER : [Initial]; To use a JVC CD changer, [9], an Apple iPod
or a JVC D. player, [17].
EXT IN : To use any other external component than the above,
[19].
TAG DISP
Tag display
TAG ON : [Initial]; Shows the Tag information while playing
MP3/WMA tracks, [11].
TAG OFF : Cancels.
AMP GAIN
Amplifier gain control
You can change the maximum volume level of this unit.
LOW PWR : VOL 00 – VOL 30 (Select this if the maximum power
of the speaker is less than 50 W to prevent them from
being damaged.)
HIGH PWR : [Initial]; VOL 00 – VOL 50
IF BAND
Intermediate frequency
filter
AUTO : [Initial];
Increases the tuner selectivity to reduce
interference noises between close stations. (Stereo
effect may be lost.)
WIDE : Subject to interference noises from adjacent stations,
but sound quality will not be degraded and the stereo
effect will remain.
*
3
Displayed only when DAB tuner is connected.
*
4
Some characters or symbols will not be shown correctly (or will be blanked) on the display.
*
5
Displayed only when one of the following sources is selected—FM, AM, or DISC.
EN12-15KD-G421[EX_EU]f.indd 15EN12-15KD-G421[EX_EU]f.indd 15 11/22/05 5:44:50 PM11/22/05 5:44:50 PM
16
ENGLISH
Select a service (either primary or
secondary) to listen to.
To tune in to an ensemble manually
Start searching for an ensemble, as in step ! on
the left column.
1
2 Select the desired ensemble frequencies.
Storing DAB services in memory
You can preset six DAB services (primary) for
each band.
1 Select a service you want (see steps ~
to on the left column).
2 Select the preset number (1 – 6) you
want to store into.
DAB tuner operations
What is DAB system?
Digital Audio Broadcasting (DAB) can deliver
digital quality sound without any annoying
interference and signal distortion. Furthermore,
it can carry text, pictures, and data. When
transmitting, DAB combines several
programmes (called “services”) to form one
“ensemble.” In addition, each “service”—called
“primary service”—can also be divided into its
components (called “secondary service”). A
typical ensemble has six or more programmes
(services) broadcast at the same time.
By connecting the DAB tuner, this unit can do
the following:
Tracing the same programme automatically
—Alternative Frequency Reception (see
“DAB AF” on page 15).
It is recommended to use DAB tuner
KT-DB1000 with your unit. If you have
another DAB tuner, consult your JVC
IN-CAR ENTERTAINMENT dealer.
Refer also to the Instructions supplied for
your DAB tuner.
~
Ÿ
! Start searching for an ensemble.
When an ensemble is received, searching
stops.
To stop searching, press the same button
again.
Preset number flashes for a while.
EN16-23KD-G421[EX_EU]f.indd 16EN16-23KD-G421[EX_EU]f.indd 16 11/22/05 5:45:11 PM11/22/05 5:45:11 PM
ENGLISH
17
Tuning in to a preset DAB service
1
2 Select the preset DAB service
(primary) number (1 – 6) you want.
If the selected primary service has some
secondary services, pressing the same
button again will tune in to the secondary
services.
Tracing the same programme—
Alternative Frequency Reception
You can keep listening to the same programme
by activating the Alternative Frequency
Reception.
While receiving a DAB service:
When driving in an area where a service
cannot be received, this unit automatically
tunes in to another ensemble or FM RDS
station, broadcasting the same programme.
While receiving an FM RDS station:
When driving in an area where a DAB service
is broadcasting the same programme as the
FM RDS station is broadcasting, this unit
automatically tunes in to the DAB service.
When shipped from the factory, Alternative
Frequency Reception is activated.
To deactivate the Alternative Frequency
Reception, see page 14 and 15.
To change the display information while
tuning to an ensemble
Service name = Ensemble name = Channel
number = Frequency = Clock = (back to the
beginning)
iPod®/D. player operations
This unit is ready for operating an Apple iPod
or a JVC D. player from the control panel.
Before operating your iPod or D. player:
Connect either one of the following (separately
purchased) to the CD changer jack on the rear
of this unit.
Interface adapter for iPod
®
—KS-PD100 for
controlling an iPod.
D. player interface adapter—KS-PD500 for
controlling a D. player.
For connection, see Installation/Connection
Manual (separate volume).
For details, refer also to the manual supplied
with the interface adapter.
Caution:
Make sure to turn off this unit or turn off the
vehicle’s ignition switch before connecting
or disconnecting the iPod or D. player.
Preparations:
Make sure “CHANGER” is selected for the
external input setting, see page 15.
~
Ÿ
Playback starts automatically from
where it has been paused*
1
or stopped*
2
previously.
! Adjust the volume.
To be continued....
EN16-23KD-G421[EX_EU]f.indd 17EN16-23KD-G421[EX_EU]f.indd 17 11/22/05 5:45:17 PM11/22/05 5:45:17 PM
18
ENGLISH
Adjust the sound as you want. (See
pages 12 and 13.)
Make sure the equalizer on the iPod or
D. player is deactivated.
To pause*
1
or
stop*
2
playback
To resume
playback, press it
again.
To fast-forward or
reverse the track
To go to the next
or previous tracks
*
1
For iPod
*
2
For D. player
Selecting a track from the menu
1 Enter the main menu.
Now the 5// 4 /¢ buttons
work as the menu selecting buttons*
3
.
2 Select the desired menu.
For iPod:
PLAYLIST Ô ARTISTS Ô ALBUMS Ô SONGS
Ô GENRES Ô COMPOSER Ô (back to the
beginning)
For D. player:
PLAYLIST Ô ARTIST Ô ALBUM Ô GENRE
ÔTRACK Ô (back to the beginning)
3 Confirm the selection.
To move back to the previous
menu, press 5.
If a track is selected, playback starts
automatically.
If the selected item has another layer, you
will enter the layer. Repeat steps 2 and 3
until the desired track is played.
Holding 4
/¢ can skip 10
items at a time.
*
3
The menu selecting mode will be canceled:
If no operations are done for about
5 seconds.
When you confirm the selection of a track.
Selecting the playback modes
1
2 Select your desired playback mode.
7 Repeat play
ONE RPT
Functions the same as “Repeat One” of
the iPod or “Repeat Mode One” for the
D. player.
ALL RPT
Functions the same as “Repeat All” of the
iPod or “Repeat Mode All” for the D. player.
RPT OFF
Cancels.
EN16-23KD-G421[EX_EU]f.indd 18EN16-23KD-G421[EX_EU]f.indd 18 11/22/05 5:45:18 PM11/22/05 5:45:18 PM
ENGLISH
19
Other external component
operations
You can connect an external component to
the CD changer jack on the rear using the Line
Input Adapter—KS-U57 (not supplied) or AUX
Input Adapter—KS-U58 (not supplied).
For connection, see Installation/Connection
Manual (separate volume).
For listening to the iPod or D. player, refer to
pages 17 – 19.
~
If “EXT IN” does not appear, see page 15
and select the external input (“EXT IN”).
Ÿ Turn on the connected component
and start playing the source.
! Adjust the volume.
Adjust the sound as you want. (See
pages 12 and 13.)
To check the clock time while listening to an
external component
EXT IN Ô Clock
7 Random play
ALBM RND*
4
Functions the same as “Shuffle Albums” of
the iPod.
SONG RND/RND ON
Functions the same as “Shuffle Songs” of the
iPod or “Random Play On” of the D. player.
RND OFF
Cancels.
*
4
For iPod: Only if you select “ALL” in
“ALBUMS” of the main “MENU.”
To check other information while listening to
an iPod or a D. player
EN16-23KD-G421[EX_EU]f.indd 19EN16-23KD-G421[EX_EU]f.indd 19 11/25/05 12:01:16 PM11/25/05 12:01:16 PM
20
ENGLISH
Main elements and features
1 (standby/on attenuator) button
Turns the power on if pressed briefly or
attenuates the sound when the power is
on.
Turns the power off if pressed and held.
2 SRC (source) button
Selects the source.
3 R (reverse) / F (forward) buttons
Searches for stations (or services) if
pressed briefly.
Searches for ensembles if pressed and
held.
Fast-forwards or reverses the track if
pressed and held.
Changes the tracks if pressed briefly.
While listening to an Apple iPod or a
JVC D. player (in menu selecting mode):
Selects an item if pressed briefly.
(Then, press D (down) to confirm the
selection.)
Skips 10 items at a time if pressed and
held.
4 SOUND button
Selects the sound mode (C-EQ: custom
equalizer).
Remote controller — RM-RK60
This unit can be remotely controlled as
instructed here (with an optionally purchased
remote controller). We recommend that you
use remote controller RM-RK60 with your unit.
Installing the lithium coin battery
(CR2025)
Aim the remote controller directly at the
remote sensor on the unit. Make sure there is
no obstacle in between.
Warning:
Do not install any battery other than
CR2025 or its equivalent; otherwise, it may
explode.
Store the battery in a place where children
cannot reach to avoid risk of accident.
To prevent the battery from over-heating,
cracking, or starting a fire:
– Do not recharge, short, disassemble, heat
the battery, or dispose of it in a fire.
– Do not leave the battery with other
metallic materials.
– Do not poke the battery with tweezers or
similar tools.
– Wrap the battery with tape and insulate
when throwing away or saving it.
Caution:
EN16-23KD-G421[EX_EU]f.indd 20EN16-23KD-G421[EX_EU]f.indd 20 11/22/05 5:45:20 PM11/22/05 5:45:20 PM
  • Page 1 1
  • Page 2 2
  • Page 3 3
  • Page 4 4
  • Page 5 5
  • Page 6 6
  • Page 7 7
  • Page 8 8
  • Page 9 9
  • Page 10 10
  • Page 11 11
  • Page 12 12
  • Page 13 13
  • Page 14 14
  • Page 15 15
  • Page 16 16
  • Page 17 17
  • Page 18 18
  • Page 19 19
  • Page 20 20
  • Page 21 21
  • Page 22 22
  • Page 23 23
  • Page 24 24
  • Page 25 25
  • Page 26 26
  • Page 27 27
  • Page 28 28
  • Page 29 29
  • Page 30 30
  • Page 31 31
  • Page 32 32
  • Page 33 33
  • Page 34 34
  • Page 35 35
  • Page 36 36
  • Page 37 37
  • Page 38 38
  • Page 39 39
  • Page 40 40
  • Page 41 41
  • Page 42 42
  • Page 43 43
  • Page 44 44
  • Page 45 45
  • Page 46 46
  • Page 47 47
  • Page 48 48
  • Page 49 49
  • Page 50 50
  • Page 51 51
  • Page 52 52
  • Page 53 53
  • Page 54 54
  • Page 55 55
  • Page 56 56
  • Page 57 57
  • Page 58 58
  • Page 59 59
  • Page 60 60
  • Page 61 61
  • Page 62 62
  • Page 63 63
  • Page 64 64
  • Page 65 65
  • Page 66 66
  • Page 67 67
  • Page 68 68
  • Page 69 69
  • Page 70 70
  • Page 71 71
  • Page 72 72
  • Page 73 73
  • Page 74 74
  • Page 75 75
  • Page 76 76
  • Page 77 77
  • Page 78 78
  • Page 79 79
  • Page 80 80

JVC KD-G421 User manual

Category
Receiver
Type
User manual

Ask a question and I''ll find the answer in the document

Finding information in a document is now easier with AI