Makita 6226DW Owner's manual

Category
Power drills
Type
Owner's manual

This manual is also suitable for

Cordless Driver Drill
Equipped with Electric Brake
9.6 V
12V
14.4 V
MODEL 6226DW, 6226DWE
MODEL 6227DW, 6227DWE
MODEL 6228DW, 6228DWE
With Battery ChRger
INSTRUCTION MANUAL
SPECIfiCATIONS
Capacities
Model
Steel Wood Wood screw
lOmm 2tram 5.1 minx 38 mm
6Z260 (3/8") (13/16") (13/_4" x 1-I/2"1
1gram 24rnm 5.1 rr_mx 63 mm
6227D {3/8"1 (15/16") 113/64" x 2-1/2")
10ram 24ram 5.1 mmx 63 rrwn
6228D (3J8") (I_16") {13/6A" x 2-1/_')
Noload speed (RPM) Overafl Net
Machine so'ew High Low length weight
6ram 0-1,100 0-350 210 rnrn 1.4kg
(1/4"} imP. /Ynin. (8-1/4") (3,1 Ibs)
5ram 0-1,100 0-350 210 mrn 1.5kg
(114"} /r_n. /rain. (B-1/4"1 13.3 Ibsl
6mm 0-1,100 0-350 210 rnm 1.6kg
(I/4") hnin. imin. (8-I/4") (3.5 Ibs)
BetteWCartridge Vo_ge Eatte_ charger Input Output CharOn0time
g120 9.0 V 0C9710 A.C.only D.C. 60 n,_n.
50Hz-60 Hz 7.2 V.9.6V
A.C.on_ D,C. 60 rn_n.
1220 12V DC1470 50Hz-e0 Hz 7.2V- 14.4V
A.C.only D.C. 60 rn_n.
1420 14.4V DC1470 50 Hz-60Hz 7.2V- 14.4V
Manufacturer restores the right to change specificationswithout notice.
Note: Specificationsmay differ horn country to countw.
WARNING: Foryou[ personal safety, READend understandbefore using.
SAVE"IHESEINSTRUCTIONS FOR FUTURE REFERENCE.
GENERAL SAFETY RULES
(For All Battery Operated Tools)
WARNING! Read and understand all instructions. Failure
to follow all instructions listed below, may result in electric
shock, fire and/or serious personal injury,
SAVE THESE INSTRUCTIONS
Work Area
1. Keep your work area clean end well lit. Cluttered benches and dark areas invite
accidents.
2. Do not operate power tools in explosive atmospheres, such as in the presence
of flammable liquids, gases, or dust. Power tools create sparks which may
ignite the dust or fumes.
3. Keep bystanders, children, and visitors away while operating a power tool.
Distractions can cause you to lose control.
Electrical Safety
4. A battery operated tool with integral batteries or a separate battery pack
must be recharged only with the specified charger for the battery. A charger
that may be suitable for one type of battery may create a risk of fire when
used with another battery.
5. Usa battery operated tool only with specifically designated battery pack,
Use of any other batteries may create a risk of fire_
Personal Safety
6. Stay alert, watch what you are doing, and use common sense when operating
a power tool. Do not use tool while tlrsd or under the influence of drugs,
alcohol, or medication. A moment of inattention while operating power tools
may result in serious personal injury.
7. Dress properly. Do not wear loose clothing or jewelry. Contain long hair. Keep
your hair, clothing, and gloves away from moving parts. Loose clothes, jewelry,
or long hair can be caught in moving parts.
8. Avoid accidental starting. Be sure switch is in the locked or off position before
inserting battery pack. Carrying tools with your finger on the switch or
inserting the battery pack into a tool with the switch,on invites accidents.
9. Remove adjusting keys or wrenches before turning the tool on. A wrench
or a key that is left attached to a rotating part of the tool may result in personal
injury.
10. Do not overreach, Keep proper footing and balance at all times. Proper footing
and balance enable better control of the tool in unexpected situations.
11. Use safety equipment. Always wear eye protection. Dust mask, non-skid
safety shoes, hard hat, or hearing protection must be used for appropriate
conditions.
ToolUseandCare
12.Useclamps or other practical way to secure and support the workplace to
a stable platform. Holding the work by hand or against your body is unstable
and may lead to loss of control,
13. Do not force tool. Use the correct tool for your application. The correct tool
will do the job better and safer at the rate for which it is designed.
14. Do not use tool if switch does not turn It on or off. A tool that cannot be
controlled with the switch is dangerous and must be repaired.
15. Disconnect battery pack from tool or place the switch in the locked or off
position before making any adjustments, changing accassorles, or storing
the tool. Such preventive safety measures reduce the risk of starting the tool
accidentally.
16. Store idle tools out of reach of chlldrsn and other untrelced persons. Tools
are dangerous in the hands of untrained users,
17. When battery pack is not In use, keep It away from other metal objects like:
paper clips, coins, keys, nails, screws, or other small metal objects that can
make a connection from one terminal to another. Shorting the battery
terminals together may cause sparks, burns, or a fir_
18. Maintain tools with care. Keep cutting tools sharp and clean. Properly
maintained tools with sharp cutting edge are less likely to bind and are easier
to control.
19. Check for mlsallgnmcnt or binding of moving parts, breakage of parts, end
any other condition that may affect the tool's operation. If damaged, have
the tool serviced before using. Many accidents are caused by poorly
maintained tools.
20. Use only eccassodes that are recommended by the manufacturer for your
model. Accessories that may be suitable for one tool may create a risk of injury
when used on another tool.
Service
21. Tool service must be performed only by qualified repair personnel. Service
or maintenance performed by unqualified personnel may result in a dsk of injury.
22.When servicing tool, use only Identical replacement parts. Follow
Instructions In the Maintenance section of this manual. Use of unauthorized
parts or failure to follow Maintenance Instructions may create e risk of shock
or injury.
Specific Safety Rules
1. Hold tool by insulated gripping surfaces when performing an operation where
the cutting tool may contact hidden widng. Contact with a "live" wire will
also make exposed metal parts of the tool "live" and shock the operator.
2. Be aware that this tool is always in an operating condition, because it does
not have to be plugged into an electrical outlet.
3. Always be sure you have s firm footing.
4. Be sure no one is below when using the tool in high locations.
5. Hold the tool firmly.
6. Keep hands away from rotating parts.
7. Do not leave the tool running. Operate the tool only when hand-held.
8. Do not touch the drill bit or the workplace immediately after operation; they
may be extremely hot and could burn your sk]n,
SYMBOLS
The followings show the symbols used for tool.
V ................................. volts
__----= ................................. direct current
no ................................. no load speed
.._nln ................................ revolutions or reciprocation per minute
S
IMPORTANT SAFETY INSTRUCTIONS
FOR CHARGER &
BATTERY CARTRIDGE
1.SAVE THESE INSTRUCTIONS - Thismanual
contains important safety and operating instructions for battery charger.
2. Before using battery charger, read all Instructions and cautionary markings
on (1} battery charger, (2) battery, and (3) product using battery.
3. CAUTION -- To reduce dsk of injury, charge only MAKITA rechargeable
batteries marked on the charger label. Other types of batteries may burst
causing personal injury and damage.
4. Do not expose charger to rain or snow.
5. Use of an attachment not recommended or sold by the battery charger
manufacturer may result In a dsk of fire, alectdc shock, or Injury to persons.
6. To reduce dsk of damage to eloctdo plug and cord, pull by plug rather than
cord when disconnecting charger.
7. Make sure cord Is located so that it will not be stepped on, tripped over, or
otherwise subjected to damage or stress.
8. An extension cord should not be used unless absolutely necessary. Use of
Improper extension cord could result In a dsk of fire and elactdc shock, if
extension cord must be used, make sure:
a. That pins on plug of extension cord are the same number, size, and shape
as those of plug on charger;
b. That extension cord is properly wired end in good electrical condition; and
c. That wire size is at least as large as the one specified in the table below.
TABLE 1
RECOMMENDED MINIMUM AWG SIZE FOR
EXTENSION CORDS FOR BATTERY CHARGERS
Length of Cord (Feet)
1161,611611BI
AWG 61ze of Cord
9. Do not operate charger with damaged cord or plug -- replace them Im-
mediately.
10. Do not operate charger if it has received a sharp blow, been dropped, or other-
wise damaged In any way; take It to a qualified san/Iceman.
11. Do not disassambla charger or battery cartridge; take It to a qualified
serviceman when service or repair Is required. Incorrect rsassambly may
result in a risk of electdc shock or fire.
12. To reduce risk of electric shock, unplug charger from outlet before attempt-
Ing any maintenance or cleaning. Turning off controls wm not reduce this dsk.
6
ADDITIONAL SAFETY RULES °_®"
FOR CHARGER & BATTERY CARTRIDGE
1. Do not charge Battery Cartridge when temperature is BELOW lO°C (50°F)
or ABOVE 40°C (104°F}.
2. Do not attempt to use step-up transformer, an engine generator or DC power
receptacle.
3. Do not allow anything to cover or clog the charger vents.
4. Always cover the battery terminals with the battery cover when the battery
cartridge is not used.
5. A battery short can cause a large current flow, overheating, possible burns
and even a breakdown.
(1) Do not touch the terminals with any conductive material.
(2) Avoid stodng battery cartridge in a container with other metal objects such
as nails, coins, etc.
(3) Do not expose battery cartridge to water or rain.
6. Do not store the tool and Battery Cartridge in locations where the tempera-
ture may reach or exceed 50°C (122°F).
7. Do not incinerate the Battery Cartridge even if It is severely damaged or is
completely worn out. The battery cartridge can explode in e fire.
SAVE THESE INSTRUCTIONS.
7
FUNCTIONAL DESCRIPTION
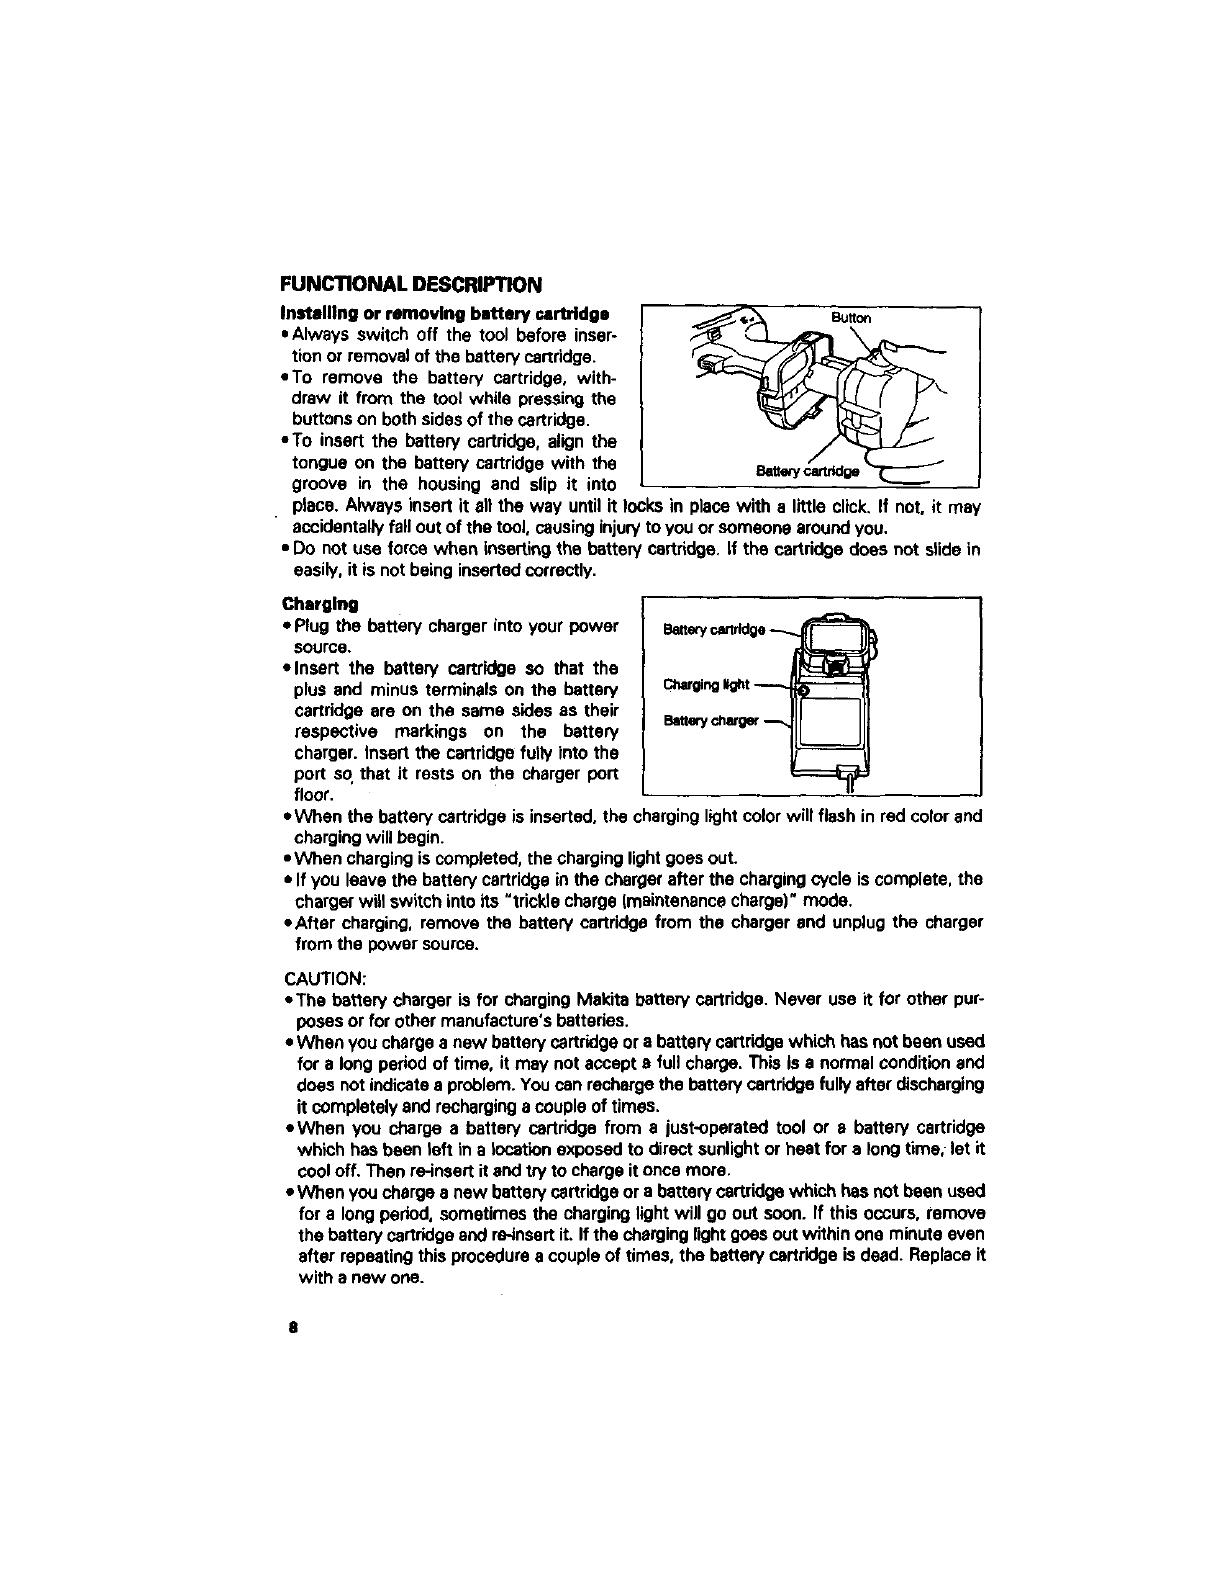
InstelUng or removing battery aartrldge
Always switch off the tool before inser-
tion or removal of the battery cartridge.
=To remove the battery cartridge, with-
draw it from the tool while pressing the
buttons on both sides of the cartridge.
To insert the battery cartridge, align the
tongue on the battery cartridge with the
groove in the housing and slip it into
place. Always insert it all the way until it locks in place with a little click. If not, it may
accidentally fall out of the tool, causing injuryto you or someone around you.
Do not use force when inserting the battery cartridge, if the cartridge does not slide in
easily, it is not being inserted correctly.
Charging
Plug the battery charger into your power
source,
Insert the battery cartridge so that the
plus and minus terminals on the battery
cartridge are on the same sides as their
respective markings on the battery
charger. Insert the cartridge fully into the
port so.that it rests on the charger port
floor.
When the battery cartridge is inserted, the charging light color will flash in red color and
chargingwill begin.
When charging iscompleted, the charging light goes out.
If you leave the battery cartridge in the charger after the chargingcycle iscomplete, the
charger will switch into its "trickle charge (maintenance charge)" mode.
• After charging, remove the battery cartridge from the charger and unplug the charger
from the power source.
CAUTION:
',The battery charger is for charging Makita battery cartridge. Never use it for other pur-
poses or for other manufacture's batteries.
When you charge a new battery cartridge or a battery cartridge which has not been used
for a long period of time, it may not accept a full charge. This is a normal condition and
does not indicate a problem. You can recharge the battery cartridge fully after discharging
it completely and recharging a couple of times.
When you charge a battery cartridge from a just-operated tool or a battery cartridge
which has been left in a lecation exposed to direct sunlight or heat for a long time,, let it
cooloff. Then re-insert it end try to charge it once more.
When you charge a new batten/cartridge or a battery cartridge which has not been used
for a long period, sometimes the charging light will go out soon. If this occurs, remove
the battery cartridge and re-lnsert it. If the che_ginglightgoes out within one minute even
after repeating this procedure a couple of times, the battery cartridge is deed. Replace it
with a new one.
Tricklecharge(Maintenancecharge)
tfyouleavethebatterycartridgeinthechargertopreventspontaneousdischargingafter
ful_charge,thechargerwillswitchintoits"trickle charge (maintenance charge)" mode and
keep the battery cartridge fresh and fullycharged.
Tips for maintaining maximum battery life
1. Charge the battery cartridge before completely discharged.
Always stop tool operation and charge the battew cartridge when you notice less tool
power.
2. Never recharge a fully charged battery cartridge.
Overcharging shortens the battery service life. _
3. Charge the battery cartridge with room temperature at 10°C - 40oc (50°F - 104°F).
Let a hot battery cartridge cooldown before chargingit.
Switch action
CAUTION:
Before inserting the battery cartridge into
the tool, always check to see that the
switch trigger actuates properly and returns
to the "OFF" positionwhen released.
To start the tool, simply pull the trigger.
Tool speed is increased by increasing pres-
sure on the trigger. Release the trigger to
Stop.
Switch t_
Reversing switch action
CAUTION:
,Always check the direction of rotation before operation.
*Use the reversing switch only after the tool comes to a complete stop. Changing the
directionof rotation before the tool stops may damage the tool.
• When not operating the tool, always set
the reversing switch fever to the neutral
position.
This tool has a reversing switch to change
the direction of rotation. Depress the
reversing switch lever from the A side for
clockwise rotation or from the B side for
counterclockwise rotation.When the switch
lever is in the neutral position, the switch
trigger cannot be pulled.
switchk_ver
Aside eside
9
Speed change
To change the speed, first switch off the
tool end then slide the speed change lever
to the "Ill" side for high speed or "l" side
for low speed. Be sure that the speed
change lever is set to the correct position
before operation. Use the right speed for
your job.
Low_
Highspeed
_-- Speedd_nge lever
CAUTION:
Always set the speed change lever fully to the correct position. If you operate the tool
with the speed change lever positioned half-way between the _1" side end "ll" side, the
tool may be damaged.
Do not use the speed change lever while the tool is running, The tool may be damaged.
Adjusting the feetonlng torque
The fastening torque can be adjusted in 17
steps by turning the adjusting ring so that
its graduations are aligned with the pointer
on the tool body, The fastening torque is
minimum when the number 1 is aligned
with the pointer, and maximum when the
illmarking isaligned with the pointer.
The clutch will slip st vadous torque levels
when set at the number 1 to 16. The clutch
is designed not to slip at the a marking.
Before actual operation, drive a tdal screw
into your matedal or a piece of duplicate
material to determine which torque level is required for aparticular application.
NOTE:
"Do not operatethe tool with the adjusting dngset between the number16 end the
marking.The toolmay bedamaged.
lO
ASSEMBLY
Installing or removing driver bit or drill bit
CAUTION:
Always be sure that the tool is switched off and the battery cartridge is removed before
installing or removing the bit.
Hold the ring and turn the sleeve counter-
clockwise to open the chuck jaws. Place
the bit in the chuck as far as it will go. Hold
the ring firmly end turn the sleeve clock-
wise to tighten the chuck.
To remove the bit, hold the ring and turn
the sleeve counterclockwise.
Tighlen
11
OPERATION
ScrewdrMng operation
Place the point of the driver bit in the
screw head and apply pressure to the tool,
Start the tool slowly and then increase the
speed gradually, Release the trigger as
soon as the clutch cuts in,
NOTE:
oMake surethatthe driverbitisinsertedstraightin thescrewheed,orthe screwand/or
bit may be damaged.
*When driving wood screws, preddll pilot
holes to make driving easier and to pre-
vent splitting of the work,piece. See the
chart.
Nominoldia_otor of RecommerKIodsLt'oof
woodSO'raN(ram} pilothole(ram)
3,1 {1/8"1 2.0 - 2.2 "_" - 3/32'1
3.519/64"1 2,3 - 2.513/32" - 3/32"}
3_1(T_32") 2,5- 2.B13/32"- 7/64"f
45 (11/64"J 230- 3.2 _/64" - 1/8")
4.8 rN16*') 3.1_ 3,4 (1/8"- 9R4")
5.1t13J84"1 3.3 - 3.6 (1/8"- 9_4"}
5.517/32") 3.7- 3.9 (8/4" - 5/32")
5.817f32"} 4.0- 4.2 (5/32" - 11/64"3
6.1 {15/64"1 4.2- 4.4 [11/54"- 11/64"1
elf the tool is operated continuously until the battery cartridge has discharged, allow the
tool to rest for 15 minutes before proceeding with a fresh battery.
Drilgng operation
First, turn the adjusting ring so that the pointer on the tool body points to the _ marking.
Then proceed as follows.
*Drilling in wood
When drillingin wood, best results are obtained with wood drills equipped with a guide
screw. The guide screw makes drillingeasier by pullingthe bit into the workpiece.
*Drilling in metal
To prevent the bitfrom slippingwhen starting a hole. make an indentation with a center-
punch and hammer at the pointto be drilled. Place the point of the bit in the indentation
and start drilling.
Use a cutting lubricant when drilling metals. The exceptions are iron and brass which
should be drilled dry.
12
CAUTION:
Pressing excessivelyon the toolwill not speed up the drilling.In fact. this excessive pros-
sure will only serve to damage the tip of your bit, decrease the tool performance and
shorten the service lifeof the tool.
There is a tremendous force exerted on the toot/bit at the time of hole breakthrough.
Hold the tool firmly and exert care when the bit beginsto break through the workpiece.
A stuck bit can be removed simply by setting the reversing switch to reverse rotation in
order to back out However, the tool may back out abruptlyif you do not hold it firmly.
Always secure small workpieces in a vise or similar hold-down device.
• If the tool is operated continuously until the battery cartridge has discharged, allow the
tool to rest for 15 minutes before proceeding with a fresh battery.
Installing set plate
For 6226D 8=6227D
Always install the set plate when using bat-
tery cartridges 9100, 9102, 9102A for
6226D and 1200, 1202, 1202A for 6227D.
Install the set plate on the tool with the
screw provided.
_SEI pate
13
MAINTENANCE
CAUTION:
Alwaysbesurethatthetoolisswitchedoffand the battery cartridge is removed before
attempting to perform inspection or maintenance.
To maintain product SAFETY and RELIABILITY. repairs, maintenance or adjustment should
be performed by Makita Authorized or Factory Service Centers, always using Makita
replacement parts.
Recycling the Battery
The only way to dispose of a Maklta battery Is
to recycle It. The law prohibits any other
method of disposal.
Ni-Cd
To recycle the battery:
1. Remove the battery from the tool.
2. a). Take the battery to your nearest Makita Factory Service Center
or
b). Take the battery to your nearest Makita Authorized Service Center or
Distributor that has been designated as a Makita battery recycling location.
=Call your nearest Makita Service Center or Distributor to determine the location
that provides Makita battery recycling. See your local Yellow Pages under
"Tools-Electric'.
14
ACCESSORIES
CAUTJON:
These accessories or attachments are recommended for use with your Makita tool specified in this
manual The use of any other accessories or attachments might present a risk of injury to persons.
The accessories or attachments should be used only in the proper and intended manner.
.Bit=
Size PartNo.
Phillips II 2 784214-0A
Double-ended Phillips I Slotted bit
1-3/4" long Pert No 784614-0
2-1/2" long PartNo. 784613-A
#3 784215-0A
Slotted # 51: 784010-0A
# 7F 784011-0A
Rubber
pad assembly
PartNo. 123001-2
Squ_redr_ bit 7846(_-0A
PhUllpa bit
Part No.
784201-5
784202-3
784203-1
7B4206-5
784207-3
Size L (rnm)
No. 1 6512--5/B")
45 (1-3/4"}
No 2 65 (2-5/8")
1t 0 (4-3/3")
150 (4.7/8'*)
Drill bits
Tested best in Makitadriver-drills for smooth fast
drillingand more holesper pettew change,
High speed steel For drillingin metal, wood and
p_astic.Jobberslength. Specialsurfacetreatment
for lubricitygivessmootherdrilling.
Drill Shank Flute
Part No, die. dia. length
711011-A 1116" 1/t6" 7/8"
711012"A 3/32" 3/32" 1-1/4"
71tO13-A liB" I_B" 1-5/8"
71tO14-A 5/32" 5/32" 2"
7t t015-A 3116" 3/18" 2-5/16"
711016-A 7/32" 7/32" 2-1/2"
711017-A 1/4" 1/4" 2_/4"
711018"A 9/32" 9/32" 2-r_16"
711019-A 5/t6" 5/16" 3-3/16"
711020-A 11/32" 11/32" 3-7/16"
711021,,A 1/2" 3/B" 3-6/8"
71 t{_0A-A
Over_l
length
1-7/8"
2-1/4"
2-3/4"
3-1/8"
3-1/2"
3-3/4"
4-
4-1/4'*
4-1/2'*
4_4"
S"
6 pc. set: 1,'16%1/1B',3/16% I/4",
5/1e", 3/8" Bestsellingbitsin
convenientcase.
Fern pollzhlng pad
PartNo. 743023-2
*Wool bonnet
Part No. 743401-6
• Oatta_rycover
PIntNo.414938-7
%
15
Battary charger
Model DC9710
Model DC1470
Battery cartridge 9120 / 9122 19134 19135
Bat*my cartridge 1220 1 1222 11234 1 1235
Plalli* carrying case
High rapacity battery charger
Model DC1411
Battery oartrldge 1420 1 1422 / 1434 / 1436
Set plato
13
CORDLESS DRIVER DRILL
Model 6226D
Model 6227D
Model 6228D
D___oe-,99 us
Note: The switch and other part confi_urations
may differ from country to country.
17
MOO_L 822_LO*622?0, 622air
iTEM NO. I]_ICNPTION
NO. USED
I_NO. _ DE_IPTION
MACHrN[
I 1
t
3 t
4
8
9
6
1
e t
7 I
8 I
8 I
Spe_ Chanile Lev'_r ,kssemMy
HrJueVg Sat ¢_Wh tm-a :¢1
Name Plate
TaPlOCngS:mw _nd PT 31(16
For Medal 622_D. IS2270
FOr Model 62280
Pun _ Screw M4_22
Fo_ Mod_ 622180, 62270
Lmaf
F_q Change Liver
pin Hea d Sc,ew M3_6
Sw_:h
MACHIN E
tO Holder
12 Spr_O ¥,m _'_ I-)
13 P_ _ SGrew M4622
16 €IIE_II ASSEMBLy
III I_
17 _ _ 5crmw Ml_6
tl Hut _k
The ew_ch ind other part IplN:ificl_,nt may differ rr_ ©0unuy to countr_
Oec.--08 --'99 US
18
MAKITA LIMITEDONE YEARWARRANTY
V_n'anty Policy
Every MaU_ tool is thorou_ly Imq?m#._land tuted bdO_ _ the fmory. It I=v.zmmted to
be free of d_'ec¢0 horn woW,mmship w_d mtOntJ/or tin period of ONE YEAR from the date of
pu_. _,]d anyU_L_, chr,_pdudq_ _e-ymrp_, _mmthe_MPzErE
tool fgdsltt pt_pa_l, to o_ of _ J Parody ot Auth_ _'_€_ _ttm_ If I_p_bon ahowg
the trouble _ €_ by deagtive wofhutnddp or mst_id. Maidtt will ret_k (or 81 c_r option,
tlpllce) without cha_
This Wananty does not apply where:
setadrs have been made ogattsmptcd by othenJ:
lepSiu 8ze required Me.auoeof ncnnd weu _d t_ar:
The to_ has bern tbeted, mbuNd or improped7 nudnt_;
tltetttlom haw been made 1o the tool
IN NO EVENT SHALL JlAggTA BE LIABLE FOR ANY INDIRECT. INCII)ENTAL OR CON.
SEQUENTIAL DAMAGES FROM THE SALE OR USE OF THE PKODUCT. THLS DISCLAIMER
APPLIES _ DUR_qG AND AFTER THE TERMOF THIS WARRANTy.
MAglTA plSCLAIId$ LIABILITY FOR ANY IMPLIED WARRANTIES, INCLUDING IMPLIED
WARRANTIES OF "MERCHANTABILtTY" AND "FITNESS FOil A SPECIFIC PURPOSE,"
AFTER THE ONE-yEAR TERM OF THIS WARRANTY.
Thb Wemnty _ you 8pec_ teffJ r_htt, tad you may abo have olher dthtt wk_h vary from
state to state. Some |tam do not a9ow tits LxgJ_ or Lhnlt=doaof lncide_taJ or co_uent_d
d_ _o the above IladtatJmt o_ e=©lu_on mty not apply to yore. Some state= do not allow
timltatio_ oa how Ioq M _ml_ed wsrnmt_ bats, te the jbcve I_dtetiee m*y not _y _ y_.
Makita Corporation
3-11-8, Sumiyo_hl-cho,
AnJo,Aichl 446-8502 Japan
884293 _ 067 PRINTED IN JAPAN
1999 -- 12_ N
  • Page 1 1
  • Page 2 2
  • Page 3 3
  • Page 4 4
  • Page 5 5
  • Page 6 6
  • Page 7 7
  • Page 8 8
  • Page 9 9
  • Page 10 10
  • Page 11 11
  • Page 12 12
  • Page 13 13
  • Page 14 14
  • Page 15 15
  • Page 16 16
  • Page 17 17
  • Page 18 18
  • Page 19 19

Makita 6226DW Owner's manual

Category
Power drills
Type
Owner's manual
This manual is also suitable for

Ask a question and I''ll find the answer in the document

Finding information in a document is now easier with AI