Campbell Scientific RTDAQ Owner's manual
- Category
- Software
- Type
- Owner's manual

INSTRUCTION MANUAL
RTDAQ
Revision: 3/15
Copyright © 2008- 2015
Campbell Scientific, Inc.


Campbell Scientific, Inc.
Software End User License Agreement
(EULA)
NOTICE OF AGREEMENT: This software is copyrighted software. Please
carefully read this EULA. By installing or using this software, you are agreeing
to comply with the following terms and conditions. If you do not want to be
bound by this EULA, you must promptly return the software, any copies, and
accompanying documentation in its original packaging to Campbell Scientific
or its representative.
This software can be installed as a trial version or as a fully licensed copy. All
terms and conditions contained herein apply to both versions of software unless
explicitly stated.
TRIAL VERSION: Campbell Scientific distributes a trial version of this
software free of charge to enable users to work with Campbell Scientific data
acquisition equipment. You may use the trial version of this software for 30
days on a single computer. After that period has ended, to continue using this
product you must purchase a fully licensed version.
This trial may be freely copied. However, you are prohibited from charging in
any way for any such copies and from distributing the software and/or the
documentation with any other products (commercial or otherwise) without
prior written permission from Campbell Scientific.
LICENSE FOR USE: Campbell Scientific grants you a non-exclusive license
to use this software in accordance with the following:
(1) The purchase of this software allows you to install and use a single
instance of the software on one physical computer or one virtual machine
only.
(2) This software cannot be loaded on a network server for the purposes of
distribution or for access to the software by multiple operators. If the
software can be used from any computer other than the computer on which
it is installed, you must license a copy of the software for each additional
computer from which the software may be accessed.
(3) If this copy of the software is an upgrade from a previous version, you
must possess a valid license for the earlier version of software. You may
continue to use the earlier copy of software only if the upgrade copy and
earlier version are installed and used on the same computer. The earlier
version of software may not be installed and used on a separate computer
or transferred to another party.
(4) This software package is licensed as a single product. Its component parts
may not be separated for use on more than one computer.
(5) You may make one (1) backup copy of this software onto media similar to
the original distribution, to protect your investment in the software in case
of damage or loss. This backup copy can be used only to replace an
unusable copy of the original installation media.

WARRANTIES: The following warranties are in effect for ninety (90) days
from the date of shipment of the original purchase. These warranties are not
extended by the installation of upgrades or patches offered free of charge.
Campbell Scientific warrants that the installation media on which the software
is recorded and the documentation provided with it are free from physical
defects in materials and workmanship under normal use. The warranty does not
cover any installation media that has been damaged, lost, or abused. You are
urged to make a backup copy (as set forth above) to protect your investment.
Damaged or lost media is the sole responsibility of the licensee and will not be
replaced by Campbell Scientific.
Campbell Scientific warrants that the software itself will perform substantially
in accordance with the specifications set forth in the instruction manual when
properly installed and used in a manner consistent with the published
recommendations, including recommended system requirements. Campbell
Scientific does not warrant that the software will meet licensee’s requirements
for use, or that the software or documentation are error free, or that the
operation of the software will be uninterrupted.
Campbell Scientific will either replace or correct any software that does not
perform substantially according to the specifications set forth in the instruction
manual with a corrected copy of the software or corrective code. In the case of
significant error in the installation media or documentation, Campbell
Scientific will correct errors without charge by providing new media, addenda,
or substitute pages. If Campbell Scientific is unable to replace defective media
or documentation, or if it is unable to provide corrected software or corrected
documentation within a reasonable time, it will either replace the software with
a functionally similar program or refund the purchase price paid for the
software.
All warranties of merchantability and fitness for a particular purpose are
disclaimed and excluded. Campbell Scientific shall not in any case be liable for
special, incidental, consequential, indirect, or other similar damages even if
Campbell Scientific has been advised of the possibility of such damages.
Campbell Scientific is not responsible for any costs incurred as a result of lost
profits or revenue, loss of use of the software, loss of data, cost of re-creating
lost data, the cost of any substitute program, telecommunication access costs,
claims by any party other than licensee, or for other similar costs.
This warranty does not cover any software that has been altered or changed in
any way by anyone other than Campbell Scientific. Campbell Scientific is not
responsible for problems caused by computer hardware, computer operating
systems, or the use of Campbell Scientific’s software with non-Campbell
Scientific software.
Licensee’s sole and exclusive remedy is set forth in this limited warranty.
Campbell Scientific’s aggregate liability arising from or relating to this
agreement or the software or documentation (regardless of the form of action;
e.g., contract, tort, computer malpractice, fraud and/or otherwise) is limited to
the purchase price paid by the licensee.
COPYRIGHT: This software is protected by United States copyright law and
international copyright treaty provisions. This software may not be sold,
included or redistributed in any other software, or altered in any way without
prior written permission from Campbell Scientific. All copyright notices and
labeling must be left intact.

Table of Contents
PDF viewers: These page numbers refer to the printed version of this document. Use the
PDF reader bookmarks tab for links to specific sections.
Preface — What’s New in RTDAQ? ................................ xi
1.
Introduction .............................................................. 1-1
1.1 RTDAQ Overview ........................................................................... 1-2
1.1.1 Main Screen .............................................................................. 1-2
1.1.2 Clock/Program and the EZSetup Wizard .................................. 1-3
1.1.3 Monitor Data ............................................................................. 1-3
1.1.3.1 Real-time Monitors ........................................................ 1-3
1.1.4 Collect Data .............................................................................. 1-6
1.1.5 Field Calibration and the Calibration Wizard ........................... 1-7
1.1.6 RTMC Development, Run-time and Pro Development ............ 1-7
1.1.7 View Pro ................................................................................... 1-8
1.1.8 Split ........................................................................................... 1-9
1.1.9 CardConvert .............................................................................. 1-9
1.1.10 Short Cut ................................................................................... 1-9
1.1.11 CRBasic Editor ....................................................................... 1-10
1.1.12 CR5000/CR9000X Program Generators ................................. 1-10
1.2 Getting Help for RTDAQ Applications ......................................... 1-11
1.3 Windows Conventions ................................................................... 1-11
2. System Requirements ............................................. 2-1
2.1 Hardware and Software .................................................................... 2-1
3. Installation, Operation, and Backup Procedures .. 3-1
3.1 CD-ROM Installation ....................................................................... 3-1
3.2 RTDAQ Operations and Backup Procedures ................................... 3-2
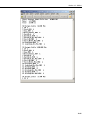
3.2.1 RTDAQ Directory Structure and File Descriptions .................. 3-2
3.2.1.1 Program Directory .......................................................... 3-2
3.2.1.2 Working Directories ....................................................... 3-2
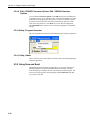
3.2.2 Backing up the Network Map and Data Files ........................... 3-3
3.2.2.1 Performing a Backup ...................................................... 3-4
3.2.2.2 Restoring the Network from a Backup File .................... 3-4
3.2.3 Loss of Computer Power .......................................................... 3-4
4. The RTDAQ Main Screen ......................................... 4-1
4.1 Overview .......................................................................................... 4-1
4.1.1 Program Startup and Main Screen Functionality ...................... 4-1
4.1.2 Datalogger Connectivity, Help and Program Exit .................... 4-3
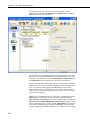
4.2 EZSetup Wizard ............................................................................... 4-3
4.2.1 Add Datalogger ......................................................................... 4-3
4.2.2 Communication Setup ............................................................... 4-4
4.2.3 Datalogger Settings ................................................................... 4-4
4.2.3.1 Max Time Online ........................................................... 4-5
4.2.4 Summary, Communications Test, and Clock Set ...................... 4-5
4.2.5 Send Program ............................................................................ 4-5
i

Table of Contents
4.2.6 Editing and Deleting Dataloggers ............................................. 4-5
4.3 Clock/Program Tab .......................................................................... 4-6
4.3.1 Basic Operation ......................................................................... 4-6
4.4 Monitor Data Tab ............................................................................. 4-7
4.4.1 Field Monitor ............................................................................ 4-7
4.4.2 Editing Variable Values ............................................................ 4-7
4.4.3 Specialized Real-time Monitor Screens .................................... 4-8
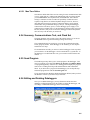
4.5 Collect Data Tab ............................................................................... 4-8
4.6 Pull-down Menus ............................................................................. 4-9
4.6.1 File Menu .................................................................................. 4-9
4.6.1.1 Saving and Loading Configurations ............................... 4-9
4.6.1.2 Exit ................................................................................. 4-9
4.6.2 View Menu ................................................................................ 4-9
4.6.3 Datalogger Menu ..................................................................... 4-10
4.6.3.1 Connect/Disconnect ...................................................... 4-10
4.6.3.2 Update Table Definitions .............................................. 4-10
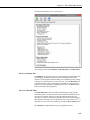
4.6.3.3 Status Table .................................................................. 4-10
4.6.3.3.1 Summary Tab .................................................... 4-11
4.6.3.3.2 Table Fill Times ................................................. 4-11
4.6.3.3.3 Status Table Tab ................................................ 4-12
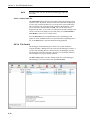
4.6.3.4 File Control ................................................................... 4-12
4.6.3.4.1 Datalogger Devices ............................................ 4-13
4.6.3.4.2 Run Options ....................................................... 4-13
4.6.3.4.3 Working with Files and Directories ................... 4-13
4.6.3.4.4 Right-Click Menu Options ................................. 4-16
4.6.3.5 Calibration Wizard ....................................................... 4-16
4.6.3.6 Terminal Emulator ........................................................ 4-17
4.6.4 Network Menu ........................................................................ 4-18
4.6.4.1 Add/Delete/Edit/Rename Datalogger ........................... 4-18
4.6.4.2 Backup/Restore Network .............................................. 4-18
4.6.4.3 Computer’s Global PakBus Address ............................ 4-18
4.6.5 Tools Menu ............................................................................. 4-19
4.6.5.1 Auxiliary Applications ................................................. 4-19
4.6.5.2 Options ......................................................................... 4-20
4.6.5.3 LogTool ........................................................................ 4-20
4.6.5.4 PakBus Graph ............................................................... 4-22
4.6.5.4.1 Selecting the PakBus Network to View ............. 4-22
4.6.5.4.2 Dynamic and Static Links .................................. 4-22
4.6.5.4.3 Viewing/Changing Settings in a PakBus
Datalogger ...................................................... 4-23
4.6.5.4.4 Right-Click Functionality .................................. 4-23
4.6.5.4.5 Discovering Probable Routes between Devices . 4-23
4.7 The RTDAQ Toolbar ..................................................................... 4-24
5. Program Creation and Editing ............................... 5-1
5.1 CRBasic Editor ................................................................................. 5-1
5.1.1 Overview ................................................................................... 5-1
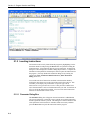
5.1.2 Inserting Instructions ................................................................. 5-2
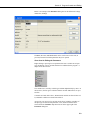
5.1.2.1 Parameter Dialog Box .................................................... 5-2
5.1.2.2 Right-Click Functionality ............................................... 5-4
5.1.3 Toolbar ...................................................................................... 5-5
5.1.3.1 Compile .......................................................................... 5-7
5.1.3.2 Compile, Save, and Send ................................................ 5-7
5.1.3.3 Conditional Compile and Save ..................................... 5-11
5.1.3.4 Templates ..................................................................... 5-11
ii

Table of Contents
5.1.3.5 Program Navigation using BookMarks and GoTo ....... 5-12
5.1.3.6 CRBasic Editor File Menu ........................................... 5-12
5.1.3.7 CRBasic Editor Edit Menu ........................................... 5-13
5.1.3.7.1 Other Options .................................................... 5-13
5.1.3.8 CRBasic Editor View Menu ......................................... 5-13
5.1.3.8.1 Editor Preferences ............................................. 5-13
5.1.3.8.2 Instruction Panel Preferences ............................ 5-15
5.1.3.8.3 Other Options .................................................... 5-15
5.1.3.9 CRBasic Editor Tools Menu ........................................ 5-16
5.1.3.9.1 Edit Instruction Categories ................................ 5-16
5.1.3.9.2 Constant Customization ..................................... 5-17
5.1.3.9.3 Other Options .................................................... 5-19
5.1.3.10 Available Help Information .......................................... 5-20
5.1.4 CRBasic Programming ........................................................... 5-20
5.1.4.1 Programming Sequence ................................................ 5-20
5.1.4.2 Program Declarations ................................................... 5-21
5.1.4.3 Mathematical Expressions ............................................ 5-22
5.1.4.4 Measurement and Output Processing Instructions ....... 5-22
5.1.4.5 Line Continuation ......................................................... 5-23
5.1.4.6 Inserting Comments Into Program ............................... 5-23
5.1.4.7 Example Program ......................................................... 5-24
5.1.4.8 Data Tables ................................................................... 5-24
5.1.4.9 The Scan — Measurement Timing and Processing ...... 5-26
5.1.4.10 Numerical Entries ......................................................... 5-27
5.1.4.11 Logical Expression Evaluation ..................................... 5-27
5.1.4.11.1 What is True? .................................................... 5-27
5.1.4.11.2 Expression Evaluation ....................................... 5-28
5.1.4.11.3 Numeric Results of Expression Evaluation ....... 5-28
5.1.4.12 Flags ............................................................................. 5-29
5.1.4.13 Parameter Types ........................................................... 5-29
5.1.4.13.1 Expressions in Parameters ................................. 5-29
5.1.4.13.2 Arrays of Multipliers and Offsets for Sensor
Calibration...................................................... 5-30
5.1.4.14 Program Access to Data Tables .................................... 5-30
5.2 Short Cut ........................................................................................ 5-31
5.2.1 Overview ................................................................................. 5-31
5.2.2 Creating a Program Using Short Cut ...................................... 5-32
5.2.2.1 Step 1 – Create a New File or Open Existing File ........ 5-32
5.2.2.2 Step 2 – Select Datalogger and Specify Scan Interval . 5-33
5.2.2.3 Step 3 – Choose Sensors to Monitor ............................ 5-36
5.2.2.4 Step 4 – Setup Output Tables ....................................... 5-43
5.2.2.5 Step 5 – Generate the Program in the Format
Required by the Datalogger ...................................... 5-46
5.2.3 Short Cut Settings ................................................................... 5-47
5.2.3.1 Program Security .......................................................... 5-47
5.2.3.2 Datalogger ID ............................................................... 5-47
5.2.3.3 Power-up Settings ........................................................ 5-47
5.2.3.4 Select CR200 Compiler ................................................ 5-48
5.2.3.5 Sensor Support ............................................................. 5-48
5.2.3.6 Integration/First Notch Frequency (f
N1
) ....................... 5-49
5.2.3.7 Font .............................................................................. 5-49
5.2.3.8 Set Working Directory ................................................. 5-49
5.2.3.9 Enable Creation of Custom Sensor Files ...................... 5-49
5.2.4 Editing Programs Created by Short Cut .................................. 5-49
5.2.5 New Sensor Files .................................................................... 5-50
5.2.6 Custom Sensor Files ............................................................... 5-50
iii

Table of Contents
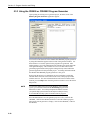
5.3 Program Creation with the RTDAQ Program Generator ............... 5-50
5.3.1 Basic Operation ....................................................................... 5-50
5.3.2 Program Startup ...................................................................... 5-51
5.3.3 Using the CR5000 or CR9000X Program Generator .............. 5-52
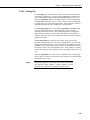
5.3.4 Supporting Functionality ......................................................... 5-53
5.3.4.1 File | New ..................................................................... 5-53
5.3.4.2 File | Open… ................................................................ 5-53
5.3.4.3 File | Save As ................................................................ 5-54
5.3.4.4 File | Edit Generator Program ....................................... 5-54
5.3.4.5 File | Open Wire Diagram ............................................. 5-54
5.3.4.6 File | <Previously opened programs> ........................... 5-54
5.3.4.7 File | Exit ...................................................................... 5-55
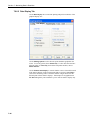
5.3.4.8 Edit | Color Options ...................................................... 5-55
5.3.4.9 Edit | CR9000X Generator Options, Edit | CR5000
Generator Options ..................................................... 5-56
5.3.4.10 Help | Program Generator ............................................. 5-56
5.3.4.11 Help | About .................................................................. 5-56
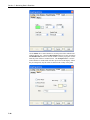
5.3.5 Using Save and Send ............................................................... 5-56
5.3.5.1 Download ..................................................................... 5-57
5.3.5.2 Run Options .................................................................. 5-58
5.3.5.3 Datalogger Response .................................................... 5-58
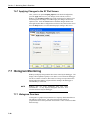
6. View Pro ................................................................... 6-1
6.1 Overview .......................................................................................... 6-1
6.2 The Toolbar ...................................................................................... 6-2
6.3 Opening a File .................................................................................. 6-4
6.3.1 Opening a Data File .................................................................. 6-4
6.3.2 Opening Other Types of Files ................................................... 6-4
6.3.3 Opening a File in Hexadecimal Format .................................... 6-4
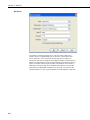
6.4 Viewing a LoggerNet Database Table ............................................. 6-4
6.4.1 Selecting a Database ................................................................. 6-4
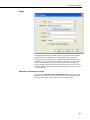
6.4.2 Selecting a Table ....................................................................... 6-8
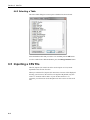
6.5 Importing a CSV File ....................................................................... 6-8
6.6 Data View ....................................................................................... 6-11
6.6.1 Column Size ............................................................................ 6-12
6.6.2 Header Information ................................................................. 6-12
6.6.3 Row Shading ........................................................................... 6-12
6.6.4 Locking the TimeStamp Column ............................................ 6-12
6.6.5 File Information ...................................................................... 6-12
6.6.6 Background Color ................................................................... 6-12
6.6.7 Font ......................................................................................... 6-12
6.6.8 Window Arrangement ............................................................. 6-13
6.7 Graphs ............................................................................................ 6-13
6.7.1 Line Graph .............................................................................. 6-15
6.7.1.1 Selecting Data to be Graphed ....................................... 6-15
6.7.1.2 Graph Width ................................................................. 6-16
6.7.1.3 Scrolling ....................................................................... 6-16
6.7.1.4 Graph Cursor ................................................................ 6-16
6.7.1.5 Line Graph Toolbar ...................................................... 6-17
6.7.2 Histogram ................................................................................ 6-19
6.7.2.1 Selecting Data to be Viewed ......................................... 6-20
6.7.2.2 Options ......................................................................... 6-21
6.7.2.3 Histogram Toolbar ........................................................ 6-21
6.7.3 XY Plot ................................................................................... 6-22
6.7.3.1 Selecting Data to be Plotted .......................................... 6-23
iv

Table of Contents
6.7.3.2 XY Plot Toolbar ........................................................... 6-23
6.7.4 Rainflow Histogram ................................................................ 6-23
6.7.4.1 Selecting Data to be View ............................................ 6-24
6.7.4.2 Options ......................................................................... 6-26
6.7.4.3 Rainflow Histogram Toolbar ........................................ 6-26
6.7.5 FFT ......................................................................................... 6-27
6.7.5.1 Selecting Data to be Graphed ....................................... 6-27
6.7.5.2 Options ......................................................................... 6-29
6.7.5.3 FFT Toolbar ................................................................. 6-29
6.8 Right-click-Menus ......................................................................... 6-30
6.8.1 Data View ............................................................................... 6-30
6.8.2 Graphs ..................................................................................... 6-32
6.8.3 Traces ...................................................................................... 6-32
6.9 Printing Options ............................................................................. 6-32
6.9.1 Print Setup .............................................................................. 6-32
6.9.2 Printing Text ........................................................................... 6-32
6.9.3 Printing Graphs ....................................................................... 6-33
6.10 View Pro Online Help .................................................................... 6-33
6.11 Assigning Data Files to View ........................................................ 6-33
7. Monitoring Data in Real-time .................................. 7-1
7.1 Using the Monitor Data Screen ........................................................ 7-1
7.1.1 Connect to Target Datalogger ................................................... 7-1
7.1.2 Selecting Items for Display in the Monitor Data Screen........... 7-2
7.1.3 Using the Start/Stop Button ...................................................... 7-3
7.1.4 Customizing the Display of Data in the Monitor Data Screen .. 7-4
7.1.5 Setting the Monitor Data Screen Options ................................. 7-4
7.1.5.1 Display Tab .................................................................... 7-5
7.1.5.2 Alarms Tab ..................................................................... 7-6
7.1.5.3 Setup Tab ....................................................................... 7-7
7.1.6 Specialized Real-time Monitoring Screens ............................... 7-7
7.2 Ports and Flags ................................................................................. 7-8
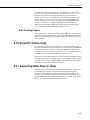
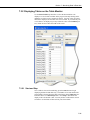
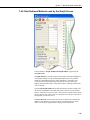
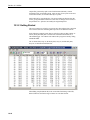
7.3 Table Monitor .................................................................................. 7-9
7.3.1 Using the Table Monitor ........................................................... 7-9
7.3.2 Displaying Tables on the Table Monitor ................................ 7-11
7.3.2.1 Start and Stop ............................................................... 7-11
7.3.2.2 Reset Table ................................................................... 7-12
7.3.2.3 Fields and Values ......................................................... 7-12
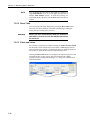
7.3.2.4 Save | Load Configurations .......................................... 7-13
7.3.2.5 Saving Displayed Data to a File ................................... 7-13
7.3.3 Moving and Resizing the Table Monitor Window .................. 7-14
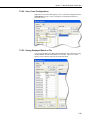
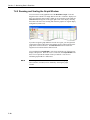
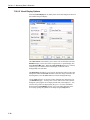
7.4 Real Time Graph ............................................................................ 7-14
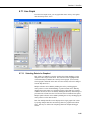
7.4.1 Using Graph Window ............................................................. 7-14
7.4.2 Adding Items for Display on the Graph .................................. 7-16
7.4.3 Moving and Resizing the Graph Window ............................... 7-16
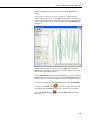
7.4.4 Basic Graph Operation ............................................................ 7-16
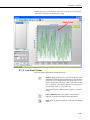
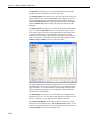
7.4.5 Zooming and Scaling the Graph Window ............................... 7-18
7.4.6 Data Retrieval Methods used by the Graph Screen ................. 7-19
7.4.7 Drawing Methods used by the Graph Screen .......................... 7-20
7.4.8 Graph Window Display and Print Options ............................. 7-21
7.4.9 Setting the Options for the Graph Screen ............................... 7-22
7.4.9.1 Scaling the Axes ........................................................... 7-22
7.4.9.2 Data Display Options ................................................... 7-23
7.4.9.3 Visual Display Options ................................................ 7-25
7.4.9.4 Customizing the Traces on the Display ........................ 7-26
v

Table of Contents
7.4.9.4.1 Individual Trace Options ................................... 7-26
7.4.9.4.2 Using Marks on the Graph ................................. 7-27
7.4.9.5 Using Saved Configurations ......................................... 7-28
7.4.10 Accepting or Abandoning Changes to the Graph Options ...... 7-29
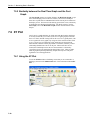
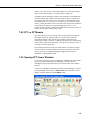
7.5 Fast Graph ...................................................................................... 7-29
7.5.1 Using the Fast Graph ............................................................... 7-29
7.5.2 Similarity between the Real Time Graph and the Fast
Graph ................................................................................... 7-30
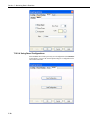
7.6 XY Plot ........................................................................................... 7-30
7.6.1 Using the XY Plot ................................................................... 7-30
7.6.2 Setting up the XY Plot for Display ......................................... 7-32
7.6.2.1 Setting Values for Display ............................................ 7-32
7.6.2.2 Number of Points per Field........................................... 7-34
7.6.2.3 Right-Click Functionality ............................................. 7-35
7.6.3 Using the Control Buttons ....................................................... 7-36
7.6.4 Using the Graphical Display Area of the XY Plot .................. 7-40
7.6.5 Zooming with the XY Plot ...................................................... 7-41
7.6.6 Using the Special Options of the XY Plot ............................... 7-42
7.6.6.1 Scaling Tab ................................................................... 7-43
7.6.6.2 Data Display Tab .......................................................... 7-44
7.6.6.3 Visual Display Tab ....................................................... 7-45
7.6.6.4 Trace Tab ...................................................................... 7-45
7.6.6.5 Save Tab ....................................................................... 7-47
7.6.7 Applying Changes to the XY Plot Screen ............................... 7-48
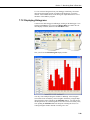
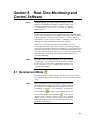
7.7 Histogram Monitoring .................................................................... 7-48
7.7.1 Histogram Overview ............................................................... 7-48
7.7.2 Displaying Histograms ............................................................ 7-49
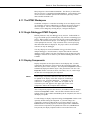
7.8 Fast Fourier Transform Spectra ...................................................... 7-50
7.8.1 Brief Overview of Fourier Analysis ........................................ 7-50
7.8.2 FFT vs. FFTSample ................................................................ 7-51
7.8.3 Opening FFT Viewer Windows .............................................. 7-51
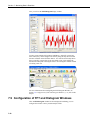
7.9 Configuration of FFT and Histogram Windows ............................. 7-52
7.9.1 Moving and Resizing the FFT/Histo Window ........................ 7-53
7.9.2 Displaying FFT Spectra or Histograms ................................... 7-53
7.9.3 Using the Buttons .................................................................... 7-54
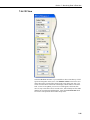
7.9.4 3D View .................................................................................. 7-55
7.9.5 X-Axis Mode ........................................................................... 7-57
7.9.6 Zooming in on the Spectrum or Histogram ............................. 7-58
7.9.7 Save and Print Options ............................................................ 7-58
7.9.8 Setting the Options for the FFT/Histogram Screen ................. 7-60
7.9.8.1 Scaling the Axes ........................................................... 7-60
7.9.8.2 Data Display Options .................................................... 7-61
7.9.8.3 Visual Display Options ................................................. 7-62
7.9.8.4 Individual Trace Options .............................................. 7-63
7.9.8.4.1 Display Tab ........................................................ 7-63
7.9.8.4.2 Marks Tab .......................................................... 7-63
7.9.8.5 Using Saved Configurations ......................................... 7-64
7.9.9 Accepting or Abandoning Changes to the FFT/Histogram
Options................................................................................. 7-65
7.10 Rainflow Histogram Monitoring .................................................... 7-66
7.10.1 Rainflow Histogram Overview ............................................... 7-66
7.10.2 Opening Rainflow Histograms ................................................ 7-66
7.10.3 Movement and Resizing of the Rainflow Window ................. 7-68
7.10.4 Selecting Tables and Bins For Display ................................... 7-68
7.10.5 Using the Buttons and Controls .............................................. 7-69
7.10.6 X-Axis Mode ........................................................................... 7-72
vi

Table of Contents
7.10.7 Zooming in on the Histogram ................................................. 7-72
7.10.8 Save and Print Options............................................................ 7-73
7.10.9 Setting the Options for the Rainflow Screen ........................... 7-75
7.10.9.1 Scaling the Axes ........................................................... 7-75
7.10.9.2 Visual Display Options ................................................ 7-76
7.10.9.3 Trace Options ............................................................... 7-77
7.10.9.4 Using Saved Configurations ......................................... 7-78
7.10.10 Accepting or Abandoning Changes to the Rainflow Options . 7-79
7.11 Saving and Loading Configurations ............................................... 7-80
7.11.1 Saving and Loading Configuration Files for Real-Time
Data Screens ........................................................................ 7-80
7.11.2 Using Configurations in the Field Monitor ............................. 7-81
7.11.3 Using Configurations in the Table Monitors .......................... 7-82
7.11.4 Saving and Loading Global Configuration Files..................... 7-82
8. Real-Time Monitoring and Control Software ......... 8-1
8.1 Development Mode .......................................................................... 8-1
8.1.1 The RTMC Workspace ............................................................. 8-3
8.1.2 Single Datalogger RTMC Projects ........................................... 8-3
8.1.3 Display Components ................................................................. 8-3
8.1.4 Functions Available from the RTMC Menus ............................ 8-5
8.1.4.1 File Menu ....................................................................... 8-5
8.1.4.2 Edit Menu ....................................................................... 8-5
8.1.4.3 View Menu ..................................................................... 8-6
8.1.4.4 Project Menu .................................................................. 8-7
8.1.4.5 Screen Menu ................................................................... 8-7
8.1.4.6 Component Menu ........................................................... 8-7
8.1.4.7 Window Menu ................................................................ 8-9
8.1.4.8 Help Menu ...................................................................... 8-9
8.1.5 Expressions ............................................................................... 8-9
8.1.5.1 Operators ...................................................................... 8-11
8.1.5.2 Order of Precedence ..................................................... 8-12
8.1.5.3 Predefined Constants .................................................... 8-12
8.1.5.4 Predefined Time Constants .......................................... 8-12
8.1.5.5 Functions ...................................................................... 8-13
8.1.5.6 Logical Functions ......................................................... 8-14
8.1.5.7 String Functions ........................................................... 8-15
8.1.5.8 Conversion Functions ................................................... 8-16
8.1.5.9 Time Functions ............................................................. 8-16
8.1.5.10 Start Option Functions ................................................. 8-16
8.1.5.11 Functions with State ..................................................... 8-17
8.2 RTMC Run-time ............................................................................ 8-18
9. Calibration and Zeroing ........................................... 9-1
9.1 Calibration Essentials ....................................................................... 9-1
9.1.1 Definition of Calibration ........................................................... 9-1
9.1.2 Basic Calibration Process ......................................................... 9-1
9.2 Writing Calibration Programs with the CRBasic Editor .................. 9-2
9.2.1 The FieldCal Instruction ........................................................... 9-2
9.2.2 Calibration File Details ............................................................. 9-3
9.3 Five Kinds of Calibration ................................................................. 9-3
9.3.1 Zeroing ...................................................................................... 9-3
9.3.2 Offset Calibration ..................................................................... 9-4
9.3.3 Two-Point Multiplier and Offset Calibration ............................ 9-4
vii

Table of Contents
9.3.4 Two-Point Multiplier Only Calibration ..................................... 9-5
9.3.5 Zero Basis Point Calibration ..................................................... 9-5
9.4 Performing a Manual Calibration ..................................................... 9-6
9.4.1 How to Use the Mode Variable for Calibration Status and
Control ................................................................................... 9-6
9.4.2 Using the Mode Variable for Manual Single-Point
Calibration ............................................................................. 9-7
9.4.3 Using the Mode Variable for Manual Two-Point Calibration ... 9-7
9.5 Generating Calibration Programs ..................................................... 9-8
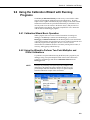
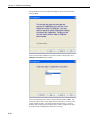
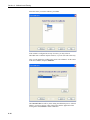
9.6 Using the Calibration Wizard with Running Programs .................... 9-9
9.6.1 Calibration Wizard Basic Operation ......................................... 9-9
9.6.2 Using the Wizard to Perform Two-Point Multiplier and
Offset Calibrations ................................................................. 9-9
9.6.3 Using the Wizard to Perform Zeroing Calibrations ................ 9-13
9.6.4 Using the Wizard to Perform Offset Calibrations ................... 9-15
9.7 Strain and Shunt Calibration .......................................................... 9-16
10. Utilities ................................................................... 10-1
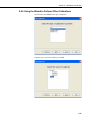
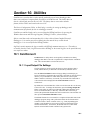
10.1 CardConvert ................................................................................... 10-1
10.1.1 Input/Output File Settings ....................................................... 10-1
10.1.2 Destination File Options.......................................................... 10-2
10.1.2.1 File Format ................................................................... 10-2
10.1.2.2 File Processing .............................................................. 10-3
10.1.2.3 File Naming .................................................................. 10-4
10.1.2.4 TOA5/TOB1 Format .................................................... 10-4
10.1.3 Converting the File .................................................................. 10-5
10.1.4 Repairing/Converting Corrupted Files .................................... 10-5
10.1.5 Viewing a Converted File ....................................................... 10-6
10.1.6 Running CardConvert from a Command Line ........................ 10-6
10.2 Device Configuration Utility .......................................................... 10-7
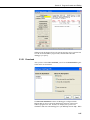
10.2.1 Overview ................................................................................. 10-7
10.2.2 Main DevConfig Screen .......................................................... 10-8
10.2.3 Downloading an Operating System ......................................... 10-9
10.2.4 Terminal Tab ......................................................................... 10-11
10.2.5 The Unknown Device Type .................................................. 10-12
10.2.6 Off-line Mode ....................................................................... 10-12
10.3 Split .............................................................................................. 10-13
10.3.1 Functional Overview ............................................................. 10-13
10.3.2 Getting Started ...................................................................... 10-14
10.3.3 Split Parameter File Entries ................................................... 10-20
10.3.3.1 Input Files ................................................................... 10-20
10.3.3.1.1 File Info ........................................................... 10-21
10.3.3.1.2 File Offset/Options .......................................... 10-22
10.3.3.1.3 Start Condition ................................................. 10-25
10.3.3.1.4 Stop Condition ................................................. 10-28
10.3.3.1.5 Copy ................................................................ 10-31
10.3.3.1.6 Select ............................................................... 10-33
10.3.3.1.7 Ranges ............................................................. 10-33
10.3.3.1.8 Variables .......................................................... 10-34
10.3.3.1.9 Numerical Limitations ..................................... 10-34
10.3.3.1.10 Mathematical Functions, Details, and
Examples ...................................................... 10-35
10.3.3.1.11 Time Series Functions, Details, and Examples 10-37
10.3.3.1.12 Special Functions, Details, and Examples ....... 10-42
10.3.3.1.13 Split Functions Example .................................. 10-46
viii

Table of Contents
10.3.3.1.14 Summary of Select Line Syntax Rules ............ 10-49
10.3.3.1.15 Time Synchronization ..................................... 10-49
10.3.3.2 Output Files ................................................................ 10-52
10.3.3.2.1 Description of Output Option Commands ....... 10-53
10.3.3.2.2 Report Headings .............................................. 10-58
10.3.3.2.3 Column Headings ............................................ 10-58
10.3.4 Help Option .......................................................................... 10-58
10.3.5 Editing Commands ............................................................... 10-58
10.3.6 Running Split From a Command Line .................................. 10-58
10.3.6.1 Splitr Command Line Switches .................................. 10-59
10.3.6.1.1 Closing the Splitr.exe Program After
Execution (/R or /Q Switch) ......................... 10-59
10.3.6.1.2 Running Splitr in a Hidden or Minimized
State (/H Switch) .......................................... 10-59
10.3.6.1.3 Running Multiple Copies of Splitr (/M
Switch) ......................................................... 10-59
10.3.6.2 Using Splitr.exe in Batch Files ................................... 10-60
10.3.6.3 Processing Alternate Files .......................................... 10-60
10.3.6.3.1 Input/Output File Command Line Switches
for Processing Alternate Files ...................... 10-60
10.3.6.4 Processing Multiple Parameter Files with One
Command Line ....................................................... 10-64
10.3.7 Log Files ............................................................................... 10-64
10.4 Log Files and the LogTool Application ....................................... 10-64
10.4.1 Event Logging ....................................................................... 10-64
10.4.1.1 Log Categories ........................................................... 10-64
10.4.1.2 Log File Message Formats ......................................... 10-65
10.4.1.2.1 General File Format Information ..................... 10-65
10.4.1.2.2 Transaction Log Format .................................. 10-66
10.4.1.2.3 Communications Status Log Format ............... 10-78
10.4.1.2.4 Object State Log Format ................................. 10-80
10.4.2 CQR Log (RF Link) .............................................................. 10-81
10.5 SDM-CAN Helper Software ........................................................ 10-81
Appendices
A.
Campbell Scientific File Formats .......................... A-1
A.1 PC File Data Formats ...................................................................... A-1
A.1.1 TOA5 ....................................................................................... A-1
A.1.2 TOB1 ....................................................................................... A-2
A.2 Datalogger Data Formats ................................................................ A-3
A.2.1 TOB2 or TOB3 ........................................................................ A-3
A.3 Binary Data Value Types ................................................................ A-5
A.3.1 FP2 (2 Byte Low Resolution Format) ...................................... A-5
A.3.2 FP4 (4 Byte High Resolution Format) ..................................... A-5
A.3.3 IEEE4 ....................................................................................... A-5
A.3.4 IEEE8 ....................................................................................... A-5
A.4 Converting Binary File Formats ...................................................... A-6
A.4.1 Split .......................................................................................... A-6
A.4.2 CardConvert ............................................................................. A-6
B. Importing Files into Excel ...................................... B-1
B.1 Table-Based Data File Import (TOA5) ............................................ B-1
ix

Table of Contents
Figures
3-1. Typical Working Directories for RTDAQ ........................................ 3-3
Tables
5-1. Formats for Output Data ................................................................. 5-26
5-2. Formats for Entering Numbers in CRBasic .................................... 5-27
5-3. Synonyms for True and False ......................................................... 5-28
5-4. Rules for Names ............................................................................. 5-29
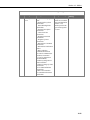
9-1. The FieldCal Instruction “Family” ................................................... 9-2
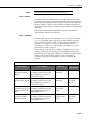
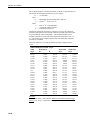
10-1. Comma Separated, Field Formatted, Printable ASCII, and
Table Oriented ASCII Input File Format Types ....................... 10-20
10-2. Example of Event Driven Test Data Set ....................................... 10-30
10-3. Processed Data File Using Option C ............................................ 10-30
10-4. Input File Entries to Process the First Data Point for each Test ... 10-31
10-5. Effects of Out of Range Values for Given Output Options .......... 10-33
10-6. Split Operators and Math Functions ............................................. 10-35
10-7. Time Series Functions .................................................................. 10-37
10-8. Split SPECIAL FUNCTIONS ...................................................... 10-42
10-9. Definition of Blank or Bad Data for each Data File Format ........ 10-55
10-10. Transaction Log Messages ........................................................... 10-66
10-11. Communication Status Log Messages .......................................... 10-79
x

Preface — What's New in RTDAQ?
RTDAQ 1.2 adds support for the new CR6 Series datalogger.
xi


Section 1. Introduction
RTDAQ (Real-time Data Acquisition) is a software application targeted to
industrial and other high-speed data collection implementations which use
Campbell Scientific’s dataloggers. RTDAQ replaces PC9000 as the
company’s flagship product offering in the industrial marketplace. This
software supports configuration, programming, communications, and data
collection for the majority of dataloggers using the CRBasic datalogger
programming language. Support is included for the CR800, CR850, CR1000,
CR6 Series, CR3000, CR5000, and CR9000X. RTDAQ runs on the Windows
XP, Windows Vista, Windows 7, and Windows 8 platforms.
RTDAQ contains numerous improvements over the previous PC9000 product
line. It features a new user-interface, including a look and feel similar to other
Campbell Scientific datalogger software such as LoggerNet and PC400. Its
underlying architecture uses the same communications server used by
LoggerNet (the “LoggerNet Server”). This technology enables connection to
PakBus dataloggers (including the CR1000 and CR3000) as well as tight
integration with other Campbell Scientific products and utilities such as RTMC
and PakBus Graph.
Datalogger communications technologies supported include “direct connect”
(or RS-232 via local serial cable, short haul modems, or other “transparent”
links), telephone, TAPI, TCP/IP, VHF/UHF radios, RF400-series spread
spectrum radios, and multidrop interfaces (MD9 and MD485).
RTDAQ represents a significant milestone in bringing ease of use, improved
datalogger support, and configurable data monitoring to Campbell Scientific’s
industrial customer base. Customized data monitoring is accomplished via
graphical real-time windows and specialized engineering displays. RTDAQ is
an ideal solution for users desiring high-speed data collection over a single
telecommunications medium, but who do not rely on scheduled data collection.
1-1

Section 1. Introduction
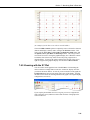
1.1 RTDAQ Overview
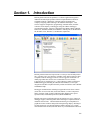
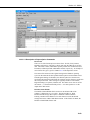
1.1.1 Main Screen
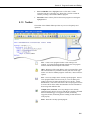
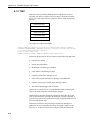
The main screen of RTDAQ provides three tabs with datalogger interaction
functions (Clock/Program, Monitor Data, and Collect Data), as well as a
toolbar with buttons to launch frequently-used utilities and auxiliary
applications.
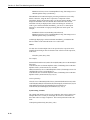
The toolbar includes utilities for working with data files (View Pro, Split, and
CardConvert) as well as utilities for generating and editing datalogger
programs (Short Cut, CRBasic, and the CR5000/CR9000X Program
Generator). Datalogger setup and status functions are also available, along
with access to RTMC (Real-time Monitoring and Control) applications. You
can also launch the Device Configuration Utility which is used to send new
operating systems to dataloggers and other peripheral devices, and to configure
settings in the dataloggers and other devices. All of the toolbar functionality is
also accessible from the RTDAQ menu, along with other tools, such as the
Terminal Emulator, PakBus Graph, and LogTool (a program for viewing
and storing communication logs). Each application includes extensive, online
help.
Some utilities installed with RTDAQ can be opened independently from the
main RTDAQ program by using the Windows Start Menu item Programs |
RTDAQ | Utilities. These utilities include the Device Configuration Utility
(or DevConfig), View Pro, and CardConvert. DevConfig is described above.
View Pro enables the viewing and graphing of collected data, and
CardConvert converts data files originating from removable card storage into
other useful formats.
1-2

Section 1. Introduction
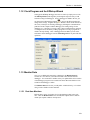
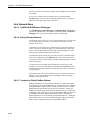
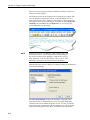
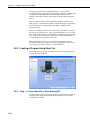
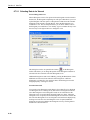
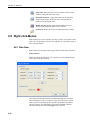
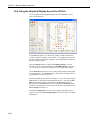
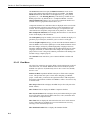
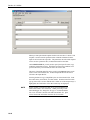
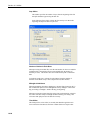
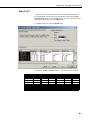
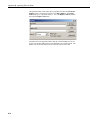
1.1.2 Clock/Program and the EZSetup Wizard
Setting up the RTDAQ datalogger network is a relatively simple process with
the EZSetup Wizard, which guides you through the steps necessary to add
and enter settings for dataloggers. Once a datalogger is added to the list, you
can choose the Edit Datalogger button to activate the Wizard again and
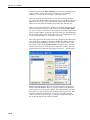
change those settings. Progress through the Wizard is shown on the left side of
the screen, with steps for choosing a datalogger, defining the communications
path between the computer and the datalogger, fine tuning settings for the
datalogger (e.g., baud rate or security code), testing communications, checking
or setting the clock, and finally sending a program or viewing a program file
which is already running. After a datalogger has been added, you can select
and connect to that datalogger from the Clock/Program tab via point and click
operations.
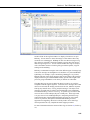
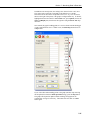
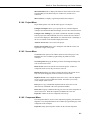
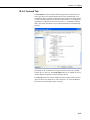
1.1.3 Monitor Data
Once you’ve added and connected to a datalogger, the Monitor Data tab
switches to a view that lets you monitor the latest values measured on the
datalogger. You can monitor variables as they are updated after each execution
of the datalogger program scan or monitor the latest data items that have been
stored into the datalogger’s tables.
The Monitor Data tab also lets you edit public variables directly, or view data
using several available real-time monitors.
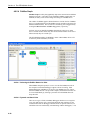
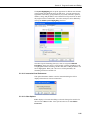
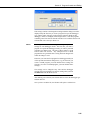
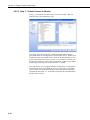
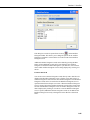
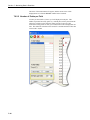
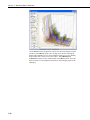
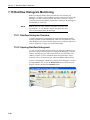
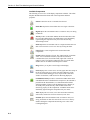
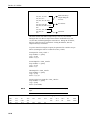
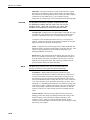
1.1.3.1 Real-time Monitors
RTDAQ has a variety of windows for viewing datalogger data in near real-
time. After the Monitor Data tab is selected, these options show as buttons
which open separate windows when pressed.
1-3

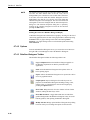
Section 1. Introduction
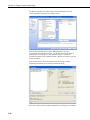
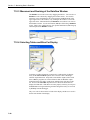
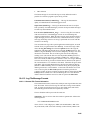
• The status of ports, flags, or any boolean variables can be monitored and
controlled within the Ports and Flags window.
• The Table Monitor allows quick numeric viewing of entire output tables.
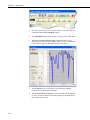
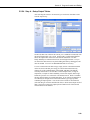
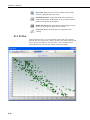
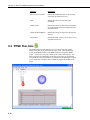
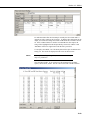
• With both the Graph and Fast Graph, graphical data traces from a
datalogger can be monitored in a window width as small as 1 millisecond,
with resolution support for individual points up to 100 KHz.
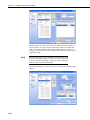
• The XY Plot allows up to four values to be plotted against another
measured value (other than the timestamp).
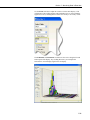
• With the Fast Fourier Transform viewer, both single-valued (amplitude
or power spectrum) and dual-valued (real-imaginary or amplitude-phase)
FFT spectra can be viewed.
1-4
Page is loading ...
Page is loading ...
Page is loading ...
Page is loading ...
Page is loading ...
Page is loading ...
Page is loading ...
Page is loading ...
Page is loading ...
Page is loading ...
Page is loading ...
Page is loading ...
Page is loading ...
Page is loading ...
Page is loading ...
Page is loading ...
Page is loading ...
Page is loading ...
Page is loading ...
Page is loading ...
Page is loading ...
Page is loading ...
Page is loading ...
Page is loading ...
Page is loading ...
Page is loading ...
Page is loading ...
Page is loading ...
Page is loading ...
Page is loading ...
Page is loading ...
Page is loading ...
Page is loading ...
Page is loading ...
Page is loading ...
Page is loading ...
Page is loading ...
Page is loading ...
Page is loading ...
Page is loading ...
Page is loading ...
Page is loading ...
Page is loading ...
Page is loading ...
Page is loading ...
Page is loading ...
Page is loading ...
Page is loading ...
Page is loading ...
Page is loading ...
Page is loading ...
Page is loading ...
Page is loading ...
Page is loading ...
Page is loading ...
Page is loading ...
Page is loading ...
Page is loading ...
Page is loading ...
Page is loading ...
Page is loading ...
Page is loading ...
Page is loading ...
Page is loading ...
Page is loading ...
Page is loading ...
Page is loading ...
Page is loading ...
Page is loading ...
Page is loading ...
Page is loading ...
Page is loading ...
Page is loading ...
Page is loading ...
Page is loading ...
Page is loading ...
Page is loading ...
Page is loading ...
Page is loading ...
Page is loading ...
Page is loading ...
Page is loading ...
Page is loading ...
Page is loading ...
Page is loading ...
Page is loading ...
Page is loading ...
Page is loading ...
Page is loading ...
Page is loading ...
Page is loading ...
Page is loading ...
Page is loading ...
Page is loading ...
Page is loading ...
Page is loading ...
Page is loading ...
Page is loading ...
Page is loading ...
Page is loading ...
Page is loading ...
Page is loading ...
Page is loading ...
Page is loading ...
Page is loading ...
Page is loading ...
Page is loading ...
Page is loading ...
Page is loading ...
Page is loading ...
Page is loading ...
Page is loading ...
Page is loading ...
Page is loading ...
Page is loading ...
Page is loading ...
Page is loading ...
Page is loading ...
Page is loading ...
Page is loading ...
Page is loading ...
Page is loading ...
Page is loading ...
Page is loading ...
Page is loading ...
Page is loading ...
Page is loading ...
Page is loading ...
Page is loading ...
Page is loading ...
Page is loading ...
Page is loading ...
Page is loading ...
Page is loading ...
Page is loading ...
Page is loading ...
Page is loading ...
Page is loading ...
Page is loading ...
Page is loading ...
Page is loading ...
Page is loading ...
Page is loading ...
Page is loading ...
Page is loading ...
Page is loading ...
Page is loading ...
Page is loading ...
Page is loading ...
Page is loading ...
Page is loading ...
Page is loading ...
Page is loading ...
Page is loading ...
Page is loading ...
Page is loading ...
Page is loading ...
Page is loading ...
Page is loading ...
Page is loading ...
Page is loading ...
Page is loading ...
Page is loading ...
Page is loading ...
Page is loading ...
Page is loading ...
Page is loading ...
Page is loading ...
Page is loading ...
Page is loading ...
Page is loading ...
Page is loading ...
Page is loading ...
Page is loading ...
Page is loading ...
Page is loading ...
Page is loading ...
Page is loading ...
Page is loading ...
Page is loading ...
Page is loading ...
Page is loading ...
Page is loading ...
Page is loading ...
Page is loading ...
Page is loading ...
Page is loading ...
Page is loading ...
Page is loading ...
Page is loading ...
Page is loading ...
Page is loading ...
Page is loading ...
Page is loading ...
Page is loading ...
Page is loading ...
Page is loading ...
Page is loading ...
Page is loading ...
Page is loading ...
Page is loading ...
Page is loading ...
Page is loading ...
Page is loading ...
Page is loading ...
Page is loading ...
Page is loading ...
Page is loading ...
Page is loading ...
Page is loading ...
Page is loading ...
Page is loading ...
Page is loading ...
Page is loading ...
Page is loading ...
Page is loading ...
Page is loading ...
Page is loading ...
Page is loading ...
Page is loading ...
Page is loading ...
Page is loading ...
Page is loading ...
Page is loading ...
Page is loading ...
Page is loading ...
Page is loading ...
Page is loading ...
Page is loading ...
Page is loading ...
Page is loading ...
Page is loading ...
Page is loading ...
Page is loading ...
Page is loading ...
Page is loading ...
Page is loading ...
Page is loading ...
Page is loading ...
Page is loading ...
Page is loading ...
Page is loading ...
Page is loading ...
Page is loading ...
Page is loading ...
Page is loading ...
Page is loading ...
Page is loading ...
Page is loading ...
Page is loading ...
Page is loading ...
Page is loading ...
Page is loading ...
Page is loading ...
Page is loading ...
Page is loading ...
Page is loading ...
Page is loading ...
Page is loading ...
Page is loading ...
Page is loading ...
Page is loading ...
Page is loading ...
Page is loading ...
Page is loading ...
Page is loading ...
Page is loading ...
Page is loading ...
Page is loading ...
Page is loading ...
Page is loading ...
Page is loading ...
Page is loading ...
Page is loading ...
Page is loading ...
Page is loading ...
Page is loading ...
Page is loading ...
Page is loading ...
Page is loading ...
Page is loading ...
Page is loading ...
Page is loading ...
Page is loading ...
Page is loading ...
Page is loading ...
Page is loading ...
Page is loading ...
Page is loading ...
Page is loading ...
Page is loading ...
Page is loading ...
Page is loading ...
Page is loading ...
Page is loading ...
Page is loading ...
Page is loading ...
Page is loading ...
Page is loading ...
Page is loading ...
Page is loading ...
Page is loading ...
Page is loading ...
Page is loading ...
Page is loading ...
Page is loading ...
Page is loading ...
Page is loading ...
Page is loading ...
Page is loading ...
Page is loading ...
Page is loading ...
Page is loading ...
Page is loading ...
Page is loading ...
Page is loading ...
Page is loading ...
Page is loading ...
Page is loading ...
Page is loading ...
Page is loading ...
Page is loading ...
Page is loading ...
Page is loading ...
Page is loading ...
Page is loading ...
Page is loading ...
Page is loading ...
Page is loading ...
Page is loading ...
Page is loading ...
Page is loading ...
Page is loading ...
Page is loading ...
Page is loading ...
Page is loading ...
Page is loading ...
Page is loading ...
Page is loading ...
Page is loading ...
Page is loading ...
Page is loading ...
Page is loading ...
Page is loading ...
-
 1
1
-
 2
2
-
 3
3
-
 4
4
-
 5
5
-
 6
6
-
 7
7
-
 8
8
-
 9
9
-
 10
10
-
 11
11
-
 12
12
-
 13
13
-
 14
14
-
 15
15
-
 16
16
-
 17
17
-
 18
18
-
 19
19
-
 20
20
-
 21
21
-
 22
22
-
 23
23
-
 24
24
-
 25
25
-
 26
26
-
 27
27
-
 28
28
-
 29
29
-
 30
30
-
 31
31
-
 32
32
-
 33
33
-
 34
34
-
 35
35
-
 36
36
-
 37
37
-
 38
38
-
 39
39
-
 40
40
-
 41
41
-
 42
42
-
 43
43
-
 44
44
-
 45
45
-
 46
46
-
 47
47
-
 48
48
-
 49
49
-
 50
50
-
 51
51
-
 52
52
-
 53
53
-
 54
54
-
 55
55
-
 56
56
-
 57
57
-
 58
58
-
 59
59
-
 60
60
-
 61
61
-
 62
62
-
 63
63
-
 64
64
-
 65
65
-
 66
66
-
 67
67
-
 68
68
-
 69
69
-
 70
70
-
 71
71
-
 72
72
-
 73
73
-
 74
74
-
 75
75
-
 76
76
-
 77
77
-
 78
78
-
 79
79
-
 80
80
-
 81
81
-
 82
82
-
 83
83
-
 84
84
-
 85
85
-
 86
86
-
 87
87
-
 88
88
-
 89
89
-
 90
90
-
 91
91
-
 92
92
-
 93
93
-
 94
94
-
 95
95
-
 96
96
-
 97
97
-
 98
98
-
 99
99
-
 100
100
-
 101
101
-
 102
102
-
 103
103
-
 104
104
-
 105
105
-
 106
106
-
 107
107
-
 108
108
-
 109
109
-
 110
110
-
 111
111
-
 112
112
-
 113
113
-
 114
114
-
 115
115
-
 116
116
-
 117
117
-
 118
118
-
 119
119
-
 120
120
-
 121
121
-
 122
122
-
 123
123
-
 124
124
-
 125
125
-
 126
126
-
 127
127
-
 128
128
-
 129
129
-
 130
130
-
 131
131
-
 132
132
-
 133
133
-
 134
134
-
 135
135
-
 136
136
-
 137
137
-
 138
138
-
 139
139
-
 140
140
-
 141
141
-
 142
142
-
 143
143
-
 144
144
-
 145
145
-
 146
146
-
 147
147
-
 148
148
-
 149
149
-
 150
150
-
 151
151
-
 152
152
-
 153
153
-
 154
154
-
 155
155
-
 156
156
-
 157
157
-
 158
158
-
 159
159
-
 160
160
-
 161
161
-
 162
162
-
 163
163
-
 164
164
-
 165
165
-
 166
166
-
 167
167
-
 168
168
-
 169
169
-
 170
170
-
 171
171
-
 172
172
-
 173
173
-
 174
174
-
 175
175
-
 176
176
-
 177
177
-
 178
178
-
 179
179
-
 180
180
-
 181
181
-
 182
182
-
 183
183
-
 184
184
-
 185
185
-
 186
186
-
 187
187
-
 188
188
-
 189
189
-
 190
190
-
 191
191
-
 192
192
-
 193
193
-
 194
194
-
 195
195
-
 196
196
-
 197
197
-
 198
198
-
 199
199
-
 200
200
-
 201
201
-
 202
202
-
 203
203
-
 204
204
-
 205
205
-
 206
206
-
 207
207
-
 208
208
-
 209
209
-
 210
210
-
 211
211
-
 212
212
-
 213
213
-
 214
214
-
 215
215
-
 216
216
-
 217
217
-
 218
218
-
 219
219
-
 220
220
-
 221
221
-
 222
222
-
 223
223
-
 224
224
-
 225
225
-
 226
226
-
 227
227
-
 228
228
-
 229
229
-
 230
230
-
 231
231
-
 232
232
-
 233
233
-
 234
234
-
 235
235
-
 236
236
-
 237
237
-
 238
238
-
 239
239
-
 240
240
-
 241
241
-
 242
242
-
 243
243
-
 244
244
-
 245
245
-
 246
246
-
 247
247
-
 248
248
-
 249
249
-
 250
250
-
 251
251
-
 252
252
-
 253
253
-
 254
254
-
 255
255
-
 256
256
-
 257
257
-
 258
258
-
 259
259
-
 260
260
-
 261
261
-
 262
262
-
 263
263
-
 264
264
-
 265
265
-
 266
266
-
 267
267
-
 268
268
-
 269
269
-
 270
270
-
 271
271
-
 272
272
-
 273
273
-
 274
274
-
 275
275
-
 276
276
-
 277
277
-
 278
278
-
 279
279
-
 280
280
-
 281
281
-
 282
282
-
 283
283
-
 284
284
-
 285
285
-
 286
286
-
 287
287
-
 288
288
-
 289
289
-
 290
290
-
 291
291
-
 292
292
-
 293
293
-
 294
294
-
 295
295
-
 296
296
-
 297
297
-
 298
298
-
 299
299
-
 300
300
-
 301
301
-
 302
302
-
 303
303
-
 304
304
-
 305
305
-
 306
306
-
 307
307
-
 308
308
-
 309
309
-
 310
310
-
 311
311
-
 312
312
-
 313
313
-
 314
314
-
 315
315
-
 316
316
-
 317
317
-
 318
318
-
 319
319
-
 320
320
-
 321
321
-
 322
322
-
 323
323
-
 324
324
-
 325
325
-
 326
326
-
 327
327
-
 328
328
-
 329
329
-
 330
330
-
 331
331
-
 332
332
-
 333
333
-
 334
334
-
 335
335
-
 336
336
-
 337
337
-
 338
338
-
 339
339
-
 340
340
-
 341
341
-
 342
342
-
 343
343
-
 344
344
-
 345
345
-
 346
346
-
 347
347
-
 348
348
-
 349
349
-
 350
350
-
 351
351
-
 352
352
-
 353
353
-
 354
354
-
 355
355
-
 356
356
-
 357
357
-
 358
358
-
 359
359
-
 360
360
-
 361
361
-
 362
362
-
 363
363
-
 364
364


Campbell Scientific RTDAQ Owner's manual
- Category
- Software
- Type
- Owner's manual
Ask a question and I''ll find the answer in the document
Finding information in a document is now easier with AI
Related papers
-
Campbell Scientific RTMC Owner's manual
-
-
-
-
-
-
-
-
-
Other documents
-
Potter FFT-TC User manual
-
Omega TXDIN101 Owner's manual
-
Vernier Graphical Analysis 3 User manual
-
-
Lynx Tip 10 User guide
-
-
-
TFA Professional Thermo-Hygrometer with Data Logger Function KLIMALOGG PRO User manual
-
UNI-T UT240 Plus TRUE RMS Power and Harmonics Clamp Meters User manual
-