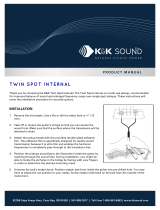
Page is loading ...

Prefix Stereo Blender
Acoustic Guitar System
Warning! We strongly recommend that you familiarize yourself with
the preamp's controls before you attempt to perform with this sys-
tem. Failure to do so can produce painful acoustic feedback (see
Quick Start on page 3).
Please take a few minutes to read this guide and familiarize your-
self with the Stereo Onboard Blender's controls.
User Guide
User Guide
®

Thank you for choosing a Fishman equipped instrument. Our goal is to provide you with the finest
acoustic amplification products - systems that simply let you sound your best. With our long-stand-
ing commitment to quality, you can feel confident that your Fishman gear will provide great sound
and trouble free performance for years to come.
Your satisfaction is very important to us. If you have any questions, please contact us on the web
at [email protected]; or by telephone at 978-988-9665.
Featured for the Stereo Blender is the acclaimed Acoustic Matrix™ under-saddle pickup. It deliv-
ers a clear, articulate sound with emphasis on string definition and attack. To compliment and
contrast this pickup, a miniature electret microphone (mounted to the underside of the preamp
chassis) captures the guitar's elusive natural ambience and sound chamber resonance. Blend the
pickup and Microphone together for a powerful and cohesive acoustic guitar tone that is deeper
and more "filled out", than the sound of either the microphone or pickup alone.
The Stereo Blender preamp module incorporates a unique flip-top battery compartment for easy
access. Levels are set by the master volume and blend controls. Traditional shelving-style bass &
treble, plus a semi-parametric "Contour" EQ are included so you can shape your guitar's tone
exactly to taste. To complete the package, we include a phase switch and an adjustable notch fil-
ter, both essential for fighting feedback.
IMPROVEMENTS
For the Stereo Blender we have updated and upgraded our top-of-the-line Prefix preamp. With
the flick of a switch, you can now choose between stereo or mono signal paths for the system's
under-saddle pickup and integral miniature microphone. This new feature expands your options
for routing both signals.
We have also improved the performance of our notch filter by fine tuning its response to give you
better control over your sound. In addition, a completely new circuit improves EMI and RF rejec-
tion for even quieter performance than its predecessor.
THE PICKUP
The system's under-saddle pickup is the industry standard Fishman Acoustic
Matrix™. It is made with Fishman's exclusive co-polymer sensing material. This
proprietary material reproduces your acoustic guitar sound with a sensitivity and
dynamic range that surpasses all other known materials (including piezo-ceramic
and so called "piezo-film" pickups).
2
2
Prefix -
Prefix -
Stereo Blender
Stereo Blender

At the heart of the pickup is a multi-layer stack of co-polymer strips. These strips sense motion
across the entire length of the saddle for unparalleled performance. Compared ceramic pickups
with individual elements, the Acoustic Matrix' "unitary" co-polymer design provides a more natural
and balanced response, with sensitivity to both the strings and the soundboard. The transducer is
fully enclosed in a shielded foil wrap for quiet performance and total EMI noise rejection.
THE MICROPHONE
This quality electret-condenser microphone will provide very high level sound reproduction before
feedback when used in conjunction with the unit's Phase, Notch and Contour EQ (see pages 7-
8). Conveniently shock-mounted to the underside of the preamp chassis, the microphone is strate-
gically isolated inside the instrument. For stage use, the Microphone's interior location affords
you unprecedented freedom of movement as well as minimal bleed through from other instru-
ments.
QUICK START
We recommend that you preset the system EQ to locate and eliminate microphone
feedback before you mix in the under-saddle pickup.
1. Set all controls as follows:
• Notch and Volume fully counter-clockwise
• All EQ sliders at center position
• Blend slider at full left position (A = microphone)
2. Slowly increase the volume and play the notes from the open low E, up to the
fourth fret G sharp until the instrument starts to rumble or howl with feedback on
one or more of these notes. Adjust the Notch control until this feedback is elimi-
nated (usually between one and two o'clock on the dial).
3. Increase the volume some more and play (on the low E string) the fifth fret A
and above. Flip the phase switch to the position that eliminates feedback in this
region.
3
3
U
U
SER
SER
G
G
UIDE
UIDE

Quick Start Cont’d ...
4. Slowly increase the Volume again, until you start to hear a high squeal.
5. Lower the Contour Slider (level) all the way down and adjust the Frequency slid-
er until the squealy feedback is eliminated. Raise the Contour slider (if possible)
to just below the threshold of feedback.
6. Move the Blend slider to the right to mix in the pickup signal (B).
7. Adjust the Bass and Treble controls as desired. Note that these controls do not
affect the microphone signal.
8. Play your guitar as loud as you like.
See diagram on page 9
SETUP
Battery Compartment
Pull the small tab at the top of
the Onboard Blender™ toward
you. The body of the preamp
will swing out, revealing the
battery compartment. Observe
the polarity marks on the bat-
tery clip and install a fresh 9V
alkaline battery accordingly.
Microphone Trim Control
A small circular potentiometer is located on the underside of the preamp just below
the battery compartment. This is a "set it and forget it" control. Use it to initially cali-
brate the microphone balance in relation to the pickup. Set the Blend slider to the
center position and with a small slotted screwdriver, adjust the Trim Control until
both the microphone and pickup levels are balanced to your taste.
4
4
Prefix -
Prefix -
Stereo Blender
Stereo Blender
Stereo Blender
9 Volt Battery

Mono/Stereo Switch
A small slide switch, located on the
underside of the preamp (across
from the Notch control pot), lets you
choose between mono and stereo
operation. Leave the switch in the
factory set Mono position when you
use a standard instrument cable.
If you wish to split the pickup and microphone signals for separate external process-
ing (such as with a Fishman Acoustic Blender), move the switch to the Stereo posi-
tion and use a stereo cable or a stereo "Y" cable to carry the two signals to separate
destinations. In the stereo mode, the pickup goes to the tip output and the micro-
phone goes to the ring output.
Note that the microphone signal at the ring output is affected only by the Volume,
Blend and Phase controls.
U
U
SER
SER
G
G
UIDE
UIDE
MONO / STEREO
Mono / Stereo
Switch
Microphone
Trim Control
MONO CABLE
Microphone & Pickup
Signals
MIC
STEREO CABLE
Tip
Pickup
Ring
Microphone
MIC
Mono Stereo
5
5

Endpin Jack
When you plug into the endpin jack, the Stereo Onboard Blender™ switches on. To
conserve the battery, remove the instrument cable from the endpin jack when the
system is not being used. It is a good idea to turn down your amp or mixer input
before you plug into the endpin jack. Doing so will protect your speakers (and your
ears) from loud pops.
Battery Low LED
Plug into the endpin jack and the Low Battery light will flash momentarily, indicating
that the power is on. When the Low Battery light stays on, it is time to change the
battery.
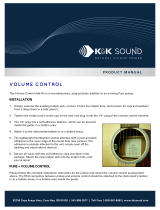
CONTROLS
Volume Control
Set this as high as possible (without distorting your amp or mixer) for the cleanest
signal. This control affects both the pickup and the microphone.
Notch and Phase
These controls work hand in hand to suppress two adjacent ranges of acoustic
feedback. When you set them properly, you can play your instrument as loud as you
like, feedback free.
Notch
Tune the Notch filter to scoop out the lowest range of feedback when you play
bass notes between the open low E string and (up to and including) the fourth fret
G sharp on the same string. Low frequency "cavity resonance" feedback can usu-
ally be squelched by setting the Notch control between one o'clock and two
o'clock on the dial. Note that for instruments that do not suffer from low frequen-
cy feedback, the notch can be defeated by moving the dial to the Off (seven
o'clock) position.
6
6
Prefix -
Prefix -
Stereo Blender
Stereo Blender

NOTE: The Notch control only affects the magnetic and piezo pickup sig-
nals at the tip output.
Phase Switch
Flip the Phase switch back and
forth until you find the position
that sounds best and subdues
mid-bass feedback. Mid-bass
feedback generally occurs when
you play bass notes above the
fourth fret G sharp on the low E
string.
Lower Feedback Range
(E to G#)
Upper Feedback Range
(A and above)
7
7
U
U
SER
SER
G
G
UIDE
UIDE

Bass
This control affects the under-saddle pickup signal only!
A Boost here will add depth and weight to the sound the instrument.
Contour EQ
Two sliders (Contour and Frequency) make up this EQ. The Frequency slider lets
you tune in on the specific range of sounds that you can boost/cut with the Contour
(level) slider. The Contour control affects only the pickup and microphone signals at
the tip output.
With the Contour EQ you can boost or cut a wide range of frequencies, from gutsy
low midrange (250 Hz) to brilliant high treble (10 kHz). Often your instrument will
benefit from a slight midrange cut.
To cut mids, boost the Contour control and then sweep the Frequency control until
you find the band of frequencies that are brash and nasal sounding (usually around
the center of the Frequency slider's travel).
Then move the Contour slider below its detent to taste.
Treble
This control affects the under-saddle pickup signal only!
A boost here will help to "cut through the mix". Conversely, cutting the Treble will
mellow and subdue your amplified tone.
Blend Control
This control determines the balance between the two pickups. Move the slider left to
emphasize the Microphone (A). Move it right to hear more of the Pickup (B).
8
8
Prefix -
Prefix -
Stereo Blender
Stereo Blender

U
U
SER
SER
G
G
UIDE
UIDE
SUGGESTED EQ SETTINGS
Anti-feedback
See Quick Start on Page 3
Brilliance
If you are playing through a limited range
amplifier (like an electric guitar amp) or
have dead strings on the instrument, you
can brighten up your sound by setting the
Frequency slider to 10 kHz and raising
the Contour level to taste. If you plan to
play at high stage volume levels, dial in
more pickup than microphone to avoid
feedback.
9
9
PHASE
LOW
BATTERY
10 kHz
250 Hz
-
12 dB
+
12 dB
+
12 dB
-
12 dB
+
12 dB
-
12 dB
50 Hz 900 Hz QUIET
LOUD
STEREO
BLENDER
AB
PHASE
LOW
BATTERY
10 kHz
250 Hz
-
12 dB
+
12 dB
+
12 dB
-
12 dB
+
12 dB
-
12 dB
50 Hz 900 Hz QUIET
LOUD
STEREO
BLENDER
AB

Suggested EQ Settings Cont’d ...
Mid-Cut
You can scoop out harsh midrange by
setting the Frequency slider slightly
above center with the Contour (level)
cut to taste below the center detent.
Often the desired mid-cut will fall into
the same frequency range as poten-
tial microphone feedback. You can
also cut midrange (pickup only) by
boosting the BASS and TREBLE slid-
ers to realize an "implied" mid-cut at
800 Hz.
Fingerstyle
This setting will add fullness to the bass
and definition to the treble.
PHASE
LOW
BATTERY
10 kHz
250 Hz
-
12 dB
+
12 dB
+
12 dB
-
12 dB
+
12 dB
-
12 dB
50 Hz 900 Hz QUIET
LOUD
STEREO
BLENDER
AB
Prefix -
Prefix -
Stereo Blender
Stereo Blender
PHASE
LOW
BATTERY
10 kHz
250 Hz
-
12 dB
+
12 dB
+
12 dB
-
12 dB
+
12 dB
-
12 dB
50 Hz 900 Hz QUIET
LOUD
STEREO
BLENDER
AB
10
10

SPECIFICATIONS
Nominal Input Level: -20 dBV
Input Overload: (20 Hz - 20 kHz)-2 dBV
Pickup Input Impedance: 20 M Ohms
Output Impedance (tip): Less than 3.5 k Ohms
Output Impedance (ring): Less than 6.6 k Ohms
Nominal Output Level (tip): -12 dBV
Output Level Range (ring): Max: -12 dBV Min: -16dBV
THD: Less than .04 %, -20 dBV input
Signal to Noise Ratio: 77 dB (A weighted referred to nominal
-20 dBV input)
Current Drain: Less than 4 mA
Power Supply: 9V alkaline battery (estimated 140 hours
continuous use with low battery indicator
at 6.5V)
Notch Filter Range: 20Hz - 300 Hz (-15 dB)
Bass Control Range:
±
12 dB at 60 Hz
±
3 dB at 350 Hz
Treble Control Range:
±
12 dB at 10 kHz
±
3 dB at 2.4 kHz
Contour Control Range:
±
12dB
(adjustable from 250 Hz to 10 kHz)
Q = 0.5
All specifications subject to change without notice.
11
11
U
U
SER
SER
G
G
UIDE
UIDE
PICKUP ONLY

The Fishman Prefix Stereo Blender is warranted to function for a period of One (1)
Year from the date of purchase. If the unit fails to function properly within the
warranty period, free repair and the option of replacement or refund in the event
that Fishman is unable to make repair are Fishman’s only obligations. This warranty
does not cover any consequential damages or damage to the unit due to misuse,
accident, or neglect. Fishman retains the right to make such determination on the
basis of factory inspection. Products returned to Fishman for repair or replacement
must be shipped in accordance with the Return Policy, as follows. This warranty
remains valid only if repairs are performed by Fishman. This warranty gives you
specific legal rights and you may also have other rights which may vary from state
to state.
Return Policy
To return products to Fishman Transducers, you must follow these steps...
1. Call Fishman Transducers at 978-988-9665 for a Return Authorization Number
(“RAN”).
2. Enclose a copy of the original Bill of Sale as evidence of the date of purchase,
with the product in its original packaging and a protective carton or mailer.
3. Fishman Transducers’ technicians will determine whether the item is covered by
warranty or if it instead has been damaged by improper customer installation or
other causes not related to defects in material or workmanship.
4. Warranty repairs or replacements will be sent automatically free of charge.
5. If Fishman Transducers determines the item is not covered by warranty, we will
notify you of the repair or replacement cost and wait for your authorization to
proceed.
F
ISHMAN
T
RANSDUCERS
340-D Fordham Road Wilmington MA 01887 USA
Phone 978-988-9199 • Fax 978-988-0770
www.fishman.com
009-087-006 • 11-00
Limited Warranty
Limited Warranty
®
/