Reduce-Reuse-Recycle
This product is made primarily of recyclable materials. You can reduce your carbon footprint by recycling
this product at the end of its useful life. Contact your local recycling support center for further recycling
instructions.
WARRANTY
For more eective and safer operation and to
prolong the life of the heater, read the Owner’s
Guide and follow the instructions. Failure to prop-
erly maintain the heater will void any warranty and
may cause the heater to function improperly.
LIMITED SEVEN YEAR WARRANTY: Cadet will
repair or replace any Cadet SoftHEAT (EBHN)
heater found to be defective within seven years
after the date of purchase.
These warranties do not apply:
1. Damage occurs to the product through improper
installation or incorrect supply voltage;
2. Damage occurs to the product through
improper maintenance, misuse, abuse, accident,
or alteration;
3. The use of unauthorized accessories or
unauthorized components constitutes an
alteration and voids all warranties. Refer to
Cadet website or call customer service at 855.
CADET.US or 360.693.2505 for list of authorized
accessories and components.
4. CADET’S WARRANTY IS LIMITED TO
REPAIR OR REPLACEMENT.
5. IN THE EVENT CADET ELECTS TO REPLACE
ANY PART OF YOUR CADET PRODUCT, THE
REPLACEMENT PARTS ARE SUBJECT TO
THE SAME WARRANTIES AS THE PRODUCT.
THE INSTALLATION OF REPLACEMENT
PARTS DOES NOT MODIFY OR EXTEND THE
UNDERLYING WARRANTIES. REPLACEMENT
OR REPAIR OF ANY CADET PRODUCT
OR PART DOES NOT CREATE ANY NEW
WARRANTIES.
If you believe your Cadet product is defective,
please contact Cadet during the warranty period,
for instructions on how to have the repair or
replacement processed.
Parts and Service
Visit cadetheat.com/parts-service for information
on where to obtain parts and service.
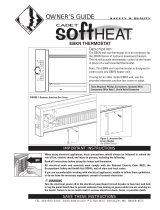
How to operate your heater
The room temperature is controlled by a thermostat located either on the wall, or on the heater.
Once installation is complete and power has been restored, follow the steps below for your
thermostat.
If you have a wall or built-in thermostat with a knob:
1. Turn the thermostat knob all the way to the right.
2. When the room reaches your comfort level, turn the knob to the left, just until it clicks and the
heater turns o. The heater will automatically keep the room temperature around this setting.
3. To reduce the room temperature, turn the knob to the left. To increase the room temperature,
turn the knob to the right.
If you have an electronic thermostat, follow the instructions in the programming and operating guide
included with your thermostat.
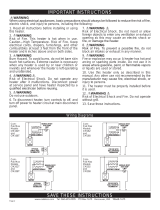
OPERATING INSTRUCTIONS
To register your product, visit cadetheat.com/product-registration
1. Make sure all wires are properly
connected and your heater is
installed before you turn it on.
2. Do not tamper with the high-
temperature safety shuto.
7
The SoftHEAT uid is a non-toxic mineral oil. No special rst aid measures are needed if the uid is
swallowed, inhaled, or if it gets on your skin or in eyes; simply rinse or wash with soap and water.
The uid does not freeze.
If the uid leaks, stop using the heater. Cleanup is the same as it is for used oil. Wipe up any leaking
uid with a rag or paper towel. Dispose of uid at a recycling center that accepts used oil. Wash
hands with soap and water.
For more information you can view the Safety Data Sheet here: cadetheat.com/softheat/sds
PLEASE NOTE: On initial start-up, the heater may cause an odor due to the manufacturing
process. It typically goes away within several hours.