Page is loading ...

81441001R8-3/06
Price - $2.00
ROFLAUNAMNOITALLATSNI
MAHNRUB
AR-ESABY
®
PAGE
2 I=B=R RATINGS
4 ASSEMBLY CHART
5 SYSTEM TYPES
6 SERIES LOOP SYSTEMS
7 SERIES LOOP DESIGN
8 INSTALLATION DETAILS
9 INSTALLATION INSTRUCTIONS
10 ASSEMBLY INSTRUCTIONS
14 SPECIAL APPLICATIONS
16 WARRANTY
TABLE OF CONTENTS
rotcartnoCgnitaeH
etaDnoitallatsnI
sserddA rebmuNenohP

2
For Ratings at the following temperatures, multiply the 150° rating by the multiplier of the desired temperature.
No. 9A Base-Ray
®
I=B=R Ratings – Steam and Hot Water (500 LBS/HR Flow Rate **)
I=B=R Ratings are determined from tests
made in accordance with the I=B=R Testing
and Rating Code for Baseboard Type of
Radiation, including an allowance of 15% for
heating effect permitted by the Code.
Ratings based on active length. Active length
same as total length.
**The Hot Water Ratings at 500 lb. Flow Rate are based on a standard water À ow rate of 500
lbs. per hour (one gallon per minute) through the Base-Ray. These ratings should be used for all
installations except as noted under 2000 Lb. Flow Rate.
*Add ½" to length for each bushing. Add 5" to length for each valve enclosure.
***Based on ¾" pipe connections.
nihtgneL
*teeFlaeniL
maetS
gnitaR
teeFerauqS
maetS
gnitaR
reP.U.T.B
F°512tA.rH
TARUOHREPUTBNISGNITARRETAWTOH
**
ETARWOLF).M.P.GENO(.RH/.SBL005
FOERUTAREPMETREAWEGAREVATA
erusserP
niporD
fosehcnI
***retaW
F°032F°022F°012F°0
02F°091F°081F°071F°051
.tF.niLreP04.3028098038077017056095025093
5.11.50321043105210611070108909808758501.
0.28.604610871066104510241003
10811040108701.
5.25.80502032208020391087103610841003157911.
0.32.0106420762094201320312059107710651071121.
5.39.1107820213019200720942082207020281563131.
0.46.3108230653023308030482006206320802065141.
5.43.5109630104047307430023039206620432557141.
0.50.7100140544051405830
553052305920062059151.
5.57.8101540094075404240193085305230682541261.
0.64.0202940435089402640624009304530213043271.
5.61.2203350975004
501050264032404830833535281.
0.78.3204750326018509350794055403140463037281.
5.75.5205160866032608750335088403440093529291.
0.82.7206560217046606160865002502740614021302.
5.89.8207960757060705560406035502050244513312.
0.96.0308370108074703960936058501350864015322.
5.93.2309770648098702370576081601650494507322.
0.010.4300280098003800770017005600950025009332.
5.017.5301680539517809080647038600260645590442.
0.114.7302090979031907480187051709460275092452.
5.111.93034904201055906880718084709760895584462.
0.218.04048908601069904290258008708070426086462.
5.215.2405201031110830103690888031808370056587472.
0.312.44066010751109701010010329054807670676070582.
5.319.54070110202101211004010959087807970207562592.
0.416.74084110642102611087010499001906280827064503.
5.413.940981101921040210711100301034905580457556503.
0.510.150032105331054210551105601057905880087058513.
5.517.2501721008310782104911010110800105190608540623.
0.614.45021310
42410823102321063110040104490238042633.
5.611.6503531096410073101721027110370107490858534643.
0.718.75049310315101141090310702105
011030010488036643.
5.715.95053410855103541084310342108311033010019528653.
0.812.16067410206104941068310872100711026010639020763.
5.819.26071510746106351052410413103021029010269512773.
0.916.46085510196107751036410943105321012110889014783.
5.913.6609951063710
91610205105831086210151104101506783.
0.020.860046100871006610045100241000310081100401008793.
5.027.960186105281020710975106541033310012106601599704.
0.124.170227109681034710716101941056310932102901091814.
5.121.370367104191058710656107251089310962108111583
824.
0.228.470408108591062810496102651003410892104411085824.
Temperature – Multiplier
150° - 1.0
140° - .82
130° - .68
120° - .54
110° - .42
100° - .32

3
For Ratings at the following temperatures, multiply the 150° rating by the multiplier of the desired temperature.
Temperature – Multiplier
150° - 1.0
140° - .82
No. 9A Base-Ray
®
I=B=R Ratings – Steam and Hot Water (2000 LBS/HR Flow Rate **)
nihtgneL
*teeFlaeniL
maetS
gnitaR
teeFerauqS
maetS
gnitaR
reP.U.T.B
F°512tA.rH
TARUOHREPUTBNISGNITARRETAWTOH
**
ETARWOLF).M.P.GRUOF(.RH/.SBL0002
FOERUTAREPMETREAWEGAREVATA
erusserP
niporD
fosehcnI
***retaW
F°032F°022F°012F
°002F°091F°081F°071F°051
.tF.niLreP04.3028049088018057096026055014
5.11.503210141023102210311040103903851692.1
0.28.6046108810671026100
5108310421001102893.1
5.25.805020532002203020881037105510831520105.1
0.32.0106420282046203420522070206810561032116.1
5.39.1107820923080
304820362024207120391534117.1
0.46.3108230673025304230003067208420022046128.1
5.43.5109630324069305630833011309720842548139.1
0.50.7100140074004405040573054300130572050230.2
5.57.8101540715048406440314008301430303552241.2
0.64.0202940465082506840054041402730033064252.2
5.61.2203350116027507250884094403040853566253.2
0.78.3204750856061607650525038404340583078264.2
5.75.5205160507006608060365081505640314570375.2
0.82.7206560257040708460006025506940044082386.2
5.89.8207960997084709860836078507250864584387.2
0.96.0308370648029709270576012608550594096398.2
5.93.2309770398063800770317065609850325598300.3
0.010.4300280049008800180057009600260055001401.3
5.017.5301680789042901580887052701560875503412.3
0.114.73020904301086901980528095702860506015423.3
5.111.930349018010210102390368049703170336517424.3
0.218.040489082110650102790009082804470066029435.3
5.215.24052010571100011031010839036805770886521546.3
0.312.44066010222104411030510579079806080517033547.3
5.319.540701109621088110490103101023907380347535558.3
0.416.740841106131023210431100501066908680077047569.3
5.413.9409811036310672105711088010100109980697549560.4
0.510.1500321001410023105121052110530100390528051671.4
5.517.2501721075410463106521036110070101690358553682.4
0.614.4502131040510804106921000210401102990088065683.4
5.611.65035310155102541073310832109311032010809567694.4
0.718.75049310895106941077310572103711045010539079606.4
5.715.95053410546100451081410313108021058010369571707.4
0.812.16067410296104851085410053102421061110099083718.4
5.819.260715109371082610994108831077210741108101585729.4
0.916.460855106871027610935105241011310871105401097730.5
5.913.660995103381061710085103641064310902103701599731.5
0.020.860046100881006710026100051008310042100011002842.5
5.027.960186107291040810166108351051410172108211504853.5
0.124.170227104791084810107105751094410203105511016854.5
5.121.370367101202029810247103161048410333103811518865.5
0.228.47040810860206391028710056108151046310012102097
6.5
I=B=R Ratings are determined from tests made
in accordance with the I=B=R Testing and Rating
Code for Baseboard Type of Radiation, including
an allowance of 15% for heating effect permitted
by the Code.
Ratings based on active length. Active length
same as total length.
**The Hot Water Ratings at 2000 lb. Flow Rate are limited to installations where the water
À ow rate through the Base-Ray is greater than 2000 lbs. per hour (four gallons per minute).
Where the water À ow rate through the Base-Ray is not known, the rating at the standard À ow
rate of 500 lbs. per hour must be used.
*Add ½" to length for each bushing. Add 5" to length for each valve enclosure.
***Based on ¾" pipe connections.
9A Base-Ray Water Content - 2.5 lbs. or .3 gal. per linear ft.
130° - .68
120° - .54
110° - .42

4
Dimensions and Speci¿ cations
BASE-RAY TAPPINGS- Tapped 3/4" top and bot-
tom of end sections. A 3/4" x 1/8" vent bushing is
furnished with each Base-Ray Assembly. Only one air
vent location need be used.
Copper tubing is not recommended for steam appli-
cations due to high heat loss through the tubing and
thermal expansion noise.
Base-Ray
®
Assembly Chart
BASE-RAY Assemblies up to and including 6 lineal ft. are
shipped in one piece.
Longer Assemblies are shipped in two or more pieces or sub-
assemblies, none of which exceeds 6 lineal ft.
Maximum recommended length for steam applications is 10
lineal feet.
EDAMERASEILBMESSA-BUSDNASEILBMESSA
SNOITCESGNIWOLLOFFOPU
SEILBMESSA
"81
tfeL
dnE
"42
tfeL
dnE
.tnI"42
"42
thgiR
d
nE
"21
thgiR
dnE
"81
lenaP
"42
lenaP
ylbmessA.tF½1---------------1---
ylbmessA.tF2------------------1
ylbmessA.tF½21---------1------
ylbmessA.tF3---1 ------1------
ylbmessA.tF½31------1---------
ylbmessA.tF4---1 ---1---------
ylbmessA.tF½41---1---1------
ylbmessA.tF5---1 1 ---1------
ylbmessA.tF½51---11---------
y
lbmessA.tF6---1 1 1 ---------
SEILBMESSA-BUS
.H.L.tF½5
.yssA-buS
1---2 ------------
.H.L.tF6
.yssA-buS
---1 2 ------------
retneC.tF6
.yssA-buS
------3 ------------
.H.RllA
.yssA
-buS
------
deriuqeR
rebmuN
1ro1------
trahCylbmessA-buStrahCylbmessA-buS
trahCylbmessA-buS
trahCylbmessA-buStrahCylbmessA-buS
YLBMESSA
HTGNEL
.H.LRETNEC.H.R
.tF½6.tF½5---.tF1
.tF7.tF6---.tF1
.tF½7.tF½5---.tF2
.tF8.tF6---.tF2
.tF½8.tF½5---.tF3
.tF9.tF6---.
tF3
.tF½9.tF½5---.tF4
.tF01.tF6---.tF4
.tF½01.tF½5---.tF5
.tF11.tF6---.tF5
.tF½11.tF½5---.tF6
.tF21.tF6---.tF6
.tF½21.tF½5.tF6.tF1
.tF31.tF6.tF6.tF1
.tF½31.tF½5.tF6.tF2
.tF41.tF6.tF6.tF2
.tF½41.tF½5.tF6.tF3
.tF51.tF6.tF6.tF3
.tF½51.tF½5.tF6.tF4
.tF61.tF6.tF6.tF4
.tF½61.tF½5.tF6.tF5
.tF71.tF6.tF6.tF5
.tF½71.tF½5.tF6.tF6
.tF81.tF6.tF6.tF6
.tF½81.tF½5.tF6-2.tF1
.tF91.tF6.tF6-2.tF1
.tF½91.tF½5.tF6-2.tF2
.tF02.tF6.tF6-2.tF2
.tF½02.tF½5.tF6-2.tF3
.tF12.tF6.tF6-2.tF3
.tF½12.tF½5.tF6-2.tF4
.tF22.tF6.tF6-2.tF4
.t
F½22.tF½5.tF6-2.tF5
.tF32.tF6.tF6-2.tF5
.tF½32.tF½5.tF6-2.tF6
.tF42.tF6.tF6-2.tF6
Use of PTFE (TeÀ on
®
) tape or paste
containing PTFE is not recommended
as overtightening is possible, causing
cracking of the Base Ray tappings.

5
BASE-RAY
®
HYDRONICS
Types of Systems
Hydronic Heating Systems are classi¿ ed according to the pip-
ing arrangement and heating medium employed. BASE-RAY
is very versatile in that it may be used in almost all types of
systems as noted below:
1. Series Loop Forced Circulation Hot Water
2. One-Pipe Forced Circulation Hot Water
3. Two-Pipe Reverse Return Gravity or Forced Circulation
Hot Water
4. Two-Pipe Steam or Vapor.
It is not recommended that BASE-RAY be used in a One-Pipe
Steam System.
System Description
1. Series Loop is a forced circulation hot water heating system
with the BASE-RAY Assemblies connected so that all the
water À owing through a circuit passes through each series-
connected Assembly in the circuit. Thus, the Assemblies
serve as portions of the main.
2. One-Pipe is a forced circulation hot water heating system
utilizing one continuous main from boiler supply to boiler
return. BASE-RAY Assemblies are connected to this pipe
or main by two smaller pipes known as branches. When
connecting these branches to the main, one of the standard
tees is replaced by a special tee frequently called a one-pipe
¿ tting. These one-pipe ¿ ttings cause a portion of the water
À owing through the main to pass through the BASE-RAY
Assemblies and back to the main again.
3. Two-Pipe Reverse Return is a gravity or forced circulation
hot water heating system utilizing one main to carry heated
water from the boiler to the BASE-RAY Assemblies and a
second main to carry the cooled water from the Assemblies
back to the boiler. The Assemblies are connected to the
return main in the reverse order from that in which they are
connected to the supply main. Very few designers use this
type of system for residential applications, since there is
no difference between the heating qualities of this system
and the other two hot water systems.
4. Two-Pipe Steam or Vapor Systems are steam systems in
which each BASE-RAY Assembly is provided with two
piping connections, and where steam and condensate À ow
in separate mains and branches. The Vapor system differs
from the low pressure system only in the type of air valve
used.

6
SERIES LOOP SYSTEMS
Installation Data
This type of installation, in which the BASE-RAY
®
Assem-
blies serve as part of the main, is the most economical way
BASE-RAY can be installed. Substantial savings in labor and
material are realized in that one-pipe ¿ ttings, shut-off valves,
balancing cocks and additional piping are eliminated. Quality
is not sacri¿ ced as tests have proven the ability of a Series Loop
System to produce comfort conditions equal to those produced
by other hydronic heating systems. Series Loop Systems are
ideal for homes without basements, especially those built on
concrete slabs, as it eliminates the necessity for running the
mains in the attic or in the concrete slab. With proper design,
the Series Loop System can be used to advantage in apartment
construction.
As indicated in the adjacent piping diagrams, the supply runs
from the boiler to the ¿ rst BASE-RAY Assembly in the circuit
and then from Assembly to Assembly, dropping below the
À oor only when necessary to avoid obstructions such as doors,
¿ replaces, etc. BASE-RAY Baseboard Extensions are used to
conceal the piping run above the À oor.
It is sound practice to run a loop around an ordinary 5 or 6 room
house. In the case of very small two-story homes, the loop may
take in both ¿ rst À oor and second À oor rooms. Larger ranch
style, two-story and split level homes may use two separate
loops running from the same supply line and coming back into
the common return line. An example of this is shown (lower
right) where the rooms on each À oor are on a separate loop.
In some two-story homes it might be desirable to put part of
each À oor on one loop and the other portions of each À oor on
a second loop. Do not include three stories on one loop. In
multiple loop systems, a valve should be placed at the return
end of each loop for balancing.
EXPANSION – BASE-RAY Assemblies and connecting pip-
ing will vary in length with water temperature changes in the
system. To prevent distortion or noise as this expansion takes
place, adequate measures must be provided in the system design
and by the installer. Proper location of breaks in a run when the
piping must drop through the À oor to clear obstructions such as
doors and ¿ replaces, expansion ¿ ttings, use of À exible tubing
at the end of a run, offsetting the vertical risers in adequate size
holes (1¼” holes for ¾” copper tubing, 1¼” x 1½” elongated
holes for ¾” steel pipe) – all provide for expansion and make
for a quality installation. In systems where high boiler water
temperature must be maintained for domestic hot water, length
of BASE-RAY Assemblies between two inside adjacent cor-
ners (when BASE-RAY is on three walls) should not exceed
25-feet, unless there is an expansion break between or swing
joint provided at end. See SPECIAL APPLICATIONS, page
14. It is also desirable on these types of systems to provide a
by-pass and mixing valve between boiler supply and return so
that in mild weather, temperature changes in the system will
be gradual instead of rapid.
BALANCING SYSTEM – System should be balanced on
days when average winter temperatures prevail outdoors.

7
To Design Series-Loop Base-Ray
®
Installation –
1. Calculate the Heat Loss of each room using the procedure
outlined in the I=B=R Heat Loss Calculation Guide No.
H-21 or the ASHRAE Guide.
2. Using 210°F as design water temperature and 500 lbs/hr.
as À ow rate, select length of BASE-RAY Assembly for
each room to produce desired output. (Design water
temperature other than 210°F may be used but should
not exceed 230°F.) If system designed on 20°F drop,
this 210°F average water temperature means roughly,
that under maximum load conditions, the water leaves
the boiler at 220°F and returns at 200°F and returns at
200°F. Since maximum load conditions occur only at
rare intervals, the system usually operates at considerably
lower water temperatures.
3. Locate BASE-RAY Assemblies on Floor Plan drawn to
scale.
4. Layout Piping on Floor Plan as illustrated. Since the
temperature of the water decreases progressively from the
¿ rst Heating Unit to the Last Heating Unit on a circuit, the
system should be laid out, if possible, so that the Heating
Units with the hotter water are in areas such as the living
room, bath and dining room. Heating Units in bedrooms,
kitchen and similar areas should be located on the end of
the loop.
5. Measure length of Circuit (horizontal and vertical)
from boiler supply to boiler return (include BASE-RAY
lengths). In Series Loop Systems, on rare instances a
BASE-RAY Assembly, Radiant Radiator or Slenderized
Radiator is connected to the main with branches. Since
a one-pipe ¿ tting is used, add 12 additional feet to the
measured length to obtain total length of Circuit.
6. Knowing the load-length of the loop from Steps 2 and
5 above, Table A will indicate whether or not a standard
¾” or 1” circulator is adequate.
If, for a given output, the total length of the loop exceeds the
values shown in Table A, the loop may be split into two circuits
– see Illustration. Check load-length of each circuit.
Determine from Table B if 1” trunk is adequate.
For Piping Arrangements and Design conditions other than
those given above, follow procedure outlined in I=B=R Instal-
lation Guide No. 200.
AELBATBELBAT
fotuptuO.rH/utB
YAR-ESAB
hcaEseilbmessA
pooL
latoT
fohtgneL
.tFpooL
fotuptuO.rH/utB
YAR-ESAB
llAseilbmessA
spooL
fohtgneL
tsegnoL
.tF-pooL
000,04001000,05042
000,53531000,55012
000,03571000,06561
000,52062000,56041
000,07021
F°02nodesabelbaT:ETON
"¾-tiucriChguorhtporD
gnipip
daehnodesabelbaT:ETON
ro"¾dradnatSybdepoleved
porDF°02-
rotalucric"1
.metsyshguorht

8
Installation Details
A BASE-RAY
®
heating system is extremely easy to install – no
other heating system requires less labor. The same installa-
tion practices that are used in an ordinary radiator system are
followed. Use conventional methods in selecting boiler and
pipe sizes, including mains, risers and branches. Supply and
return connections to BASE-RAY are made in the same way
as with conventional radiators.
I=B=R Installation Guide No. 200 for Hydronic Heating
Systems shows installation details for both the conventional
piping system and the Series Loop System.
LOCATION OF BASE-RAY
BASE-RAY should be placed along exposed walls in place of
the regular wood baseboard. If the outside walls do not provide
suf¿ cient space, place additional assemblies on inside wall.
RECESSED
BASE-RAY may be recessed the depth of the lath and plaster,
and will extend into the room approximately one and a quarter
inches.
EXPANSION
BASE-RAY will expand about 1/8” in 10 lineal feet with
a temperature rise of 180°F. To provide for this, holes cut
through the À oors should be larger than the pipe, and swing
connections should be located in branches between the Main
and Risers.
VENTING
When two or more BASE-RAY assemblies are connected in
series on a hot water job it is necessary to vent each assembly,
unless the assemblies are connected at the top tapping. When
connected in series on a two-pipe steam job, the assemblies
should be connected at the bottom, and only one steam air
vent need be used.
MAXIMUM DIMENSIONS OF FITTINGS
Inasmuch as the BASEBOARD EXTENSION PANELS and
PROJECTING CORNER PLATES are installed À ush with
the face of BASE-RAY, there are a few types of ¿ ttings that
cannot be used in back of these parts because of the space
limitations. As shown in the adjacent diagram, the diameter
of the ¿ ttings cannot exceed 1½” – radiator union elbows and
regular pipe unions usually measure more, ¾” copper sweat
or screw ¿ ttings usually measure less. When iron pipe and ¿ t-
tings are used, straight connections may be made with ¾” right
and left coupling and corner connections with ¾” street elbow.
Because of these space limitations, Burnham has available a
No. 90-S Compression Connector for use with the Projecting
Corner Plate (see illustration).
Because of the radius on the face of INVERTED CORNER
PLATE, ¿ ttings having a diameter greater than 1½” may be
used (see illustration). For easy and quick connections at
inside corners, however, we recommend the Burnham No.
90-S Compression Connector for use with the 4-5/8” Inverted
Corner Plate. Both are illustrated.
VALVE ENCLOSURES have been designed to accommodate
almost all makes of shut-off valves and steam traps. See Il-
lustration for Enclosure dimensions.

9
INSTALLATION INSTRUCTIONS
1. Wall Preparation:
To prevent excessive heat loss through the walls in back
of BASE-RAY
®
, it is recommended that the stud space
behind the Assemblies be insulated to a height of at least
12” above the À oor with 4” mineral wool batts (blanket
or loose insulation may also be used) or other approved
insulating materials. This is particularly essential if the
BASE-RAY is recessed. Mark Stud locations.
2. Allowance for Finished Flooring to Wall-to-Wall
Carpeting:
If BASE-RAY is to be installed prior to the ¿ nished À oor,
a wooden strip 2½” in width and equal in height to the
¿ nished À oor should be installed along the base of all walls
where baseboard assemblies and trim are to be placed.
If allowance is not made for wall-to-wall carpeting, or for
carpeting that is to be laid with edges À ush to the room
side surface of BASE-RAY, the air inlet of the BASE-
RAY will be restricted, resulting in a reduction in output.
To compensate for the wall-to-wall carpeting, baseboard
assemblies and trim should be raised by laying under them
a strip of wood 2½” wide and the same thickness as the
carpet and pad.
3. Recessing of BASE-RAY Assemblies and Trim.
(If BASE-RAY to be installed free-standing, proceed to
Step 4.)
BASE-RAY and Trim may be partially recessed or installed
free standing against the ¿ nished wall surface. Although
procedure for preparing recess may vary slightly with type
of ¿ nished wall, in general, steps outlined below for lath
and plaster construction may be followed:
a. Nail ½” plaster ground to studs with the bottom of
the plaster ground located 10” above ¿ nished À oor.
* Additional height must be allowed if recess
prepared before ¿ nished À oor is laid or if wall-to-
wall carpeting is to be installed – see Step 2 of
Installation Instructions.
b. Line back of recess with paper-backed aluminum
foil. This can be accomplished quickly and neatly
by stapling foil to studs with staple gun. Foil
surface should be on room side.
4. Locate Holes for Piping (see Illustrations):

10
5. Assembling BASE-RAY
®
BASE-RAY is shipped assembled in lengths up to six (6)
lineal feet – longer assemblies are shipped in two or more
sub-assemblies for assembly on the job (see BASE-RAY
Assembly chart, page 4). One man can join tow sub-
assemblies together in a matter of minutes providing he
has a BASE-RAY Assembly Clamp (available at a nominal
charge) and follows the recommended procedure.
In assembling BASE-RAY sub-assemblies on the job,
the sections should be lined up, face down, on the À oor
or other À at surface near the wall on which they are to
be installed. Ends of section, nipple ports and nipples
should be thoroughly cleaned with kerosene or gasoline
and wiped dry with a clean cloth.
Place a thin coating of nipple lubricant on nipples and
insert into the nipple ports of one assembly without
cocking. Engage nipples in nipple ports of second
assembly and push sections together by hand as far as
possible keeping ends of sections parallel.
In order to secure necessary leverage with BASE-RAY
Clamp, cut two pieces of 1¼” steel pipe 15” long and
place them on the two cam handles.
Insert BASE-RAY Clamp nose in the recesses in the
BASE-RAY castings, being certain that the nose of
the clamp is resting on the bottom of the recess –
THIS IS IMPORTANT. If the clamp nose will not
reach the bottom of the recess, exert light pressure
downward on the cam handles until the two castings are
PARTIALLY drawn together. Release the pressure on
the handles and the clamp nose will then drop to the
bottom of the recess.
Press down on both cam handles simultaneously until
castings are drawn together. Be sure clamp is not tilted,
since this may break casting. If nipples do not draw up
evenly during ¿ nal tightening, strike end of assembly with
wood block and hammer or mallet to bring the sections
back in line. Do not strike BASE-RAY sections with
metal hammer.
Remove the clamp, place the tie bolts in the bolt slots and
tighten securely.
6. Installation of BASE-RAY
®
Assemblies
Install all ¿ ttings in end of sections and all necessary
vents while assemblies are still laying À at on À oor.
Install bottom center supports prior to raising assemblies to
upright position. Refer to table for number of supports
required. They should be spaced evenly.
ylbmessAhtgneL
mottoBdnapoTforebmuN
deriuqeRstroppuSretneC
teeFlaeniL½41ot½11
teeFlaeniL½12ot512
teeFlaeniL½82ot223
Install the spring clip Bottom Center support by pushing it all the
way up against the bottom of two ¿ ns and next to the waterway
of the section as illustrated below. Run the ¼” cap screw into
the clip until head is not more than ¾” from the clip.

11
Stand Assemblies upright, place in position and fasten to the
walls with Top Center Supports using the number shown in the
table above. Insert Top Center Supports in Air Outlet opening
of Sections opposite studs (stud locations determined in step
1). Use wood screw furnished with Top Center Support and
screw into stud until tight, the longer dimension of the top
center support is in a vertical position when installed. Back
off fraction of a turn to permit movement caused by expansion
and contractions of sections. Adjust Bottom Center Supports
by turning Cap Screws down until they begin to contact À oor.
Do not extend the Cap Screws any further.
Connect assemblies to piping. Complete remainder of piping
to boiler, ¿ ll system with water and check for leaks.
CARE MUST BE EXERCISED TO SEE THAT 30 PSI GAUGE
PRESSURE IS NOT EXCEEDED.
DO NOT PRESSURE TEST WITH AIR.
7. Installation of Valve enclosures (furnished in right-hand
and left-hand patterns).
Remove knockout in end of Valve Enclosure if piping to
run through Valve Enclosure.
Bend tab on Valve Enclosure so that hole is on inside of
Valve Enclosure facing wall.
Place Valve Enclosure next to BASE-RAY
®
and fasten
to BASE-RAY with ¼” thumb screw furnished.
Insert screw furnished through tab on Valve Enclosure
and fasten to wall. Set Valve Enclosure Cover in place.

12
8. Installation of Corner Plates
INVERTED CORNER PLATES – for inside corners – furnished
in two types, 4-5/8” standard plate is used when Assemblies
on adjoining walls extend to within 4-3/8” of the corner. If
this distance is greater than 4-3/8” but less than 10-3/8”, the
10-5/8” plate is used. Extended Plate may be cut to desired
length with hacksaw.
Set Inverted Corner Plate in place overlapping the end of the
adjoining BASE-RAY
®
Assemblies. Secure to À oor with wood
screws furnished.
If installation is on tile with wood sub-À ooring, drill 1/2”
holes in tile in line with holes in Corner Plate. Holes should
not penetrate sub-À ooring. Substitute screws of same size as
furnished but longer and secure Corner Plate to sub-À ooring.
If installation is on masonry À oor, drill 1/2” holes approximately
1” deep in À oor in line with holes in Corner Plate. Drive slightly
oversized wood plugs into holes and secure Corner Plate to
plugs with wood screws furnished.
PROJECTING CORNER PLATE – for concealing pipe and
¿ ttings at outside corners. See section on MAXIMUM DI-
MENSION OF FITTINGS, page 8. Assemblies on adjoining
walls must extend to within 3” of corner.
Set Projecting Corner Plate in place overlapping the ends of
the adjoining BASE-RAY Assemblies. Secure with moulding
(not furnished) at top and bottom.
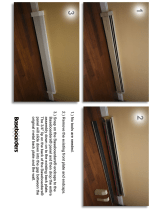
9. Installation of Baseboard Extension, Splice Plates,
End Caps and Filler Pieces.
BASEBOARD EXTENSION – Extension panels are
furnished in six foot lengths but may be cut to desired
lengths with hacksaw. Extensions are supported by hang-
ers which are attached to studs (stud locations determined
in Step 1) with two No. 10 x 1-1/2” wood screws.
Screw hangers to studs so that there is a hanger located at
the extreme ends of the Baseboard Extension and at two
foot intervals along its length. If construction members
are not suitably located, use Moly Screw anchors to
secure Hangers to wall. Bottom of Hangers should rest
on ¿ nished À oor unless BASE-RAY has been raised for
wall-to-wall carpeting (see page 9). If such is the case,
Hangers must be raised an equal amount.
Install END CAPS on Extension (see succeeding para-
graph), insert lip on top rear of Extension into slot at top
of Hangers and snap channel on bottom of Extension
under spacer arm on lower part of Hanger.
SPLICE PLATES – used to make neat covering for joint
where two Extension Panels butt together or where Ex-
tension Panel terminates at BASE-RAY.
Plate hooks on bottom of Splice Plate over lip on bottom
of Extension Panel and push top of Splice Plate toward
wall until hooks on top of the Splice Plate snap into posi-
tion behind the Extension or the BASE-RAY. When the
Splice Plate is used to join an Extension Panel to BASE-
RAY, bottom hook which overlaps BASE-RAY must be
cut off.
END CAPS – available in both left-hand and right-hand
patterns for ¿ nishing off ends of Baseboard Extensions
that terminate at doorways or at Valve Enclosures. They
can be used where Extensions butt against BASE-RAY
in preference to Splice Plate.
Remove Knockout in end of End Cap if piping is to run
in this direction. Slide over end of Extension Panel.

13
ADJUSTABLE END CAPS & FILLER PIECES
– Adjustable End Caps are available in both left-hand
and right-hand patterns and are used in the same loca-
tions as the standard end caps except the 9” length of the
adjustable end caps makes it possible to ¿ ll in spaces of
up to 7-1/2”. A knockout is also available in the ends for
piping.
Filler pieces are used where a 9” space or less exists
between two sections of baseboard or between a section
of baseboard and baseboard extension.
To install adjustable end cap or ¿ ller piece accessory, insert
bolt thru hole in accessory and engage toggle as shown
below. Place accessory against BASE-RAY
®
at same
time pushing toggle thru air outlet of BASE-RAY. With
accessory in ¿ nal location, tighten bolt until accessory
is secure. Use ¿ nger to keep toggle in vertical position,
as shown below.
10. Completing Installation – Important
AIR-SEAL – It is necessary to prevent leakage of air
between the walls and BASE-RAY
®
, since this will cause
dirt streaks on the wall above the heating unit. This can
be avoided by installing an “Air-Seal”.
We recommended using 1” wide tape for this purpose,
preferably with a thermal setting adhesive, available from
Burnham at nominal charge.
With the adhesive side down, press one-half of tape against
the top of BASE-RAY and the other half against the wall
as illustrated on page 9.
WOOD MOULDING – For ¿ nished installation, 3/4”
quarter round or other wood moulding should be nailed
to wall on top of BASE-RAY (over “Air-Seal”) and Trim
and down side of Valve Enclosures. When Projecting
Corner Plates are used, install wood moulding at base of
Corner Plate to hold in place. An illustration showing the
application of the moulding can be found on page 9.
PAINTING – BASE-RAY and Trim are primed with a
latex (water based) paint and must be top coated with a
high grade oil or solvent based enamel to prevent rusting
of the metals immediately after installation. Primer
coated products should not be allowed to sweat as a
result of high room humidity or cold water in system.
The use of À at wall paint is not recommended since it may
chip or crack when applied to surfaces that are heated.
Consult reputable paint dealer.
PROPER LOCATION OF TOGGLE
WHEN SECURING ACCESSORY TO BASE-RAY
INSTALLATION OF BASE-RAY
ADJUSTABLE END CAP & FILLER PIECE

14
SPECIAL APPLICATIONS
BASE-RAY
®
INSTALLED ON THREE WALLS OF ROOM
– When BASE-RAY is installed on three walls, expansion
noises are sometimes created by the middle assembly when
rigid piping is used to connect all three assemblies together.
Flexibility can be gained by connecting two of the adjoining
assemblies with a À exible connector or swing joint such as
illustrated.
INSTALLATION WITH BURNHAM RADIANT OR
SLENDERIZED RADIATORS – Since a BASE-RAY
installation is made in much the same manner as any other
radiator system, BURNHAM RADIANT OR SLENDER-
IZED RADIATORS may be used in a BASE-RAY Radiant
Baseboard System.
TWO-TIER INSTALLATION – Where wall space is limited,
BASE-RAY may be installed in tiers. Both sections may be
upright or lower section inverted as illustrated. Legs on end
sections are cut off to enhance appearance.
RATING CORRECTION FACTOR – If BASE-RAY is
installed in tiers in accordance with the illustrations, each tier
will have a rating of .91 times the rating shown in the Tables
on pages 2 and 3.
POSSIBLE PIPING ARRANGEMENTS
TWO-TIER BASE-RAY FORCED CIRCULATION HOT WATER SYSTEMS

15
All Base-Ray® repair parts may be obtained through your local Burnham Wholesale Distributor. Should you require assistance
in locating a Burnham Distributor in your area, or have questions regarding the availability of Burnham products or repair parts,
please contact Burnham Customer Service at (717) 481-8400 or Fax (717) 481-8408.

Limited Warranty – Except as provided below with respect to products or parts not manufactured by U.S. Boiler Co., Inc.
U.S. Boiler Co., Inc. warrants to the original owner at the original installation site that products manufactured by U.S. Boiler Co.,
Inc. comply, at the time of manufacture, with recognized Hydronics industry regulatory agency standards and requirements then
in effect and will be free from defects in materials and workmanship for a period of one year after the date of installation.
The remedy for breach of this warranty is expressly limited to the repair or replacement of any part found to be defective
under conditions of normal use and does not extend to liability for incidental, special or consequential damages or losses such as
loss of the use of the products, inconvenience, loss of time or labor expense involved in repairing or replacing alleged defective
product. U.S. Boiler Co., Inc. shall have no responsibility for the performance of any product sold by it under conditions varying
materially from those under which such product is usually tested under existing industry standards, nor for any damage to the
product from abrasion, erosion, corrosion, deterioration or the like due to abnormal temperatures or the inÀ uence of foreign matter
or energy, nor for the design or operation of any system of which any such product may be made a part or for the suitability of any
such product for any particular application.
For products or parts not manufactured by U.S. Boiler Co., Inc., the warranty obligation of U.S. Boiler Co., Inc. shall, in all
respects, conform and be limited to the warranty actually extended to U.S. Boiler Co., Inc. by its vendors.
Warranty service can be obtained by contacting the original installer of the product and providing him with a detailed
description of any apparent defect. If this procedure fails to result in satisfactory warranty service, the owner should notify U.S.
Boiler Co., Inc., P.O. Box 3079, Lancaster, PA 17604. Transportation to a factory or other designated facility for repairs of any
products or items alleged defective shall, in all events, be the responsibility and at the cost of the owner.
Notwithstanding any of the above provision, (1) failures resulting from misuse, improper installation or lack of maintenance
are not covered by this warranty, and (2) U.S. Boiler Co., Inc.’s liability under this warranty shall not exceed the selling price of
the product found to be defective.
Equipment furnished by the Buyer, either mounted or unmounted, and when contracted for by the Buyer to be installed
or handled is not covered by this warranty. U.S. Boiler Co., Inc. does not assume any responsibility in connection with such
equipment, operation, warranty, performance, or any other liability connected thereto.
Then foregoing provisions of this WARRANTY shall be effective to the maximum extent permitted by applicable law, and,
to the extent that any such provision would otherwise have an unconscionable result or would otherwise be inconsistent with
applicable law, such provision shall be limited in effect to the minimum extent necessary to avoid such unconscionable result or
inconsistency with applicable law.
Any implied warranties, including implied warranties of merchantability and ¿ tness for a particular purpose shall, to the extent
permitted by applicable law, be limited in duration to a period of one year after the date of installation. To the extent permitted by
applicable law, the remedies for breach of any such implied warranty shall be limited to the remedies set forth above with respect
to a breach of the express limited warranty provided. With respect to the limitations on implied warranties set forth above, U.S.
Boiler Co., Inc. hereby noti¿ es each person to whom such warranty is made as follows: Some states do not allow limitations on
how long an implied warranty lasts or the exclusion or limitation of incidental or consequential damages, so the above limitations,
or exclusions may not apply to you. This warranty gives you speci¿ c legal rights, and you may also have other rights which vary
from state to state.
Limited Warranty
DUO-RAD
®
, DUO-RAD
®
II AND CAST IRON RADIATION
03/03
/