Page is loading ...

RPLS730B/RPLS731B 1/6
RPLS730B/RPLS731B
Installation and User Guide
Programmable Wall Switch
The RPLS730B/RPLS731B programmable wall switch has been
designed to control lightings and motors:
NOTE: This switch cannot be used if there are not at least 2 white
wires joined by a connector inside the electrical box.
Cut power at the circuit breaker to avoid electric shock.
Remove the existing switch.
Install the new switch as shown in the diagram below.
Apply power at the circuit breaker.
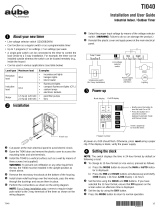
Pry the switch door open from the
bottom using a small screwdriver.
Ensure the ON/OFF selector is set
to ON.
Reset the switch using a paper clip.
0:00 and MO will flash.
If the display is blank:
• Ensure the ON/OFF selector is properly engaged in the ON posi-
tion. Push it to the right using a small screwdriver.
NOTE: The switch displays the time in 24-hour format by default or
following a reset.
To change to 12-hour format (or vice versa), proceed as follows:
a) Press one of the control buttons to ensure the MAN or
AUTO indicator is displayed.
b) Press the MIN and HOUR buttons simultaneously and brief-
tly (0:00 display = 24-hour, 12:00 display = 12-hour ).
Set the time using the HOUR and MIN buttons. If you have
selected the 12-hour format, ensure that PM appears on the
screen when an afternoon time is displayed.
Set the day by using the DAY button.
Press one of the control buttons or close the switch door to
return to normal operation.
The programmable switch has 2 operating modes: manual (MAN)
and automatic (AUTO).
To switch mode, press the switch door for 3
seconds.
Manual Mode
The programmable switch operates as a regular
switch. Briefly press the switch door to turn the lights
On or Off. The mode (MAN) and state (ON or OFF)
are displayed.
Automatic Mode
The programmable switch follows the programmed
schedule. The mode (AUTO), state (ON or OFF)
and current program number are displayed.
To temporarily override the programmed schedule,
briefly press the switch door. The new state
(ON or OFF) will flash to
show that this state is temporary. The override remains in effect until
you press the switch door again or until the beginning of the next
program.
You can set up to 7 programs. To set a program, you need to enter its
start time (ON) and its end time (OFF).
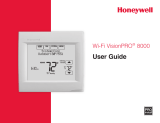
Pry the switch door open using a small screwdriver.
Press the PGM button to display a program and
its On or Off time. For example, when you first
press PGM, program number 1 (P1) and its On
time (ON) will appear. -:-- will appear instead
of the time if the program is not set (inactive).
Press the DAY button to select the day to which
you want to apply the program.
NOTE: If you want to apply the program to
every day of the week, press DAY until all the
days are displayed. (This still counts as 1 program, not 7)
Applications
1.
Load type Maximum load Examples
Resistive load
2400 W
(20 A @ 120 V)
• incandescent lights
• halogen lights
• block heater
Inductive load
2400 W
(20 A @ 120 V)
• fluorescent lights
• compact fluorescent lights (CFL)
• sodium lamps
• electronic ballasts
Motor 1 hp
• pool filter pumps
• fans
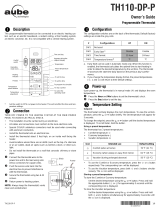
Installation
2.
Power-On
3.
120 VAC
(line)
white (neutral)
black (line)
blue (load)
Load
Control (4)
Reset
On/Off
selector
Setting the Clock
4.
Selecting the Operating Mode
5.
Programming
6.
69-2457EFS-01_400-033-005-A (TI033_RPLS730B) USA print at 90%.book Page 1 Tuesday, May 18, 2010 10:38 AM

RPLS730B/RPLS731B 2/6
Press the HOUR and MIN buttons to set the ON time (time when
you want the lights to turn on). If you have selected the 12-hour
format, ensure that PM appears on the screen when an
afternoon time is displayed.
After you have programmed the ON time, press the PGM button
to display the OFF time (time when you want the lights to turn
off).
Repeat steps 3 through 5 to program the OFF
time. If the program ON time is set for every day
of the week, the program OFF time will
automatically be set for every day.
To set another program, repeat steps 2 through 6. Programs that
are not set will remain inactive.
Press one of the control buttons or close the switch door to
return to normal operation.
Clearing a Program
Press the PGM button until the desired program is selected. Hold the
PGM button for 3 seconds. -:-- appears when the program is
erased.
Supply: 120 VAC, 50 / 60 Hz
Maximum load: 2400 watts resistive or inductive, 1 HP motor
Operating temperature range: 5°F to 122°F (-15°C to 50°C)
Storage temperature range: -4°F to 122°F (-20°C to 50°C)
Power outage: The programs are protected by a rechargeable
battery. The screen is blank during the power outage.
Certifications: CSA & UL
Honeywell warrants this product, excluding battery, to be free from
defects in the workmanship or materials, under normal use and ser-
vice, for a period of one (1) year from the date of purchase by the
consumer. If at any time during the warranty period the product is
determined to be defective or malfunctions, Honeywell shall repair or
replace it (at Honeywell's option).
If the product is defective,
(i) return it, with a bill of sale or other dated proof of purchase, to
the place from which you purchased it, or
(ii) call Honeywell Customer Care at 1-800-468-1502. Customer
Care will make the determination whether the product should be
returned to the following address: Honeywell Return Goods,
Dock 4 MN10-3860, 1885 Douglas Dr N, Golden Valley, MN
55422, or whether a replacement product can be sent to you.
This warranty does not cover removal or reinstallation costs. This
warranty shall not apply if it is shown by Honeywell that the defect or
malfunction was caused by damage which occurred while the prod-
uct was in the possession of a consumer.
Honeywell's sole responsibility shall be to repair or replace the prod-
uct within the terms stated above. HONEYWELL SHALL NOT BE
LIABLE FOR ANY LOSS OR DAMAGE OF ANY KIND, INCLUDING
ANY INCIDENTAL OR CONSEQUENTIAL DAMAGES RESULTING,
DIRECTLY OR INDIRECTLY, FROM ANY BREACH OF ANY WAR-
RANTY, EXPRESS OR IMPLIED, OR ANY OTHER FAILURE OF
THIS PRODUCT. Some states do not allow the exclusion or limitation
of incidental or consequential damages, so this limitation may not
apply to you.
THIS WARRANTY IS THE ONLY EXPRESS WARRANTY HONEY-
WELL MAKES ON THIS PRODUCT. THE DURATION OF ANY
IMPLIED WARRANTIES, INCLUDING THE WARRANTIES OF
MERCHANTABILITY AND FITNESS FOR A PARTICULAR PUR-
POSE, IS HEREBY LIMITED TO THE ONE-YEAR DURATION OF
THIS WARRANTY. Some states do not allow limitations on how long
an implied warranty lasts, so the above limitation may not apply to
you.
This warranty gives you specific legal rights, and you may have other
rights which vary from state to state.
If you have any questions concerning this warranty, please write Hon-
eywell Customer Relations, 1985 Douglas Dr, Golden Valley, MN
55422 or call 1-800-468-1502. In Canada, write Retail Products
ON15-02H, Honeywell Limited/Honeywell Limitée, 35 Dynamic Drive,
Scarborough, Ontario M1V4Z9.
If you have any questions about your light switch, go to
http://yourhome.honeywell.com, or call Honeywell Customer Care
toll-free at 1-800-468-1502.
Troubleshooting
7.
Blank display • Verify circuit breaker at main panel.
• Ensure the ON/OFF selector is at ON.
• Reset the switch using a paper clip.
Faded or irregular
display
Ambient temperature below freezing
point
Cannot switch between
24-hour format and
12-hour format
First, press one of the control buttons so
that MAN or AUTO appears on display.
Programs do not run
as expected
• Make sure the switch is properly pro-
grammed.
• Note that -:-- indicates an inactive pro-
gram, 00:00 indicates midnight.
• If the switch has been configured for
12-hour format, check that PM appears
on the left side of the screen when an
afternoon time is displayed.
The switch resets itself
without apparent rea-
son when used to con-
trol an inductive load
such as a relay or a
contactor.
The reset is caused by the load. Install a
snubber (AC130-03) at each relay/con-
tactor.
Technical Specifications
8.
Warranty
9.
Customer Assistance
10.
TROUBLESHOOTING
69-2457EFS-01_400-033-005-A (TI033_RPLS730B) USA print at 90%.book Page 2 Tuesday, May 18, 2010 10:38 AM
/