Page is loading ...

HOW TO USE
REFRIGERATOR-FREEZER
型號
R-SF42BMS
R-SF42BMH
使用說明書
日立無霜全自動式多門電冰箱
Model
Six doors
六門形式
It takes time to cool for the fi rst time.
Pg.36, 37
It may take more than 4 24 hours to fully cool.
Make sure that any food does not protrude beyond the storage height
limit of each compartment, and allow clearance between each food in
each compartment.
Pg.42, 46
Otherwise, food and/or package may not be stored in each compartment properly, and as
a result, the door may not be closed completely. It may cause the refrigerator not to cool
suf ciently and/or not to make ice.
●
購買後,初次使用時,需要時間冷卻。
8, 9
頁
庫內冷卻可能需要約
4
小時至
24
小時以上。
●
請遵守可容納食物的高度,食品之間空開間隙儲放。
14, 18
頁
過分塞堵食物,會造成食品及袋子被挾住 門關不緊 製冷效率低 不能製冰。
Thank you very much for purchasing a Hitachi
Refrigerator.
This refrigerator is designed for home use only.
Do not use this refrigerator for the business use
and/or any purpose other than storing food.
Please read this operation manual carefully
and ensure you use the appliance correctly.
In particular, be sure to read the “Safety
Suggestions” section of this operation manual
before use.
Please keep this operation manual along with your
guarantee card.
Hand over this operation manual together with
the refrigerator when the refrigerator is passed
to a third party and used in a different location,
or when it is sent to a recycling plant.
非常感謝您購買日立電冰箱。
此電冰箱是家庭使用的。請勿使用於業務用途和儲
存食品以外的目的上。
請詳閱本使用說明書,以確保正確使用。
使用前,請務必詳閱「安全上之注意事項」。
請妥善保管本使用說明書與保証書。
當將電冰箱交給第三者在別的場所使用時,以及交給
回收工場時,請將本使用說明書隨電冰箱一同轉交。
家庭用
For household use
只限在新加坡 香港 越南使用
For use in Singapore, Hong Kong
and Vietnam only.

2
首先
INTRODUCTION
To save energy more actively, the energy saving mode increases the temperature setting for each
compartment and reduces the number of revolutions for the compressor.
In the energy saving mode, the cooling capacity is reduced. You may feel that cooling is not enough, for example, ice-cream becomes softer.
Pg.39
想要更進一步省電時,將各室的溫度設定、冷卻調弱,可以讓壓縮機以低轉速來運轉。
※ 因省電模式會降低冷卻效果,有可能造成冰淇淋變軟或感到冷卻效果較差的情形。
11
頁
Energy saving mode
省電模式
Effectively utilizes frost which is adhered to radiator when refrigerator is operating and was useless before.
Utilizes the cold of frost to cool Refrigerator Compartment and Vegetable Compartment, and prevents food
from drying utilizing the moisture of frost.
Ice is automatically made in the Ice Case with only putting water into the Water Supply Container in the
Refrigerator Compartment.
Freezer Compartment with bigger capacity is arranged in the "Mid" for easy access.
3-Layer freezer case with different depths in which you can tly store various foods according to their sizes
is equipped in the Lower Freezer.
■
有效利用了至今從未使用過的,運作中附著在冷卻器上的結霜。
將霜的冷氣有效運用於冷卻冷藏室 蔬果保鮮室,並且利用霜的水分可防止食品的乾燥。
■
只要在冷藏室的給水槽裡加水,便會自動製冰於製冰盒內。
■
大容量的上層冷凍室配置在使用方便的「中間」。
■
下層冷凍室內配有
3
個不同深度的冷凍盒,可以依據食品的大小整潔地儲放。
Frost Recycle Cooling
Automatic ice maker
Mid-Freezer Lay-out and 3-Layer freezer case
霜循環冷卻
自動製冰機
中間冷凍室與
3
層冷凍盒
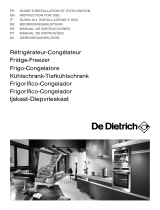
3
層冷凍盒
請依據食品的大小來儲放。
3-Layer freezer case
Store foods according to their sizes.
Slimline slide case : Up to 5cm in height
(Front)
Slide case : Up to the top line of the case
Lower freezer case : Up to the top line of the case
●
初次使用時,庫內冷卻約需
4
小時至
24
小時以上。
●
請遵守各個儲存盒的可容納食品高度。
(否則會造成門關不緊)
●
自動進行的一系列的製冰運作是在
庫內充分冷卻後才開始。
(剛安裝之後,首次結冰可能需要
24
小時以上。)
It may take more than 4 24
hours to fully cool for the fi rst
time.
Make sure that any food does not
protrude beyond the storage height
limit of each case. (Otherwise, the
door may not close completely.)
A series of ice-making procedures
which is automatically performed
starts after the refrigerator cools
enough. (It may take more than 24
ours to make ice for the fi rst time.)
Water Supply Container
Ice Case

31
CONTENTS
BEFORE USE
SAFETY SUGGESTIONS ..................................... 32
BEFORE USE ....................................................... 36
Preparation before use ...................................... 36
Installing your refrigerator ................................. 36
Adjusting the refrigerator adjustable mount to
keep it level ....................................................... 36
On the Power Plug and Grounding ................... 37
Cooling down the inside of the refrigerator....... 37
Transporting your refrigerator (transport for
moving) ................................................................ 37
GENERAL FEATURES AND USE
........................... 38
Control Panel .................................................... 38
Name of each compartment/Food stored ........ 39
Setting Energy Saving mode ......................... 39
GENERAL USE
REFRIGERATOR COMPARTMENT .................... 40
Swing partition .................................................. 41
Height Adjustable Shelf ..................................... 41
Reversible Shelf ................................................ 41
Chill room .......................................................... 41
Cooling food Quickly (Quick Cooling) ............... 41
Adjust the temperature of the refrigerator
compartment ..................................................... 41
FREEZER COMPARTMENT ................................ 42
Upper Freezer ................................................... 42
Lower Freezer ................................................... 42
Height of the storageable food ......................... 42
Adjust the temperature of the freezer
compartment ..................................................... 43
Quickly freezing warm food (Quick Freezing) ... 43
ICE COMPARTMENT (AUTOMATIC ICE MAKER)
.... 44
How to make Ice ............................................... 44
How to change the Settings of the Automatic ice
maker ................................................................ 45
When you want to make ice quickly (Quick Ice
Making) .............................................................. 45
Ice making time and capacity ........................... 45
VEGETABLE COMPARTMENT ........................... 46
Lower Case/Spacious Upper Case ................... 46
HOW TO MAINTAIN
HOW TO MAINTAIN/HOW TO CARE THE INNER
OUTER OF THE REFRIGERATOR ...................... 47
When dirt is found ............................................. 47
Power Plug ........................................................ 47
How to care the inner outer of the refrigerator
.. 47
HOW TO REMOVE PARTS .................................. 48
HOW TO MAINTAIN THE AUTOMATIC ICE MAKER
.... 50
Ice Maker Cleaning ........................................... 50
Water supply container / Water lter ................ 50
Ice tray .............................................................. 51
TROUBLESHOOTING
TROUBLESHOOTING.......................................... 52
FAQ when using for the rst time ..................... 52
Control Panel does not respond. ...................... 52
Automatic ice making is not properly performed.
.... 52
It smells strange ................................................ 53
Refrigerator does not cool ................................ 53
Frost and/or dew occur ..................................... 54
Refrigerator cools overly ................................... 54
Door is not in a horizontal state ........................ 54
The refrigerator becomes hot ........................... 54
Abnormal operating sound is generated ........... 55
Others ............................................................... 55
PRACTICAL ADVICE ON HOW TO USE THE
REFRIGERATOR/REPLACEMENT PARTS ........ 56
[
“
eco
”
OPERATION INDICATOR LAMP]/DOOR
ALARM/LOCKING THE CONTROL PANEL ....... 57
ABOUT NON-CFC REFRIGERATORS/
SPECIFICATION/STORABLE WEIGHT .............. 59

32
WARNING
CAUTION
Suggestions headed by this pictograph
indicate "There is high chance of serious
injury or death" if ignored.
This symbol indicates something
you must not do. (Prohibited)
This symbol indicates something
you must do. (Compulsory)
Suggestions headed by this pictograph
indicate "There is a high chance of injury or
damage to property" if ignored.
WARNING
Installation
Handling the power and power cable
Install earth leakage
circuit breaker when
installing the
refrigerator in a
humid or damp environment.
Electrical leakage due to failure, etc. could
result in electrical shock.
Make sure to contact the dealer for earthing
installation.
Pg.37
Avoid usage that may
cause the wall outlet or
power cord components
to work beyond the
specifi ed voltage. Also do
not use power sources
that are not a rated voltage current.
If a power source is shared with other
appliances, double or multipoint adapters may
heat up beyond normal levels and cause re.
Use a wall outlet rated above 15 ampere by itself.
Do not do anything that may
damage the power cord or plug.
Using a damaged power cord
may cause electric shock, short circuits, or re.
Please consult with a retailer about the
repair of the power cord or plug.
Do not insert or remove the
power plug with wet hands.
This may result in electric shock.
This appliance is not intended for
use by persons (including children)
with reduced physical, sensory
or mental capabilities, or lack of experience
and knowledge, unless they have been given
supervision or instruction concerning use of
the appliance by a person responsible for their
safety. Children should be supervised to ensure
that they do not play with the appliance.
Connect the power plug
fi rmly to a power outlet with
the cord running down.
Connection of the power plug
with the cord running up could
apply stress on the cord and
cause electrical short or overheat, which
could result in electrical shock or re.
Incomplete connection of the power plug could
result in electrical shock or re due to heat.
Take measures to prevent overturning of refrigerator due to
earthquake, etc.
Overturning of the refrigerator could result in personal injury.
Pg.37
Do not install the
refrigerator in damp places
or where water may splash.
This may impair electricity
insulation causing electric
shock or re.
earth
terminal
earth connection screwEarth
Connection
Prohibited Prohibited
Wet Hands
Prohibited
Wetting
Prohibited
trembling
and
unstable
The power cord or plug should not
be cut, modi ed, touched with hot
implements, bent by force, twisted,
pulled, have heavy objects placed
on it, squeezed by the refrigerator,
or be bound or tied up.
The following pictographs categorize and explain the level
of possible harm on damage that may occur from ignoring
suggestions resulting in missing the appliances.
How the suggestions should be taken are
indicated and categorized by the following
symbols accompanied by explanations.
(The symbols below are examples)
This symbol denotes the precautions on ammable refrigerants.
This refrigerator uses ammable refrigerants. The symbol column below states the precautions on ammable refrigerants.
R600a
SAFETY SUGGESTIONS
Ensure to follow
these precautions
When using this appliance, failure to follow safety precautions may result in personal harm, harm to other people,
and also damage to property.

33
Safety Suggestions
WARNING
Handling the power and power cable
During normal use
Clean the dust on the
power plug frequently.
Insulation failure from
moisture when dust collects
on the power plug may
cause re.
Unplug the power plug and wipe it with a dry cloth.
Do not splash water on
or inside the refrigerator.
This may impair electrical
insulation causing electric
shock or re.
Do not put in things
that may catch fi re.
Benzine, ether, LP gas,
thinner, adhesives may
ignite an explosion.
Do not hang on the
doors or step on the
various compartments.
Injury may be caused by
the refrigerator tipping over
or hands getting caught
between doors.
Do not remove the cover
of the interior lamp.
When the interior lamp is
damaged, please contact the
service centre for replacing the
lamp to avoid injury.
Do not add impact to the glass door.
Drugs, chemicals,
research and experimental
substances should not be
stored in the refrigerator.
Substances that require
precise conditions for storage cannot be stored
in a domestic refrigerator.
Do not use fl ammable
sprays near the
refrigerator.
Sparks from points of
electrical contact such
as door switches may
ignite a re.
Do not put water containers
on the refrigerator.
Spilled water may impair insulation
of electrical components causing
faulty electrical currents. This may result in electric
shock or re.
Do not put things on top
of the refrigerator.
Opening and closing doors
etc. may cause things placed
on top of the refrigerator to fall
resulting in injury.
Do not hang from the Descendible
Case.
Children should be supervised to
ensure that they do not play with the
appliance.
Do not touch
the machinery
components of the
automatic ice maker.
There is a danger of injury when the ice trays are
rotating.
Be sure to unplug the
power plug before
maintaining the
refrigerator.
Continued use may
cause electric shock or injury.
Pg.47
Always hold the plug when unplugging it.
Wetting
Prohibited
Wetting
Prohibited
Prohibited
Prohibited
Prohibited
Prohibited
Prohibited
Prohibited
Prohibited
Prohibited
Contact
Prohibited
binder
LP gas
Benzine

Concerning the refrigerant (Be careful of the following related to
the use of fl ammable gas R600a: ISOBUTANE.)
Do not scratch or
damage the main body
of the refrigerator with
a sharp object such as
screw.
Since the refrigerant used is ammable,
any leakage from the pipe inside the wall
may cause ignition and explosion.
Do not use
mechanical devices
or other means
to accelerate the
defrosting process,
other than those
recommended by the manufacturer.
Do not use electrical
appliances inside
the refrigerator.
If the refrigerant leaks,
sparks on the contact
may cause ignition
and explosion.
Do not damage the
refrigerant circuit.
If you happen
to damage the
refrigerant pipe,
stay away from the
refrigerator and
avoid using fi re and electrical appliances.
Should you damage the refrigerator, open
the window to ventilate and contact your
dealer or our repair reception desk.
Allow clearance around
the refrigerator and keep
ventilation openings
when installing it.
Pg.36
Leakage of the refrigerant
may accumulate and cause ignition and
explosion.
Please consult your dealer
or the Recycle Hotline
(0800-085-717) of the
Recycle Centers in the
Environmental Protection
Administration when
discarding the unit.
If the refrigerant is wet, it may
cause ignition and explosion.
Prohibited
Prohibited Prohibited
In case of emergency
When discarding the unit
Stop the refrigerator
by unplugging it if it is
not running properly or
broken.
Continue may cause
electric shock or injury.
Always hold the plug when unplugging it.
Before discarding the unit or recycling, remove the door packing to avoid
the risk of an infant or children to be entrapped inside.
In the event of a fl ammable gas leak do not touch refrigerator
and open windows to let air fl ow.
Sparks from points of electrical contact such as door switches may ignite
explosions causing re or burn injuries.
Do not disassemble,
repair, or modify your
refrigerator.
Injury may be caused by
ignition of re or faulty running.
Please consult with a retailer if any repairs
or disassembly are required.
Dissassembly
prohibited
turn off
the switch
WARNING
R600a
The warning label and name plate including this symbol affi xed
on compressor and refrigerator should be kept throughout the
life of the refrigerator.
R600a
34

Prohibited
CAUTION
When moving the refrigerator
On a fl oor that is easily
scratched, do not move
the refrigerator using
the wheels at its base.
The wheels may scratch
the oor.
For a oor that may be easily scratched, lay a
protective mat.
Use the carrying handle
when carrying it.
Your hands may slip
resulting in injury if you
hold the refrigerator in
other places apart from
at the carry handles.
More than 2 person should carry the
refrigerator for safety reasons.
Carry it with the door facing upward; as
shown in the illustration.
Never hang the handle with a crane.
caution
During normal use
Do not put bottles in
the Door Baskets if they
do not sit properly on
the bottom of the front
section.
Forcing in items like large
bottles may result in them
getting tipped over, causing injury.
Do not have food
items protruding
over the front of
the shelves.
Injury may be caused
from items like bottles getting knocked over.
Do not eat food that
smells strange or
has changed color.
Spoiled food may cause
serious sickness.
Do not press the
auto door switch
on the auto door
compartment with
knee, etc.
Avoid placing anything like a bottle
near the auto door
compartment.
Food and containers
inside the Freezer
Compartment should
not be touched with
wet hands.
This may cause frost injury. (Especially in the
case of metal items)
When two or more doors
are being opened or
another person is using
the refrigerator, make sure
fi ngers do n
o
t get caught.
Fingers may get caught in the spaces between
doors causing injury.
Do not put the glass
bottles in the Freezer
Compartment.
Bottles may break from the
contents freezing and cause
injury.
Do not have your
feet too close when
opening the bottom
door of the refrigerator.
When opening this door
you may hit the instep or other parts of your
feet resulting in injury.
Do not put your hands or feet under the
base surface of the refrigerator.
When cleaning, putting
your hands under the
base surface of the
refrigerator may result in
injury by cutting them on
sheet metal parts.
Do not hold the top of
the doors when closing
them.
If you hold the top of a door
when closing it you may get
your ngers caught or pinched causing injury.
Prohibited
Prohibited
Prohibited
Prohibited
Prohibited Prohibited
Prohibited
Prohibited
Prohibited
stink
35
Safety Suggestions

36
BEFORE USE
1
Installing your refrigerator
The oor should be sturdy and at.
Lay the board which has 1cm thickness on the oor if the refrigerator is installed on the carpet, tatami mat,
ooring or PVC sheet ooring which may be hollow or discolor.
A location away from direct sunlight and heat is recommended.
The location is not damp and has good air ow.
This will reduce adverse effects to refrigerating power and keep electricity cost
down. This will also prevent the refrigerator from discoloring and rusting.
To cool ef ciently, allow enough space around the refrigerator for
radiating heat.
The actual size of the center part of the side of the refrigerator's main
body is slightly larger than the nominal size. Therefore, please allow
enough space around the when installing the refrigerator.
The back of the refrigerator can be placed very close to the wall. If any
vibration sound occurs and/or any discolor/dirt is found on the wall,
move the refrigerator away from the wall.
Preparation before use
Required space above the
Required space above the
refrigerator: 5cm or more
refrigerator: 5cm or more
Required space for right and
Required space for right and
left of the refrigerator: 1cm or more
left of the refrigerator: 1cm or more
3 3
2
Adjusting the refrigerator adjustable mount to keep it level
Left side or right side of the door may be slightly lower when the surface of the installation place is not
level or either of the left and right leg is sunk in the oor surface because of the soft oor material and
the addition of food weight.
This does not affect the refrigerator function. Adjust the refrigerator adjustable mount to keep it level
according to the procedure listed below if you want to correct it.
Correcting any left/right lean and lifting slightly the front side of the refrigerator, the door can close
easily and completely.
To remove leg cover, hold both
ends of it and pull it towards to
you applying some force.
Turn both Adjustable mounts to
lower them to the fl oor surface and
fi x them. (2 mounts: left & right)
Turn left and/or right Adjustable
mounts to make the Refrigerator
Compartment Door horizontal.
Insert the left and right pins of
the leg cover into the leg holes to
install the leg cover.
The height of the door will change
by 1mm every 1 turn of Adjustable
mount.
The adjusted door may lean because
it may take several days until the
refrigerator permanently becomes
level after adjusting.
Adjust the refrigerator legs again
to keep it level according to the
procedure if this is the case.
Use the optional parts "Door Adjusting
Plate" (Parts No. R-Y6000 500) if the
door still leans after that.
Contact your dealer for details.
2
3
4
1
Leg cover
Turn the left
Adjustable mount to
lower the left side of
the door.
Turn the right
Adjustable mount to
lower the right side
of the door.
Adjustable mounts
The left side of the door is
lower.
When it is hard to turn
the Adjustable mount
push and turn it with a
tool such as a driver.
The right side of the
door is lower.
21

37
Before Use
3
4
Cooling down the inside of the refrigerator
It may take more than 4 hours through 24 hours to cool well the inside of the refrigerator, depending on
conditions such as the ambient temperature or the storage state of foods.
Perform
CLEANING
(Ice Maker Cleaning) when using the automatic ice making function rst.
Pg.50
A series of ice making operation will start automatically after the inside of the refrigerator is cooled well.
(When using for the rst time, it may take 24 hours and more to make ice.)
Make sure to empty food and ice from the refrigerator. Always
drain water from the water supply container and ice tray.
Secure the door with tape.
Lay a protective sheet or cloth to protect the oor from damage
and catch remaining water spilled from the refrigerator.
With a large piece of old cloth underneath, tilt the refrigerator
backward to drain water.
More than two persons should grip the handles for carrying
and move the refrigerator.
See Preparation before use for installing the refrigerator in a
new location.
Pg.36
Do not remove the sticker from the back of the refrigerator. This
sticker is necessary to secure the performance and safety.
Do not remove the plastic parts and label from the bottom part of the
side of the refrigerator.
If you wish to install the refrigerator in a hot spring area exposed to sul de gas, you may need to apply anti-rust treatment
to the piping. Contact your dealer in advance. Failure caused by gas damage will not be covered under guarantee.
Stickers
Left/Right
Plastic parts
Label
Caution
Transporting your refrigerator (transport for moving)
Such as old cloth
On the Power Plug
and Grounding
It is not a problem to plug in the
power cord soon after installing the
refrigerator.
Use a wall outlet exclusively
when connecting the power cord.
(Alternating current 220 230V,
rated 15A or more)
Preparation for an earthquake has been made
properly?
It is recommended to x the refrigerator to a sturdy wall or pillar using
two "safety belt against overturning for refrigerators".
Option: "Safety belt against overturning for refrigerators" (Parts No.
R-826CV 300: belt x 1) Contact your dealer for details.
Screw x 4
(attached to belt)
Belt

38
Display area
Touch Area
(Switch Area)
GENERAL FEATURES AND USE
Control Panel
Approximately two minutes after the end of operation, indicator lamps, excluding
FRE
EZER ,
REF
RIGERATOR ,
EN
ERGY SAVING ,
QUIC
K ,
WA
TER and eco Operation , become unlit for energy saving.
To con rm settings, open a refrigerator door or push any button. The indicator lamps become lit again.
When opening a refrigerator door, the displayed characters become lit. They become unlit about 15 seconds after closing it.
Be sure to operate the Control Panel with all the doors closed. It remains inactive when you push the button with a
refrigerator door opened or displayed characters blinking.
When a door remains open for 30 minutes or more, door alarm is raised to indicate it.
Pg.57
■
Blinking
(Locking the Control Panel) indicates that the refrigerator is in an abnormal state.
Pg.56
Notice
Notice
Providing information
Selecting an ice making mode
Adjusting temperature settings
Selecting a cooling mode
eco operation indicator lamp
(Locking the
Control Panel)
Pg.57
You can select a mode from
NORMAL , QUICK and
OFF .
Pg.45
Set temperature for each
compartment.
Normally, use the
M
ID. setting.
Refrigerator Compartment
Pg.40
Freezer Compartment
Pg.42
Vegetable Compartment
Pg.46
Set a cooling mode for each
compartment.
FRE
E
ZER
Pg.43
REF
R
IGERATOR
Pg.41
“
EN
ERGY SAVING
”
Pg.39
All the indicator lamps are lit
for the sake of explanation.
●
CLEANING
Allows you to wash the
ice tray and water supply
channel.
Pg.50
“
W
ATER
Pg.56
Allows you to prevent
erroneous operation
on the Control Panel.
●
Is lit when the
refrigerator is
operated with a low
energy consumption,
such as in Frost
Recycle Cooling.
Pg.57
●
You can also turn off
the indicator lamp.
Pg.57
When the water level
in the water supply
container becomes
low, this lamp is lit
automatically.
●
Control Panel Image (It is an image when all displays are turned on. Only the selected character display is
turned on when actually operating it.)
The character display will be turned off in about 2 minutes after the operation is fi nished. Quick
Cooling operation and eco operation indicator lamps will not be turned off. In order to check the
setting, push either button. The indicator lamp will be illuminated again.

39
General Features and Use
Name of each compartment/Food stored
Setting Energy Saving mode
Pg.40
Refrigerating food
The temperature of door pocket is
slightly high.
Pg.44
Store the ice cubes made by auto
ice making function.
Pg.42
Store frozen food, ice-cream and
dried food.
Pg.42
Store frozen food, ice-cream and
dried food.
Low Temperature Freezer
Pg.43
(About -23˚C ~ -20˚C)
Food is preserved at lower
temperature than usual.
Pg.46
Vegetable, fruits, drink
Refrigerator compartment
(About 2˚C ~ 6˚C)
Ice compartment
(About -20˚C ~ -18˚C)
Upper freezer
(About -20˚C ~ -18˚C)
Lower freezer
(About -20˚C ~ -18˚C)
Vegetable compartment
(About 3˚C ~ 7˚C)
Push the COOLING MODE button to enter Energy Saving mode. ENERGY SAVING display comes on
with the push of the button.
The display switches in sequence as shown below every time the button is pushed.
Turn off the ENERGY SAVING display to disable
ENERGY SAVING
mode
ENERGY SAVING mode becomes disabled if it is switched to FREEZER or REFRIGERATOR . Reset the mode.
No effective energy saving is attained when temperature is set to MIN. which has no automatic temperature control.
EN
ERGY SAVING mode allows effective energy saving.
The mode includes:
Automatic temperature control to lower cooling loads in each compartment.
Turning down an LED light in the Refrigerator Compartment if the door of the Refrigerator Compartment is left open for
more than 30 seconds.
Automatic temperature control lowers cooling loads, which may cause ice cream to get soft and frost to form on frozen
food. It also requires longer freezing time and ice making time.
Notice
Caution
The above temperatures are standard values under the condition that the refrigerator is stable with no food stored and the door
closed, at ambient temperatures of 30
º
C.
Display Area
(Factory default setting)
“
Energy Saving
”
mode
Touch Area
1 beep
Light ON

40
REFRIGERATOR COMPARTMENT
LED lamp
Lower shelf
Height adjustable
pockets (Left)
Height adjustable
shelf
Swing partition
Double door pockets
(Left)
Refrigerator
Compartment
Temperature Sensor
Height adjustable
pockets (Right)
Fixed shelf
Pocket (Right)
Egg stand
(for 10 items)
Reversible shelf
Double door pockets
(Right)
Chill room
快速冷藏區
Cold Air Blowout Port
Store warm foods in the upper shelf in which the cooling air is low in temperature. If such warm foods are stored near the
Temperature Sensor, the reading of the sensor may go down too low.
Don
’
t place any juicy food and/or canned beverage near the Cold Air Blowout Port. As it may be frozen.
Caution
Quick cooling corner
Swing partition
Do not hold the swing partition to open the left door
while the right door is open.
Do not close the door when the swing partition folds
out.
To open the door To close the door
Swing partition Swing partition

41
Refrigerator Compartment
Cooling effect may become weaker depending on the operation states of the refrigerator when simultaneously using this function and Quick Freezing
Pg.41
function.
Notice
Cooling food Quickly
(Quick Cooling)
1
Place the foods in the
Quick Cooling Corner
(upper shelf).
Push the COOLING
MODE button to display
REFRIGERATOR .
REFRIGERATOR operation ends
automatically after about 45 minutes,
and REFRIGERATOR indicator
lamp will be turned off.
Push the COOLING MODE button to turn
off the display after turning on other displays
again, when you want to stop this function.
Lower shelf
Height adjustable shelf
Indicators other than REFRIGERATOR will
be turned off about 2 minutes after setting the
REFRIGERATOR .
The food cools more quickly if it is placed on the center part near the interior wall. (the front of the
Cold Air Blowout Port)
Don't place any juicy food and/or canned beverage near the Cold Air Blowout Port. As it may be
frozen.
2 3
The
indicator lamp will be
illuminated during the
REFRIGERATOR ).
Other indicator lamps
are turned off
Close the door of the Refrigerator Compartment while the slide case is in place. The door, cases or foods may damage if
closing the door while cases are not in place.
Too many times of opening/closing of the door, or high humidity around the refrigerator may cause mist on the wall, etc. or
frost around the Cold Air Blowout Port.
Wipe off spilled water or food soup soon, if any.
Do not store juicy foods such as bean curd, paste made from the arum root and yogurt in the Chill room. Otherwise, they
may freeze.
Caution
Height Adjustable Shelf Reversible Shelf
Chill room
Foods such as meats, shes and
shell shes can be preserved at low
temperature.
Remove by slightly lifting up the back
of the shelf and pull forward.
Remove by slightly lifting up the shelf.
Adjust the shelf to the desired height
and slide it until it reaches to the
interior wall, then slightly lift up the
back of the shelf and push it in.
(Hitch the forks of the shelf to the
parts on the back of the shelf)
Turn over and set at either top or bottom level.
1 1
2
2
As a normal shelf
Slide case
Pattern 1 (Upper shelf) Pattern 2 (Lower shelf)
Adjust the temperature of the refrigerator compartment
The displayed character will disappear about 2 minutes after the
operation nishes. However, REFRIGERATOR or eco operation
indicator lamp will not be turned off.
For more information about the panel for operation.
Pg.38
If you adjust the temperature more nely.
Pg.56
Notice
Control Panel on the Refrigerator Compartment Door
1 beep
Light OFF
Light OFF
pushing the
button
4
beeps
2 beeps
Light ON pushing
the button
Select MID. in ordinary usage. The temperature may change
depending on the operation states.
The temperatures of the Chill room also change if selecting
M
AX. or
M
IN.
Temperature of the door pocket is set slightly higher than the one in the
left table.
Adjust the temperature of the
refrigerator compartment
MAX.
About 1 3˚C lower than MID.
MID.
About 2 6˚C
MIN.
About 1 3˚C higher than MID.
Push the REFRIGERATOR button to adjust the temperature of the refrigerator compartment.
The temperatures are standard values under the speci c condition (the surrounding temperature of 30˚C, no food stored, door closed and
the temperature in the refrigerator is steady).

42
Store foods of which height are suited for each case.
Otherwise, the door will not be closed securely, which lead to inef cient cooling action. In addition, it may cause
damage of foods or each case.
Keep the food off from the bottom of the slimline slide case and/or the slide case.
Height of the storageable food
FREEZER COMPARTMENT
With Quick Freezing System, the foods are preserved in an instant.
Pg.43
It is recommended to use this compartment when freezing meat and/or sh
quickly.
3-layer freezer case provides you with large storage space
compartment and convenient reach of your freeze food items.
It is suitable for storing the foods preserved for a long time and the
foods that melt easily such as ice cream.
Upper Freezer
Lower Freezer
Upper Freezer case
Slimline
slide case
Slide Case
Lower
freezer case
Small-item and frozen food,
etc.
Freezing bag
Airtight container etc.
Frozen food and bread Ice
cream etc.
Moving the aluminium tray in the Upper Freezer to the left side of the Slimline
slide case, it can be used as the Quick Freezing Corner.
Do not store any 500ml PET bottle in the Slimline
slide case. It cannot be taken out because it
expands when it is frozen.
Do not use with the Slimline slide case and/or
Slide case removed.
Food may be caught in and/or drop to the inner
part of the case, and as a result, the door may not
close completely.
It is recommended to use this tray as a storing space
for small items such as freezing bag and airtight
container.
Aluminium tray (Quick Freezing Corner)
How to use the Ice Compartment
(Automatic ice maker)
Pg.44
Upper
Freezer
Lower
Freezer
(Front)
Upper Freezer case
Up to the top line of the case
Slimline slide case
Up to 5cm
Slide case
Up to the top line of the case
Lower freezer case
Up to the top line of the case

43
Adjust the temperature of the freezer compartment
Control Panel on the Refrigerator Compartment Door
The displayed character will disappear about 2 minutes
after the operation nishes. However, FREEZER and eco
operation indicator lamps will not be turned off.
For more information about the panel for operation.
Pg.38
To adjust the temperature more nely.
Pg.56
Notice
Freezer Compartment
Did you open the door frequently?
It is recommended to open and close the door quickly and/or minimize the number of
times of opening and closing the door.
Does any food or package caught in the door prevent the door from closing completely?
Check that there is not any space between the door seal and its contact surface with the
door closed.
Is food squeezed in? or Is a large amount of food put in at a time?
Make sure that any food does not protrude beyond the storage height limit of each
compartment, and do not store the amount of food that may prevent the door from
opening and closing.
Allow clearance between each food in each compartment.
The door may not be shut properly if Upper Freezer case or Slimline slide case is not
attached properly.
Check that they are put in place.
Pg.49
Troubleshooting
When this happens Please check. This is the cause.
Freezer does not
cool well enough,
frost and/or dew
occurs, ice cream
becomes soft
There is a space
between the door seal
and its contact surface.
If opening and closing the door frequently, temperature of food may become higher and food such as ice
cream may become soft.
Note: Items are preserved at lower temperature than usual freezer temperature. Electric power consumption will increase by
about 20 percent, compared with usual freezer operation.
Caution
Quickly freezing warm food
(Quick Freezing)
1
Place the food wrapped
with plastic fi lm on the
aluminium tray in the
upper Freezer.
Push the COOLING
MODE button and
FREEZER indicator lamp
will be illuminated.
FREEZER operation will end
automatically in about 90 minutes,
and
FREEZER indicator lamp will
be turned off.
Push the COOLING MODE button to turn
off the display after turning on other displays
again, when you want to stop this function.
Indicator lamps other than
FREEZER
will be turned off about 2 minutes after
FREEZER
is set.
Freezing compartment is cooled preferentially in the FREEZER operation.
For that reason, temperature of the Refrigerator Compartment may rise if opening/closing the
Refrigerator Compartment door frequently.
Warm food such as rice can be easily frozen by this function. Make sure that you never burn
yourself when putting hot food in.
It is recommended to put it in after it is cooled down to 50 60˚C.
Pushing the COOLING MODE button again within 60 minutes after the end of the FREEZER
operation, the lamp is illuminated, but the operation does not start. The operation will
start after 60 minutes pass.
Make sure to wrap the food with plastic lm to prevent it from sticking on the aluminium tray.
Dividing food into small pieces not only make them freeze completely soon, but also make them be taken out easily.
2 3
Quick Freezing Corner
FREEZER
indicator lamp will
be turned on during
the FREEZER
operation, and other
indicator lamps will
be turned off.
Adjust the temperature of
the freezer compartment
Push the FREEZER button to adjust the temperature of the freezer compartment.
The temperatures are standard values under the speci c condition (the surrounding temperature of
30˚C, no food stored, door closed and the temperature in the refrigerator is steady).
Select MID. in ordinary usage. The temperature may change
depending on the operation states.
Temperatures in the Quick Freezing operation are lower than the
temperatures described in the left.
If operating the refrigerator for a long time with the "
MAX.
" selected,
ice cream etc. may become hard or it may take a longer time to thaw
food.
MAX.
About -23 -20˚C
(Low temperature freezing
Note
)
MID.
About -20 -18˚C
MIN.
About -18 -15˚C
Light OFF
4 beeps
Light OFF
pushing
the button
2 beeps
1 beep
Light ON pushing
the button

44
ICE COMPARTMENT
(AUTOMATIC ICE MAKER)
Setting of the Automatic ice
maker
Push the ICE MAKER button to
turn on the
NOR
MAL indicator
lamp.
3
2
Add water line
How to make Ice
Not making ice
(Stop Ice Making)
1 1
2
3
Setting of the automatic ice
maker
Push the ICE MAKER button
to select
OFF
.
The automatic ice making function
becomes disabled which stops ice
making.
WATER remains off when
OFF is selected for automatic
ice making.
Pg.45
Remove the water supply
container and wash it
thoroughly. Dry the container
completely.
(How to maintain
Pg.50
)
Place the water supply
container.
The container should be pushed
in until it passes the
“
container
set position
”
line.
Take off the Water Supply
Container.
When the WATER indicator
lamp is lit or the water level
reaches to the Add water line ,
replenish water.
Open the lid and add water.
Water level can not exceed
"Container-full line".
Replace the Water Supply
Container.
Push it beyond the "Container set
position" line.
Water may spill out if the
water supply container is
inclined. Wipe off spilled water
immediately.
Ice making starts
automatically and ice is
stored in the Ice case.
Container-full
line
4
Container set position
Container set position
5
Perform Ice Maker Cleaning when making ice for the fi rst time
or for the fi rst time in a week or more.
Pg.50
It may take 24 hours or more to make ice for the fi rst time.
8 ices are usually made per 2 3 hours.
Notice
Do not place your hand in the mechanical
section of the automatic ice maker.
(Rotation of the ice tray may cause injury.)
Warning
Control Panel
Ice Compartment
Ice Making buttons
AUTOMATIC ICE MAKER
Ice Tray
Water Supply Container
Ice Case
Ice scoop
Ice Making button
Light ON
Light ON
Water Supply indicator lamp
Display
Ice Making button

45
Ice Compartment (Automatic Ice Maker)
Ice-making time and an amount of ice
How to make ice quickly
(Quick Ice Making)
Water Supply indicator lamp
The indicator lamp will turn off about 2 minutes after ice making nishes to save electricity, while FREEZER , REFRIGERATOR,
ENERGY SAVING , QUICK , WATER and ["eco" operation indicator lamp] remain on.
Pg.36
●
Ice making mode switches in order of NORMAL QUICK OFF every time the ICE MAKER button is pushed.
The current mode is indicated by the display and operating sound.
Operation sound of automatic ice making including during ice separating and water supply can be OFF while ice making stops.
WATER indicator lamp turns off when the door of the Refrigerator
Compartment is opened and closed while the indicator lamp is on, and it
turns on again if no water is added to replenish the container.
WATER indicator lamp remains off when OFF is selected for
automatic ice making.
Amount of stored ice is automatically detected by the stored ice amount detecting lever of
the Automatic ice maker which cannot be seen usually.
Automatic ice maker stops making ice when the amount of the stored ice reaches to the
speci ed level and it restarts making ice when the amount is below the level.
Limit line of stored ice amount represents the guide line of stored ice amount
when the Automatic ice maker makes ice with ice leveled.
If the ice is stored partially, the detecting lever may contact the ice early. As a
result, the Automatic ice maker may stop making ice before the amount of
stored ice is enough.
WATER may come on regardless of water levels
if the water supply container is not placed properly.
Push in the container completely if the indicator
lamp comes on.
It takes a long time to make ice under the following conditions.
When using for the rst time (It may take more than 24 hours) After opening/closing the door frequently
After storing a large amount of food at a time After power failure
When the ambient temperature is low under certain conditions (ex: using in winter)
After maintaining the Ice Tray
Notice
Notice
Notice
Request
Caution
Front
Ice scoop
Detecting
Lever
Ice scoopFrozen food
Detecting
Lever
Is any frozen food stored
in the inner part of the
Ice case?
Is the ice scoop in the
inner part of the Ice
case?
Push the ICE MAKER button to select
QUICK .
Ice making time is reduced.
※
Ice making mode is automatically
reset to NORMAL operation in
about 7 hours.
The above values are obtained with an ambient temperature of 25˚C, the temperature in each compartment set to
M
ID. and no door opened/closed.
WATER indicator lamp automatically comes on when water in the water
supply container is getting low. Replenish the container with water.
Normal operation Normal state
Operation mode
Mode
About 110 minutes 140 minutes
About 90 pcs
Required time for an ice making operation (12 pcs by once)
Storage amount of the Ice case
Quick Ice Making
Stored ice cubes are levelled to the front part of the case
About 70 minutes 80 minutes
About 130 pcs
Do not use the following ones because they may
cause malfunction, deformation or sticking ice.
Furthermore, these types of water are easily
contaminated with bacteria.
Please wash the container usually once 3 days.
Mineral water
(Hardness: 100mg/L
or less)
Juice drink Sports drink Carbonated
drink
Tea
Filtered water or
boiled water
Well water
(Required to satisfy the appropriate
water quality standard)
Light ON
Light ON
Do not store any food such as frozen food other than ice in the Ice case when
making ice automatically.
(Otherwise, it may not make ice, or the door may not open or parts may damage
because the food interferes with the parts of the Automatic ice maker.)
Gently open and close the door of the Ice Compartment. Ice may fall out of the
ice case onto the lower freezer if disregarded.
WARNING: ll with potable water only.
Water for ice making is according to your drinking standard. Quality of tap water may vary in different countries. Please
check and verify with your local authority.
Change water and clean the container at least once a week for hygiene purposes.
If the ice made of mineral water containing a lot of mineral ingredients is put into water, white powder may come out,
however this is those mineral ingredients and harmless.
Limit line of stored
ice amount

46
VEGETABLE COMPARTMENT
Spacious
Upper Case
To the edge of the case
Spacious Upper Case
Storage height limit line
Lower Case
Height of
stored food
Half-used vegetables or
small vegetables such as
tomato, lemon.
VEGETABLE
COMPARTMENT
Upright storage of items.
(2L PET bottles can be
stored)
Medium and large vegetables
such as cabbage, lettuces.
Lower Case
Stored vegetables are not exposed to cold air directly, and they are cooled gently but thoroughly. Vegetables
can be kept from drying out.
Lower Case/Spacious Upper Case
It is recommended to wrap vegetable with
plastic fi lm when the following conditions exist.
When it is undesirable that the stored foods
absorb the smells of the stored vegetables such
as scallion, leeks, and shallots
When storing the vegetables and/or fruits which
were used partially
When the amount of the stored vegetables is
small or many wrapped vegetables are stored
When it is undesirable that dew occurs in the
Vegetable Compartment
Make sure that any stored food does not protrude beyond the storage height limit line.
Otherwise, the door may not close completely, and as a result, the refrigerator may not cool suf ciently.
Food and/or each case may damage.
Some kind of PET bottle may not be able to be stored.
Moreover, PET bottle may not be able to be stored if its cap is not completely tightened.
Temperature in this compartment may become lower when the surrounding temperature is low.
Dew may adhere to the spacious upper case or the ceiling in the Vegetable Compartment, depending
on the volume/type of vegetables, because the humidity is high in the Vegetable Compartment. Water
is no good to perishable foods. Wipe off water with a dry cloth.
Open/close the Vegetable Compartment Door slowly.
Opening/closing the door mightily, the foods stored in the tall storage compartment (PET bottle etc.)
may overturn.
Caution
Caution

47
Vegetable Compartment / How To Maintain / How to Care The Inner Outer of the Refrigerator
HOW TO MAINTAIN/HOW TO CARE THE
INNER OUTER OF THE REFRIGERATOR
The back/fl oor of the refrigerator
When dirt is found
Control Panel for operation
Door gaskets
Power Plug
Surface of door
Liquid receivers
Wipe off it immediately.
It is recommended to clean the hidden places
once a year.
Wipe off it using a soft cloth wet by lukewarm water.
If it is hard to clean dirt, wipe off it using diluted
neutral detergent for kitchen and a soft cloth wet
by lukewarm water.
Some detergents cannot be used for this purpose.
Therefore, refer to the
Caution
on this page.
Take foods out beforehand if you remove the parts.
Wipe the Control Panel for
operation with a soft dry cloth.
Make sure that water never
splash to it.
Otherwise, it may cause
malfunction.
Wipe it thoroughly because
it can become easily dirty.
If the dust on the power plug remains not cleaned,
it may cause a re. Clean it once a year.
Wipe the surface of door using a soft
cloth wet by lukewarm water.
Wipe the door in stainless color along
the hairline on the surface.
Wipe off them if liquid collects
and/or they becomes dirty.
Unplug the power cord from the outlet.
Check the following matters.
Is any damage found on the
power cord?
Does the power plug become
hot?
Remove the dust and wipe it
with a dry cloth.
Connect the power plug rmly to a power outlet.
Do not use the following ones.
Alkaline and alkalescence detergent for kitchen, plate powder, powder soap, oil, hot water, scrubbing brush, acid, benzine, thinner,
alcohol, and bleach, etc. (check the "liquid" part of "display according to the household goods quality labeling law" for detergent.)
Make sure to wipe off spilled cooking oil, citrus fruits juice and food soup.
When using a chemical dustcloth, follow the instructions of it.
It may cause damage and discoloration of the door, paintwork and plastic parts.
Do not wipe out the movable contact surface of the rail for
cases and drawers because the lubricant agent is applied to it.
(The lubricant agent complies with the Food Sanitation Law.)
Caution
Caution
1
2
3
4
How to care the inner outer of the refrigerator
Make sure to unplug the power plug when maintaining the refrigerator.
Warning
Liquid receivers
Turn the Adjustable mounts
1
Pull the leg cover and
remove it.
Push it in from the front
when installing it.
Float the Adjustable mounts
from the fl oor and draw the
refrigerator straight.
Lay the protection board etc.
on the oor which can be easily
scratched.
Wipe off dirt on the back of
the refrigerator, wall and fl oor.
The back of the refrigerator
easily becomes dirty because
ne dust is accumulated on it
by convection of air.
2 3

48
HOW TO REMOVE PARTS
Height adjustable shelf Lower shelf
Fixed shelf
Reversible shelf
Chill room
When installing the shelf, slide it until it reaches to the
interior wall, then slightly lift up the back of the shelf
and push it in. (hitch the forks of the shelf to the parts
on the back of the shelf)
Draw the shelf, and pull off
the two pins on the lower
right and remove it.
Slightly lift up and pull out.
Pull out the case to the full,
lift the front side slightly
and then remove it.
1
Slightly lift up the
back of the shelf
and draw it.
Raise the shelf as
shown in fi gure,
and turn it and
remove it.
2
Door may damage if drawing the shelf
without turning it.
Caution
Slide case
/