Generalmusic GeneralMusic PRP 7 User manual
- Category
- Digital pianos
- Type
- User manual
This manual is also suitable for

OWNER’S MANUAL
English

The information in this publication has been carefully prepared and checked. The
manufacturers however decline all liability for eventual errors. All rights are reserved.
This publication may not be copied, photocopied or reproduced in part or in whole without
prior written consent from Generalmusic S.p.A. Generalmusic reserves the right to apply
any aesthetic, design or function modifications it considers necessary to any of its products
without prior notice. Generalmusic declines all liability for damage to property or
persons resulting from improper use of the instrument.
© 2000 Generalmusic S.p.A. All rights reserved.
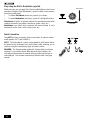
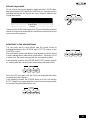
General safety instructions
Power supply
• This keyboard is powered by current from a standard household wall outlet (using the supplied AC
adaptor).
About the AC adaptor
• Use only the supplied AC adaptor. Use of another type of adaptor creates the danger of fire and electric
shock.
For safety sake, be sure to unplug the AC adaptor from the wall outlet whenever leaving the keyboard
unattended for a long time.
• Always ensure that the instrument is turned OFF when connecting or disconnecting the power adaptor.
Applying power while the power switch in depressed may damage the components inside the unit.
• Do not use adapters other than the one specified for this keyboard. The technical specifications of the
adapter must be: 9~12V DC output, 1800MA, centre positive type.
If water gets into the instrument
• Remove the power cord from the wall socket at once, and contact the store where the unit was purchased.
• The top surface of your instrument should never be used as a shelf for flower vases and other containers
which hold liquids.
If the instrument plays in an abnormal way
• Turn off the power immediately, remove the power cord from the main outlet and contact the store where
it was purchased.
• Discontinue using the unit at once. Failure to do so may result in additional damage or other unexpected
damage or accident.
General user maintenance
• Clean the cabinet and keys of your instrument using a soft, clean, slightly damp cloth and polish with a
soft, dry cloth.
• Never use industrial cleaners, detergents, abrasive cleansers, waxes, solvents or polishes as they may
damage the instrument finish.
• Always turn off the power supply after use and never turn the unit on and off repeatedly in quick succession
as this places an undue load on the electronic components.

i
Contents
Introduction 1
Front and rear panel 2
Front Panel 2
Rear panel 4
Playing the pRP7 5
Connect the audio cables 5
Connect the power supply 5
Turn the instrument on 5
Adjust the overall volume 5
Headphone jack 5
Play using the Pitch/Modulation Joystick 6
Pedal Connection 6
Listen to the Demo songs 7
Select a single demonstration song 7
The pRP7 Presets 8
The Selection buttons 8
Preset selection 9
The CONTROL section 10
Realtime operations 10
Activate Split mode 10
Change the Split point setting 10
Activate Layer mode 11
Add effects to the selected Preset 11
Change the Volume Balance between two sounds 12
Transpose 13
Touch 14
The Functions of the pRP7 15
Tune 16
MIDI Channel 17
Midi Local 18
Midi Common channel 19
About MIDI 20
MIDI Applications 22
As a MIDI controlling device 22
As a Slave device 22
Midi Sequencer recording 22
Recording Studio 23
Recording a song 23
Recording a new song 24
Click (metronome) 24

ii
Song Library 25
Select a sequence from the Song Library 25
Panel Reset 26
Technical specifications pRP7 27
Technology 27
Index 28
Appendix
GM-GMX Sound tables A.1
Preset table A.2
Song Library tables A.3
Drumkit tables A.4
Midi Implementation chart A.7
Recognized Control Change messages A.8

1
Introduction
Thank you for purchasing the GEM pRP7, the new portable Digital Piano
belonging to the prestigious Real Piano Series by Generalmusic.
The new portable pRP7 Digital Piano features an 88 note, weighted
Hammer Action keyboard, 32 note polyphony and 48 Presets including
10 exclusive Piano sounds.
Also featured is an internal Sound Library consisting of 444 GM/GMX
compatible sounds, addressable via MIDI from any external MIDI
controlling device.
The 22 Reverb and 22 Delay/Modulation effects contained in the on-
board Digital Signal Processor add realism to the Preset sounds.
With its 8,000 event sequencer, (allowing you to record and play back
your own performances), and a Song Library of 96 songs, (featuring
famous classical pieces written for the piano), pRP7 is the perfect
partner for practising.
Through the stereo output jacks, you can connect your pRP7 to any
external amplification system to faithfully reproduce the complex sound
diffusion of an acoustic piano.
The pRP7 is very easy to use, but to make the most of the instrument’s
features, you are recommended to consult this manual whenever you
are not sure what to do.
Most important, of course, is how you treat your pRP7. Please take time
to read the General Safety Instructions to guarantee a long and trouble
free use of your instrument.

2
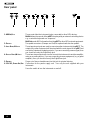
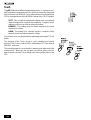
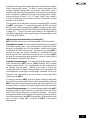
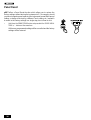
Front and rear panel
Front Panel
1. V
OLUME
: Slider that controls the main volume of the instrument.
2. T
RANSPOSE
i/g Increases (
g
) or decreases (
i
) the overall pitch of the instrument in half-step
(semitone) increments.
3. S
OUND
V
ARIATIONS
/D
EMO
:These buttons select a variation of the current Preset in increasing (+) or decreasing
(–) order. When pressed together at the same time, they activate the factory
programmed demonstration songs.
4. S
ELECTION
: These buttons select Presets banks, (Piano, El-Piano, etc.), and are used in
conjunction with the Sound Variation buttons to select Presets from the active bank.
The Presets are recalled as single, layer or split sound combinations.
5. G
RAND
P
IANO
: Press this button to select the GrandPiano Preset which instantly recalls the
GrandPiano Preset across the entire keyboard.
6. C
ONTROL
: This section contains 4 buttons: Split, Layer, Reverb, Effect.
Split : Turning this button on will split the keyboard into separate left and right parts
and automatically recall the sound for the left hand.
Layer : Press this button to instantly activate two layered sounds which play at the
same time across the entire keyboard.
Reverb : Use this button to activate (LED on) or deactivate (LED off) the Reverb
effect recalled by the current Preset.
Effect : Use this button to activate (LED on) or deactivate (LED off) the Modulation/
Delay effect recalled by the current Preset.
5
71
2
3
4
9
10
11
6 8
13
12
i i
g g

3
7. T
OUCH
: Use this button to adjust the touch of the keyboard according to your playing style.
8. B
ALANCE
/ : These buttons regulate the volume balance between two sounds in either Layer or
Split modes.
9. D
ISPLAY
: A three-digit, Liquid Crystal Display (LCD).
10. T
EMPO
D
ATA
+/–: Use these buttons to modify the playing speed (Tempo) when using the Sequencer
and to select Songs from the Song Library when the Song Library button is active.
These buttons are also used to adjust the value of the currently selected parameter
in Function mode. The functions are selected with the last four notes of the highest
octave of the keyboard.
11. R
ECORDING
S
TUDIO
: This section contains functions that control the on-board Sequencer.
Play\Stop : Press this button to playback what you have recorded, to stop the
playback or stop the recording.
Rec. : Press this button to record what you play.
Click. : Press this button to record or playback with or without the click of a
Metronome.
Song Library. : Press this button to gain access to the internal Song Library
consisting of 96 famous pieces of piano music, useful to practice with as well as
listen to.
12. J
OYSTICK
: Pitch Bend/Modulation joystick control
13. F
UNCTION
KEYS
: Notes G7-C8 of the highest octave are dedicated to the selection of the pRP7
functions. The function parameters are selected with the Data +/– buttons while
holding down a function key.

4
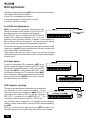
Rear panel
21
3
4 65
1. MIDI I
N
/O
UT
: These ports allow the instrument to be connected to other MIDI devices.
Midi In allows the sounds of the pRP7 to be played by an external controlling device
e.g. a controller keyboard or a sequencer.
Midi Out sends MIDI information from the pRP7 to other MIDI external equipment.
2. P
EDALS
: Two pedal connectors (Damper and Soft) for optional switch-action pedals.
3. I
NPUT
R
IGHT
/M-L
EFT
: These two stereo inputs are used to connect another instrument to the pRP7. The
output of the other instrument will be mixed with the main signal of the pRP7 and
sent to the Output and Headphone jacks. If you are connecting a mono signal, then
you should use only the Right/Mono jack.
4. O
UTPUT
R
IGHT
/M-L
EFT
: These two stereo outputs are used to connect the instrument to another amplifier,
mixer or recording device. If you are connecting to mono equipment, (e.g. a guitar
amplifier), then you should use only the Right/Mono jack.
5. P
HONES
: Plug a set of stereo headphones into this jack for private listening.
6. 12 V DC, P
OWER
O
N
/O
FF
: Connection for the power supply unit. Use only the unit supplied with your
instrument.
Press the switch to turn the instrument on and off.

5
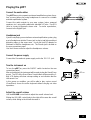
Playing the pRP7
Connect the audio cables
The pRP7 does not incorporate an internal amplification system, there-
fore you must either play using headphones or connect to a suitable
external amplification system.
Connect the audio outputs to your amp. system (mixer, powered
speakers, etc.) using audio cables with standard 1/4” jacks. Use RCA
jacks to connect to domestic stereo units. For mono reproduction,
connect to the Right/M jack.
Headphone jack
If you are not playing connected to an external amplfication system, plug
a set of headphones into the Phones jack to play in total silence without
disturbing others in the same room. Use a mini jack1/4” adapter for
Walkman or MidiDisc headphone sets. The Phones jack is located on
the rear connections panel.
Use the Volume control to adjust the Headphones volume.
Connect the power supply
Connect the Generalmusic power supply unit to the 12V. D.C. jack.
Turn the instrument on
To turn the pRP7 on, press the ON/OFF switch located on the rear
connections panel.
After a short period, the instrument will be ready to play the Grand Piano
preset. The LED of the Grand Piano Preset button will be on and the 3-
digit LCD display will show a tempo setting as an indication that the
instrument is on.
In this power up condition, you will be able to play a piano sound
(GrandPiano) across the entire keyboard without carrying out other
operations.
Adjust the overall volume
Use the VOLUME control knob to adjust the overall volume level.
Sliding the VOLUME control knob to the right will increase the overall
volume, while sliding to the left will decrease it.
LED on

6
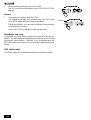
Play using the Pitch/Modulation Joystick
While you play, you can apply Pitch Bend and Modulation to the Preset
sounds by using the Pitch/Modulation Joystick located on the extreme
left of the control panel.
• To obtain Pitch Bend, move the Joystick Up or Down.
• To obtain Modulation, move the Joystick in Left/Right directions.
Pitch Bend is a “glide” (or glissato) effect which simulates the effect that
certain instruments can produce (trombone, guitar, violin, etc.).
Modulation is an effect which simulates the natural vibrato of such
instruments as the violin, cello, human voice, etc..
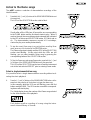
Pedal Connection
The pRP7 has two connectors for the connection of optional, switch-
action pedals: SOFT and DAMPER.
SOFT: The Soft pedal is a switch control pedal (On/Off) which affects
the timbre of the instrument such that it plays softer, allowing you to
continue using the same playing style at a lower volume.
DAMPER: The Damper pedal applies the Sustain effect to all notes
released. If you release a note after depressing the Damper, the
note will proceed towards its natural decay according to the type of
sound played. The Damper is particularly effective with Piano type
sounds.
MODULATION
PITCH BEND

7
Listen to the Demo songs
The pRP7 contains a selection of demonstration recordings of the
internal sounds.
1. Press both the [–] and [+] buttons of the SOUND VARIATIONS buttons at
the same time.
The LEDs of the SELECTION section start to flash.
Shortly after, all the LEDs turn off except the one corresponding
to the PIANO button and the first demo starts to play. When it
reaches the end, the second demo starts automatically, indicated
by the LED of the second SELECTION button, (El Piano) and so
on. The demonstration sequence consists of 8 recordings,
chained to play as a medley automatically.
2. To stop the current Demo song at any point without cancelling Demo
mode, press any of the buttons of the SELECTION section.
The Demo song stops instantly and the LEDS of the SELECTION
section start flashing. At this point, while the LEDs are still
flashing, you can select another Demo song by pressing the
corresponding button of the SELECTION section.
3. To Stop the Demo song and escape Demo mode, press both the [–] and
[+] buttons of the SOUND VARIATIONS buttons at the same time.
The LEDs of the SELECTION section turn off and the instrument
sets to the last selected PRESET prior to entering Demo mode.
Select a single demonstration song
It is possible select a single demonstration recording without acti-
vating the chain playback.
4. Press the [–] and [+] buttons of the SOUND VARIATIONS buttons at the
same time and press one of the buttons to trigger the demo song.
In this example, while the LEDs are still flashing, press the first
button marked PIANO. The LED remains on and the correspond-
ing demo will start to play.
The 3-digit display shows the number of the Demo song selected
for the entire duration of the playback.
Each button recalls a recording of a song using the instru-
ment’s internal library of Sounds.

8
The pRP7 Presets
The pRP7 contains 48 Internal Presets, consisting of Single, Split and
Layered sound combinations. Each sound combination also recalls the
volume levels, a configuration of effects (Reverb and Delay/Modula-
tions) together with relative effect send levels
The Presets are organized in the SELECTION section. The table shown
opposite lists the pRP7 Presets, grouped in sets of six, each group
corresponding to a button of the section.
The Selection buttons
This section consists of a row of 8 Preset “family” Groups.
The 8 Preset Group buttons are marked as follows: Piano, Electric
Piano, Keyboard, Organ, Strings, Choir\Pad, Guitar, Vibes.
Each button of the SELECTION section activates a Bank of 6 Presets.
Using the [–] and [+] buttons of the SOUND VARIATIONS buttons, it is
possible to select the 8 Presets of each bank sequentially. The 8 Presets
of each bank are factory-set to recall Presets configured in the following
manner:
123456
Single Single Single Single Layer Split
Each Preset of the current Group contains a memorized Layer and Split
sound combination which you can recall in real time by activating the
LAYER or SPLIT buttons in the CONTROL section accordingly.
Similarly, a Layer or Split Preset is easily converted to one of the other
modes by activating/deactivating the SPLIT or LAYER buttons accord-
ingly.
For example, if you have selected the Layer Preset 5 of a Preset Group,
simply press SPLIT to recall the memorized Split combination, or
deactivate LAYER to recall the memorized Single sound.
The 3 digit LCD display will show the current selection for about 4
seconds before returning to the Tempo display setting.
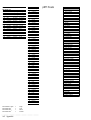
PRESET PRP7
• GROUP PIANO
1- GRANDPIANO
2- ELECT.GRAND
3- UPRIGHTPIANO
4- HONKY TONKY
5- STRING PIANO
6- JAZZ PIANO
• GROUP EL.PIANO
7- RHODEX 1
8- WURLIE
9- RHODEX 2
10- FM PIANO
11- RHODEX PAD
12- RHODEX BASS
• GROUP KEYBOARD
13- HARPSICHORD
14- CLAVINET
15- CELESTA
16- GRAND HARP
17- MIXED CELESTA
18- SPLIT HARP
• GROUP ORGAN
19- JAZZ ORGAN
20- JAZZ ORGAN 2
21- THEATRE ORGAN
22- PIPE ORGAN
23- DRAWBARS
24- ORGAN COMBO 1
• GROUP STRING
25- STRING1
26- MELLOW STRING
27- SLOW STRING
28- OCTAVE STRING
29- STRINGBELL 1
30- CONCERTO
• GROUP CHOIR/PAD
31- CHOIR 1
32- SLOW CHOIR
33- ATTACK PAD
34- TAP PAD
35- MIXPAD 2
36- RAIN PAD
• GROUP GUITAR
37- NYLON GUITAR
38- STEEL GUITAR
39- JAZZ GUITAR
40- STRATO GUITAR
41- HARPTAR
42- WES COMBO
• GROUP VIBES
43- VIBES 1
44- VIBES 2
45- VIBES 3
46- MARIMBA
47- VIBES PIANO
48- VIBES COMBO 2

9
Preset selection
1. After turning the pRP7 on, press one of the SELECTION buttons.
In this example, we press the PIANO button.
You will recall the first Preset, “Grand Piano”, which plays across
the entire keyboard.
The display will show “P1” for an instant before returning to the
Tempo setting.
2. Press the [+] button of the SOUND VARIATIONS to select the second preset
of the Piano bank, another variation of a piano sound, in this case, Electric
Grand.
The 3 digit display shows the selection as “P 2”:
The last Preset button selected for the current Preset Group
remains memorized. For example, if you select the Organ Group
button, Preset 1, (Jazz Organ), will be recalled. If you now select
the Piano Group button, you will recall the last Preset selected,
Preset 2, (Electric Grand), in this case.
This system of memorizing the last selection made will help you
recall your preferred Presets quickly.
3. Continue pressing the [+] button of the SOUND VARIATIONS to select the
Presets of the Piano bank in increasing order.
When you reach the last Preset of the current Bank, pressing the
[+] button will have no effect.
When you reach Preset n. 6 of the current Bank, you can use the
[–] button to select the Presets in reverse order.
4. To cancel the current Preset and return to the Grand Piano Preset, press
the Grand Piano button.
The Grand Piano button will always return to the Grand Piano
Preset active across the entire keyboard.
The Grand Piano Preset is shown in the 3-digit display as “G P” for
a short period before returning to the Tempo setting.
LED on

10
The CONTROL section
Realtime operations
The pRP7 operating system has been conceived to permit several
simple and quick real time operations using the buttons of the CON-
TROL section.
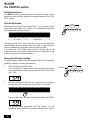
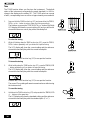
Activate Split mode
Starting from the Single Preset “GrandPiano”, you can easily split the
keyboard by pressing the SPLIT button. This will divide the keyboard
into separate left and right sections.
<------- Ac. Bass ------><--------- GrandPiano ---------->
After pressing the SPLIT button (the LED turns on), the GrandPiano
sound remains active on the right side of the split. An Acoustic Bass
sound is automatically assigned on the left side of the split.
If you press the SPLIT button again, the LED will turn off and the
keyboard returns to the previous mode with the GrandPiano sound
active to play across the entire keyboard.
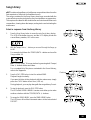
Change the Split point setting
The default setting of the Split point corresponds to F#3. You can quickly
modify the setting to suit your requirements.
1. Press and hold down the SPLIT button.
The LED of the SPLIT button starts to flash and the display shows
the current split point setting expressed as the MIDI note number
(54 = F#3).
2. While still holding down the SPLIT button, press the note on the keyboard
corresponding to the new split point required (B3 in the example).
The new split point is shown in the display as Midi note 59 (B3).
The setting remains memorized for all the Presets. It is not
possible to assign a different Split point setting for each Preset.
Flashing

11
Activate Layer mode
To mix or “layer” two sounds together, simply press the LAYER button.
After pressing the LAYER button (the LED turns on), a second sound is
activated layered with the first (in this case, Strings is added to the
GrandPiano sound).
<------------------------ GrandPiano ---------------------->
<----------------------- Strings ---------------------->
If you press the LAYER button again, the LED turns off and the keyboard
returns to the previous mode with the GrandPiano sound active to play
across the entire keyboard.
Add effects to the selected Preset
You can easily add or cancel effects from the current Preset by
activating/deactivating the REVERB and EFFECTS buttons in the
CONTROL section.
The on/off status of these two buttons show whether or not the current
Preset is playing with or without one or both effects. When the LED of
a button is on, the preset is playing with the corresponding effect.
In the following example, the REVERB and EFFECT buttons are both
on, meaning that the current Preset can be played with both effects.
When the LED of a button is off, the Preset can be played without the
corresponding effect (bypass).
In the following example, the REVERB button is off (LED off) and the
EFFECT button is on, meaning that the current Preset can be played with
the recalled Delay/Modulation effect only.

12
Change the Volume Balance between two sounds
If you are playing either in Layer or Split mode, you can regulate the
volume of the two sections in real time using the BALANCE buttons.
These buttons regulate the volume of one section with respect to the
other, creating a perfect balance between the two sections according to
your requirements.
1. Hold down the BALANCE button to increase the volume of the main
sound.
The volume of the main sound will increase while the second
sound (split or layer) will decrease automatically in proportion to
the main one. Release the Balance button when you obtain the
required setting. The 3 digit LCD display will show the current
setting for a short period before returning to the Tempo setting.
2. Conversely, hold down the BALANCE button to increase the volume of
the second sound.
The volume of the second sound will increase while the main
sound will decrease automatically in proportion to the second one.
Release the Balance button when you obtain the required setting.
The display will eventually show a negative value when the level
of the second sound is higher than the main one.
If you select a Single Preset (or deactivate the SPLIT or LAYER
button), the BALANCE buttons operate as normal Volume con-
trols for the main section.

13
Transpose
Pressing either TRANSPOSE button will adjust the pitch of the instru-
ment in half-step (semitone) increments or decrements, through the
overall range of –/+ 12 semitones.
When both LEDs are off, the pitch of the instrument is set to normal
(Equal: C = C).
1.Press the TRANSPOSE # button once to raise the pitch of the instrument.
Play on the keyboard and you will hear that the pitch of the
instrument is raised one semitone. The LCD display shows the
current setting as a relative value, “01”, for a short period before
returning to the tempo setting.
The LED of the TRANSPOSE # button remains on to indicate the
changed status of the pitch. Every time you press the TRANS-
POSE # button, the pitch is raised by one semitone.
2.Press the TRANSPOSE b button to lower the pitch of the instrument.
Play on the keyboard and you will hear that the pitch of the
instrument is lowered one semitone. The LCD display shows the
current setting as a relative value, “–01” in this case, for a short
period. A negative transposition value indicates that the pitch is
one semitone lower than normal (00).
The LED of the TRANSPOSE b button remains on to indicate the
changed status of the pitch. Every time you press the TRANS-
POSE b button, the pitch is lowered by one semitone.
After about 5 seconds, if you fail to press either Transpose button,
the display returns to the previous situation and the instrument
remains at the last set pitch.
The current Transpose setting remains memorized even after
turning the instrument off. When you turn the instrument on again,
the LED of the Transpose buttons will indicate the changed status
of the pitch.
Reset
The current pitch setting can be cancelled instantly by pressing both
buttons together.
ii
#
ii
#
ii
#

14
Touch
The pRP7 offers three different keyboard responses, or “velocity curves”,
which affect the instrument as a whole. When you turn on the instrument
for the first time, the “NORMAL” curve will be shown set, indicated by the
LED in correspondence to the NORMAL setting of the TOUCH button.
SOFT: This is useful for a player with a lighter touch or somebody
more accustomed to a synth action keyboard. It requires only a
relatively soft touch to achieve maximum volume.
NORMAL: This setting most accurately represents the touch
response of a piano.
HARD: This setting is for “stronger” players. It requires a fairly
powerful touch to achieve maximum volume.
The various curves can be selected by repeatedly pressing the TOUCH
button.
The selection of the Touch curves is cyclic; starting from Normal,
pressing TOUCH once selects HARD, followed by SOFT, then back to
NORMAL, and so on....
The selected response curve remains in memory even after turning the
instrument off. When you turn on again, you will be able to see at a
glance what the current Touch setting is by looking at the status of the
LED.

15
The Functions of the pRP7
pRP7 features 4 functions which affect the instrument in various ways.
The Functions are activated using the last 4 notes of the highest octave
of the keyboard.
To activate a function and modify its value, hold down the corresponding
key and press the TEMPO/DATA +/– buttons.
The functions and corresponding notes are:
T
UNE
(G7) : fine tunes the instrument;
M
IDI
C
H
. (A7) : sets the instrument’s MIDI Channel (for MIDI set-
ups);
M
IDI
L
OCAL
(B7) : sets the instrument for MIDI Local operation (for
MIDI setups). Local disconnects the pRP7 sound
generation.
M
IDI
C
OMMON
(C8) : sets the instrument’s MIDI Common channel (for
MIDI setups). The Common channel is useful to
control another MIDI device which has automatic
arrangements.

16
Tune
The TUNE function allows you fine tune the instrument. The default
status of the instrument corresponds the equal standard A = 440 Hz,
shown in the display as the setting “00”. The TUNE value has a range
of
±
63, corresponding to an excursion of approximately one semitone.
1. Press and hold the TUNE function key (G7) and press either the TEMPO/
DATA + or the – button to raise or lower the tuning accordingly.
The first time you press the TEMPO/DATA + or – button, the 3 digit
LCD display will show the current setting (00) and you will hear a
sinusoidal reference note A play at the standard pitch.
To raise the tuning
2. While still holding down the TUNE function key (G7), press the TEMPO/
DATA + button repeatedly until you obtain the required tuning.
The LCD display will show the current setting and the reference
sinusoidal sound will play with the current tuned pitch.
Release the TUNE function key (G7) to escape the function.
To lower the tuning
3. While holding down the TUNE function key (G7), press the TEMPO/DATA
– button repeatedly until you obtain the required tuning.
The LCD display will show the current setting and the reference
sinusoidal sound will play with the current tuned pitch.
Release the TUNE function key (G7) to escape the function.
The current Tune setting will remain memorized even after turning
the instrument off.
To reset the tuning
4. Hold down the TUNE function key (G7) and press both the TEMPO/DATA
+/– buttons at the same time.
The LCD display will show the standard setting and the reference
sinusoidal sound will play with the standard pitch (C = C).
Page is loading ...
Page is loading ...
Page is loading ...
Page is loading ...
Page is loading ...
Page is loading ...
Page is loading ...
Page is loading ...
Page is loading ...
Page is loading ...
Page is loading ...
Page is loading ...
Page is loading ...
Page is loading ...
Page is loading ...
Page is loading ...
Page is loading ...
Page is loading ...
Page is loading ...
Page is loading ...
Page is loading ...
Page is loading ...
Page is loading ...
Page is loading ...
-
 1
1
-
 2
2
-
 3
3
-
 4
4
-
 5
5
-
 6
6
-
 7
7
-
 8
8
-
 9
9
-
 10
10
-
 11
11
-
 12
12
-
 13
13
-
 14
14
-
 15
15
-
 16
16
-
 17
17
-
 18
18
-
 19
19
-
 20
20
-
 21
21
-
 22
22
-
 23
23
-
 24
24
-
 25
25
-
 26
26
-
 27
27
-
 28
28
-
 29
29
-
 30
30
-
 31
31
-
 32
32
-
 33
33
-
 34
34
-
 35
35
-
 36
36
-
 37
37
-
 38
38
-
 39
39
-
 40
40
-
 41
41
-
 42
42
-
 43
43
-
 44
44


Generalmusic GeneralMusic PRP 7 User manual
- Category
- Digital pianos
- Type
- User manual
- This manual is also suitable for
Ask a question and I''ll find the answer in the document
Finding information in a document is now easier with AI