Page is loading ...

Jaguar Soarer
Vacuum Cleaner
Issue 2/05
GG
OO
OO
DD
NN
AA
MM
EE
GG
OO
OO
DD
VV
AA
LL
UU
EE
KVC23

Welcome to Kambrook and
your new Jaguar Soarer
Vacuum Cleaner.
At Kambrook we believe that the safe
performance of our products is the first
priority in any consumer product so that
you, our valued customer, can confidently
use and trust our products.
We ask that any electrical appliance that
you use be operated in a sensible fashion
with due care and attention placed on the
following important operating instructions:
Read all instructions thoroughly
before activating the appliance and
retain them for future reference.
Ensure that the power source to be used
is the same as the voltage requirements of
the product.
Always switch the vacuum to off, then
switch off at the power outlet, then unplug
the vacuum when not in use and prior to
cleaning the powerhead or replacing dust
bags or filters.
Never use the vacuum without a dust bag
or motor protection filter installed.
Never use the vacuum to vacuum hot
ashes, broken glass, sharp objects or liquids.
Never use in the presence of explosive
liquids or vapours.
Never vacuum up inflammable or
poisonous liquids such as petrol, copier
toner or other volatile substances. Never
vacuum up acids, asbestos or asbestos dust.
This vacuum is not intended for use by
young children or infirm persons unless
they are adequately supervised by a
responsible person to ensure that they
can use the vacuum safely.
Do not leave the appliance unattended
when in use.Young children should be
supervised to ensure that they do not play
with the appliance.
Close supervision is required at all times
when operating the vacuum near children.
Do not store or leave the vacuum near
hot ovens or heating appliances.
This appliance is suitable for domestic use
only. Do not use this appliance for
anything other than its intended use.
Do not use or store outdoors.
Fully extend the cord (to the yellow or
red tape mark) whenever the vacuum
cleaner is in use.
The installation of a residual current
device (safety switch) is recommended to
provide additional safety protection when
using electrical appliances. It is advisable
that a safety switch with a rated residual
operating current not exceeding 30mA be
installed in the electrical circuit supplying
the appliance. See your electrician for
professional advice.
Regularly inspect the supply cord, plug and
actual appliance for any damage. If found
damaged in any way, immediately cease
use of the appliance and return the entire
appliance to the nearest authorised
Kambrook service centre for examination,
replacement or repair.
2

3
Features of your Kambrook Jaguar Soarer Vacuum
1
13
3
5
14
6
2
17
8
4
9
18
7
11
10
19
12
1. Hose inlet connection point
2. Cord rewind foot pedal
3. On/off foot pedal
4. Park tool
5. On board tool storage lid release lever
6. On board tool storage compartment
7. Dust bag compartment
8. Dust bag full indicator
9. Dust bag compartment opening
10. HEPA filter
11. Motor protection filter (not shown)
12. 360 degree crush proof hose
13. Telescopic wand
14. Motor driven powerhead
15. Crevice tool & brush attachments
16. Variable power control
17. Cord storage outlet
18. Carry handle
19. Multi ter
rain floor tool
15
16

4
Using Your Kambrook Jaguar
Vacuum Cleaner
Remove all packaging from the unit, hose
and other accessories; ensure that you
have removed all of the accessories before
discarding the packaging.
Ensure that the dust bag and filters are
correctly fitted.
Locate the crush proof hose and push the
connection point into the hose inlet
connection on the top of the unit, until a
“click” sound is heard.
Connect the wide end of the metal wand
to the hose end, and push together firmly.
Fit the floor tool to the narrow end of
the wand/s and push together firmly.
Fully extend the power cord by pulling
the power plug (situated at the rear of the
unit) out from the unit, until the
red/yellow tape on the cord is shown.
ENSURE THAT YOU DO NOT
OVER EXTEND THE POWER
CORD – DO NOT EXTEND PAST
THE RED/YELLOW WARNING
TAPE ON THE CORD
Plug into a 230/240v power point and
switch the power on.
To commence vacuuming push down on
the on/off foot pedal, at the top, rear of
the unit.
When vacuuming is complete, push down
on the ‘on/off’ pedal to switch off.Turn
the power off at the outlet and then
remove the power cord from the power
outlet (when removing plug fr
om the
power outlet grasp the plug not the cor
d).
To retract the cord push down on the
‘cord rewind’ pedal.
IMPORTANT: HOLD THE PLUG
END WHEN RETRACTING THE
CORD TO PREVENT IT FROM
STRIKING YOU OR THE VACUUM.
ALWAYS ENSURE THAT THE
DUST BAG AND THE MOTOR
PROTECTION FILTER ARE
CORRECTLY FITTED. NEVER
OPERATE WITHOUT THE DUST
BAG OR FILTERS IN PLACE.
Variable Power Control
The variable power control slide switch is
located on the top of the vacuum cleaner.
Slide the control to the left for maximum
power for vacuuming hard floor and
carpet surfaces. Slide the control to the
right at the minimum power level when
using the crevice and brush tools.
Crevice and brush tool
accessories
The crevice tool is ideal for vacuuming
hard to reach places such as the edges
along skirting boards.
The brush tools can be used to vacuum
delicate surfaces and areas such as shelves
and venetian blinds.
Set the variable temperature control
between minimum and medium power
when using the tool accessories.
Separate crevice and brush tools are
located inside the on-board tool storage
compar
tment.
The opening f
or this
compartment is located directly below
the hose connection inlet.To open place a

5
finger inside the thumb groove and pull
the compartment lid upwards.
Turn off the vacuum cleaner when
changing any attachments.
Motor Driven Powerhead
The Jaguar Soarer Vacuum Cleaner
features a floor tool which is powered by
a dedicated motor giving additional power
and brush bar speed for picking up dust,
hair and dirt.
Always switch the vacuum off then switch
off at the power outlet and inplug the
vacuum prior to connecting the
powerhead.
To connect the Powerhead, simply remove
the multi-terrain floor tool by pulling it off
the wand. Connect the Powerhead floor
tool to the narrow end of the wand and
push together firmly. Insert the Powerhead
cord into the marked ‘Powerhead’ inlet
connection point on top of the vacuum
cleaner, near the carry handle.
Fix the powerhead cord to the hose and
the wand with the clips supplied.
WARNING: Do not operate the
powerhead with the wand in the
vertical (parking) position as this will
cause damage to the unit.
IMPORTANT: ENSURE THE
VACUUM CLEANER IS TURNED
OFF AND UNPLUGGED FROM
THE POWER OUTLET PRIOR TO
CLEANING OR MAINTAINING
THE POWERHEAD.
Dust bag indicator and
changing the dust bag
The dust bag should be changed when full.
The dust bag indicator window will
gradually turn red as the bag fills up and
when the dust bag indicator displays ‘red’
it is time to change the dust bag.
Always switch the vacuum off, then switch
off at the power outlet and unplug prior
to replacing dust bags or filters.
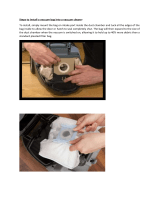
To remove the dust bag, ensure the unit is
down on its wheels, remove the crush
proof hose and push the ‘Dust bag
compartment lid release lever’ underneath
the handle. Once the lid has released, pull
the top cover back.
To remove the bag, grasp the top of dust bag
and pull out, and dispose in a rubbish bin.
To place a new dust bag, take a fresh dust
bag and with the arrow (printed on the
material section of the dust bag) pointing
down slide the material down into the
dust bag holder, until it comes in contact
with the bottom of the holder.
HINT: once the bag is inserted ‘puff-out’ the bag as
much as possible to ensure the full capacity of the
bag can be taken up.
When vacuuming fine dust par
ticles,
the
fine dust par
ticles can clog the por
es of
Dust bag holder
Filter holder
HEPA filter

6
the dust bag and the dust bag indicator
will indicate full. If this happens the bag
could appear relatively empty, however
the bag will still need to be changed to
avoid strain on the motor.
NOTE:The bag compartment lid may not close if
the bag is not correctly fitted.
IMPORTANT: DO NOT USE THE
UNIT WITHOUT A DUST BAG
IN PLACE
Replacing filters
Filters must be cleaned from time to time
to remove the fine dust particles that have
been collected.This can be done by shaking
them; however after approximately 5 dustbag
changes the filters should be replaced.
Motor protection filter
The motor protection filter must always
be in place when operating the vacuum
otherwise damage to the motor may occur
To replace the motor protection filter –
Remove the dustbag or pull the bag
forward.The motor protection filter is
located at the rear, right hand side of this
inner chamber. Pull the filter upward to
remove and push downwards to insert.
The HEPA filter must be replaced after
multiple use. Lift the lid of the filter
housing and lift the filter in an upward
position.To replace the filter, place in a
descending position lowering the filter
until it is firmly in place.
Care and Maintenance
Always switch appliance off, then switch
off at the power outlet and then unplug
the appliance prior cleaning or replacing
either filter.
To clean the outside of the unit, wipe the
exterior with a soft, damp cloth. Never
use an abrasive cleaner.
Check and replace both the motor
protection and HEPA dust filters on a
regular basis.
From time to time hair, cotton and other
items may get caught in the brushes of the
floor head.To remove such items, take a
pair of scissors and cut across the cotton,
hair, etc to loosen, then gently pull to
remove.
NOTE: Do not continue to pull if the item/s does
not easily come out as this may permanently
damage the floor tools.

KAMBROOK warrants the purchaser
against defects in workmanship and material,
for a period of 2 years from the date
of purchase (3 months commercial use).
Guarantee and purchase receipt for this
product are to be retained as proof
of purchase and must be presented
if making a claim under the terms of the
KAMBROOK guarantee.
KAMBROOK reserves the right to repair
the appliance within the warranty period.
Warranty does not apply to any defect,
deterioration, loss or injury or damage
occasioned by, or as a result of the misuse
or abuse, negligent handling or if the product
has not been used in accordance with the
instructions. Items subject to wear and
tear, such as filters, bags, accessories and
drive belts, are not covered by this
warranty.The guarantee excludes
breakages and consumables.
This warranty is void if there is evidence
of the product being tampered with by
unauthorised persons.
If the product includes one or a number of
accessories only the defective accessory
or product will be replaced.
In Australia, this KAMBROOK Guarantee
is additional to the conditions and
guarantees which are mandatory as
implied by the Trade Practices Act 1974
and State Territory legislation.
For service, spare parts or product
information in Australia, please call
KAMBROOK on the customer Service
Line (free call) 1800 800 634.
For service, spare parts or product
information in New Zealand,
please call KAMBROOK New Zealand,
Greenmount, Auckland Phone 09 271 3980
Fax 0800 288 513. For spare parts phone
09 271 3980.
If claiming under this guarantee the product
must be returned to freight prepaid.
YOUR PURCHASE RECORD (Please complete)
DATE OF PURCHASE______________________________________________________
MODEL NUMBER ________________________________________________________
SERIAL NUMBER (If applicable) ______________________________________________
PURCHASED FROM ______________________________________________________
Attach a copy of
purchase receipt here.
Please don’t return purchase record
unless you are making a claim
KAMBROOK
2YEAR REPAIR
WARRANTY

Kambrook 461 Plummer Street, Port Melbourne 3207, Australia
Customer Service Line (free call) 1800 800 634 Customer Service Fax 1800 621 337
Kambrook New Zealand, Private Bag 94411, Greenmount, Auckland, New Zealand
Customer Service Line/Spare Parts 09 271 3980 Customer Service Fax 0800 288 513
GG
OO
OO
DD
NN
AA
MM
EE
GG
OO
OO
DD
VV
AA
LL
UU
EE
Due to continual improvement in design or otherwise
,
the product you purchase may differ slightly from the one illustrated in this book. Issue 2/05
/