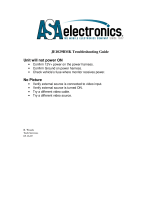
Page is loading ...

INSTALLATION/OWNER’S MANUAL
Multimedia Receiver with Bluetooth, Navigation
featuring a 6.2" Touch Screen Display
AVM82NAV

1
AVM82NAV OPERATION
Copyright Notes
Sirius, XM and all related marks and logos are trademarks of Sirius XM Radio, Inc. All rights reserved.
MicroSD logo is a trademark of SD-3C, LLC.
To see if your receiver has the latest firmware, contact customer service at 1-866-382-5476 to see if your radio needs an
update.
Other trademarks and trade names are those of their respective owners.

2
AVM82NAV OPERATION
Page
Table of Contents
Safety Information/Precautions . . . . . . . . . . . . . . . . . . . . . . . . . . . . . . . . . . . 3
Pr
eparation/Mounting . . . . . . . . . . . . . . . . . . . . . . . . . . . . . . . . . . . . .
4
Wir
ing Diagram . . . . . . . . . . . . . . . . . . . . . . . . . . . . . . . . . .5
Contr
ol Locations. . . . . . . . . . . . . . . . . . . . . . . . . . . . . . . . . . . . . . . .
6
Remote Preparation . . . . . . . . . . . . . . . . . . . . . . . . . .
. . . . . .
7
General Operation . . . . . . . . . . . . . . . . . . . . . . . . . . . . . . . . . 8-9
AM/FM
Tuner Operation . . . . . . . . . . . . . . . . . . . . . . . . . . . . . . . . . . . . . . . . .
10-11
. . . . . . . . . . . . . . . . . . . . . . . . . . . . . . . . . .
12-13
USB
Operation
14-15
Bluetooth Operation . . . . . . . . . . . . . . .
. . . . . . . . . . . . . . . . . . . . . . . . . .
16-19
SiriusXM Satellite Radio Operation
. . . . . . . . . . . . . . . . . . . . . . . . .
20
Navigation Operation
. . . . . . . . . . . . . . . . . . . . . . . . . . . . . . . . . . . . . . . . . . . . . . . . . . . .
21
Tr
oubleshooting . . . . . . . . . . . . . . . . . . . . . . . . . . . . . . . .
. . . . . . . . . . . . . . .
22
Notes
. . . . . . . . . . . . . . . . . . . . . . . . . . . . . . . .
. . . . . . . . . . . . . . .
23
Limited One Year Warranty
. . . . . . . . . . . . . . . . . . . . . . . . . . . . . . . .
. . . . . . . . . . . . . . .
24
Specifications
. . . . . . . . . . . . . . . . . . . . . . . . . . . . . . . .
. . . . . . . . . . . . . . .

3
AVM82NAV OPERATION
Safety Information
Please read all instructions carefully before attempting to install or operate.
Due to its technical nature, it is highly recommended that your Axxera AVM82NAV is installed by a professional
installer or an authorized dealer. This product is only for use in vehicles with 12VDC negative ground only.
To prevent damage or injury:
• Make sure to ground the unit securely to the vehicle chassis ground.
• Do not remove the top or bottom covers of the unit.
• Do not install the unit in a spot exposed to direct sunlight or excessive heat or the possibility of water splashing.
• Do not subject the unit to excessive shock.
• When replacing a fuse, only use a new one with the prescribed rating. Using a fuse with the wrong rating may
cause the unit to malfunction.
• To prevent short circuits when replacing a fuse, disconnect the wiring harness first.
• Use only the provided hardware and wire harness.
• You cannot view video while the vehicle is moving. Find a safe place to park and engage the parking brake.
• If you experience problems during installation, consult your nearest Axxera dealer.
• If the unit malfunctions, reset the unit as described on page 10 first. If the problem still persists, consult your
nearest Axxera dealer or call tech assistance @ 1-866-382-5476.
• To clean the monitor, wipe only with a dry silicone cloth or soft cloth. Do not use a stiff cloth, or volatile solvents
such as paint thinner and alcohol. They can scratch the surface of the panel and/or remove the printing.
• When the temperature of the unit falls (as in winter), the liquid crystal inside the screen will become darker than
usual. Normal brightness will return after using the monitor for a while.
• When extending the ignition, battery or ground cables, make sure to use automotive-grade cables or other cables
with an area of 0.75mm (AWG 18) or more to prevent voltage drops.
• Do not touch the liquid crystal fluid if the LCD is damaged or broken. The liquid crystal fluid may be hazardous to
your health or fatal. If the liquid crystal fluid from the LCD contacts your body or clothing, wash it off with soap
immediately.
FCC Compliance
This device complies with Part 15 of the FCC Rules. Operation is subject to the following two conditions:
(1) this device may not cause harmful interference, and
(2) this device must accept any interference received, including interference that may cause undesired operation.
Warning: Changes or modifications to this unit not expressly approved by the party responsible for compliance
could void the user’s authority to operate the equipment.
Note: This equipment has been tested and found to comply with the limits for a Class B digital device, pursuant to
Part 15 of the FCC Rules. These limits are designed to provide reasonable protection against harmful interference
in a residential installation. This equipment generates, uses and can radiate radio frequency energy and, if not
installed and used in accordance with the instructions, may cause harmful interference to radio communications.
However, there is no guarantee that interference will not occur in a particular installation. If this equipment does
cause harmful interference to radio or television reception, which can be determined by turning the equipment off
and on, the user is encouraged to try to correct the interference by one or more of the following measures:
• Reorient or relocate the receiving antenna.
• Increase the separation between the equipment and receiver.
• Connect the equipment into an outlet on a circuit different from that to which the receiver is connected.
• Consult the dealer or an experienced radio/TV technician for help.

4
AVM82NAV OPERATION
Before You Start
• Disconnect negative battery terminal. Consult a qualified technician for instructions.
• Avoid installing the unit where it would be subject to high temperatures, such as from
direct sunlight, or where it would be subject to dust, dirt or excessive vibration.
Getting Started
• Insert the supplied keys into the slots as shown.
• Connect wiring harness as shown on page 5. Consult a qualified technician if you are
unsure.
• Certain vehicles may require an installation kit and/or wiring harness adapter (sold
separately).
• Reconnect negative battery terminal, and test for correct operation.
• Snap trim ring into place (if required).
Preparation
TRIM PLATE
UNIT
KEY
SLEEVE
TYPICAL FRONT-LOAD DIN MOUNTING METHOD

5
AVM82NAV OPERATION
Wiring Diagram - Inputs/Outputs
Note:
When replacing a fuse, make sure to use the correct type and amperage. Using an incorrect fuse could cause
damage. The unit uses (1) 10 amp blade-type fuse located on the back of the unit.
Wiring Notes:
Rear camera input
A rear view camera (not included) can be used with the Camera input.
SiriusXM
For more information on how to install the SiriusXM Connect Vehicle tuner, consult the installation guide included
with the tuner (SiriusXM connect tuner and subscription sold separately).
SXM IN
SWC-IR
CAMERA A
UDIO INPUT
BT ANTENNA
SiriusXM Tuner Connection
(SiriusXM Connect Tuner and
subscriptions sold separately)
USB CH ARGE
GPS Antenna
PARKING BRAKE (-)

6
AVM82NAV OPERATION
Control Locations
Power
Mode
Play / Pause
Mute
Talk
End Call
Setup
Zone 1
Zone 2
Volume Up
Zoom
Select
Seek Up
Volume Down
Audio
* Key
1
2
3
4
5
6
7
8
9
17
18
19
20
21
22
23
24
Loudness
Number Keys
Root
OSD (On Screen Display)
Local / Random
Tune / Track Down
AS/PS / Repeat
Stereo
Stop
Enter / Direct Tune
Band
SiriusXM Skip Backward
SiriusXM Channel Up
SIriusXM Skip Forward
SiriusXM Channel Down
MicroSD Card (map only)
Microphone
IR Sensor
Reset
Map
1
2
3
Tune/Track Up
Power / Volume / Mute
Tune / Track Down
USB Port
Auxiliary Input
6
7
8
9
4
25
26
10
10
5
11
12
13
14
15
16
27
28
29
30
31

7
AVM82NAV OPERATION
Notes:
• The remote control uses one 3 volt
Lithium CR2025 battery. Remove the
battery if the remote will not be used
for a month or longer.
• Remove and dispose of battery
properly.
• Do not store battery with metallic
objects or materials.
Remove battery insulation tape .
To insert or replace the battery,
remove the battery holder.
Remove the battery from the
battery holder.
Install the new battery.
Make sure to keep the (+) side
up.
Insert the battery holder.
Remote Control Preparation

8
AVM82NAV OPERATION
Press to turn the unit on. Press and hold to turn the unit off.
Press MODE to access available input modes: Radio, SiriusXM,
Navigation, USB, Bluetooth Phone, Bluetooth Music, Rear Camera,
Auxiliary Input, AV In and Settings. Modes of operation are indicated
on the display and/or the monitor. USB device must be connected/
inserted to appear in the mode selection string.
Rotate the volume knob to increase or decrease the volume level.
Momentarily press to silence the audio. Momentarily press again
to return to the previously selected volume. Rotating the volume knob
while the muted will also cancel the mute function.
Connect external audio devices to the 3.5mm auxiliary input on the
front panel.
Connect a USB device to the USB port on the front panel to play MP3
files or JPG photos.
microSD slot is for navigation use only. Use of any other microSD card
may cause damage to the unit.
From any operational mode, press the house icon in the top left corner
to access the Main Menu screen.
Connect an optional audio/video source to the rear auxiliary input[Red/
White/Yellow RCA connectors].
1. Adjust screen brightness or put the monitor into standby mode.
2. Access audio setting such as EQ, Surround Sound Settings and Field
Settings (Balance).
Press the Zone 1 button to turn on/off the sound from this zone
Press the Zone 2 button to turn on/off the sound from this zone.
Power On/Off
Mode
Volume
Mute
Auxiliary Input
USB Port
MicroSD Slot
Main Menu
Using AV Input
Speaker Zone 1
Speaker Zone 2
General Operation
1 2

9
AVM82NAV OPERATION
From the Main Menu screen, press Settings in the bottom right corner to
access the Setup Menu and select from the following categories: General,
Audio, Video and Bluetooth.
General:
• OSD Language - Select English as the language for the on-screen display.
• Wallpaper - Select between three available wallpaper options.
• Panel Adust - Select to calibrate the touch screen.
• Radio Area - Select your current geographic area: Europe, USA, South
America, Russia and Asia.
• Time Setting - Adjust the current time (hours and minutes) and choose
between a 12-hour and 24-hour clock.
• SWC - Select to program steering wheel controls.
• Beep - Select to turn the audible beep On or Off.
• Camera - Select to turn the rear camera On or Off.
• Version- Select to view information about the unit.
• Restore Default- Select to restore the unit to default settings.
Audio:
• Sound Effect - Select to access the three sound effect sub-menus.
- EQ - Select from any preset equalization curve (Classic, Rock, Pop,
Jazz, Beat, Flat) or use custom settings (User).
- Subwoofer - Select the desired Subwoofer frequency and volume.
- Loudness - Turn the Loudness setting On or Off.
- Loudness Cutoff Frequency - Select the desired frequency as a
cutoff for the Loudness setting.
- Camera Audio Level - You can adjust the volume level from the
audio input for camera.
Video:
• Aspect Ratio - Select the desired aspect ratio: 4:3PS, 4:3LB or 16:9.
• Adjust - Select to adjust levels of Brghtness, Contrast, Hue, Saturation
and Sharpness.
• Panel - Select to choose backlight settings: 10s, 20s, 30s or Off.
Bluetooth:
• Auto Connect - Turn auto connect feature On or Off.
• Auto Answer - Turn auto answer feature On or Off.
General Operation
Setup Menu

10
AVM82NAV OPERATION
Select the Radio icon from the Main Menu screen.
Press to return to Main Menu screen.
Displays current mode of operation.
Press momentarily to tune the unit down one step at a time. Press
and hold to tune down by seeking the next strong station.
To store a preset station, tune unit to desired station, then press
and hold the desired preset button to store the current station in
that preset spot. Up to 18 FM and 12 AM stations can be stored in
memory. Momentarily press any preset station to play it instantly.
Press to adjust screen brightness or put the monitor into standby
mode.
Press to select between three FM and two AM bands.
Press to toggle between LOCAL and DX (distance) tuning.
Press to access audio setting such as EQ, Surround Sound Settings
and Field Settings (Balance].
Press to toggle between Stereo and Mono tuning.
Radio Operation
Main Menu
1
Current Mode Indicator
2
Tune Frequency Down
3
Preset Stations
4
Screen
5
Band
6
Local / Distance
7
Audio
8
Stereo / Mono
9
AM/FM Tuner Operation
1
4
3
2
5 6 87 9

11
AVM82NAV OPERATION
Press and hold to automatically store the six strongest stations in the
current band as presets. Press briefly for a preset scan, which will
scan all preset stations and play 10 seconds of each. Press again to
cancel the scan and continue playing the current station.
Press to access the Settings Menu.
Press momentarily to tune the unit up one step at a time. Press and
hold to tune up by seeking the next strong station.
AS/PS
10
Settings
11
Tune Frequency Up
12
AM/FM Tuner Operation
12
1110

12
AVM82NAV OPERATION
USB Operation
MP3
or JPG Operation
Main Menu
1
Current Mode Indicator
2
File Information
3
Screen
4
Tune / Track Down
5
Play / Pause
6
Audio
7
Tune / Track Up
8
To play MP3 files from a USB device, insert device and playback will
begin automatically. To return to USB playback from another mode of
operation, select the corresponding icon from the Main Menu.
• USB Playback - Insert a USB device into the USB slot on the
front of the unit.
Press to return to Main Menu screen.
Displays current mode of operation.
Displays information about the current file.
Press to adjust screen brightness or put the monitor into standby
mode.
Press momentarily to tune the unit down one step at a time. Press
and hold to tune down by seeking the next strong station.
Press to play or pause playback.
Press to access audio setting such as EQ, Surround Sound Settings
and Field Settings (Balance).
Press momentarily to tune the unit up one step at a time. Press and
hold to tune up by seeking the next strong station.
1
2
3
65
84 7

13
AVM82NAV OPERATION
USB Operation
Folder Search
9
Settings
10
Repeat
11
Random
12
Press to access the directory of folders and files. Use the up/down
arrows to scroll through the folder list, then press on the name of the
desired folder to access it. Use the up/down arrows to scroll through
the file list, then press on the name of the desired file to access it.
Press to access the Setting Menu.
Press to turn Repeat feature on.
Press to turn Random feature on.
12
11
9
10

14
AVM82NAV OPERATION
Before you can use a Bluetooth device, it must be paired and
connected. Make sure that Bluetooth is activated on your device
before you begin the pairing process.
The unit broadcasts the pairing signal constantly when no
devices are currently connected. Complete the pairing sequence
from your Bluetooth device. Refer to the owner's manual for
your device for more details. The device name is "Axxera
AVM82NAV". The Bluetooth passcode "0000". The unit can
be in any mode of operation when pairing is performed.
Note: On certain phones, pairing may need to be done more than
once if there are connectivity issues.
Most Bluetooth devices support the auto-connect feature and
will connect automatically if the device is in range when the unit
is powered-on. If your device was previously paired but does not
connect, enter the Bluetooth setup menu and ensure that Auto
Connect is On.
To access the phone, select Bluetooth Phone from the Main
Menu.
Press to return to the Main Menu screen.
Displays current mode of operation.
Use the phone keypad to dial the desired phone number.
Alternately, numbers can be dialed directly from the phone.
Press to display keypad and dial a number.
Press to play music using the Bluetooth connection.
Preparation
Pairing a New Device
Connecting a
Paired Device
Bluetooth Phone
Main Menu
1
Current Mode Indicator
2
Phone Keypad
3
Phone
4
Music
5
Bluetooth Operation
1
2
4
5
3

15
AVM82NAV OPERATION
Screen
6
Audio
7
Settings
8
End Call
9
Make a Call
10
Bluetooth Music
11
Previous File/Track
12
Play / Pause
13
Next File/Track
14
Press to adjust screen brightness or put the monitor into standby
mode.
Press to access audio setting such as EQ, Surround Sound Settings
and Field Settings (Balance).
Press to access the Settings Menu.
Press the end the current call.
Press to connect or answer a call.
To use your Bluetooth connection to play music from your device,
press #5 or select Bluetooth Music from the Main Menu.
Press to go back to the previous file or track.
Press to pause or resume playback.
Press to advance to the next file or track.
Bluetooth Operation
6
8
7
1312 14
9
11
10

16
AVM82NAV OPERATION
Only SiriusXM® Satellite Radio brings you more of what you love
to listen to, all in one place. Get over 140 channels, including
commercial-free music plus the best sports, news, talk, comedy and
entertainment. Welcome to the world of satellite radio. A SiriusXM
Vehicle Tuner and Subscription are required. For more information,
visit www.siriusxm.com.
After installing your SiriusXM Connect Vehicle Tuner and antenna,
power on your radio and select SiriusXM mode. You should be able to
hear the SiriusXM preview channel on Channel 1. After you can hear
the Preview channel, tune to Channel 0 to find the Radio ID of your
tuner. The Radio ID is located on the bottom of the SiriusXM Connect
Vehicle Tuner and its packaging.
Note: SiriusXM Radio ID does not include the letters I, O, S or F.
In the USA, activate online or by calling SiriusXM Listener care:
• Visit www.siriusxm.com/activatenow
• Call SiriusXM Listener Care at 1-866-635-2349
For Canadian Subscriptions, please contact:
• Visit www.siriusxm.ca/activatexm
• Call XM customer Care at 1-877-438-9677
Activation typically takes 10-15 minutes, but may take up to one hour.
It is recommended to leave your vehicle on until the “Subscription
Updated” message appears. Your radio will need to be powered on
and receiving the SiriusXM signal to receive the activation message.
Once activated, you can tune to channels in your subscription plan.
From the Main Menu, touch the SiriusXM icon to access SiriusXM
mode and begin operation.
SiriusXM® Radio
Activating
SiriusXM® Radio
Accessing
SiriusXM® Radio
SiriusXM® Satellite Radio Operation

17
AVM82NAV OPERATION
Main Menu
1
Band
2
Current Mode Indicator
3
Program Information
4
Search
5
Preset Channel List
6
Press to return to the Main Menu screen.
Touch to select a band of preset channels. Three bands are available:
SXM1, SXM2, and SXM3. Each band can store up to six preset
channels. (Preset channels are accessed from the List icon.)
Displays current mode of operation.
Displays program information such as channel name, artist name
and song title.
Press to enter search mode, then press Channel to choose between
the following search options: Channel, Artist, Song Title or Info. Use
the up/down arrows on the left side to navigate categories, and use
the up/down arrows on the right side to navigate channels, artists,
song titles or info.
Press to display a list of preset channels in the current band.
SiriusXM® Satellite Radio Operation
1 3 42 5 6
Category & Channel Search
Preset Channel List

18
AVM82NAV OPERATION
SiriusXM® Satellite Radio Operation
Additional Options
7
Press to display/adjust the options Mode, Tune Scan and Go to Live:
Mode - Press to access and adjust the following options:
• Parental Code - When enabled, the Parental Control feature
requires you to enter a passcode to tune to the locked channels.
Press "Change" to change the parental code. Follow the prompts to
enter the current code, then enter and confirm the new code. The
default code for the unit is "0000".
• Parental Control - The Parental Control feature allows you to limit
access to any SiriusXM channels, including those with mature
content. Select a Parental Control option: Off (turns Parental Control
off) Mature (locks all mature channels) or User (allows the user to
lock specific channels using the Parental Lock Channel feature).
Enter the Parental Code when prompted to confirm the change.
• Parental Lock Channel - Press "SET" to select specific specific
channels to lock. Press "All Clear" to clear all locked channels.
• Channel Skipping - If Parental Control is set to User, press "SET" to
select channels to skip. Press "All Clear" to clear locked channels.
• TuneStart™ - Press "ON" or "OFF" to enable or disable TuneStart.
With TuneStart enabled, when the user tunes to a Smart Favorite
channel that predominantly plays music selections, the unit plays
the current track from the start so the user can enjoy the full track
rather than joining the channel live broadcast (typically somewhere
in the middle of the track).
TuneScan™ - Press TuneScan button to initiate the TuneScan
function. The unit plays samples from the start of multiple buffered
songs from each of the Preset Channels that predominantly play
music selections,. This gives the user easy access to a large sampling
of music content, and they can enjoy hearing a full song when
stopping the scan on a song of interest. Pressing TuneScan again will
stop the TuneScan function and continue playing the song currently
being scanned. Pressing and holding the TuneScan button cancels the
TuneScan and returns the user to the original channel that was tuned
when TuneScan was first initiated.
Go to Live - Press to resume play of live broadcast while in Replay
mode. See page 22 for information on Replay mode.
Additional Options
7

19
AVM82NAV OPERATION
SiriusXM® Satellite Radio Operation
Preset Buttons
8
Direct
9
Channel Down
10
Channel Up
11
On Screen Controls
12
Replay
Tune / Track Down
13
Play / Pause
14
Tune / Track Up
15
Press and hold any preset button (1-6) to save the current station
as a preset. Press the desired preset button to begin playback of the
corresponding preset channel.
Press to display screen for direct channel access. Press the desired
channel number, then press Enter. Playback of desired channel will begin.
Press to go back to the previous channel.
Press to advance to the next channel.
Press to display the following controls: on the bottom of the screen.
Replay is a feature that allows the user
to pause, rewind and replay content from
the active channel. During Replay, the Replay
bar will appear towards the top of the screen
and display replay time in red and time to live
in yellow. The time to live play will also be
displayed as a number above the Replay bar.
Press to enter Replay mode. Once in Replay mode, press to skip to the
previous track or press and hold to fast reverse.
Press to pause and replay contect from the active channel.
Press to skip to the next track. Press and hold to fast forward. Press
repeatedly to "catch up" and resume live play. Selecting Go to Live under
Additional Options will also resume live play.
8
9 11 13 14 1510 12
A CB
A. Press to adjust screen brightness or put
the monitor into standby mode.
B. Press to access audio setting such as EQ,
Surround Sound Settings and Field
Settings (Balance and Fader).
C. Press to access the Settings Menu.
/