Page is loading ...

10 LITER Planetary Mixer
Owner’s Manual
RTK10
GGM GASTRO INTERNATIONAL [email protected] Tel: +49 (0) 2553 7220 0

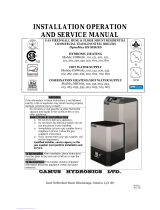
Safety Guard
(for CE model only)
Upper Lid
Control Panel
Column Cover
Bowl Lift Handle
Bowl Support
Locating Pins
SS Bowl
Dough Hook
Wire Whip
Flat Beater
1. OVERVIEW
- Our 10 liter mixer has a high 650 Watts power to allow mixing bread
dough, cake, cream and meringue etc..
- All metal body and counter-top style is designed professionally.
- Its shafts are mounted in ball bearing and 100% steel gears drive.
- Electronic 5-speed control helps you to enjoy non-stop shifting speed.
- Planetary mixing action and digital timer ensures perfect results.
- Simple hand lift is good for changing bowl and attachments.
- When overloading, power off automatically to protect motor and electrical.
- Safety guard is for CE model. Smoothly rotate open with a micro switch to
shut off power immediately to protect operator.
GGM GASTRO INTERNATIONAL [email protected] Tel: +49 (0) 2553 7220 0

1-1 SAFETY PRECAUTIONS
When using this machine, always make sure the following conditions or operations are in effect.
Failure to this will may be the cause of accidents.
z Keep hand & clothing away from bowl and attachments when in operation.
z Keep rigid objects away from bowl and attachments when in operation.
z To protect against risk of electrical shock, do not immerse mixer in water or other liquid.
z Use the machine only with the electrical service specified on its nameplate.
z Disconnect the machine from its power source before carrying out any maintenance.
z Do not disable or remove the safety mechanisms included with the machine.
z Do not leave the machine in operation unattended.
z Observe maintenance and safety inspection schedules.
z Maximum flour capacity 800 gram and water percentage must higher than 65%.
1-2 SPECIFICATIONS
Motor: 650 Watts powerful, ball bearing, ventilated within mixer enclosure.
Electrical: □100-120V, single phase
□208-240V, single phase
Switch & Timer: All in one digital control panel
Cord and Plug: 6 feet flexible cord and plug (for 110 V model only), respectively consist of 3 wires which one wire is
connected for grounding, other wires are connected to power supply.
Transmission: The gears are constantly meshed in a special lubricant assuring long life; transmission gears are of
heat-treated alloy steel, High accurate construction. All bearings are ball bearings.
Speeds: The mixer has five positive speeds as 100 RPM – 500 RPM
Safety Guard: Safety guard is CE MODEL. Smoothly rotate open with a micro switch to shut off power immediately to
protect operator.
Dimension:
L x W x H
340 x 485 x 545 mm
Net Weight: 20 Kg
Standard
Attachment:
Stainless steel bowl: 1pc
Mixing hook: 1 pc
Flat beater: 1 pc
Whipping ball: 1 pc
GGM GASTRO INTERNATIONAL [email protected] Tel: +49 (0) 2553 7220 0

2. INSTALLATION
BEFORE INSTALL YOUR MIXER, CHECK TO BE SURE THAT YOUR ELECTRICAL SERVICE
SPECIFICATIONS MATCH THOSE OF YOUR MIXER AS PRINTED ON THE MIXER’S
NAMEPLATE.
2-1 LOCATION
Place the mixer in its operating location. Bench should be placed on a
sturdy level surface. There should be adequate space around the mixer for
the user to operate the control and install and remove bowls.
2-2 ELECTRICAL CONNECTIONS (Cord Connected Mixers)
WARNING:
THIS SUPPLY CORD ON THIS MACHINE IS PROVIDED WITH A
THREE-PRONG GROUNDING PLUG. IT IS IMPERATIVE THAT THE
OUTLET TO WHICH THIS PLUG IS CONNECTED BE PROPERLY
GROUNDED. IF THE RECEPTACLE IS NOT THE PROPER GROUNDING
TYPE, AN ELECTRICIAN SHOULD BE CONTACTED.
2-3 INSTALLATION DIAGRAM (MM)
GGM GASTRO INTERNATIONAL [email protected] Tel: +49 (0) 2553 7220 0

3. OPERATION
Note:
New mixers bowls and agitators (beaters, whip, and dough hook) should be thoroughly washed with
hot water and mild soap solution, rinsed with either a mild soda or vinegar solution, and thoroughly
rinsed with clean water BEFORE being put into service. This cleaning procedure should also be
followed for bowls and agitators before whipping egg whites with or whole eggs.
3-1 CONTROLS
All models are furnished with a digital Timer and electronic 5-speed
ON/OFF: To start or stop
operation
Timer: digital set by 1-30
minutes or non-timer service.
Speed:
Speed 1 – For slow beating,
mashing and kneading yeast
dough.
Speed 2 – For mixing cookie and cake batters.
Speed 3 – For beating, creaming and medium fast whipping.
Speed 4 – For whipping heavy cream, egg whites and boiled frostings.
Speed 5 – For whipping small amounts of heavy cream and egg whites.
3-2 HOW TO INSTALL AN AGITATOR
To install an agitator, the bowl must be installed and fully lowered. Place the agitator in the bowl, push
it up on the agitator shaft, and turn it clockwise to seat the shaft pin in the slot of the agitator shank.
3-4 HOW TO INSTALL A BOWL
The bowl must be installed before the agitator. To install the bowl, fully lower the bowl support. Position
the bowl so the alignment bracket on the back of the bowl is in the bowl retainer and the locating pins
on the front of the bowl support fit in the holes on the sides of the bowl.
ON/ OFF
SPEED
5
1
2
3
4
TI MER
GGM GASTRO INTERNATIONAL [email protected] Tel: +49 (0) 2553 7220 0

3-5 ATTACHMENT USE GUIDE
DOUGH ARM:
It is frequently used for heavy bread dough, and preferable to be use at 1 speed.
BEATER:
It is commonly used for thin batters, cake and mashing potatoes, like stuffing and
preferable to be used at 2-3 speed.
WHIP:
It is best for whipping cream and beating eggs and preferable to be used at 4-5 speed.
4. MIXING CAPACITY:
PRODUCT TOOL 10 LITER BOWL
Egg Whites Whip 1000 g
Mashed Potatoes Beater 2000 g
Mayonnaise (Qts. Oil) Beater 4 liter
Meringue (Qts. Water) Whip 1.5 liter
Waffle/Pan cake Batter Beater 3 liter
Whipped Cream Whip 4 liter
Sheet Cake Batter Beater 2000 g
Layer Cake Beater 2500 g.
Pound Cake Beater 2500 g
Sugar Cookie Beater 2500 g
Sponge Cake Whip 1000 g
Dough, pie Beater 1500 g
Bread or Roll Dough
(Light/ Medium, 60%
water)
Hook
1
speed
Water
500 g.
Flour
800 g
GGM GASTRO INTERNATIONAL [email protected] Tel: +49 (0) 2553 7220 0

5. MAINTENANCE
NOTE : ALL MAINTENANCE WORK SHOULD BE DONE ONLY AFTER UNIT HAS
BEEN DISCONNECTED FROM ELECTRICAL POWER AND GROUNDING.
z Never use a metal or stiff brush to clean the mixer. Never clean the mixer with a water hose or any
fluid pressure.
z The mixer should be thoroughly cleaned after using.
z Bowls and agitators should be removed from the mixer and cleaned.
z The transmission case and planetary gears are filled special grease that will last for several years.
When grease is needed for replacement, it should be ordered from our authorized service
representative.
z If the attachment strikes bowl, stop the mixer. The original seller will help you to make adjustment.
If your mixer should malfunction or fail to operate, check the following.
z Is the mixer plugged in?
z Is the fuse in the circuit to the mixer in working order? If you have a circuit breaker box, be sure the
circuit is closed.
z If the problem is not due to one of the above items, please contact your original seller.
GGM GASTRO INTERNATIONAL [email protected] Tel: +49 (0) 2553 7220 0

10 LITER Planetary Mixer
DIAGRAM
GGM GASTRO INTERNATIONAL [email protected] Tel: +49 (0) 2553 7220 0

RTK10 MIXER PART LIST
RTK10 Parts No. Parts Name Q'ts
1 GM10-01-001 To
p
Cover 1
2 GM10-01-004 Retainer 1
3 GM10-01-005 Mixer Head and Column 1
4 GM10-02-001 Center Shaf
t
1
5 GM10-02-003 Gear-Center Shaft 1
6 GM10-02-010 S
p
acer 1
7 GM10-04-001 Worm Gear Shaft 1
8 GM10-04-002 Worm Gear 1
9 GM10-04-003 Gear-Worm Gear Shaft 1
10 GM10-05-001 Motor
(
100-120V
)
OR Motor
(
200-240V
)
1
11 GM10-07-001 Control Board 1
12 GM10-07-002 IC Board
(
100-120V
)
OR IC Board
(
200-240V
)
1
13 GM10-08-001 Planetar
y
Gear 1
14 GM10-08-002 Internal Gear 1
15 GM10-08-003 Head Rin
g(
for HL-11007 model onl
y)
1
16 GM10-08-004 Planetar
y
Head 1
17 GM10-08-005 Planetar
y
Shaft 1
18 GM10-08-007 Ta
p
ered Pin 1
19 GM10-09-002 Rear Plate of Column 1
20 GM10-09-003
Ap
ron 1
21 GM10-09-004 Base 1
22 GM10-10-001 Bowl Su
pp
or
t
1
23 GM10-10-002 Bowl Pin 2
24 GM10-11-001 Liftin
g
Bar 1
25 PM10
T
-11-002 Fixed An
g
le Plate 1
26 GM10-11-003 Liftin
g
Bracket 1
27 GM10-11-004 Liftin
g
Handle 1
28 BM-11-005 Com
p
ression S
p
rin
g
1
29 GM10-12-001 10 Liter Bowl 1
30 GM10-12-002 Flat Beater 1
31 GM10-12-003 S
p
iral Hook 1
32 GM10-12-004 Wire Whi
p
1
33 11012-04-008 Cover Plu
g
2
34 GM10-01-002 Cover Fixed Tube 1
35 BR-6201Z Ball Bearin
g
1
36 BR-6203Z Ball Bearin
g
1
37 BR-6000Z Ball Bearin
g
2
38 BR-6201Z Ball Bearin
g
1
39 BR-6002Z Ball Bearin
g
1
40 OR-G40 O-Rin
g
1
41 OS-TC153007 Oil Seal 1
42 OS-TC203007 Oil Seal 1
43 OS-TC173207 Oil Seal 1
44 SPP-5*28 S
p
rin
g
Pin 2
45 SPP-3*16 S
p
rin
g
Pin 2
GGM GASTRO INTERNATIONAL [email protected] Tel: +49 (0) 2553 7220 0

46 CR-S16 C-Rin
g
1
47 CR-S14 C-Rin
g
1
48 CR-S12 C-Rin
g
1
49 CR-R32 C-Rin
g
1
50 CR-R26 C-Rin
g
1
51 KRR-4*4*10 Ke
y
3
52 KRR-4*4*15 Ke
y
1
53 KR-4*4*25 Ke
y
1
54 PP-0001 Plastic Plu
g
3/4" 2
55 PP-0002 Plastic Plu
g
53mm 1
56 Cable Connector 1
57 Cable 1
58 Plastic Tube 1
59 S-5/16"*1/2" Bolt 4
60 S-3/16"*1/2" Bolt 5
61 S-S1/4"*1/2" Screw 3
62 S-S1/4"*5/8" Screw 3
63 S-S1/4"*3/8" Screw 2
64 S-S1/4"*1" Screw 1
65 S+R5/32"*1/4" Mach. Screw 1
66 S+F1/8"*1/4" Mach. Screw 4
67 S+R3/16"*1/4" Mach. Screw 6
68 S+F3/16"*1/4" Mach. Screw 2
69 S+F3/16"*2" Mach. Screw 1
70 S-S5/16"*1/4" Screw 2
71 NU
T
-1/4*20NC Nut 3
72 NU
T
-5/16*18NC Nut 4
73 NU
T
-3/8*16NC Nut 1
74 W-3/8 Flat Washer 1
75 W-5/16 Flat Washer 2
76 W-5/16*23 Flat Washer 2
77 SW-1/4 S
p
rin
g
Washer 4
78 SW-5/16 S
p
rin
g
Washer 6
79 GM10-01-007 Sticker of Control Panel 1
80 GM10-13-001 Back Cover
(
for CE model onl
y)
1
81 GM10-13-002 Front Cover
(
for CE model onl
y)
1
82 GM10-13-003 Seat of Micro Switch
(
for CE model onl
y)
1
83 GM10-13-004 Fixed Rin
g
1
84 S+R5/32"*1/4" Mach. Screw 4
85 S-S3/16"*3/16" Screw 2
86 S+R3/16"*1/4" Mach. Screw 4
87 Micro Swich 1
88 11012-10-006 Bowl Retainer 2
89 Bolt 2
90 Flat Washer 2
91 Carbon of Motor 2
92 Carbon Cover 2
GGM GASTRO INTERNATIONAL [email protected] Tel: +49 (0) 2553 7220 0
/