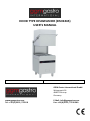
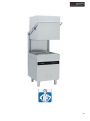
GGM Gastro DSOZ445N Owner's manual
- Category
- Dishwashers
- Type
- Owner's manual


2
TABLE OF CONTENTS
TOPICS
PAGE
1-INTRODUCTION
3
2-TECHNICAL DATA
4
3-WARNING SIGNS AND SAFETY DETAILS
6
4-TRANSPORTING AND MOVING
7
5-OPERATION OF THE MACHINE
12
6-CLEAN-UP AND MAINTENANCE
19
7-ELECTRICAL CIRCUIT DIAGRAM
20
8-TROUBLESHOOTING
21

3
1-INTRODUCTION
Dear User,
Thank you for purchasing our device and for your reliance upon our company. Our devices have been used within our
customers kitchen, your kitchen in 100 countries. Our devices are produced in compliance with international
standards. Important notice: Please read or ensure that the users read this user’s manual in order to achieve the
desired performance in line with your expectations and to use your device for long years. Please take the warnings
mentioned above into consideration before calling for service...
Please read and ensure that your operation personnel also reads this user’s manual carefully before installing
and using the device. If the device is operated without reading the user’s manual, the device will not be
covered by the guarantee.
The manual containing information about installation, usage and maintenance of our product you purchased
should be read carefully. Please ensure that power supply connections to the device are already installed by
qualified personnel according to local legislation, before our authorized service personnel arrives for the
installation of the device.
If you are confused or you don’t have enough information please get in touch with authorized service by
phone.
Please keep in mind that, if the service personnel is delayed at your site, related expenses and delay costs will
be charged to you on hourly basis.
We hope that you will get the best performance from our product…

4
2-TECHNICAL DATA:
MODEL
DSOZ445
Code
071D.11014G.BB
Total Rating
400 V ~ 3NPE/50 Hz
Total Rating(kW)
9,66
Washing Capacity (Plate/Hour)
1108
Washing Capacity (Basket/Hour)
69/35/27/23/18
Washing/Boiler Tank Capacity
19/7
Washing Program Number
4
Program Times(sn.)
60/90/120/150
Washing Water Temp. (°C)
55-60
Rinsing Water Temp. (°C) max.
80-85
Water Inlet Connection
3/4 “
Water Inlet Pressure (Bar)/Temp.
2-4 Bar / 50 °C
Heat Power (Washing/Rinsing)
2 / 9 kW
Dirty Water Discharge Connection
1 1/4” (Ø 42 mm)
Gross Weight
110 (±5) kg
Dimensions (WxDxH) (mm.)
700x790x1420(1860)
Protection Class
IPX5
Rack Dimension (cm.)
50x50
Loading Height
380 mm
Inclination
6°
Washing Pump Power (kW)
0.66
Rinsing Pump Power (kW)
-
Detergent Pump
+
Rinse Aid Pump
+
Rinsing Pump
-
Drain Pump
+
Electrical Connection Cable / Flexible Water Supply and Drain Hose
+
Stainless Steel Washing Arms
OPTIONAL

5
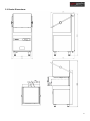
2.1 Device Dimensions:

6
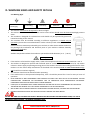
3- WARNING SIGNS AND SAFETY DETAILS
3.1 Warning Signs
The machine should never be exposed to direct sunlight.
The machine should never be left in water and its outer surface should never be cleaned with high pressure
water.
This machine is designed for industrial use and should only be operated by personnel
trained according to this manual.
This machine must be installed according to effective regulations. It should only be
operated in places that are ventilated well or under a chimney hood. Otherwise, hot water
steam and excess moisture produced by your machine or other devices within the kitchen
may damage the mechanical and electrical parts of your machine. Ambient humidity
should not exceed 65%.
Ambient temperature where the machine is operated should be between (+5 °C / +40 °C).
If the machine is fed with hot supply water, water inlet temperature should not exceed maximum + 50 °C.
The machine is designed to operate with softened water at a French water hardness level of (0 -10). Excess
calcium in water supply may damage moving parts of the machine and decrease washing performance of the
machine. For this reason daily maintenance as described in the section (CLEAN-UP AND MAINTENANCE Page
-18) should be carried out regularly.
The machine should not be dislocated when operating.
If the machine has to be operated subsequently, then it should be paused for 1 hour for every 4 hours of
operation.
OUR COMPANY IS NOT RESPONSIBLE FOR POSSIBLE FAILURES THAT MAY OCCUR AT DETERGENT SYSTEM
CONNECTIONS. THEREFORE WE RECCOMENT YOU TO COOPERATE WITH PROFESSIONAL DETERGENT
COMPANIES EMPLOYING ELIGIBLE INSTALLATION PERSONEL.
LOW QUALITY DETERGENT MAY HARM OPERATING SYSTEM AND PLASTIC COMPONENTS OF THE DEVICE.
THEREFORE WE REMIND YOU TO CHOOSE APPROPRIATE TYPE OF DETEREGENT.
WE DO NOT USE CLEANING CHEMICALS CONTAINING LAUNDRY WATER, CHLORIDE OR HYPOCLORURE.
CLEANING MATERIALS MUST NOT BE USED AS STEEL SPONGE AND WIRE BRUSH.
WE RECCOMEND YOU TO TREAT THE SUPPLY WATER IN A PURIFICATION SYSTEM BEFORE USING, IF IT HAS A
HARDNESS HIGHER THAN 0 - 10 FRENCH HARDNESS LEVEL.
Electrical Connection: 400 V ~ 3NPE/50 Hz
Power Network
Grounging
Grounding
Electricity
Attention
Important
+5 °C / +40 °C

7
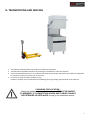
4- TRANSPORTING AND MOVING
The machine should be placed vertically on a palette by manpower.
Transportation should be carried out by inserting the forklift forks under the machine.
If the transported distance is far, the machine should be moved slowly and fixed to the palette or supported
by another personnel to prevent jolt, if necessary.
Do not hit or drop the machine when moving.
Producer company is not responsible for the damage occurring during transportation of the machine.
CHANGING THE LOCATION ;
Machines installed by an authorized service CANNOT BE MOVED
ELSEWHERE, ITS CONNECTION HOSES AND CABLES CANNOT
BE EXTENDED OR REPLACED except by an authorized service.

8
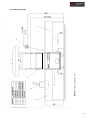
4.1 Installation Diagram
NOTE: Dimensions are given in mm.
700

9
4.3 Electrical Connections:
All electrical connections must be made by authorized service personnel in accordance with local and national
standards and directives.
All products must be connected to the residual current device of 30mA.
Use the power socket and an appropriate connector to connect the appliance. Power socket is on the side.
This connection is additional to existing grounding.
Before connection, make sure that rated voltage on the name plate matches the mains voltage. Furthermore,
also the fuse rating should match product specifications.
If power cable is damaged, please obtain a replacement from Öztiryakiler or authorized service.
Electrical ratings are marked on the product’s name plate.
4.4. Water Connection:
A 3/4” water inlet hose is provided with the appliance. Use this hose for water connection and check water
tightness on connections and the hose.
When installing the appliance, use the new hose provided. Avoid using old damaged hoses.
Washing performance of the product depends on external conditions such as water inlet temperature,
pressure, hardness and chemicals used (detergent, polisher). To increase the service life and washing
performance of the appliance, supply water should have proper hardness. Otherwise, use a water softening
device.
Caution! Any damage resulting from the use of hard water will not be the manufacturer’s or dealer’s liability, and voids
the product warranty.
4.5. Limits in Water Connection:
Water inlet temperature: 4-50°C.
Inlet pressure of flowing water: A rinsing pump is needed if pressure is 0-2 bars. A pressure of 2-4 bars is
appropriate. If pressure exceeds 4 bars, adjust the pressure using the pressure regulator.
If these conditions cannot be satisfied, appliance’s washing performance would decline.
4.6. Drain Connection:
4.6.1. Models Without a Drain Pump:
In models without a drain pump, waste water is transferred to the drain vent by gravity. Drain hose should run
to the drain vent with a downward slope. Therefore, drain vent height should be max. 100 mm. Never reduce
the diameter of the drain hose.
Allow a adequately long drain hose so that the appliance can safely be moved during servicing. Drain vent
diameter should be Ø42 mm (1 1/4ʺ) and drain should be below the hose outlet level. Make sure that the
hose-drain vent connection is watertight.

10
4.6.2. Models With a Drain Pump:
If drain vent is below the appliance’s drain outlet, attach the hose to the drain vent with a downward slope.
Otherwise, drain vent height should be 60 cm max. The Ø28 mm (3/4ʺ) drain vent should not be below the
appliance base.
Please call the authorized service or dealer for drain problems.
4.7. Loading Detergents and Rinse Aid:
Chemical pumps are located on the back side of the front panel (Optional). Disconnect the appliance before removing
any panel. A plastic hose is available for each chemical pump. There are hose outlets on the back side of the appliance.
Attach the weights provided with the appliance to the ends of the chemical hose. Then, position the weight at the
hose end below the chemical drum. Always make sure to attach the detergent hose and the rinse aid hose to the right
container. (Rinse aid hose to the rinse aid drum, detergent hose to the detergent drum)
Attention: Only use chemicals suitable for industrial washing or glass washing. Rinse aid should be suitable for
temperatures below 40°C as well.
4.7.1. Detergent & Rinse Aid Amount:
Detergent pump dosage is set during production, and rinse aid pump is automatically set. However, depending on
actual water hardness at the place of installation, chemical dosage may be re-set on the detergent pump.
Chemical pumps are located right on the back of the front bottom panel (Optional). Turning the setting knob clockwise
and counter clockwise increases and decreases the chemical dose respectively.
Note: At start-up, bleed excess air in the hoses.
4.8 Washing and Rinsing Water Temperatures
Water temperatures can be adjusted. During production, our appliance is set to the following temperature values. The
temperature should not be set higher than these temperatures.
Models:
ALL
Rinsing Water Temp.(Boiler)
80-85°C
Washing Water Temp.(Tank)
55-60°C

11
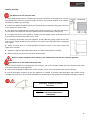
Machine Assembly
4.9. Measures on the Customer Side:
1- Call a qualified electrician to complete the electrical connection of the appliance. A V-type
automated fuse located at a minimum height of 120 cm, and a 30 mA residual current device
should be installed in the assembly.
2- Ground the appliance with the mains ground lead securely attached to the ground terminal
of the appliance’s power cable.
3- The appliance is delivered with a power cable (5x2.5 mm NYAF), an inlet hose with a 3/4”
tap connector and a Ø42 mm drain hose (Ø28 mm for the models with a drain pump).
4- To supply clean water to the appliance, install a new 1/2”piping system on the rear wall at a min. height of 200 mm
from the floor and terminate it with a 3/4” valve.
5- To discharge wastewater from the appliance, install a Ø50 PVC piping system on the rear
wall at a max. height of 100 mm from the floor. Use a floor trap if the drain outlet is equipped
with a grate.
6- Make sure that there is a hood-equipped ventilation system in the room where the
appliance is installed.
7- Appliance’s legs are adjustable. Adjust them to create a level plane on the floor.
8- Make sure that the room is free of steam and moisture.
Unless customer completes these measures, the authorized service will not install the appliance.
4.10. Measures on the Authorized Service Side:
1- After initial measures are completed by the customer, the service member called will install electrical and water
connections and start up the appliance.
2- Never start the appliance before the service member arrives, otherwise product warranty will be void.
3- Call the detergent company on the day appliance is installed, if possible. Have detergent and polisher pumps
installed. Our company or service will not be liable for any damage on the appliance caused by the detergent company.
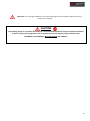
“Grounding” screw for an external
connection
CAUTION! : NEVER START THE EQUIPMENT
BEFORE GROUND CONNECTION IS
COMPLETED

12
5- OPERATION OF THE MACHINE
5.1 Getting to know our device: To understand the information in the user manual correctly, the main parts of the
machine should be known, please have the information by examining the picture below.
This product is used in tourism facilities, industrial kitchens, work sites, patisseries, catering companies for washing
dishes. Only preparation equipment, dishes (plates, forks, spoons, knives, glasses, service trays etc.), service utensils
(ladles, skimmers, spatulas, tongs, etc.) should be washed in the machine.
NOTE: Do not use for purposes other than mentioned above. Machine should be operated by a qualified personnel
informed about safety terms and technical specifications and who has read the instruction manual.
To ensure that the user is using the machine correctly after installation, the following items should be shown to
the user;
It should be shown how to cut off the electricity and water supply in case of emergency.
Turning on the machine
Working with machine
Water discharge process
Turning off the machine
HANDLE
WASHING/RINSING ARMS
WASHING TANK
CONTROL PANEL
RACK
WATER OUTLET PIPE
ADJUSTABLE FEET
FRONT COVER
FILTER
RACK HOUSING

13
5.2 Operation:
5.3 Description of the Appliance
Unlike domestic appliances, industrial dish and glass washers are designed for almost uninterrupted operation.
5.4 Control Panel
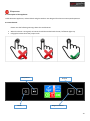
Please note the following warnings about the touchbuttons
When the device is energized, no buttons should be touched until the On / Off button lights up.
Infographic below shows the proper touch.
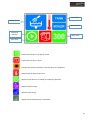
Keylock
Program selector
Start/Pause
Power

14
Visible when the door is proplerly closed
Visible when the door is open.
Indicates the number of washes in the dirt timer are completed.
Visible when the water level is low.
Appears when device is in standby and ready for operation.
Appears while washing.
Appears while rinsing.
Appears when the washcycle is completed
Washprogram
Tank Status
Door Alert
Operation
Indicator
Boiler Status
Wash timer

15
5.5. Switching the Device on and off:
Press the “power” button to turn on/off the device. When the device is switched off, a led indicator
will turn on on the button & it will turn off then te device is working. After the water intake process completed; first
Boiler, then the tank heater will activate. Both heat indicators will wink until reaching the proper temperature. When
reached, status icons turn completely on & red.
5.6. Starting a Wash Cycle
When the device is switched on & is ready to start, press “Program Selector” to select the desired
program. When the device is ready to start wash cycle, led on the “start/pause” button will wink. When you
press & hold the “start/pause” button, washing will start. “Start/pause” button is not active only for
one cycle. After you open & close the door, new wash cycle will start automatically. If you want to pause the
washing operation, you need to press “start/pause” button again. Please note that, this button doesn’t stop
the heating operations. The device still will be ready to wash & will start instantly when pressed “start/pause”
again.
Program Indicators
60 seconds 90 seconds
120 seconds 1 150 seconds
5.7. Draining:
When the device is on, press “Program Selector” button and select “drain” icon. Then press
and hold “start/pause” button to start draining process. After starting the process “remove stopper”
icon will appear on the screen. When you see this icon; you need to open the door, remove the stopper & close the
door in order to start draining process. Draining will take 180 seconds and when completed the device will turn off
automatically.

16
5.8 Self Cleaning:
When the device is on, press “Program Selector” button and select “self clean” icon. Then
press and hold “start/pause” button to start self cleaning process. “Remove stopper” icon will
appear on the screen. When you see this icon; you need to open the door, remove the stopper & close the door in
order to start self cleaning process. Self cleaning will take 120 seconds and “add stopper” icon will appear on
the screen. When you see this icon, you need to open the door, place the stopper properly & close the door. Device
will intake fresh water for 60 seconds. Next “remove stopper” button will appear again for the final
drainage. Repeat the stopper removal steps again. Final drainage will take 120 seconds and when completed the
device will turn off automatically.
After washing the set pollution counter value in the parameters menu, “dirty device” warning will
appear on the screen. This warning has no effect on the operation of the device, but it is necessary to carry out a self
cleaning in order to remove the warning from the display.
5.9 Key lock:
Press and hold “keylock” to lock & unlock the device. The LED on the button is on when the key lock is
activated.
5.10 Setting the Device Parameters:
Access to the parameters menu:
Please make sure the device is switched off and the key lock is deactivated.
Then please press related buttons in the following order;
Setting the parameters:
When you Access the menu, press “program selector” to switch between parameters. Below you can
find the table for the parameters. When you are on the selected parameter, press “power” to
increase & “start/pause” to decrease value. Then press “key lock” to set the new value of the
parameter. When settings are completed, press and hold “program selector” to exit.

17
5.9 Deactivating the Appliance:
If you need to remove or deactivate the appliance for any reason, appropriate local or national regulations should be
observed. Öztiryakiler recommends the following procedures.
Remove chemical hoses from their drums carefully, then close the container lids to avoid chemical spillage.
Refer to safety notes for the chemical drums to prevent any damage due to spillage.
Make sure that water is fully drained off the appliance, and then remove the drain hose from the drain vent.
Wipe and dry moist areas of the appliance after draining.
Turn off the mains power supply.
If the appliance is plugged to the plug socket, disconnect it.
If cable terminals are connected directly to the electrical panel, call a qualified electrician to carry out the
disconnection as per local and national wiring regulations.
After disconnection, make sure that the voltage / ground wire is removed from its housing on the rear part of
the appliance.
Turn off water supply to the appliance and isolate the water inlet hose. Before proceeding with the next step,
dry out any leak.
Unscrew the bottom panel and remove it.
Remove the boiler discharge plug and drain water into a vessel. The vessel should have a 6-litre capacity.
Attention:
If draining is to be carried out immediately after the operation, discharge water from the boiler may be 85°C.
Then, re-place and tighten the plug.
Re-place the front panel and make sure that all cables and hoses are securely fastened to the device to avoid
any risk. It is now safe to move the appliance.
5.10. Recycling:
If you intend to recycle or dispose of the appliance, make sure that local and national regulations are observed.
NOTE:
1- Hardness of water supplied to the appliance should be softened to 0-10 °fH.
2- Extremely hard water both shortens the service life of the appliance and drops its washing performance. Calcified
parts are outside the warranty coverage.
3- In case of continuous operation, apply a 1-hour break every 4 hours of operation.
4- Never move the appliance when running.
CAUTION! Take utmost care to install and operate the appliance in strict accordance with this manual. In case of a
mechanical failure, please first refer to the “Troubleshooting” section in this manual, and then call our call centre to
request for authorized service if necessary. Always avoid unauthorized intervention in the appliance.

18
5.11. Use of Detergents and Rinse Aid in the Dishwasher
1. Remove the plug on the rear part of the appliance and connect the hose from the detergent dosing unit to the wash
tank using a proper coupling.
2. Dirt level of dishes and detergent characteristics should be considered to assess water hardness and consumption
in the dishwasher. User should never modify the detergent dosing rate set by authorized members of the detergent
company.
3. If detergent dose supplied to the appliance is increased through unauthorized intervention, excess foam would be
produced, causing the dishes look dirty and detergent-contaminated after washing, and also excessive detergent
consumption would occur. On the contrary, reducing the detergent dose would cause inefficient washing, resulting in
non-cleaned dishes.
4. Rinse Aid pump is automatically set according to rinse water consumption and water hardness. Thanks to this
automatic setting, excessive rinse aid feed and excessive foam production in the washing system is avoided and hence
poor rinsing performance and dirty-looking dishes contaminated by hazardous chemical agents are prevented.
5. Another harmful effect of excess rinse aid in the rinse water is the occurrence of a higher acidic effect resulting in
abrasion of the rinsing line.
6. The detergent and rinse aid used should be health-friendly.
7. It is recommended to use non-effervescent detergents and rinse aids designed for dishwashers.

19
6- CLEAN-UP AND MAINTENANCE
CAUTION!
Never use cleaning chemicals containing bleaching agents, chlorine or hypochloride.
Never use steel sponge or wire brush for cleaning purposes.
Do not use pressurized water to clean inner and outer surfaces of the appliance.
Before cleaning the interior of the dishwasher, first carefully remove from the boiler any parts that may cause
injury during cleaning, such as sharp glass pieces.
Wipe clean the interior of the dishwasher. Once wastes and particles are removed, re-place the
washing/rinsing arms and filters.
Clean the outer surface of the dishwasher with a damp cloth. Never use wet cloth for cleaning.
After drying, clean with a stainless steel cleaning article.
6.1 Periodical Maintenance and Clean-up
Daily maintenance should be carried out by people informed about
the safety instructions as following, after disconnecting power supply
and water connections.
6.1.1 Daily Maintenance:
Daily maintenance should be carried by the user. In order to clean up
the machine within the day following should be carried out
periodically after the washing operation:
1. Wash and rinse arms should be disconnected and the scraps
remaining in those arms should be removed away using
pressure water, brush, fine wire etc. and reinstalled back to
their places.
2. Scraps remaining in the washing tank should be removed and
cleaned up. (Do not carry out washing operation without
installing scrap filters)
3. If the period between two washing operations exceeds “5
Hours“ water outlet pipe should be disconnected and all of the
water should be drained out fully.
4. Suction filter should be disconnected and cleaned up with
plenty of water.
5. Inside of the tank should be cleaned up with a sponge or cloth
and plenty of water.
6. After cleaning operation is finished suction filter, water
outlet pipe, scrap filters and washing and rinsing arms should
be reinstalled.
7. Scale formed on the carriers of the device after certain period
of use, must be wiped away. If it is not cleaned up for a long
time, scale formed on the carriers of the device, hinder the free
movement of the hood.
6.1.2 Periodical Maintenance:
Periodic maintenance should be carried out by the user at least once
in a month, after the cleanup and maintenance that must be
conducted after each washing operation is completed. This should be
done when the machine is ready for operation and before the dishes
are set up in the machine. After ½ kg’s of decalcination substance is
added to the washing tank, the machine is operated for ½ hours so
that it cleans itself up. Afterwards the water within the machine is
disposed and then refilled with fresh water. This time the machine is
operated without any additive substance only with water for ½ hours
and after the water inside is disposed, the machine will be ready for
operation.
If the device is not used for long period of time, you must drain the
water left inside the boiler. For this purpose, let the water drain out
after opening the tap (boiler tank tap) at the lower part of the devices
body. Other wise, water staying inside too long, may harm the
resistances.
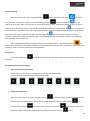
Rinsing Arm Washing Arm

20
7-ELECTRICAL CIRCUIT DIAGRAM
Page is loading ...
Page is loading ...
Page is loading ...
Page is loading ...
Page is loading ...
-
 1
1
-
 2
2
-
 3
3
-
 4
4
-
 5
5
-
 6
6
-
 7
7
-
 8
8
-
 9
9
-
 10
10
-
 11
11
-
 12
12
-
 13
13
-
 14
14
-
 15
15
-
 16
16
-
 17
17
-
 18
18
-
 19
19
-
 20
20
-
 21
21
-
 22
22
-
 23
23
-
 24
24
-
 25
25


GGM Gastro DSOZ445N Owner's manual
- Category
- Dishwashers
- Type
- Owner's manual
Ask a question and I''ll find the answer in the document
Finding information in a document is now easier with AI
Related papers
Other documents
-
Meiko FV 60.2 Operating Instructions Manual
-
-
Meiko EcoStar 545D Operating instructions
-
-
 Evocare EcoStar 530 F-M Operating Instructions Manual
-
 Evocare EcoStar 530 F-M Operating Instructions Manual
-
-
Buffalo DW319 User manual
-
Bartscher 109244 Operating instructions
-

