Bartscher 109244 Operating instructions
- Category
- Dishwashers
- Type
- Operating instructions

COD.: 4750_U
Ed. 05 - 10/2017
Instructions for Use and
Maintenance
EN
109244

Thank you for choosing our machine.
The instructions for installation, maintenance and use found on the following pages have
been prepared to ensure a long life and perfect operation of your unit.
Please, do follow the instructions carefully.
We have designed and built this machine using the latest innovative technologies. Now
you shall take good care of it.
Your full satisfaction is our greatest reward.
READ THESE INSTRUCTIONS CAREFULLY BEFORE INSTALLING THE MACHINE.
WARNING: FAILURE TO COMPLY, EVEN PARTIALLY, WITH THE PRESCRIPTIONS IN THIS MANUAL
WILL RENDER THE PRODUCT WARRANTY NULL, AND THE MANUFACTURER SHALL NOT BE LIABLE.

EN
page 23
CONTENTS Page
WARNINGS 24
1. MACHINE DESCRIPTION 27
1.1 Machine Description 27
1.2 Machine features 28
1.3 Dataplate 28
2. MACHINE INSTALLATION 29
2.1 Handling 29
2.1.1 Handling the product 29
2.1.2 Storage 29
2.2 Machine equipment 29
2.3 Prepare for installation 29
2.3.1 Room features 29
2.3.2 Water supply connection - Characteristics 29
2.3.3 Water supply characteristics 30
2.3.4 Electrical connection 31
2.3.5 Steam evacuation 31
2.4 Installation 31
2.4.1 Positioning the machine 31
2.4.2 Start-up 32
3. CONTROL PANEL AND RELATIVE SYMBOLS OPERATION 32
4. OPERATION 32
4.1 Machine start-up 32
4.1.1 Start-up 32
4.1.2 Operation 33
4.1.3 Switching OFF 33
4.2 Cutlery and crockery loading 34
4.3 Detergent use 34
4.4 Rinse aid use 35
4.5 Drain pump system 35
4.6 Regeneration device (optional) 35
5. ECOLOGICAL ASPECTS 36
5.1 Recommendations for optimal use of energy, water and additives 36
6. H.A.C.C.P. AND HYGIENE REGULATIONS 36
7. MAINTENANCE 37
7.1 Routine maintenance 37
7.2 Extraordinary Maintenance – by qualifi ed Service Personnel 38
8. SIGNALS AND ALARMS 38
8.1 Signals 38
8.2 Alarms 38
9. ENVIRONMENTAL ASPECTS 39
9.1 Packaging 39
9.2 Disposal 39
10. TROUBLESHOOTING 39
11. EU DECLARATION 41
TRANSLATION OF THE ORIGINAL INSTRUCTION

EN
page 24
WARNINGS
This instruction booklet must be kept with the machine for future
consultation. If this machine is sold or transferred to other users,
make sure the booklet always goes with the unit so that the new owner
can have all the necessary information on operations and all relevant
instructions.
The instruction booklet must be carefully read before installation and before starting
the machine.
• Adaptation of the electrical and water systems for dishwasher installation must
only be carried out by qualifi ed operarators.
• This machine must only be used by adults. This is a professional
machine to be used by
qualifi ed personnel, installed and repaired exclusively by qualifi ed Technical Personnel.
The Manufacturer declines any responsibility for improper installation, use, maintenance
or repair.
• This appliance can be used by trained youth aged from 15 years and above. It cannot
be used by persons with reduced physical, sensory or mental capabilities or lack of
experience and knowledge.
• Children shall keep off the appliance.
• Cleaning and user maintenance shall not be made by children without supervision.
• Do not slam the hood when opening and closing.
• Do not put material or objects on the hood.
• Make sure the machine is not standing on the power cable or on the fi lling/drain hoses.
Level the machine fl at, by adjusting the support feet.
• Do not use this appliance or any part of it as a stepladder or support as it has been
designed exclusively to bear the weight of its rack, containing the items to be washed.
• This machine is designed exclusively for washing dishes, glasses and crockery
with human food type of residue. Do not wash articles polluted with petrol, paint,
chips of steel or iron. Do not wash fragile objects or material not resistant to the
washing process. Any other use is deemed improper. Do not use acidic corrosive
chemical products or alkaline and solvents or chlorine based detergents.
• Do not open the machine hood when operating. In any case, the machine has a special
safety device which immediately stops the unit if the hood is open, thus preventing water
spillage. Always switch the machine completely off and drain the water tank, before
accessing inside.
• A suitable omni-polar automatic fuse switch shall be installed and sized according
to the absorption provided, in order to completely guarantee the disconnection
from the power network, with “category III” overvoltage conditions.
• This switch shall be included in the power network, be solely and exclusively used
for this purpose and be installed in the immediate vicinity of the machine.

EN
page 25
• Always turn off the machine by this switch: only this switch gives a full warranty
of a complete insulation from the electric network.
• Make sure the appliance is linked to an effi cient ground connection.
• The user shall not carry out any repair and/or maintenance operations.
In any case
contact qualifi ed personnel.
• Servicing of this machine must be performed by authorized personnel only.
N.B.: Use genuine spare parts only. Non-genuine parts will void the warranty and
the manufacturer will take no responsibility for any damage.
• Do not use old water hoses, but new ones only.
• Some important rules must be followed for using this appliance:
1) never touch the appliance with wet hands or feet;
2) never use the appliance when barefooted;
3) do not install the appliance in places exposed to water splashes.
• Do not dip bare hands into water containing detergent. If this should occur, wash them
immediately with plenty of water. Check the emergency instructions on the detergents
containers.
• Follow the instructions given in the manufacturer’s booklet for cleaning operations (chap.
7).
• This machine must be disconnected from the main electrical supply after use at the
end of the day and for any service/maintenance operation following this procedure:
Switch the machine off from the control panel.
Drain the tank by removing the overfl ow pipe.
Disconnect the electrical supply by the omni-polar switch (main switch located on
the wall).
Shut the water supply valve(s).
Disregarding the aforesaid prescriptions is a serious misuse and can cause
damages and injures to property and people, and will relieve the manufacturer
from whatever liability.
• This appliance is designed to work at room temperatures from 5°C up to a max. 35°C,
in a suitable room.
• Do not use water to extinguish fi res on electrical parts.
• Do not cover the intake or dissipation grids.
• Only qualifi ed personnel can access the control panel, when the main power switch is
OFF.
• The machine has an IPX3, protection rating against accidental water splashes and is not
protected against pressurized water jets. Pressure-cleaning systems shall, therefore, not
be used on this machine.
• Water infeed to the machine 400 Kpa maximum.

EN
page 26
ATTENTION: DO NOT INSERT HANDS AND/OR TOUCH THE PARTS
LOCATED AT THE BOTTOM OF THE WASH TANK AND/OR AT THE END
OF THE WASH CYCLE.
ATTENTION: INTERNAL CLEANING OF THE MACHINE SHALL BE
CARRIED OUT AT LEAST 10 MINUTES AFTER THE POWER SWITCH HAS
BEEN TURNED OFF.
NOTE: The manufacturer declines any responsibility for accidents to people or any
damage deriving from failure to observe the above listed instructions.

EN
page 27
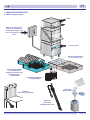
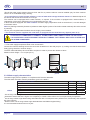
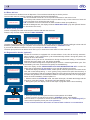
1. MACHINE DESCRIPTION
1.1 Machine Description
Wall-hung main power
switch: at installation
serviceman supply and
care, according to local
laws
Standard equipment:
nr. 2 plates racks
Capacity per plate rack:
12 soup plates or
18 fl at plates
Standard equipment:
nr. 1 glasses rack
Standard equipment:
1 cutlery basket
Optional:
Heat recovery system
Optional:
Water softener
Optional:
Probe lack
detergent/rinse aid
Hood
Control panel

EN
page 28
To operate the Hood machine, 3 connections are needed:
• Electrical;
• Water supply;
• Water drain.
This is a cycle machine comprising a 55°C wash cycle with detergent, a 82°C rinse cycle with injection of rinse-aid in the
boiler hull. 50x50 cm racks are used.
The machine can be complemented with wash-tables, rinse-showers and dedicated waste collection systems.
A new wash cycle can be started by closing the hood down.
The optional heat recovery system reduces signifi cantly the humidity in the dishwashing-room, recovering the energy that
is wasted from the roof, by condensation, by reducing the steam when the door is opened.
1.2 Machine features
The machine’s sound level is Lpa = 66,4dBA ± 0,7dB(A)**
**test made according to EN 60335-2-58/A11
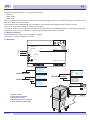
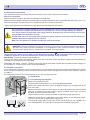
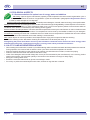
1.3 Dataplate
A Power source
B Total power installed
C Dynamic pressure
D Envelope protection degree
E Total electricity absorption
Model S/N
%QFG
50 6[RG&9.:::::
ZZ°%
ZZZkcal
ÄM2C
IPXX
/#&'+0+6#.; ;;;;
/QFGN &9::::;;;;
ZZZZ9
80*< ZZ#
RoHS
/#:
/#:
*
1
&'5%4+26+10
S/N DW X xxxxxxx
ANNO
YEAR
ANNÉE
AÑO
JAHR
NUMERO DI SERIE
SERIAL NUMBER
NUMÉRO DI SÉRIE
NUMERO DI SERIE
SERIENNUMMER
E=2010 - 2011
F=2011 - 2012
G=2013 - 2014
H=xxxx - xxxx
Model DW XXXX
FAMIGLIA PRODOTTO
FAMILY PRODUCT
FAMILLE DU PRODUIT
FAMILIA PRODUCTO
FAMILIE DES PRODUKTES
Model DW XXXX.YYYY
FAMIGLIA PRODOTTO
FAMILY PRODUCT
FAMILLE DU PRODUIT
FAMILIA PRODUCTO
FAMILIE DES PRODUKTES
CODICE MODELLO
CODE MODEL
CODE ARTICLE
CODIGO MODELO
KODE VON MODELL
Model S/N
%QFG
50 6[RG&9.:::::
ZZ°%
ZZZkcal
ÄM2C
IPXX
/#&'+0+6#.; ;;;;
/QFGN &9::::;;;;
ZZZZ9
80*< ZZ#
RoHS
/#:
/#:
*
1
&'5%4+26+10
A
D
B
C
E

EN
page 29
2. MACHINE INSTALLATION
2.1 Handling
2.1.1 Handling the product
Before accepting the machine, verify that all the data on the data-plate
corresponds to the required ones (as shown on par. 1.1) and to the ones
of the available electrical supply.
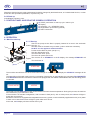
The machines must be handled strictly as shown in pict. 1 regarding the
grip points indicated for lifting with a lift truck.
Latch the machine in a way that secures no vibration or shocks during
transportation.
N.B.: Slinging with ropes not recommended.
After
removing the packaging, make sure that the machine was not
damaged during transportation. Should this be the case, please notify
the seller immediately. If safety has been compromised, do not install the
machine.
The installation and the starting of the machine must be carried out by trained operators only, even if the machine is coming
from another site and it has been used, already.
Adaptation of the electrical and water system for dishwasher installation must be carried out by only qualifi ed operators.
This machine has to be used in a place with room temperature between 5°C and 35°C max. The room has to be dry and
ventilated.
See chap. 9 for disposing the packing material.
2.1.2 Storage
Storage temperature: min. +4°C – max. +50°C – humidity <90%.
The stored parts should be checked periodically to detect any sign of deterioration.
Do not store the machine exposing it to atmospheric agents (rain, sun, cold,
etc.). Do not place material on the packed machine. Do not rotate the machine
in the storing phase (see pict. 2).
2.2 Machine equipment
Use and maintenance manual
Wiring diagrams
A copy of the wiring diagrams must be kept inside the electrical board.
2.3 Prepare for installation
This is just a guide-line for the machine installation.
The installation must be performed by a qualifi ed engineer.
2.3.1 Room features
Install the machine, in a room closed to weather and with a guaranteed temperature-range between 5 and 35°C.
The machine is equipped with thermostatic sensors to manage the
temperatures. To guarantee a proper functionality
these sensor shall not operate at a room temperature below 5°C.
For this reason, it is fundamental that before starting the machine reaches the room temperature.
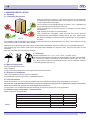
2.3.2 Water supply connection - Characteristics
Water connections characteristics:
Pict. 1
pict. 2
table 1
Water characteristics table Min Max
Static Pressure* 200Kpa 400Kpa
Dynamic Pressure 150Kpa 350Kpa
Water hardness** 5°f 8°f
Cold water-supply temperature*** 5°C 50°C
Hot water-supply temperature**** 50°C 60°C
Capacity 10l/min

EN
page 30
*Should the water supply pressure be more than 400 kPa, a pressure reducer must be installed (only for those versions
where it is not a standard supply, already).
**It is compulsory to install a water-softener
, in case of water with average hardness above 8°f. Washed objects will
be cleaner and the machine will last much longer.
The machine can be equipped with a water softener, on request. If the machine is equipped with a water-softener, a
regeneration of the resins shall be done on regular basis (see par. 4.6).
In those machines equipped with water softener the water supply temperature shall not exceed 40°C, to avoid damages
to the fi lters’ resins.
Note: Any damage caused by limestone (calcareous water higher-up than
8°f and without water-softener) will not be covered
by warranty.
Once a year a supplied-water hardness check is highly recommended.
***The machine must be supplied with cold water, if equipped with the Heat Recovery System (max 15°C).
Machines shall be made with extra power in case of cold water infeed.
****The water supply temperature shall never exceed 60°C.
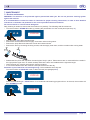
Connect
the machine draining hose to the connection located low on the side (see pict. 3), making sure that the water fl ows
freely (giving, therefore, minimum slope).
The drain tube shall always be connected to a siphon in order to prevent the release of odors.
Maximum drain height = cm. 50 (see pict. 4).
2.3.3 Water supply characteristics
The water supply must be potable, in compliance with Directive 98/83/EC.
The inlet water must also meet the parameters given in the table 2.
1
Out of range values might lead to corrosion and jeopardize the life of the machine.
2
Should the water hardness is higher it is compulsory to install a water softner and check periodically its operation.
3
Out of range values might lead scaling and sediments with a consequent lower performance, functionality, and expected
life of the machine.
4
Desired value: Out of range values might lead stainless steel blackening/tarnishing.
It is recommended a water test once a year.
pict. 4
pict. 3
IT IS STRICTLY FORBIDDEN TO CONNECT THE MACHINE'S VENT DIRECTLY WITH THE OUTDOOR!
COLD WEATHER CONDITIONS MIGHT SERIOUSLY DAMAGE THE THERMAL RECOVERY SYSTEM AND
THE STEAM CONDENSER.
Water parameters table Min Max
Chlorine
1
2mg/l
pH 6,5
1
8,5
3
Water hardness 2°f 8°f
2-3
Iron
3
0,2 mg/l
Dry residue
3
500 mg/l
Manganese
4
0,05 mg/l
table 2

EN
page 31
2.3.4 Electrical connection
Only qualifi ed and properly trained personnel can operate on the electric board and connections.
Before the installation:
Make sure that the voltage is the same as reported on the data-plate.
Make
sure the line voltage matches the machine power and voltage indicated on the machine data-plate (as shown on par. 1.1).
Electrical connection must be carried out in compliance with the current local standards.
Use the data reported on the data-plate to check dimensions and electrical connections.
The machine has a terminal on the back panel indicated by the symbol
that is meant to link the metal structures
of diff erent appliances, to prevent electro-static shocks (see electrical safety standards).
IMPORTANT: connect the clamp to other appliances.
To dimension supply cables and switches, please refer to the maximum power expressed in Watts (W) and Amperes (A)
specifi ed on the machine serial number plate.
Feed cable: the retailer - importer - installer must ensure that the feed cable
complies with the cable insulation category of
the workplace, in conformity with current Technical Standards.
2.3.5 Steam evacuation
In accordance with regulations of environmental hygiene, for the proper functioning of the machine and a healthy environment
for the operator who working in there, it should be at least 10 air volume changes per hour in the room where the machine
is installed.
For small wash rooms we recommend at least 15 air volume changes per hour.
2.4 Installation
2.4.1 Positioning the machine
Remove the packing with care.
Lift the machine as described in par. 2.1.1 Handling the product.
Position
the machine as shown on the installation diagram (lay-out) approved at the
time of the off er.
Maintain a minimum distance of about 50 mm from the walls, so that motors are ventilated
(see pict. 5). Install suction hoods to assure proper ventilation of the room, in order to
eliminate steam and excessive humidity.
Check that the machine is properly levelled, by adjusting the legs (see pict. 6).
Make sure the machine is not standing on the power cable or on the fi lling/drain hoses.
Level the machine fl at, by adjusting the support feet.
The electrical supply cable must be new, fl exible, and according to "har" H07RN-F or a
local valid equivalent. The cable size is dimensioned according to the power.
50 mm
pict. 5
pict. 6
WARNING: check very carefully if the “ground connection” of the machine is properly sized and fully effi cient,
and that not too many units are connected to it. An undersized or poor “ground connection” might lead to
corrosion and/or pitting eff ect on the stainless steel plates, even to perforation.
It is necessary to install a suitable omni-polar automatic fuse switch sized according to the absorption
that assures the complete disconnection from the network in an overvoltage category III condition.
This switch must be incorporated in the supply network, dedicated only and exclusively to this circuit
and installed in the immediate vicinity.
The machine has to be absolutely turned off by this switch: only this switch gives the full warranty of
complete detachment from the electric network.
Make sure the appliance is linked to an effi cient ground connection.

EN
page 32
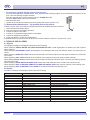
4. OPERATION
4.1 Machine start-up
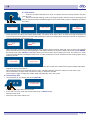
4.1.1 Start-up
• Check if the pump suction fi lter is properly inserted in its seat in the wash-tank
bottom (see pict. 7).
This fi lter must be cleaned every 20 wash-cycles or whenever necessary.
DO NOT use the appliance without the fi lter.
• Put the surface fi lters in place (see pict. 7).
• Shut the dishwasher hood.
• Turn the water valve “open".
• Turn the main power switch ON.
• The machine is on STAND-BY. In the B display, the message STAND-BY will
appear.
• Turn the button C.
The machine start will be active when the A button will light in red and on the B display the STAND-BY message will be
off .
The water fi lling of the wash-tank is done by pre-heating via the
boiler. On the B display, the messages FILLING WATER
and HEATING will alternate. Should the machines be equipped with the WRAS certifi ed Break Tank, the tank fi lling phase
is extended.
The display will read HEATING, till wash-tank and boiler will reach the set temperatures. During
this process, the machine
will not allow any cycle selection or start.
If the machine is in standard confi guration, with hot water in-feed (50°C), with no extra power, the A button will light in
green after some 20 min.
Should the machine be equipped with integrated heat recovery system, must be defi nitely supplied with cold (10°C) water
in-feed. In this case the A button will light in green after some 45 min.
At the end, the B display will show the last used cycle.
3. CONTROL PANEL AND RELATIVE SYMBOLS OPERATION
A) START push-button to start up cycle / select cycle
B) Display
C) Switching – On / STAND BY button
D) Regeneration push-button (optional)
E) Drain Push-button
pict. 7
STAND-BY
FILLING WATER HEATING
Should the electrical supply cable get damaged it shall be changed by the Manufacturer, or his Authorized Service, or other
technician with equivalent qualifi cation, to prevent any risk.
2.4.2 Start-up
At installation engineer’s care.

EN
page 33
4.1.2 Operation
• Insert the rack fi lled with dishes to wash. The plates must be correctly placed in the rack
(see par. 4.2).
• Select the wanted washing cycle by pushing the green START button A; the display will
show in sequence all these available programs. Once the wanted program is displayed, do release
the button.
SHORT CYCLE LONG CYCLE
MEDIUM CYCLE
INTENSIVE CYCLE
CYCLE
XX INTENSIVE
• Close the hood; the wash cycle starts automatically. The button A will light in blue. All wash-time long the display will
read the wash-tank temperature and the boiler temperature. Below the temperatures indications line-bar is displayed to
show the progression of the wash-cycle.
When the wash-cycle ends, the partial draining of the washing water activates. After that, the hot rinse cycle will take
place. After that, the hot rinse cycle will take place. A blue/green fl ashing on the button A will indicate the CYCLE ENDED.
By selecting the option SELECT CYCLE the wash-cycle will not start, when lowering the hood. This function in meant
to shut the hood without activating the wash-cycle, in order to keep the machine closed and reduce cooling-down during
stand-by periods.
NB: At cycle-end, keeping the hood closed, dishes will not dry. Take
out the rack or keep the hood open to allow evaporation,
helping the drying of the dishes.
When opening the hood, the button A will turn green, indicating that the machine is ready for a new wash-cycle.
We recommend to change water at least twice a day, or whenever needed.
The machine is set to change all the wash-water automatically, every 300 cycles.
4.1.3 Switching OFF
• Turn the button C. The display will show STAND-BY.
See paragraph 4.5 to drain the wash-tank.
•
At the end of the day, clean the machine (see chap. 7 Maintenance).
• Shut the water valve.
• Switch the main power switch OFF.
85°c
60°c
CYCLE ENDED
SELECT CYCLE
STAND-BY

EN
page 34
4.2 Cutlery and crockery loading
Before cutlery and crockery loading in the machine, coarsely clean them from the leftover food.
It isn't necessary to rinse the cutlery an crockery under water.
Note the following recommendations:
• Crockery and cutlery should not be inserted inside one another, covering each other.
• Place the crockery in order to all surfaces can be reached by water; otherwise the dishes are not
washed.
• Make sure all the crockery are in a stable position and that the hollow containers don't overturn
(cups, glasses, bowls, etc.) .
• Place in the rack all the hollow containers such as cups, glass, etc. upside-down.
•
Place the crockery with deep hollow with upper face downwards, so that water can fl ow out.
• Make sure the smaller crockery do not fall from the rack.
• Check all the wash arms runs freely and they are not blocked by too tall or too prominent crockery.
Eventually, run a manual rotation of the arms to check it.
Some foods, such as carrots, tomatoes, and others, may contain some natural dyes substances, that
in large amounts, can alter the crockery and plastic parts colors.
Any discoloration does not mean that the plastic is not heat resistant.
Crockery and cutlery not suitable for dishwasher
Not suitable for dishwasher:
•
Wooden crockery and cutlery or with wooden parts; water at high temperature causes deformation
to wood. Also the adhesives used are not suitable for treatment in the dishwasher; a consequence
could be the handles detachment.
• Crafts, precious vases or decorated glasses.
• Not heat-resistant plastic crockery.
• Copper, brass, pewter or aluminum objects: they may become discolored or opaque.
• The decorations on glass, after a certain number of washes, can lose gloss.
• Fragile glasses or crystal items, if often washed, can become opaque.
We recommend to buy exclusively crockery and cutlery suitable for dishwashing.
After several washes, the glass can become opaque.
It is mandatory to repeat the washing cycle if at the end of the cycle the crockery are not well
clean or if there are washing residues (glasses, cups, bowls, etc. with liquid inside).
4.3 Detergent use
The machine has a standard detergent dispenser. The machine automatically sucks the product.
The detergent shall be the NO FOAM type, suitable for industrial dishwashers.
The detergent must be introduced in the tank. The use of good quality liquid detergents is recommended. By request the
dishwasher can be equipped with an electric detergent dispenser (always recommended).
Follow the manufacturer’s recommendations for chemical dosage, related to the local water
hardness. 1cm. of the product drawn into the tube is equal to about 0.15 g. A correct amount
of detergent is very important for a successful wash.
Should the detergent lack, the display will show DETERGENT LEVEL (only with optional
"Sensor for Chemicals Low Level").
pict. 8
pict. 9
DETERGENT LEVEL
ATTENTION: Do not wash articles polluted with petrol, paint, chips of steel or iron, ash, sand, wax,
lubricant grease. These substances damage the machine. Do not wash fragile objects or material not
resistant to the washing process.

EN
page 35
4.4 Rinse aid use
The machine has a standard rinse aid dispenser. The machine automatically sucks the product.
The rinse-aid chemical, shall be suitable for professional glass and dishwashers.
The recommended amount is 2-5 cm of product measured on the suction hose.
1 cm of the product drawn into the hose is equal to about 0.13g. A correct amount of rinse aid
is very important for a quick and proper drying.
N.B.: Excessive amount of chemicals or foam will reduce wash pump effi ciency.
Should the detergent lack, the display will show RINSE-AID LEVEL (only with optional "Sensor
for Chemicals Low Level").
4.5 Drain pump system
To drain completely the wash-tank keep the machine ON and shut the hood.
Press the key E till the display will show TANK DRAINING.
The
discharge pump will automatically drain the wash-tank. During the drain process, the button A will light in blue and will
be fl
ashing. After the draining is complete, the machine will turn automatically in STAND-BY mode.
If you want to refi ll the machine for a new cycle, see par. 4.1 Machine start-up.
The drain pump will run even before each rinse cycle, to drain the excess water from the wash tank.
4.6 Regeneration device (optional)
Should the machine be equipped with a water-softener circuit, this will be fully automatic.
When needed, a 120” regeneration cycle will automatically activate. During this phase, the
display will show the letter R.
If needed, the R cycle can be activated even during the wash-tank loading. If the activation
happens during the wash-cycle, this will be elongated.
The circuit board is designed to call periodically for a 20 min. manual regeneration cycle. This
regeneration cycle can also be activated by the user, should the rinse quality be dissatisfactory.
When the display shows PRESS WATER SOFTNER REGENERATION KEY or when the
users want to activate the R regeneration cycle, start the following procedure:
• Should the display show SALT LEVEL, fi ll the special container, placed on the inside of the
tank, with coarse salt (0,500 kg - 1-4 mm. grains), being careful not to spill it into the sump. A
strong concentration of salt can negatively aff ect the correct functioning and service life of the
machine and generate rust and the steel oxidation. After fi lling with salt, lock the plug tightly.
Rinse the tank immediately if salt is spilled in it.
• With the machine in STAND-BY mode, the water valve open, the wash-tank empty and the
hood shut, press the D button. The button A will start fl ashing in blue.
• During this cycle, the display will show the steps in progress and the time remaining.
• This cycle cannot be interrupted and the normal operation is inhibited.
• At the cycle end, the machine will switch in STAND-BY mode, automatically.
At
this moment, it is possible to switch the machine OFF (see par. 4.1.3 Switching OFF) or
start a normal operation phase (see 4.1.2 Operation).
In case of water hardness above 35°f an external water softener is recommended.
RINSE-AID LEVEL
TANK DRAINING
STAND-BY
r
PRESS WATER SOFTNER
REGENERATION KEY
SALT LEVEL
REGENERATION
STAND-BY

EN
page 36
5. ECOLOGICAL ASPECTS
5.1 Recommendations for optimal use of energy, water and additives
Salt dosing: A pre-set (by the manufacturer) quantity of salt is injected in the resins at each regeneration cycle. It
is important to observe the number of regeneration cycles recommended in paragraph 4.6 Regeneration device
in order to avoid salt spills or lime deposits.
Use the machine fully loaded when possible: This shall prevent detergent, rinse aid, water and energy consumption waste.
Detergent and rinse-aids: Use detergents and rinse-aid chemicals with high biodegradability, to best respect the environment.
Verify proper dosage in relation to water hardness at least once a year. Excess product pollutes rivers and seas while an
insuffi cient dose results in unsatisfactory dish washing and/or hygiene.
Boiler and Wash-Tank temperatures: The boiler and tank temperatures are set by the manufacturer in order to obtain the best
washing results with detergents on the market. The temperatures can be reset by the installer in relation to your detergent.
Pre-washing: Carefully pre-wash with a moderate amount of water at room temperature to facilitate the removal of animal
fats. To remove encrusted materials warm water soaking is recommended.
Note: Wash objects as soon as possible to avoid deposits from drying and compromise eff ective washing.
For eff ective washing routine dishwasher cleaning and maintenance is advised (see chap. 7).
Disregarding the points listed above and of any the information contained in this manual can cause energy
, water
and detergent waste with a subsequent increase in running costs and/or performance reduction.
6. H.A.C.C.P. AND HYGIENE REGULATIONS
• When starting the machine ON, no wash-cycle will be starting until the set boiler and wash-tank temperatures are reached.
During operation, the machine will not start the rinse cycle till the set boiler temperature is reached.
• Remove carefully all solids from the objects to be washed, to avoid obstruction of fi lters, nozzles and piping.
• Drain the wash tank and clean the fi lters at least twice a day.
• Check if the detergent and rinse-aid dosage are correct (as recommended by the manufacturer). In the morning, before
starting the machine, check that the quantity of chemicals in the canisters is enough for daily supply.
• Keep your working tables clean.
• Extract the rack with clean hands or gloves to avoid fi nger marks.
• Do not dry or polish the washed objects with cloths, brushes or rags that are not sterile.

EN
page 37
7. MAINTENANCE
7.1 Routine maintenance
WARNING: The machine is not protected against pressurized water jets. Do not use pressure cleaning system
against the machine.
It is recommended to contact the seller of chemicals for proper cleaning instructions, in order to have detailed
indications on methods and products for the correct periodical machine sanitation.
Do not use bleach or chlorine based detergents.
Daily cleaning is needed to ensure that the machine runs perfectly
. The following shall be carried out:
• Turn the machine in STAND-BY mode, by pressing the push-button C of the control panel (see chap. 3).
• See paragraph 4.5 to drain the wash-tank.
•
Remove the surface fi lters and thoroughly clean them under running water.
• Remove the pump fi lter and clean with a brush and a water shower.
• Remove the arms by loosening the fi xing screws, and thoroughly clean them, and the nozzles under running water.
• Reassemble the parts and reposition the wash pipes fi rmly in place. Take extreme care to re-assemble the nozzles in
the right position (open and / or closed nozzles) and that the arms are installed with the right axial angle.
• Clean the tank very carefully, with specifi c cleaning products.
• It is recommended to leave the machine hood open at the end of the day.
Automatic cycle of machine self-cleaning/rinsing: recommended at each day end.
Turn the machine on STAND-BY mode, to drain the tank (see paragraph 4.5).
Press the blue-fl ashing A - START button. A 30” automatic self-cleaning program will run. At the
end, the machine will
be in STAND-BY mode.
STAND-BY
STAND-BY
STAND-BY

EN
page 38
• For machines equipped with the optional heat recovery:
Press the blue-fl ashing A - START button. A 30” automatic self-cleaning program for the Heat Recovery
will run. At the
end, a 30” self-cleaning program activates.
After the self-cleaning cycle the machine will go in STAND-BY mode.
Push the START button A to drain the boiler
• Shut the water valve.
• Turned off the machine by switching the main power switch OFF (see pict. 10).
7.2 Extraordinary Maintenance – by qualifi ed Service Personnel
At least once per year, the machine should be supervised by qualifi ed Service Personnel:
1 Clean the solenoid-valve(s) fi lters
2 Remove scale from the heating elements
3 Control the status of the seals
4 Control for components integrity and/or consumption
5 Control the dispenser(s) effi ciency
6 Check the effi ciency of the door safety switch.
A qualifi ed electrician, should check all electric connections inside the machine, at least once a year.
8. SIGNALS AND ALARMS
8.1 Signals
The signals messages are displayed, based upon their meaning.
When displaying PRESS WATER SOFTNER REGENERATION KEY a total regeneration is needed (only with optional
water softener).
When displaying DETERGENT LEVEL add detergent in the detergent tank (only with optional "Sensor for Chemicals Low
Level").
When displaying RINSE-AID LEVEL add rinse-aid chemical in the rinse-aid tank (only with optional "Sensor for Chemicals
Low Level").
When displaying SALT LEVEL add salt in the container in the wash-tank (only with optional water softener).
When displaying SHUT HOOD means that the open hood does not allow the maneuver tried, or a wash cycle was in progress,
when lifting the hood.
When displaying DRAIN WATER IN WASH TANK means that a full wash-tank does not allow the maneuver tried.
When displaying SELF-CLEANING: REMOVE FILTERS AND PRESS START the machine requires a self cleaning cycle.
When displaying SELF-CLEANING CYCLE OVER the machine ended the self-cleaning cycle.
8.2 Alarms
The alarm messages are displayed, based upon their meaning.
pict. 10
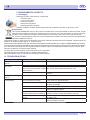
TYPE OF ALARM CAUSE REMEDIES
B1 BOILER FILLING FAIL Open the water supply valve
B2
BOILER PROBE FAIL. Contact Technical Service
B3 BOILER HEAT. ALARM Contact Technical Service
B4 RINSING FAILED Contact Technical Service
B5 BOILER OVERHEATING Contact Technical Service
E1 WATER LOAD FAILED Open the water supply valve
E2 TANK PROBE FAIL. Contact Technical Service
E3 TANK HEATING ALARM Contact Technical Service
E5 TANK OVERHEATING Contact Technical Service
E6 TANK DRAINING FAIL. Contact Technical Service
E7 WASH PUMP THERMAL RELAY Contact Technical Service
Z4 TANK SENSOR FAILURE Contact Technical Service
Z5 TANK HIGH LEVEL Contact Technical Service
Z6 TANK LOW LEVEL Contact Technical Service
Z9 REGENERATION FAIL Contact Technical Service
Z10 ALARM SL8 - BREAK TANK HIGH LEVEL Contact Technical Service
table 3

EN
page 39
9. ENVIRONMENTAL ASPECTS
9.1 Packaging
Packaging is made of the following components:
• a wooden pallet
• a nylon sack (LDPE)
• a multi-layer carton
• polystyrene (PS) strips
• polypropylene (PP) banding.
All above materials, shall be disposed and treated in accordance with the Local Laws in force.
9.2 Disposal
The symbol WEEE/RAEE used on this product indicates that it cannot be treated as domestic waste. Proper
disposal of this product contributes to protecting the environment. For more information on product recycling,
contact the local authorities, domestic waste authorities or the dealer where the product was purchased.
For product or parts disposal, follow the Council directives 2011/65/UE and 2012/19/UE as amended and/or
application legislative decrees.
The present product or parts cannot be disposed of as urban waste but shall be collected in separate containers (see the
waste bin on wheels symbol with an “X” on the product).
At the time of product disposal, the user shall refer to the waste electrical and electronic equipment (WEEE/RAEE) specifi cation.
The manufacturer guarantees the absence of dangerous substances in the EEA used in conformity to the directive 2011/65/UE.
If the user does not comply with the regulations he/she shall be subject to the penalties foreseen by each member state.
Disconnect electricity and water before disposal.
Cut away the electrical cable to ensure that further use is impossible.
All metal parts are recyclable as they are made of stainless steel.
Recyclable plastic parts are marked with the plastic material symbol.
10. TROUBLESHOOTING
Type of Problem Possible Causes Cure
The machine does not
turn on.
Main switch not ON. Turn switch ON.
The machine does not
load water.
Water valve shut. Open the hot and/or cold water valve.
Rinse area nozzles or solenoid-
valve fi lter blocked and/or scaled
with limestone.
Clean the rinse arm nozzles, conductors and solenoid-valve
fi lter. Check that the water hardness is <10°f.
Defective pressure-switch. Replace pressure-switch (call the Technical Assistance
service).
Cycle LED A fl ashing (red
colour)
See chapter 8 Alarms ---
W
ashing results are
unsatisfactory.
The washing nozzles are obstructed
or the rack does not rotate.
Clean the nozzles carefully, and check the right positioning
of the wash-arm, tightening fi rmly.
Foam is present. Use no-foam detergents or reduce the dose in use. Check
the rinse-aid dosage.
Fats or starches not removed. Insuffi cient detergent concentration.
Filter is dirty. Remove fi lter, clean with brush under a jet of water and
replace in original position.
Check tank temperature (which
must be between 55°C and 60°C).
Adjust the thermostat or check correct heating element
operation (call the Technical Assistance service).
Wash time insuffi cient for the type
of dirt.
Select a longer wash-cycle, if possible, otherwise repeat
the wash cycle.
Wash water is dirty. Drain the tank water, clean the fi lters; refi ll the tank and
replace the fi lters correctly.

EN
page 40
N.B. Per altri eventuali disturbi rivolgersi all'Assistenza Tecnica.
Il costruttore si riserva di modifi care senza preavviso le caratteristiche tecniche.
Type of Problem Possible Causes Cure
Objects are not properly
dried.
Not enough rinse aid. Increase
dosage by turning the dispenser screw (see
par. "Rinse aid dispenser" - call the Technical Assistance
service).
The rack is not suitable for the
objects
Use the suitable rack which gives the objects an inclined
position so that water can rinse away.
The washed items may have been
sitting in the wash chamber too
long.
As soon as the cycle stops, remove the rack with objects
so that they can dry more quickly in the air.
Rinse temperature under 80°C. Check the boiler thermostat temperature.
Surface of objects too rough or
porous for material wear.
Replace type of objects used. If the dirt on the objects is
dry and old, soak before washing.
Streaks and spots on
objects
Too much rinse-aid chemical. Reduce the rinse aid amount by turning the micrometric
dispenser screw (see par. "Rinse aid dispenser" - call the
Technical Assistance service).
Too hard water. Check the water quality. Water must not exceed 8°f in
hardness.
For appliances with softener: too
little salt in the salt container or
the resins have not been properly
regenerated.
Fill the salt container (coarse salt: 1-2 mm grains) and
regenerate the resins more often. If lime deposits are also
observed on the body of the machine, have a qualifi ed
technician check the operation of the water softener.
Salt present in dishwasher sump. Thoroughly clean and rinse the appliance, and avoid spilling
salt when fi lling the container.
The machine suddenly
stops during operation.
The machine is connected to an
overload device.
Connect the machine on a own overload device (call the
Technical Assistance service).
A machine safety device was
triggered.
Check the electrical devices (call the Technical Assistance
service).
The machine stops during
the wash stage and starts
refi lling water.
The previous day's water was not
changed.
Drain the tank totally and refi ll.
Excessive water temperature in
tank.
Call Service to check thermostat and pressure-switch.
Defective pressure switch.
The washing pump doesn't
work
The pump is blocked Call the Technical Assistance service
Page is loading ...
-
 1
1
-
 2
2
-
 3
3
-
 4
4
-
 5
5
-
 6
6
-
 7
7
-
 8
8
-
 9
9
-
 10
10
-
 11
11
-
 12
12
-
 13
13
-
 14
14
-
 15
15
-
 16
16
-
 17
17
-
 18
18
-
 19
19
-
 20
20
-
 21
21


Bartscher 109244 Operating instructions
- Category
- Dishwashers
- Type
- Operating instructions
Ask a question and I''ll find the answer in the document
Finding information in a document is now easier with AI
Related papers
-
Bartscher 111670 Operating instructions
-
-
-
-
-
Bartscher 109343 Operating instructions
-
-
Bartscher Deltamat TF 641 Owner's manual
-
-
Bartscher 110605 Owner's manual
Other documents
-
Metos HOOD 130S Owner's manual
-
-
-
-
GGM Gastro DSOZ445N Owner's manual
-
-
Modular 316530 User manual
-
 Elettrobar 570056 User manual
-
Hobart GLG25DNA-10 User manual
-
