Page is loading ...

Installation Instructions
INSTALLATION TIME
SKILL LEVEL
1/4 Hour
1 - Easy
TOOLS
Vehicle Application
www.Bestop.com - We’re here to help! Visit our web site and click on “Ask a Question”. Click here for more Jeep Accessories by Bestop.
Header Bikini
®
, Safari Version
• Jeep Wrangler JK Unlimited (4 Door)
2010 to Current
Part Number: 52584
This product must be used with a Windshield Header Kit Part Number 51243.
T-30 10 mm
Must be used with a Windshield Header Kit Part Number 51243.
For Use With or Without Door Surrounds

Header Bikini
®
, Safari Version – Installation Instructions
Rev. J 0914 52584 pg. 2
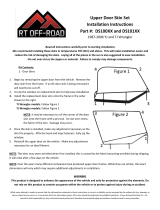
Parts List
Bikini Top Fabric Qty - 1
Slide the pocket sewn along the front of the
Bikini over the edge of the header and snap
it to the snaps.
Snap Bikini to Header
Center the Bikini on the vehicle. Place the tabs on
the Header Knob Bases above the footman loops
in the windshield frame. Place a Header Knob
Plate under a footman loop. Install a Header Knob
through the plate and footman loop and thread it
into the Header Knob Base. Repeat this with both
Header Knob Bases.
Secure Header to Windshield
Snap Fabric
to Header
Drape Bikini over Vehicle
Drape the Bikini fabric over the vehicle.
Front Tension
Strap, Part Number
457.92 , Qty - 2
Web Strap with Grommet,
Part Number 486.32,
Qty - 2
M6 x 20mm Bolt, Part
Number 322.41, Qty - 2
Footman
Loop
Header
Knob Plate
Header
Knob Base
Header
Header
Knob
Strap Clip, Part Number
338.24, Qty - 6

Header Bikini
®
, Safari Version – Installation Instructions
Rev. J 0914 52584 pg. 3
Wrap the strap around the B-Pillar between the
front and rear door. Thread the strap through the
buckle and pull it tight. Repeat on both sides.
Install a Strap Clip to secure the end of the strap.
Secure B-Pillar Straps
Wrap Strap around
B-Pillar and thread
through Buckle
Secure Flaps
Wrap the fl ap above the door opening around the
horizontal sport bar and fasten the hook and loop.
Repeat on both sides.
Wrap Flaps around
bars and fasten
Hook and Loop
Secure Center Strap
Drape the Bikini over the speaker pod. Locate the
two straps sewn to the center fl ap of the bikini. Pull
the straps under the pod and hook each strap into
the opening as shown. Pull the end of each strap
to tighten securely. Install a Strap Clip to secure
the end of the strap.
View from Rear
Center
Flap
Bikini
Hook Strap
into Hole
Pull End of Strap
to Tighten
Strap
Clip
Strap
Clip

Header Bikini
®
, Safari Version – Installation Instructions
Rev. J 0914 52584 pg. 4
Install Web Strap with Grommet
Open the sport bar cover and locate the bottom pivot
bracket bolt. Remove the bolt. Use a utility knife to
cut a hole in the sport bar cover over the location of
the bolt hole. Repeat on both sides of the vehicle.
Pivot Bracket
Remove Bolt
Cut Fabric at
Hole Location
Vehicles with a Soft Top Pivot
Bracket
Install Web Strap with Grommet
Feel through the sport bar cover and locate the bottom
hole in the sport bar. Use a utility knife to cut a hole
in the sport bar cover over the location of the hole.
Repeat on both sides of the vehicle.
Cut Fabric at
Hole Location
Vehicles without a Soft Top Pivot
Bracket
Install Side Tension Strap
Tension Strap
Thread Strap
through Buckle
Hook Tension
Strap to Beltrail
Thread a Tension Strap through the buckle on the
side of the Bikini.
Hook the end of the strap under the beltrail and slide
it under the door surround. Pull the strap tight and
install a Strap Clip to secure the end of the strap.
Slide under
Door Surround
Strap
Clip

Header Bikini
®
, Safari Version – Installation Instructions
Rev. J 0914 52584 pg. 5
Install Web Strap with Grommet
Place the grommet in the Web Strap over the hole in
the sport bar cover and secure with the M6 x 20mm
Bolt. Repeat on both sides.
For vehicles with Pivot Brackets, you may
either use the M6 x 20mm Bolt or reinstall
the bolt removed from the bracket in Step 8.
Thread Web Strap through Buckle
Thread the Web Strap through the Buckle sewn
to the Bikini and pull tight. Install a Strap Clip to
secure the end of the strap. Repeat on both sides.
M6 x 20mm
Bolt
Optional Pivot
Bracket Bolt
Pivot
Bracket
Strap
Clip

Header Bikini
®
, Safari Version – Installation Instructions
Rev. J 0914 52584 pg. 6
LIMITED WARRANTY
We warrant our product to be free from defects in material and workmanship, for the terms specifi ed below, provided there has been normal use and proper
maintenance. This warranty applies to the original purchaser only. All remedies under this warranty are limited to the repair or replacement of any item or items found
by the factory to be defective within the time period specifi ed. If you have a warranty claim, fi rst you must call our factory at the number below for instructions. You
must retain proof of purchase and submit a copy with any items returned for warranty work. Upon completion of warranty work, if any, we will return the repaired or
replaced item or items to you freight prepaid. Damage to our products caused by accidents, fi re, vandalism, negligence, misinstallation, misuse, Acts of God, or by
defective parts not manufactured by us, is not covered under this warranty.
THE WARRANTY TIME PERIOD IS AS FOLLOWS FOR REPLACE-A-TOP™, SAILCLOTH REPLACE-A-TOP™, SUPERTOP®, SUPERTOP® REPLACEMENT
SKINS, SUNRIDER®, AND TIGERTOP®: TWO YEARS FROM DATE OF PURCHASE.
THE WARRANTY TIME PERIOD IS AS FOLLOWS FOR ALL OTHER “SOFT GOODS” MANUFACTURED BY OUR COMPANY (USING PRIMARILY VINYLS,
PLASTICS, AND/OR FOAM): ONE YEAR FROM DATE OF PURCHASE.
THE WARRANTY TIME PERIOD IS AS FOLLOWS FOR ALL OTHER “HARD GOODS” MANUFACTURED BY OUR COMPANY (USING PRIMARILY METALS,
PLASTICS, AND/OR FIBERGLASS): ONE YEAR FROM DATE OF PURCHASE.
ANY IMPLIED WARRANTIES OF MERCHANTABILITY AND/OR FITNESS FOR A PARTICULAR PURPOSE CREATED HEREBY ARE LIMITED IN DURATION
TO THE SAME DURATION AND SCOPE AS THE EXPRESS WRITTEN WARRANTY. OUR COMPANY SHALL NOT BE LIABLE FOR ANY INCIDENTAL OR
CONSEQUENTIAL DAMAGE.
Some states do not allow limitations on how long an implied warranty lasts, or the exclusion or limitation of incidental or consequential damages, so the above
limitations or exclusions may not apply to you. This warranty gives you specifi c legal rights, and you may also have other rights which vary from state to state.
For further information or request for warranty work, please contact:
Bestop Inc., Customer Service
Toll-Free: (800)845-3567
Main: (303)465-1755
E-mail: [email protected]
Website: www.Bestop.com
Care and Maintenance of your Bestop Product
Your Bestop product is made of the fi nest materials available. To keep it looking new and for the maximum possible wear, it will need periodic cleaning and
maintenance.
Fabric: The fabric should be washed often using soap, warm water and a soft bristle brush. Rinse with clear water to remove all traces of soap or use Bestop-
recommended Bestop Cleaner and Bestop Protectant. Bestop Cleaner and Bestop Protectant are specially formulated to provide a total cleaning and protection
system. Bestop Cleaner will not harm vehicle fi nish, is biodegradable and environmentally friendly. Bestop Protectant protects against UV-fading, cracking and
hardening.
Water: Seeping through at the seams may be stopped by applying 3-M Scotchgard® on the inside of the seams. Rips in the fabric may be repaired with Bondex®
iron on patches. Iron the patches to the Inside of the top, carefully following the Bondex® instructions.
/