Page is loading ...

MFC 9200C
®
OWNER’S MANUAL

If You Need to Call Customer Service
Please complete the following information for future
reference:
Model Number: MFC 9200C
Serial Number:*
Date of Purchase:
Place of Purchase:
* The serial number is on the back of the unit. Retain
this Owner’s Manual with your sales receipt as a
permanent record of your purchase, in the event of a
theft, fire or warranty service.
Year 2000 Compliant
Brother is addressing the Year 2000 related issues for all
Brother fax machines and multi-function centers. Our
focus is to ensure that our bundled third party software
will continue to properly process date/time data after
January 1, 2000.
Brother fax machines and multi-function centers will
function properly after January 1, 2000, provided that all
non-Brother hardware, software and firmware used by our
customers in connection or combination with Brother fax
machines, MFCs and bundled software, accurately
exchange date data with the Brother products.
Please continue to check our Web page for updates at
http://www.brother.com. All remedies will be provided to
individual customers via software patches through
software download or from Brother Customer Service.
©1996-2000 Brother Industries, Ltd.

i
Brother Numbers
Brother fax-back system
Brother Customer Service has installed an easy-to-use fax-back system, so you
can get instant answers to common technical questions and product information
for all Brother products. This system is available 24 hours a day, 7 days a week.
You can use the system to send faxes to any fax machine, not just the one from
which you are calling.
If you can’t resolve difficulty with your MFC machine using this manual, call
our fax-back system, and follow the voice prompts to receive faxed instructions
about using the system, and an index of fax-back subjects.
The Brother fax-back system number (USA only) has been preprogrammed on
One Touch key
1
.
Frequently Asked Questions (FAQs)
You can find more information about Brother products on the World Wide Web.
From product specification sheets to Frequently Asked Questions (FAQs), it is
all there. Visit us at:
Brother Bulletin Board
Brother’s Bulletin Board Numbers are
For Customer Service
USA:
1-800-521-2846
From within Canada:
1-800-681-9838
You can check here for Brother driver updates.
USA:
1-888-298-3616
From within Canada:
1-514-685-2040
USA:
1-800-284-4329 (voice)
1-908-575-8790 (fax)
From within Canada:
1-800-853-6660 (voice)
1-514-685-4898 (fax)
From within Montreal:
1-514-685-6464 (voice)
http://www.brother.com
BROTHER NUMBERS

ii
Ordering Accessories and Supplies
For best quality results use only genuine Brother accessories, available at most
Brother retailers. If you cannot find the accessory you need and you have a Visa,
MasterCard, Discover, or American Express credit card, you can order
accessories directly from Brother. (In the USA, you can visit us online for a
complete selection of Brother accessories and supplies available for purchase.)
USA:
1-888-879-3232 (voice)
1-800-947-1445 (fax)
http://www.brothermall.com
From within
Canada:
1-800-668-2768 (voice)
Description Item
Ink Cartridge <black> LC04BK
Ink Cartridge <cyan>(blue) LC04C
Ink Cartridge <magenta>(red) LC04M
Ink Cartridge <yellow> LC04Y
720 dpi High Quality Coated Paper BP72CL
Glossy Paper BPGLL
Transparancies BPTRL
Power Protector QPD120
Telephone Line Cord UG3565001
Paper Cassette Assembly
(Includes paper output tray)
LE2228001
Owner’s Manual LE3385001 (For USA)
LE3490001 (French For Canada)
Note
Software on Floppy Disks are NOT available.
Brother Coated Paper is Ink Jet Paper.
ORDERING ACCESSORIES AND SUPPLIES

iii
Notice – Disclaimer of Warranties
(For USA and Canada)
BROTHER’S LICENSOR(S), AND THEIR DIRECTORS, OFFICERS,
EMPLOYEES OR AGENTS (COLLECTIVELY BROTHER’S LICENSOR)
MAKE NO WARRANTIES, EXPRESS OR IMPLIED, INCLUDING
WITHOUT LIMITATION THE IMPLIED WARRANTIES OF
MERCHANTABILITY AND FITNESS FOR A PARTICULAR PURPOSE,
REGARDING THE SOFTWARE. BROTHER’S LICENSOR(S) DOES NOT
WARRANT, GUARANTEE OR MAKE ANY REPRESENTATIONS
REGARDING THE USE OR THE RESULTS OF THE USE OF THE
SOFTWARE IN TERMS OF ITS CORRECTNESS, ACCURACY,
RELIABILITY, CURRENTNESS OR OTHERWISE. THE ENTIRE RISK AS
TO THE RESULTS AND PERFORMANCE OF THE SOFTWARE IS
ASSUMED BY YOU. THE EXCLUSION OF IMPLIED WARRANTIES IS
NOT PERMITTED BY SOME STATES IN THE USA AND SOME
PROVINCES IN CANADA. THE ABOVE EXCLUSION MAY NOT APPLY
TO YOU.
IN NO EVENT WILL BROTHER’S LICENSOR(S) BE LIABLE TO YOU
FOR ANY CONSEQUENTIAL, INCIDENTAL OR INDIRECT DAMAGES
(INCLUDING DAMAGES FOR LOSS OF BUSINESS PROFITS, BUSINESS
INTERRUPTION, LOSS OF BUSINESS INFORMATION, AND THE LIKE)
ARISING OUT OF THE USE OR INABILITY TO USE THE SOFTWARE
EVEN IF BROTHER’S LICENSOR HAS BEEN ADVISED OF THE
POSSIBILITY OF SUCH DAMAGES. BECAUSE SOME STATES IN THE
USA AND SOME PROVINCES IN CANADA DO NOT ALLOW THE
EXCLUSION OR LIMITATION OF LIABILITY FOR CONSEQUENTIAL
OR INCIDENTAL DAMAGES, THE ABOVE LIMITATIONS MAY NOT
APPLY TO YOU. IN ANY EVENT BROTHER’S LICENSOR’S LIABILITY
TO YOU FOR ACTUAL DAMAGES FROM ANY CAUSE WHATSOEVER,
AND REGARDLESS OF THE FORM OF THE ACTION (WHETHER IN
CONTRACT, TORT (INCLUDING NEGLIGENCE), PRODUCT
LIABILITY OR OTHERWISE), WILL BE LIMITED TO $50.
Compilation and Publication Notice
Under the supervision of Brother Industries Ltd., this manual has been compiled
and published, covering the latest product descriptions and specifications.
The contents of this manual and the specifications of this product are subject to
change without notice.
Brother reserves the right to make changes without notice in the specifications
and materials contained herein and shall not be responsible for any damages
(including consequential) caused by reliance on the materials presented,
including but not limited to typographical and other errors relating to the
publication.

iv
BROTHER ONE YEAR LIMITED WARRANTY and EXCHANGE SERVICE
(For USA Only)
This warranty gives you certain rights
and you may also have other rights that
may vary from state to state.
This warranty is given only to the first
end-use purchaser of the
accompanying product (referred to in
this warranty as “this Product”).
What is covered:
Brother warrants to
you for the Warranty Period that there
are no defects in the materials,
workmanship or Year 2000 compliance
of this Product. The “Warranty Period”
is 1 year from the date you purchased
this product. The “Warranty Period” for
consumable items, such as Ink
Cartridges, Print Heads, etc. is 90 days
from the date of purchase, or the rated
life of the Consumable item, whichever
is shorter.
What is NOT covered:
This warranty is
VOID -- that is, this Product has no
warranty -- if: (1) you did not purchase
this Product from an authorized Brother
reseller within the United States, (2) this
Product has been serviced, modified or
tampered with by anyone other than an
Authorized Service Representative of
Brother, (3) the serial number has been
modified, defaced or removed from this
Product, (4) this Product has been
abused or damaged, (5) non Brother
®
-
brand or non Brother approved parts,
supplies, power supplies or other
accessories have been used with this
Product, or (6) this Product has been
transported without the proper
preparation and packaging.
What to do if you think your Product
is defective:
Call our Customer Service Hotline at 1-
800-284-4329, or if you suspect a
defect in materials or workmanship in
this Product, you can report it to a
Brother Authorized Service Center.
During the Warranty Period, supply
Brother’s representative with a copy of
your dated bill of sale showing that this
Product was purchased within the
United States. For the name of your
Brother Authorized Service Center, call
1-800-521-2846. After contacting the
Brother Authorized Service Center, you
may be required to deliver or send the
Product properly packaged, freight
prepaid, to the Authorized Service
Center together with a photocopy of
your bill of sale.
What Brother will do:
Brother (or its
Authorized Service Center) will
evaluate your report of a possible
defect to determine whether a defect
exists, and if it does exist, Brother (or its
Authorized Service Center) will repair or
(at Brother’s option) replace the
Product with a product that performs
the same functions and performs as
well as the original Product. Brother
reserves the right to supply refurbished
or remanufactured replacement parts
provided that the replacement parts
conform to the manufacturer’s
specifications for new products. The
repaired or replacement product will be
returned to you at no cost.
Exchange Service:
When an exchange is authorized,
Brother will exchange your non-working
product with a refurbished or
remanufactured product that conforms
to the manufacturer’s specifications for
new products. The refurbished or
remanufactured Product you receive
will be covered by the balance of the
limited warranty period remaining on
the original Product, plus an additional
thirty (30) days. You will keep the
replacement Product that is sent to you
and must return (or be billed up to the
cost of a new product) your original
non- working product, which shall
become the property of Brother. You
must call Brother Customer Service and
if the representative cannot correct the
product’s malfunction over the
telephone and you elect the exchange
service, you must provide information
pertaining to this Product and you must
also provide a valid major credit card
number. Your credit card will be
charged up to the cost of a new Product
if: (i) you do not return your original
Product to Brother within five (5)
business days; (ii) the malfunctions of
your original Product are not covered by
the limited warranty; (iii) the proper
packaging instructions are not followed
and has caused damage to the product;

v
BROTHER ONE YEAR LIMITED WARRANTY and EXCHANGE SERVICE
(For USA Only)
or (iv) the warranty period on your
original Product has expired or has not
been sufficiently validated with a copy
of the proof of purchase (bill of sale).
The Brother Customer Service
Representative will ship the exchange
Product via next business day delivery
courier service, with return instructions
and prepaid return air bill. Follow the
return instructions. You must return the
original Product in the same shipping
carton in which the exchanged Product
was received and include a copy of
proof of purchase (bill of sale). Retain
your original accessory items and a
copy of the return air bill, signed by the
courier.
Limitations:
Repair or replacement as described
above is your sole and exclusive (that
is, your only) remedy if this Product is
defective. Brother is not responsible for
damage to or loss of any equipment,
media, programs or data related to the
use of this Product. Except for that
repair or replacement,
Brother shall not
be liable for any direct, indirect,
incidental or consequential damages or
specific relief. Because some states do
not allow the exclusion or limitation of
consequential or incidental damages,
the above limitation may not apply to
you.
THIS WARRANTY IS GIVEN IN LIEU
OF ALL OTHER WARRANTIES,
WRITTEN OR ORAL, WHETHER
EXPRESSED BY AFFIRMATION,
PROMISE, DESCRIPTION,
DRAWING, MODEL OR SAMPLE.
ANY AND ALL WARRANTIES OTHER
THAN THIS ONE, WHETHER
EXPRESS OR IMPLIED, INCLUDING
IMPLIED WARRANTIES OF
MERCHANTABILITY AND FITNESS
FOR A PARTICULAR PURPOSE, ARE
HEREBY DISCLAIMED.
This Limited Warranty is the only
warranty that Brother is giving for this
Product. It is the final expression and
the exclusive and only statement of
Brother’s obligations to you. It replaces
all other agreements and under-
standings that you may have with
Brother or its representatives.
This Limited Warranty (and Brother’s
obligation to you) may not be changed
in any way unless you and Brother sign
the same piece of paper in which we (1)
refer to this Product and your bill of sale
date, (2) describe the change to this
warranty and (3) agree to make that
change.
Product Support: Toll-free customer
service and technical support is
available for hardware operational
assistance at 1-800-284-4329. At any
time, free technical support in the form
of Frequently Asked Questions,
troubleshooting tips and service center
locator is available through our fax-back
system at 1-800-521-2846 or Brother’s
Internet Web Site (www.brother.com).
Now you can visit us on-line
(www.brothermall.com), your complete
source for genuine Brother Accessories
and Supplies.
B
ROTHER
I
NTERNATIONAL
C
ORPORATION
100
S
OMERSET
C
ORPORATE
B
LVD.
B
RIDGEWATER,
N
EW
J
ERSEY
08807-0911
Please record your model and serial
numbers and your date and location of
Purchase below for your records. Keep
this information with your proof of
purchase (bill of sale) in case your
Product is lost, stolen or requires
service.
Model # _______________________
Serial #________________________
Date of purchase: _______________
Store where purchased:___________
Location of store:________________
Important:
We recommend that you
keep all original packing materials, in
the event that you ship this product.

vi
BROTHER MULTIFUNCTION CENTER/FACSIMILE MACHINE
LIMITED WARRANTY
(For Canada Only)
Pursuant to this limited warranty of 1 year from the date of purchase for labour and parts,
Brother International Corporation (Canada) Ltd. (“Brother”), or its Authorized Service
Centers, will repair this MFC/Facsimile machine free of charge if defective in material or
workmanship. This Limited Warranty does not include cleaning, consumables
(including, without limitation, print cartridges, print head, toner and drum) or damage
caused by accident, neglect, misuse or improper installation or operation, any damage
caused from service, maintenance, modifications, or tampering by anyone other than a
Brother Authorized Service Representative, or from the use of supplies or consumable
items that are non-Brother products. Operation of the MFC/Facsimile machine in excess
of the specifications or with the Serial Number or Rating Label removed shall be
deemed abuse and all repairs thereafter shall be the sole liability of the end-user/
purchaser. In order to obtain warranty service, the MFC/Facsimile machine must be
delivered or shipped freight prepaid by the end user/purchaser to a “Brother” Authorized
Service Center, together with your Proof of Purchase in the form of a Sales Receipt.
For laser products: Failure to remove the Toner Cartridge (and Toner Drum Unit on
applicable models) during shipping will cause severe damage to the MFC/Facsimile and
will VOID the Warranty. (Refer to your Operation Manual for proper packaging.)
For ink-jet products: Do not remove the ink cartridges during shipping. Damage to your
print head resulting from packing without the ink cartridges will VOID your warranty.
(Refer to your Operation Manual for proper packaging.)
BROTHER DISCLAIMS ALL OTHER WARRANTIES EXPRESSED OR IMPLIED
INCLUDING, WITHOUT LIMITATION, ANY IMPLIED WARRANTIES OF
MERCHANTABILITY OR FITNESS FOR A PARTICULAR PURPOSE, EXCEPT TO
THE EXTENT THAT ANY WARRANTIES IMPLIED BY LAW CANNOT BE VALIDLY
WAIVED.
No oral or written information, advice or representation provided by Brother, its
Authorized Service Centers, Distributors, Dealers, Agents or employees, shall create
another warranty or modify this warranty. This warranty states Brother’s entire liability
and your exclusive remedy against Brother for any failure of the MFC/Facsimile
machine to operate properly.
Neither Brother nor anyone else involved in the development, production, or delivery of
this MFC/Facsimile machine shall be liable for any indirect, incidental, special,
consequential, exemplary, or punitive damages, including lost profits, arising from the
use of or inability to use the product, even if advised by the end user/purchaser of the
possibility of such damages. Since some Provinces do not allow the above limitation of
liability, such limitation may not apply to you.
This Limited Warranty gives you specific legal rights and you may also have other rights
which vary from Providence to Providence.
Warranty Service is available at Brother Authorized Service Centers throughout
Canada. For Technical Support or for the name and location of your nearest
Authorized Service Center call 1-800-853-6660. Within Montreal, please call 685-6464.
Internet support: [email protected] or browse
Brother’s Web Site: www.brother.com
Brother International Corporation (Canada) Ltd.
1 Rue Hôtel de Ville
Dollard-Des-Ormeaux, QC H9B 3H6
®
We’re at your side.

vii
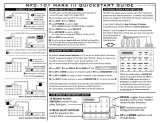
Quick Reference Guide
Sending Faxes
Automatic Transmission
1
Place the original face up in the
ADF, or face down on the scanner
glass.
2
Enter the fax number using One
Touch, Speed Dial, Search or the
dial pad.
3
Press
Start
.
Sending a Cover Page
1
Place the original face up in the
ADF, or face down on the scanner
glass.
2
Press
Function
,
3
,
1
,
1
.
3
When
NEXT FAX ONLY?
appears, press
Set
.
4
Press or to select
ON
(or
OFF
) and press
Set
.
5
Press or to select a
comment and press
Set
.
6
Enter two digits to indicate the
number of pages being sent
and press
Set
.
7
Press
1
to select additional settings
—
OR
—Press
2
if you are ready to
fax.
8
Enter the fax number.
9
Press
Start
.
Brother fax-back system :
1-800-521-2846
Brother Web Site :
http://www.brother.com
Real Time Transmission
You can send faxes in real time.
1
Place the original face up in the
ADF, or face down on the scanner
glass.
2
Press Function, 1, 3, 8.
3
Press or to select ON (or
OFF) and press Set—OR—For
the next transmission only, press
or to select NEXT FAX
ONLY and press Set.
4
For the next fax only, press or
to select ON (or OFF) and
press Set.
5
Press 1 to select additional settings
—OR—Press 2 to fax.
6
Enter the fax number.
7
Press Start.
Receiving Faxes
Select Receive Mode
Press
Receive Mode
to select
FAX
,
EXT.TEL/TAD
or
MANUAL
.
Brother Accessories & Supplies
USA: 1-888-879-3232 (voice)
1-800-947-1445 (fax)
http://www.brothermall.com
From within Canada:
1-800-668-2768 (voice)

viii
Storing Numbers
Storing One Touch Dial
Numbers
1
Press Function, 1, 5, 1.
2
Press the One Touch key where
you want to store the number.
3
Enter a number (up to 20 digits)
and press Set.
4
Enter a name (or leave it blank)
and press Set.
5
Press or to select FAX,
TEL, or FAX/TEL and press Set.
6
Press Stop.
Storing Speed Dial Numbers
1
Press Function, 1, 5, 2.
2
Enter a two-digit Speed Dial
number and press Set.
3
Enter a number (up to 20 digits)
and press Set.
4
Enter a name (or leave it blank)
and press Set.
5
Press or to select FAX,
TEL, or FAX/TEL and press Set.
6
Press Stop.
Dialing Operations
One Touch Dialing /
Speed Dialing
1
Place the original face up in the
ADF, or face down on the scanner
glass.
2
Press Search/Speed Dial, press
#, then press the two-digit Speed
Dial number.
3
Press Start.
Search/Speed Dial
1
Place the original face up in the
ADF, or face down on the scanner
glass.
2
Press Search/Speed Dial, then
enter the first letter of the name
you’re looking for.
3
Press or to search the
memory.
4
Press Start, when the screen
displays the name you want to call.
Making Copies
Making a Single Copy
1
Place the original face up in the
ADF, or face down on the scanner
glass.
2
Press Mono Copy or Color
Copy.
3
Press Mono Copy or Color
Copy again. (Make sure it’s the
same key you pressed before.)
Sorting Multiple Copies
(Using the ADF)
After you choose Mono Copy or
Color Copy in Step 2, you must
press the same key in following
steps.
1
Place the original face up in the
ADF.
2
Press Mono Copy or Color Copy.
3
Press Options.
4
Press or to select
COPY:OPTIONS and press Set.
5
Press or to select SORT
and press Set.
6
Press Mono Copy or Color Copy.
7
Use the dial pad to enter the number
of copies you want. (up to 99)
8
Press Mono Copy or Color Copy.

ix
Table of Contents
1
Introduction..................................................................................... 1-1
Using This Manual................................................................... 1-1
Finding Information............................................................. 1-1
Conventions Used in this Manual........................................ 1-1
Test Sheet Procedures (For USA Only).................................. 1-2
MFC 9200C Control Panel Overview..................................... 1-3
About Fax Machines ................................................................ 1-5
Fax Tones and Handshake................................................... 1-5
ECM (Error Correction Mode)............................................ 1-5
2
Assembly and Connections............................................................. 2-1
Packing List .............................................................................. 2-1
Choosing a Location................................................................. 2-2
IMPORTANT SAFETY INSTRUCTIONS................... 2-3
Release the Scanner Lock.................................................... 2-3
Paper.......................................................................................... 2-4
About Brother Paper............................................................ 2-4
Paper Specifications for Paper Cassette and Manual
Feed Slot..................................................................... 2-5
Print Area............................................................................. 2-6
Loading Paper in the Multi-Purpose Paper Cassette ........... 2-7
Connecting the MFC................................................................ 2-8
Installing the Ink Cartridges................................................... 2-9
Important....................................................................... 2-10
Connections............................................................................. 2-12
Connecting an External Telephone ................................... 2-12
Connecting an External Telephone
Answering Device (TAD)............................................. 2-12
Sequence....................................................................... 2-12
Connections................................................................... 2-13
Recording Outgoing Message (OGM).......................... 2-13
Special Line Considerations.............................................. 2-14
Roll Over Phone Lines.................................................. 2-14
Two-Line Phone System............................................... 2-14
Converting Telephone Wall Outlets ............................. 2-14
Installing MFC, External Two-Line TAD, and
Two-Line Telephone................................................ 2-15
Multi-Line Connections (PBX)......................................... 2-16

x
If you are installing the MFC to work with a PBX:...... 2-16
Custom Features on a Single Line..................................... 2-16
3
On-Screen Programming................................................................ 3-1
User-Friendly Programming................................................... 3-1
Function Mode..................................................................... 3-1
Alternating Displays............................................................ 3-2
Function Selection Table..................................................... 3-2
1. Fax Functions.............................................................. 3-2
2. Printer Functions......................................................... 3-5
3. Copy Functions........................................................... 3-5
4. Video Functions.......................................................... 3-5
5. PhotoCapture Center
™
Functions ............................... 3-6
4
Initial Setup...................................................................................... 4-1
Getting Started ......................................................................... 4-1
Setting Date and Time.........................................................4-1
Setting Station ID ................................................................ 4-1
Entering Text................................................................... 4-2
Inserting spaces............................................................... 4-2
Making corrections .........................................................4-2
Repeating letters.............................................................. 4-2
Special characters and symbols....................................... 4-3
Setting Tone/Pulse Dialing Mode (For Canada only)......... 4-3
Setting Beeper Volume........................................................ 4-3
Speaker Volume .................................................................. 4-4
Ring Volume ....................................................................... 4-4
Memory Storage.................................................................. 4-4
Turning On Automatic Daylight Savings Time .................. 4-4
5
Setup Receive................................................................................... 5-1
Basic Receiving Operations..................................................... 5-1
Select Receive Mode........................................................... 5-1
To select or change your Receive Mode......................... 5-1
Setting Ring Delay .............................................................. 5-2
Easy Receive ....................................................................... 5-2
Printing a Reduced Incoming Document ............................ 5-3
Recommended Reductions.............................................. 5-3
Setting Paper Size................................................................ 5-3
Advanced Receiving Operations............................................. 5-4
Operation from Extension Telephone.................................. 5-4

xi
Changing the Fax Receive Code..................................... 5-4
Printing a Fax in Memory.................................................... 5-4
Polling.................................................................................. 5-5
Setting Up Polling Receive............................................. 5-5
Setting Up Sequential Polling Receive........................... 5-5
Canceling a Scheduled Job.................................................. 5-6
6
Setup Send ....................................................................................... 6-1
Before You Begin...................................................................... 6-1
Sending Faxes Using Multiple Settings .............................. 6-1
Faxing from the ADF (Automatic Document Feeder)........ 6-1
Faxing from the Scanner Glass............................................ 6-2
Fax Resolution..................................................................... 6-3
Contrast................................................................................ 6-3
Manual Transmission (With an External Telephone) ......... 6-4
Automatic Transmission...................................................... 6-4
Color Fax transmission........................................................ 6-4
Manual and Automatic Fax Redial...................................... 6-4
Dual Access (Not Available for Color Fax)........................ 6-5
Real Time Transmission...................................................... 6-6
Checking the Job Status....................................................... 6-6
Canceling a Job in Memory................................................. 6-7
Basic Sending Operations........................................................ 6-7
Composing Electronic Cover Page...................................... 6-7
Composing Your Own Comments.................................. 6-8
Cover Page For Next Fax Only....................................... 6-8
Always Send Cover Page................................................ 6-8
Using a Printed Cover Page............................................ 6-9
Advanced Sending Operations................................................ 6-9
Overseas Mode.................................................................... 6-9
Delayed Fax (Not Available for Color Fax)...................... 6-10
Delayed Batch Transmission
(Not Available for Color Fax)....................................... 6-10
Multiple Resolution Transmission
(Not Available for Color Fax)....................................... 6-11
Setting Up Polled Transmit
(Not Available for Color Fax)....................................... 6-11
7
Auto Dial Numbers and Dialing Options...................................... 7-1
Storing Numbers for Easy Dialing.......................................... 7-1
Storing One Touch Dial Numbers....................................... 7-1

xii
Storing Speed Dial Numbers...............................................7-2
Changing One Touch and Speed Dial Numbers.................. 7-2
Setting Up Groups for Broadcasting ................................... 7-3
Dialing Options......................................................................... 7-4
One Touch Dialing .............................................................. 7-4
Speed Dialing ...................................................................... 7-4
Broadcasting (Not Available for Color Fax)....................... 7-4
Access Codes and Credit Card Numbers............................. 7-5
Search .................................................................................. 7-6
Pause.................................................................................... 7-6
Fax Redial............................................................................ 7-6
Tone/Pulse (For Canada only)............................................. 7-6
8
Remote Fax Options (Not Available for Color Fax).................... 8-1
Fax Forwarding/Paging........................................................... 8-1
Programming a Fax Forwarding Number............................ 8-1
Programming Paging Number............................................. 8-1
Setting Fax Storage .................................................................. 8-2
Changing Remote Retrieval Access Code.............................. 8-2
Remote Retrieval...................................................................... 8-3
Using Remote Retrieval Access Code................................. 8-3
Remote Commands ............................................................. 8-4
Retrieving Memory Status List ........................................... 8-4
Retrieving Fax Messages..................................................... 8-5
Changing Fax Forwarding Number..................................... 8-5
9
Printing Reports.............................................................................. 9-1
MFC Settings and Activity ...................................................... 9-1
To Print a Report ................................................................. 9-1
Transmission Verification (Xmit) Report............................ 9-2
Activity Report Interval....................................................... 9-2
10
Making Copies............................................................................... 10-1
Basic Copy Operations........................................................... 10-1
Making a Single Copy.......................................................10-1
Multiple Copies (Using the ADF)..................................... 10-1
Memory Full Message....................................................... 10-2
Multiple Copies (Using the Scanner Glass) ...................... 10-2
Temporary Copy Settings...................................................... 10-3
Using the Enlarge/Reduce Key ......................................... 10-3

xiii
Using the Options Key ...................................................... 10-4
2in1 ............................................................................... 10-6
4in1 .............................................................................. 10-6
Poster............................................................................. 10-6
Choosing the Quality......................................................... 10-7
Changing Default Copy Settings........................................... 10-8
Paper Type......................................................................... 10-9
Copy Quality ..................................................................... 10-9
Color Adjustment .............................................................. 10-9
Copy Contrast.................................................................. 10-10
Single Color (One Color) ................................................ 10-10
Legal Limitations.................................................................. 10-11
11
Walk-Up Video Printing............................................................... 11-1
Getting Started ....................................................................... 11-1
Auto Switch....................................................................... 11-1
Color Video Printing.............................................................. 11-2
Black & White Video Printing.............................................. 11-2
Temporary Video Print Setting ............................................ 11-3
Using the Options Key ...................................................... 11-3
Changing Default Settings..................................................... 11-5
Paper Type......................................................................... 11-6
Video Printing Quality ...................................................... 11-6
Video Type........................................................................ 11-6
Print Size ........................................................................... 11-7
Video Printing Color Adjustment...................................... 11-7
Video Printing Contrast..................................................... 11-8
Video Capture to PC.............................................................. 11-8
12
Walk-Up PhotoCapture Center
™
................................................ 12-1
Introduction............................................................................ 12-1
Getting Started ....................................................................... 12-1
DPOF Printing................................................................... 12-2
Printing the Index (Thumbnails) ....................................... 12-3
Printing Images.................................................................. 12-3
Using the Options Key ...................................................... 12-4
Changing Default Settings..................................................... 12-6
Paper Type......................................................................... 12-7
PhotoCapture Center
™
Quality.......................................... 12-7
Photo Brightness................................................................ 12-7

xiv
Photo Contrast ................................................................... 12-7
Color Adjustment .............................................................. 12-8
Color Enhancement ........................................................... 12-8
Understand Error Messages............................................... 12-8
PhotoCaputure Center
™
Requirements......................... 12-9
Using PhotoCapture Center
™
from your PC
(For Windows
®
Only)......................................................... 12-9
13
Setting Up the MFC and PC to Work Together......................... 13-1
Using the Brother Machine with Your PC........................... 13-1
Before You Install Multi-Function Link
®
Pro..................... 13-1
Computer Requirements.................................................... 13-2
Using a Bi-directional IEEE-1284 Compliant Parallel
Cable to Connect the MFC to the PC (Using Windows
®
95, 98, 98SE, ME, Windows NT
®
Workstation
Version 4.0 and Windows
®
2000 Professional) ................ 13-2
Notice to PC User.............................................................. 13-2
How to Attach the Filter Core to a Bi-directional
Parallel Cable:............................................................... 13-3
Using Windows
®
95, 98, 98SE and ME............................ 13-4
Using Windows
®
2000 Professional ................................. 13-8
Using Windows NT
®
Workstation Version 4.0 .............. 13-12
Using a USB Cable to Connect the MFC to the PC
(Using Windows
®
98, 98SE, ME and Windows
®
2000
Professional Only)............................................................. 13-17
Using Windows
®
98, 98SE and ME................................ 13-18
Using Windows
®
2000 Professional ............................... 13-24
Installing the Brother Software........................................... 13-27
To install Multi-Function Link
®
Pro (Main
Application): ............................................................... 13-27
To Install Automatic E-mail Printing
(Optional Application): ..........................................13-28
To Register Your MFC 9200C On-Line
(For USA only):...................................................... 13-29
To view On-Line Documentation:.............................. 13-29
To Install PhotoPrinter Pro : ....................................... 13-30
To View Brother Support Information: ......................13-30
Helpful Hints for Windows
®
95/98/98SE/ME/
2000 Professional or Windows NT
®
4.0..................... 13-31
Receiving Faxes into the PC................................................ 13-32

xv
14
Using the MFC as a Printer ........................................................ 14-1
Features................................................................................... 14-1
Printer Driver......................................................................... 14-1
Choosing the Right Kind of Paper........................................ 14-2
Multi-purpose Paper Cassette............................................... 14-2
Loading Paper in Multi-purpose Paper Cassette............... 14-2
Adjusting for Thick Paper and Envelopes.................... 14-2
Manual Feed Slot............................................................... 14-3
Setup for Envelopes........................................................... 14-4
Simultaneous Printing/Fax.................................................... 14-4
Printer Operation Keys ......................................................... 14-4
Reset Key........................................................................... 14-4
Ink Management Key........................................................ 14-5
Turning Off Bi-directional Printing................................... 14-5
15
Printer Driver Settings ................................................................. 15-1
Using the Brother MFC9200C Series Printer Driver......... 15-1
The Paper Tab........................................................................ 15-1
Paper Size.......................................................................... 15-2
User Defined Paper Size.................................................... 15-2
Orientation......................................................................... 15-3
Copies................................................................................ 15-3
Collate........................................................................... 15-3
Reverse Order ............................................................... 15-3
Paper Thickness................................................................. 15-4
Scaling............................................................................... 15-4
2 in 1 ............................................................................. 15-4
Paper Source...................................................................... 15-4
Multi-purpose Paper Cassette....................................... 15-4
Manual Feed.................................................................. 15-4
The Quality/Color Tab........................................................... 15-5
Quality............................................................................... 15-6
Media................................................................................. 15-6
Document .......................................................................... 15-7
Color/Mono ....................................................................... 15-7
Color ............................................................................. 15-7
Mono............................................................................. 15-7
Color Matching............................................................. 15-7
Custom Setting .................................................................. 15-8
Halftone Pattern............................................................ 15-8
True2Life ...................................................................... 15-8

xvi
Printing from your PC........................................................... 15-9
16
Using the Windows
®
-Based Brother Control Center ................ 16-1
Brother Control Center ......................................................... 16-1
AutoLoad the Brother Control Center............................... 16-2
How to Turn Off AutoLoad............................................... 16-2
Using the Scan Keys............................................................... 16-2
Using the Control Panel Keys................................................ 16-3
Scan Image ........................................................................ 16-3
Scan/OCR..........................................................................16-3
Scan to E-mail ................................................................... 16-3
Brother Control Center Features .........................................16-4
Auto Configuration............................................................ 16-4
Scanning Operations.......................................................... 16-4
Copy Operations................................................................ 16-5
PC Fax Operation .............................................................. 16-5
Scanner Settings for Scan, Copy and PC Fax Buttons...... 16-5
Global Settings .................................................................. 16-6
Setting Up the Scanner Configurations............................. 16-6
To access the Scanner Configurations screen: ..................16-6
Perform an Operation from the Control Center Screen..... 16-7
Scan to File.............................................................................. 16-7
Scanner Settings ................................................................ 16-7
Destination Folder ............................................................. 16-8
Send Scan to E-mail ............................................................... 16-8
Scanner Settings ................................................................ 16-9
Email Application.............................................................. 16-9
File Attachments................................................................ 16-9
Conversion Options.........................................................16-10
Show QuickSend Menu................................................... 16-10
QuickSend List................................................................ 16-10
Send Scan to Word Processor ............................................. 16-11
Scanner Settings .............................................................. 16-11
Word Processor ............................................................... 16-11
User Defined Button............................................................. 16-12
Scanner Settings .............................................................. 16-12
Target Application........................................................... 16-13
Copy/Two on One Copy....................................................... 16-13
Scanner Settings .............................................................. 16-13
Copy Settings................................................................... 16-13

xvii
Send a Fax ............................................................................ 16-14
Scanner Settings .............................................................. 16-14
FAX Settings................................................................... 16-15
17
Using ScanSoft
™
PaperPort
®
for Brother/TextBridge
®
............ 17-1
Using ScanSoft
™
PaperPort
®
and TextBridge
®
.................. 17-1
Viewing Items in ScanSoft
™
PaperPort
®
.......................... 17-2
Organizing Your Items in Folders..................................... 17-2
Links to Many Other Applications.................................... 17-3
Using ScanSoft
™
TextBridge
®
OCR
(Converting Image Text to Text You Can Edit)........... 17-3
Importing Items from Other Applications......................... 17-4
Exporting Items in Other Formats..................................... 17-4
Scanning a Document............................................................. 17-4
TWAIN COMPLIANT ..................................................... 17-4
Accessing the Scanner....................................................... 17-5
Scanning a Document into the PC..................................... 17-5
Settings in the Scanner Window........................................ 17-6
Resolution:.................................................................... 17-6
Color Type:................................................................... 17-6
Size:............................................................................... 17-7
Custom:......................................................................... 17-7
Adjust:........................................................................... 17-7
Paper: ............................................................................ 17-8
Video Capture:.............................................................. 17-8
PreScanning an Image....................................................... 17-8
How to use PreScan to adjust an image:....................... 17-8
Video Capture from the PC................................................. 17-10
Connecting Your Video Equipment................................ 17-10
To connect your video equipment: ............................. 17-10
Capturing An Image........................................................ 17-10
To capture a frame as an image: ................................. 17-11
18
Using Multi-Function Link
®
Pro Software................................. 18-1
Introduction............................................................................ 18-1
Brother Resource Manager................................................ 18-1
MFC Remote Setup................................................................ 18-2
Multi-Function Link
®
Pro Main Menu.............................. 18-3
Sending a Fax from Your PC................................................ 18-3
Sending a Fax from the Main Menu.................................. 18-4
Sending a Fax from a Windows
®
Application .................. 18-5

xviii
Receiving Faxes into the PC.................................................. 18-5
Checklist for Your PC ....................................................... 18-5
Viewing Received Faxes................................................... 18-6
19
Using the PhotoCapture Center
™
from Your PC
(For Windows
®
Only).................................................................... 19-1
Introduction............................................................................ 19-1
PhotoPrinter 2000 Pro ....................................................... 19-2
Overview of Basic Steps......................................................... 19-2
20
Using Automatic E-Mail Printing................................................ 20-1
For Windows
®
95/98/98SE, ME only.................................... 20-1
Main Features.................................................................... 20-1
To Access the On-Line Documentation........................ 20-1
21
Using the Brother MFC with a New Power Macintosh
®
G3, G4 or iMac
™
/iBook................................................................ 21-1
Set up Your USB Equipped Apple
®
Macintosh
®
G3,G4 or iMac
™
with Mac OS 8.5/8.51/8.6/9.0 ................ 21-1
Installing the Brother Printer and Scanner Drivers........... 21-1
Installing PaperPort
®
......................................................... 21-2
Using the Brother Printer Driver with your Apple
®
Macintosh
®
.......................................................................... 21-2
Using Brother TWAIN Scanner Driver with Your
Apple
®
Macintosh
®
............................................................. 21-4
Accessing the Scanner....................................................... 21-5
Scanning a Document into Your Macintosh G3, G4
or iMac.......................................................................... 21-5
Settings in the Scanner Window........................................ 21-6
Image............................................................................. 21-6
Resolution ..................................................................... 21-6
Color Type .................................................................... 21-6
Scanning Area............................................................... 21-7
Business Card Size........................................................ 21-7
Miscellaneous................................................................ 21-8
Brightness...................................................................... 21-8
Contrast......................................................................... 21-8
Color Sync Dialog......................................................... 21-8
Scanner Profile.............................................................. 21-9
PreScanning an Image..................................................... 21-10
/