1SHUT OFF MAIN ELECTRICAL SUPPLY FROM THE MAIN FUSE BOX/CIRCUIT BREAKER!
2Remove contents from box. Ensure that no parts are missing. Reference the illustration
steps included with this instruction manual.
Pull the SUPPLY WIRES (5 & 6) and the SUPPLY GROUND WIRE (7), out from the JUNCTION
BOX (1).
*NOTE: MOUNTING BRACKET (2) comes assembled in fixture, for easy install remove
from inside CANOPY (12) and follow Fig.1 illustration.
Place the MOUNTING BRACKET (2) over the JUNCTION BOX (1) and align the slots of
the bracket with the screw holes in the junction box. Slide the MOUNTING SCREWS (4)
through the holes of the MOUNTING BRACKT (2) and thread into the appropriate holes
of the JUNCTION BOX (1). Then, fasten MOUNTING SCREWS (4) tightly.
3
4
6Carefully tuck all wiring back into the JUNCTION BOX (1).
Installation complete.
Restore power at fuse box/circuit breaker. Check operation of Integrated LED Fixture and form
LED LIGHTS (13) in desired pattern.
10
9
Figure 1
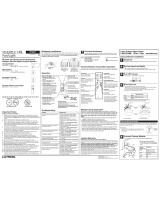
Make the following wire connections (Fig.1) using WIRE NUTS (11):
WHITE (NEUTRAL/COMMON) SUPPLY WIRE (5) TO WHITE FIXTURE WIRE (8)
BLACK (LINE) SUPPLY WIRE (6) TO BLACK FIXTURE WIRE (9)
SUPPLY GROUND WIRE (7) TO FIXTURE GROUND WIRE (10)
*If necessary, wrap all wire connections in electrical tape to ensure a secure connection.
5
7Align the screw holes at the top of the CANOPY (12) to the holes in the MOUNTING
BRACKET (2).
8Attach the CANOPY (12) to the MOUNTING BRACKET (2) by feeding the FIXTURE SCREWS
(3) through the holes of the CANOPY (12) and into the holes of the bracket. Then, fasten
FIXTURE SCREWS (3) tightly.
1-800-316-2532
ULTRALUX® LIGHTING
Modern LED Atom Ceiling Fixture
1-800-316-2532 www.ultraluxled.com
INSTALLATION INSTRUCTIONS
PN: UL-LED-MACF-XXXX
TRIAC DIMMABLE
INTEGRATED
LED
WARNINGS:
Turn power off before installation, inspection, or removal.
Use all necessary precautions while performing this procedure.
Consult a qualified electrician to ensure correct branch circuit conductor.
Min 90ºC supply conductors.
Properly ground electrical enclosure. IT IS IMPERATIVE THAT THE JUNCTION BOX
BE PROPERLY GROUNDED.
This Integrated LED Fixture has no lamp/bulb to replace.
DO NOT REVERSE THE HOT AND NEUTRAL CONNECTIONS, OTHERWISE SAFETY
WILL BE COMPROMISED.
GENERAL: All electrical connections must be in accordance with local and National Electrical
Code (N.E.C.) standards. If you are unfamiliar with proper electrical wiring connections, contact
and obtain the services of a qualified electrician. Use UL or IEC approved wire only for
input/output connections.
Remove fixture and mounting components from the box, and make sure that no parts are
missing by referencing the illustration in the installation instructions.
Do not remove or touch the inside of plastic lens covering the LED board.
DIMMING: This product is compatible with most common residential type dimmers. Dimming performance will
depend upon dimmer, dimmer settings (dimmers with adjustments to brightness range), wiring method, and
number of LED modules. For best results, set dimmer position at maximum before adjusting to a lower light level.
5-YEAR LIMITED WARRANTY
LIMITED WARRANTY: This fixture is warranted to be free from defects in
workmanship and material for up to 5-years. Based upon reasonable household
usage, when used in accordance with package and included instructions. If this
fixture does not last for the time period guaranteed, manufacturer will send you a
replacement fixture upon receipt of the returned fixture, register receipt, and proof
of purchase. To contact us, please email us at returns@ultraluxled.com or call us at
1-800-316-2532 to find out how to return the fixture. We are committed to making
high quality products. Returning the fixture will help us monitor and further improve
product quality. This replacement is the sole remedy available, and LIABILITY FOR
INCIDENTAL OR CONSEQUENTIAL DAMAGES IS HEREBY EXPRESSLY EXCLUDED.
Toll Free: 1-800-316-2532
www.ultraluxled.com
© 2021 ULTRALUX® LIGHTING is a registered trademark of Superior Ventures LLC. All rights reserved.
This device complies with Part 15 of the FCC Rules and has been tested and found to comply with the limits for Class B
digital device. Operation is subject to the following two conditions: (1) this device may not cause harmful interference, and
(2) this device must accept any interference received, including interference that may cause undesired operation. Any
changes or modifications not expressly approved by manufacturer could void user’s authority to operate the equipment.
1
2
4
5
7
8
1. JUNCTION BOX (NOT INCLUDED)
2. MOUNTING BRACKET
3. FIXTURE SCREWS (x2)
4. MOUNTING SCREWS (x2)
5. WHITE SUPPLY WIRE
6. BLACK SUPPLY WIRE
7. SUPPLY GROUND WIRE
8. WHITE FIXTURE WIRE
9. BLACK FIXTURE WIRE
10. FIXTURE GROUND WIRE
11. WIRE NUT (x3)
12. CANOPY
TROUBLESHOOTING:
• Check that line voltage at fixture is correct.
• Ensure that there is voltage at lamp fixture wires.
If there is no voltage, then check all connections.
• Check that fixture is grounded properly.
If fixture does not light:
• Check switch to ensure that there are no defects.
• Check fuse/circuit breaker for trips, then check wiring
connections.
CLEANING AND MAINTENANCE:
WARNING: Always be certain that electric current is turned off
before cleaning.
•Only a soft damp cloth should be used. Harsh cleaning products
may damage the finish.
CAUTION: Ensure fixture temperature is cool enough to touch.
DO NOT clean or perform maintenance while fixture is energized.
• Clean lens and Suite with non-abrasive cleaning solution.
• Do not open fixture to clean LED. Do not touch the LED.
• Do not spray liquid directly on to LED, LED driver or wiring.
Please follow the following steps for installation.
Please read carefully before installing fixture.
Save these instructions, as you may need them at a
later date.
Thank you for purchasing ULTRALUX®
LIGHTING Fixtures!
11
12
3
6
10
9