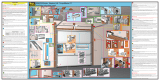
LS (Left Side) RS (Right Side)
#2. IN-JAMB MOUNTING
NOTE: There is a Left and Right Door Panel
unless otherwise specified
For adjustments, see pages 6 & 7
First, remove the Wall Mounting Plate from the
“U” Bracket. (See Fig. 3)
From inside the
cooler/freezer, measure
21/4'' in at the very top
of the jamb and place a
mark. Using a mason’s
level, draw a straight plumb line
7'' down from the mark. (See Fig.4 )
Place the “U” Bracket, with the PVC panel
attached, against the jamb, touching the header
and using the line to keep the panel vertically
straight. Mark the 4 holes. Remove the unit and
drill the holes. (See Fig. 5 )
NOTE: A 5/32'' drill bit should be used.
Next, do the same procedure on the
other side of the doorway opening.
Finally, put each bracket/panel in place and screw
down tightly to the door jamb using the supplied 1/4''
x 11/2'' screws and washers. (See Fig. 6 )
Fig. 4
Fig. 6
–4 –
Jamb
“U” Bracket
4 Mounting
Screws & Washers Header
CAUTION: Make sure that the door jamb is strong enough to support the weight
and force of the door. If questionable, check with cooler/ freezer manufacturer.
Inside of
Cooler/Freezer
Header
Jamb
Door
Fig. 5
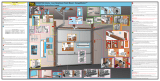
LS (Left Side)
RS (Right Side)
NOTE: There is a Left and Right Door Panel unless otherwise specified.
However, when using this mounting method, the panels are reversed
from Method #1.
This methods is primarily used for non-cooler/freezer doors
For adjustments, see page 6 & 7
Do not disassemble the PVC panel from the bracket or remove
the hinge pin from the mounting plate.
#3. WALL / IN-JAMB MOUNTING
Finally, put each unit in place and screw down tight-
ly to the interior wall using the supplied 1/4'' x 11/2''
screws and washers. (See Fig. 8)
Fig. 8
–5 –
6 Mounting
Screws & Washers
Jamb
Wall Mounting
Plate
Header
Fig. 7
View
from Inside
Cooler/Freezer
Place the right Wall Mounting Plate with the PVC panel
attached, against the inside right corner of the
doorway opening. Mark the 6 holes. (See Fig. 7)
IMPORTANT: The panel must be able to move
freely beneath the door header and there should
be no gap between the door panel and the
header.
Remove the unit and drill the holes.
NOTE: A 5/32'' drill bit should be used.
NOTE: There should be
no gap between the door
panel and the header.
Wall
Mounting
Plate
“U” Bracket
Fig. 3
Do not disassemble the PVC panel from the bracket
or remove the hinge pin from the mounting plate.
CAUTION: Make sure that the door jamb is strong enough to support the weight
and force of the door. If questionable, check with cooler/ freezer manufacturer.