Page is loading ...

®
CONTENTS
WARNING: It is recommended that installa-
tion, repairs, or adjustments of this product be
made by a qualified door agency.
IMPORTANT
An overhead door is a large heavy object that moves with the help
of springs under high tension. Moving objects and springs under
tension can cause injuries. For your safety and the safety of others,
follow these instructions:
1. Wear protective gloves during installation to avoid possible cuts
from sharp metal edges.
2. It is always recommended to wear eye protection when using tools,
otherwise serious eye injury could result.
4. Keep door in full view while operating it. Watch the door open or
close completely before leaving the area.
5. Should the door become hard to operate or completely inopera-
tive, a qualified door agency should correct the problem to prevent
damage to the door or serious personal injury.
6. DO NOT PERMIT children to play with the garage door or the
electrical controls. Fatal injury could result, should the child become
entrapped between the door and the floor.
7. To prevent serious injury or death, avoid standing in the open
doorway or walking through the doorway while the door is moving.
8. Use lift handles/step plate when manually operating the door. DO
NOT place fingers into section joints when operating the door.
9. Remove pull rope if door is operated by an electric opener.
10. Door is constantly under EXTREME SPRING TENSION. To prevent
possible serious injury or death, adjustments, repairs, removal, or
installation, ESPECIALLY of SPRING ASSEMBLIES, CABLES, or
BOTTOM BRACKETS, should be performed ONLY by qualified door
service people.
SAFETY NOTICES
11. Check door and its hardware monthly for loose, worn, or broken
parts. Have any repairs or adjustments made by a qualified door agency.
12. Have the door professionally inspected once a year.
3. Operate door ONLY when properly adjusted and free of obstruc-
tions.
This manual MUST be attached to the wall in close proximity to the door.
Door Preparation
Leveling Door
Installing Door Sections
Installing Track
Torsion Springs
Trolley Operators
Operating Zone
Part #280724© Copyright 2001 Wayne-Dalton Corp. Rev.7 07/2002
®
© Copyright 2000 Wayne-Dalton Corporation
MAINTENANCE AND PAINTING INSTRUCTIONS
MAINTENANCE
While factory-applied finishes for steel garage doors are so durable that they will last many years longer than ordinary paints, it is desirable to clean them thoroughly
on a routine basis. Apparent discoloration of the paint may occur when it has been exposed in dirt-laden atmospheres for long periods of time. Slight chalking may
also cause some change in appearance in areas of strong sunlight. A good cleaning will generally restore the appearance of these coatings and render repainting
unnecessary. An occasional light cleaning will also help maintain an aesthetically pleasing appearance. To maintain the original finish of the garage doors, the only
regular maintenance necessary is that of annual washing. Mild solutions of detergents or household ammonia will aid in the removal of most dirt, and the following
are recommended levels:
One cup of Tide™, or other common detergents, which contain less than 0.5% phosphate, dissolved into five gallons of warm water. NOTE: The use of
detergents containing greater than 0.5% phosphate is not recommended for use in general cleaning of garage doors. NEVER BLEND CLEANSERS OR DETER-
GENTS WITH BLEACH.
SURFACE PREPARATION FOR PAINTING
Wax on the surface must be removed or paint peeling/flaking will result. To remove this wax, it will be necessary to lightly scuff the surface with a gray (not green!)
3M ScotchBrite pad saturated with soapy water. A final wipe and rinse should be done with clean water only, to remove any loose dust or soap film.
Surface scratches, which have not exposed the metal substrate, can be lightly buffed or sanded with 0000 steel wool or No. 400 sand paper to create a smoother
surface. Care must be taken to not expose the substrate under the paint (see Note No. 2). Once this exposed condition exists, the likelihood for rusting is greatly
increased. See the following paragraph if the metal substrate is observed.
Exposed substrate must be treated to prevent rust from forming (see Note No. 2). Sand the exposed area lightly and paint with high quality metal primer to protect
from corrosion. Follow drying time on primer can label before applying topcoat.
The surface to be recoated must not be to smooth or the repaint material will not adhere to it (see Note No. 2). It is advisable to test a representative area to evaluate
adhesion. If poor adhesion is observed, the surface must be abraded by sanding or buffing using grades mentioned above. Care must be taken to not expose the substrate
under the paint.
PAINTING
After the surface has been properly prepared it must be allowed to dry thoroughly, then coated immediately with a premium quality latex house paint. Follow the
paint label directions explicitly. Oil base paint is not recommended. Please note that if substrate is exposed, painting with latex paint may cause accelerated rusting
of steel.
NOTES:
1. Repainting of finish painted steel doors cannot be warranted as this condition is totally beyond door manufacturer’s control.
2. If the steel door surface has a finish painted textured surface representing wood grain, stucco, etc., this step should not be attempted as danger of
exposing substrate is greatly increased.
3. Consult a professional coatings contractor if in doubt about any of the above directions.
4. Follow directions explicitly on the paint and solvent container labels for proper applications of coatings and disposal of containers. Pay particular
attention to those directions involving acceptable conditions in which to paint.
ACRYLIC GLAZING CLEANING INSTRUCTIONS:
1. To clean acrylic glazing wash with plenty of nonabrasive soap or detergent and water. Use the bare hand to feel and dislodge any caked dirt or mud. A soft,
grit-free cloth, sponge or chamois may be used to wipe the surface. Do not use hard or rough cloth that will scratch the acrylic glazing. Dry with a clean damp
chamois.
2. Grease and oil may be removed with kerosene or a good grade of naphtha (No aromatic content.). Users of these solvents should become familiar with their
properties to handle them safely.
3. Do not use: Window cleaning fluids, scouring compounds, gritty cloths, leaded or ethyl gasolines, or solvents such as alcohol, acetone,
carbon tetrachloride, etc.
Model 2411 and 2415
LIMITED WARRANTY
The Manufacturer warrants that its door and its hardware fittings will be free from defect in workmanship and material. Should any defect in workmanship or
material appear within
ONE YEAR of delivery, manufacture shall, upon notification, correct such nonconformity at its option, by repairing or replacing any
defective part or parts. See Maintenance And Painting Instructions For Prepainted Steel Doors listed elsewhere in this manual or contact Wayne-Dalton Distributor
for a copy of the maintenance and painting instructions for prepainted steel doors.
The Manufacturer warrants the steel skin of the MODELS 2411 and 2415 Roll-Formed steel garage door for a period of 10 YEARS, from the time of delivery
against cracking, splitting or deterioration due to rust-through. Other conditions and exceptions as contained herein apply.
NO EMPLOYEE, DISTRIBUTER, OR REPRESENTATIVE IS AUTHORIZED TO CHANGE THE FOREGOING WARRANTIES IN ANY WAY OR GRANT
ANY OTHER WARRANTY ON BEHALF OF MANUFACTURER.
The Manufacturer shall not be responsible for any damage resulting to or caused by its products by reason of installation (the warranty becomes null and void if
other than Manufacturer’s specified holes are drilled), improper storage, unauthorized service, alteration of products, neglect or abuse, or attempt to use the products
for other than the customary usage or for their intended purposes. The above warranty does not cover normal wear or any damage beyond Manufacturer’s control
or replacement labor.
THIS WARRANTY COVERS A COMMERCIAL PRODUCT. THE FORGOING WARRANTIES ARE LIEU OF ALL OTHER WARRANTIES AND NO
REPRESENTATIONS, GUARANTEES, OR WARRANTIES, EXPRESSED OR IMPLIED, (INCLUDING, BUT NOT LIMITED TO, THE WARRANTY OF
MERCHANTABILITY OR FITNESS FOR A PARTICULAR PURPOSE), ARE MADE BY MANUFACTURE IN CONNECTION WITH THE MANUFACTURE OR
SALE OF ITS PRODUCTS.
Claims for defects in material and workmanship covered by this warranty shall be made in writing to the dealer from whom the product was purchased within the
warranty period. Manufacturer may either send a service representative or have the product returned to the Manufacturer at Buyer’s expense for inspection. If judged
by Manufacturer to be defective in material or workmanship, the product will be replaced or repaired at the option of Manufacturer, free from all charges except
authorized transportation and replacement labor.
THE REMEDIES OF BUYER SET FORTH HEREIN ARE EXCLUSIVE AND ARE IN LIEU OF ALL OTHER REMEDIES. THE LIABILITY OF MANUFAC-
TURER, WHETHER IN CONTRACT, TORT, UNDER ANY WARRANTY, OR OTHERWISE, SHALL NOT EXTEND BEYOND ITS OBLIGATION TO REPAIR
OR REPLACE, AT ITS OPTION, ANY PRODUCT OR PART FOUND BY MANUFACTURER TO BE DEFECTIVE IN MATERIAL OR WORKMANSHIP.
MANUFACTURER SHALL NOT BE LIABLE FOR COST OF REMOVAL OR INSTALLATION OR SHALL NOT BE RESPONSIBLE FOR ANY DIRECT,
INDIRECT, SPECIAL OR CONSEQUENTIAL DAMAGES OF ANY NATURE.
This warranty gives you specific legal rights which may vary from state to state. However, some states do not allow limitations on how long an implied warranty
lasts or the exclusion or limitation of incidental or consequential damages, so the above limitations or exclusions may not apply to you.
Yearly maintenance as described in the Maintenance and Painting Instructions for Prepainted Steel Doors is required. Should you need an additional copy,
contact your local authorized Wayne-Dalton distributor.
Model 2411 & 2415
COMMERCIAL GARAGE DOOR
INSTALLATION INSTRUCTIONS
and OWNERS MANUAL
Read these instructions carefully before attempting installation.
If in question about any of the procedures, Do Not perform the work.
Instead have a qualified door agency do the installation or repairs.

PG. 15
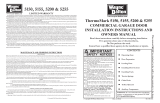
OPERATOR ARM
(SUPPLIED BY OTHERS)
CENTER HINGES
6” WELDED
TRUSS
1/4-20 X 7/8”
TEK SCREWS
OPERATOR ARM
(SUPPLIED BY OTHERS)
1-1/2” X 2-1/4” ANGLE
(CUT TO FIT BETWEEN
STRUT AND CENTER
HINGE)
(SUPPLIED BY OTHERS)
Trolley installation for doors:
< 9’ 2” All Heights
9’ 3” thru 16’ 2” X 10’ 1” (5 sections)
Trolley installation for doors:
16’ 3” thru 19’ 2” over 10’ 1” (5 sections)
19’ 3” thru 24’ 2”
Trolley installation for doors:
9’ 3” thru 16’ 2” over 10’ 1” (5 sections)
16’ 3” thru 19’ 2” X 10’ 1” (5 sections)
STEP 14: INSTALLING THE INSIDE SIDE LOCK:
Attach the inside side lock using (4) 1/4” - 20 x 5/8”
Tek screws as shown in Fig. O
FIG. O
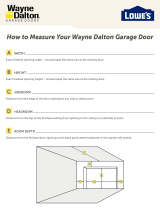
OPERATING ZONE
You Can Save Time And Effort If You First Establish All The Facts About
The “Operating Zone”
The “ Operating Zone” is the area surrounding the door opening, extending upward and backward as far as the door will
travel. We call it the Operating Zone because it is the area that the door will have to operate within and the dimensions are
critical and must be known in advance of a door and operator installation.
1. Daylight Opening; Exact size of finished opening
2. Sideroom; required distance from the door opening to a wall or any obstruction. Refer To Sideroom Chart
3. Headroom; required distance from top of door opening to the ceiling or underside of joists. Refer To Headroom Chart
4. Backroom; required distance from door opening header to the furthest back point to which the door track or operator unit, and their
brackets, will extend.
PG. 2
HEADROOM CHART For Standard Lift Track (Minimum Distance Required)
Dim. Y INDICATES THE DISTANCE FROM THE HEADER TO THE CENTER LINE OF TORSION SHAFT.
NOTE: 2 1/2” OF ADDITIONAL HEADROOM IS REQUIRED FOR SINGLE TROLLEY OPERATOR INSTALLATIONS.
STEP 1. Verify The OPERATING ZONE Dimensions
A - Exact size of finished daylight opening. Do you have the correct door size?
B - Sideroom requirements for track and spring shaft. (Refer to sideroom chart)
C - Headroom requirements. (Refer to headroom chart)
D - Backroom ( depth into room ) Manual lift = Door height plus 18” Operators = Door height plus 48”
E - Jambs must be plumb and solidly attached to the building. Floor must be level or exact gradeline established before
you start.
STEP 2. Shipping tags show important information, door size, track size and type, spring size and hardware type.
Verify that all material is present before attempting installation.
Dual Trolley installation
for doors over 24’ 2”
wide X any height.
CENTER HINGES
OPERATOR ARM
(SUPPLIED BY
OTHERS)
8” EXTENSION
(REQUIRED TO CLEAR
WELDED TRUSS)
(2) 1/4-20 X 7/8” TEK SCREWS
PER CORNER
OPERATOR BRACKET
8” WELDED
TRUSS SHOWN
1-1/2” X 2-1/4” ANGLE
(SUPPLIED BY OTHERS)
ATTACH TO EACH STILE WITH
(2) 1/4-20 X 7/8” TEK SCREWS
OPERATOR ARM
(SUPPLIED BY OTHERS)
1/4-20 X 7/8”
TEK SCREWS
8” EXTENSION
(REQUIRED TO CLEAR
WELDED TRUSS)
8” EXTENSION
(REQUIRED TO
CLEAR WELDED
TRUSS)
38 in. operator bracket
and dual trolley brackets
are optional for doors
19’ 3” thru 24’ 2” wide.
HEADROOM
“A”
“B”
SIDE ROOM
DAYLIGHT
OPENING
HEIGHT
BACKROOM
DAYLIGHT
OPENING
WIDTH
SIDE ROOM
TRACK DEPTH
SIZE INTO
ROOM
STEEL
and WOOD SOLID TUBE
MASONRY
DOOR HEIGHT
PLUS 18"
DOOR HEIGHT
PLUS 24"
DIM. A
DIM. B
SIDEROOM
SIDEROOM
TRACK
TORSION SHAFT
2" 2-1/2" 3-1/2" 10" 5"
5"3" 3" 5" 10"
3" TRACK 2" TRACK 2" TRACK
15" RADIUS 15" RADIUS 12" RADIUS
400-8 H EA DRO O M 15 1/2" 15" 12"
400-12 DIM Y 13" 12 1/2" 9 1/2"
H EA DRO O M 17 1/2" 17" 14"
DIM Y 14 1/2" 14" 11"
H EA DRO O M 21" 20 1/2" NA
DIM Y
16 1/2"
16"
NA
HEADROOM CHART
For Standard Lift Track (M inim um Distance Required)
DRUMS DIMS
5250-18
800-32

PG. 3
DIM Y
HEADER TO
SHAFT
CENTERLINE
MINIMUM
HEADROOM
REQUIRED
(REFER TO
ABOVE CHART)
8” for 2” TRACK
12” for 3” TRACK
EXTEND JAMBS TO OPENING HEIGHT
plus
DIM Y
plus
1 1/2” (MINIMUM LENGTH)
TORSION SHAFTS REQUIRE 10” OF
SIDEROOM FOR SOLID SHAFTS and 5”
OF SIDEROOM FOR TUBULAR
SHAFTS
NOTE: HEADROOM CAN BE REDUCED 2-1/2” BY
USING THE QUICK CLOSING TOP FIXTURE OR BY
SHORTENING THE VERTICAL TRACKS BY
3” MAX.
SIDEROOM REQUIREMENTS
2 inch TRACK
3 inch TRACK
PRECAST WALL WITH
CORNER ANGLE
3” TRACK
PRECAST WALL WITHOUT
CORNER ANGLE
3” TRACK
STEEL JAMBS
3” TRACK
WOOD JAMBS
3” TRACK
STEEL JAMBS
2” TRACK
PRECAST WALL WITH
CORNER ANGLE
2” TRACK
PRECAST WALL WITHOUT
CORNER ANGLE
2” TRACK
WOOD JAMBS
2” TRACK
1” OVERLAP
1”
1/2”- 5/8”
4”
1” OVERLAP
1”
1/2”- 5/8”
4”
1”
1/2”- 5/8”
4”
FLUSH
1”
4”
4 3/4”
5/16 X 1”
DRILLING /
TAPPING
SCREW
3/8 X 3” MIN.
SLEEVE
ANCHOR
OPTIONAL
MOUNTING
BRACKET
5”
OPTIONAL
MOUNTING
BRACKET
3/8 X 3” MIN.
SLEEVE
ANCHOR
5/16 X 1”
DRILLING /
TAPPING
SCREW
2” X 6” JAMB
IS
RECOMENDED
1/2”- 5/8”
2 1/2” MIN.
SIDE ROOM
1” OVERLAP
1 1/2”
1/2”- 5/8”
3 1/2”
1” OVERLAP
1 1/2”
1/2”- 5/8”
3 1/2”
1” OVERLAP
1 1/2”
1/2”- 5/8”
3 1/2”
FLUSH
1 1/2”
3 1/2”
4 3/4”
5/16 X 1”
DRILLING /
TAPPING
SCREW
3/8 X 3” MIN.
SLEEVE
ANCHOR
OPTIONAL
MOUNTING
BRACKET
4 3/4”
OPTIONAL
MOUNTING
BRACKET
3/8 X 3” MIN.
SLEEVE
ANCHOR
5/16 X 1”
DRILLING /
TAPPING
SCREW
2” X 6” JAMB
IS
RECOMENDED
1/2”- 5/8”
2 1/2” MIN.
SIDE ROOM
2 1/2” MIN.
SIDE ROOM
3 1/2” MIN.
SIDE ROOM
5” MIN.
SIDE ROOM
3” MIN.
SIDE ROOM
3” MIN.
SIDE ROOM
3” MIN.
SIDE ROOM
5/16 X 1 5/8”
LAG SCREW
5/16 X 1 5/8”
LAG SCREW
1” OVERLAP
(2) 3/8” x 1-1/4” Bolts To
Secure Bracket To Angle
Heavy Perforated Angle
(1-5/8 x 2-3/8” x 11 GA.)
Center Spring Bracket
Girt
(2) 3/8” x 1-1/4” Bolts & Nuts
Top & Bottom
Girt
“Y”
(
< 7 ft.)
(2) 3/8” x 1-1/4” Bolts To
Secure Bracket To Angle
Heavy Perforated Angle
(1-5/8 x 2-3/8” x 11 GA.)
Center Spring Bracket
(2) 3/8” x 1-1/4” Bolts & Nuts
Top & Bottom
Girt
Girt
Space Center Brackets 12” -
14” Apart On Applications
Requiring Couplers
(2) 3/8” x 1-1/4” Bolts To
Secure Bracket To Angle
Heavy Perforated Angle
(1-5/8 x 2-3/8” x 11 GA.)
Center Spring Bracket
(2) 3/8” x 1-1/4” Bolts & Nuts
Top & Bottom
Girt
Girt
Space Center Brackets 12” -
14” Apart On Applications
Requiring Couplers
Bolt “Z” Shaped Assembly Using
(4) 3/8” x 1-1/4” Bolts And Nuts
Fig. N-2
Fig. N-3
Fig. N-4
Steel Spring Pad Applications
Contact Manufacturer For Applications Other Than What Is Listed Below
NOTE: These Spring Mounting Techniques Are
Not Supported For 800-32, 6375-164, 1100-18,
1350-28, & 800-120 Drums. These Instructions
Are Also Not Applicable For 5750-120 Drums
With 72” Or More High-Lift
NOTE: Do Not Bolt (2) 3-3/4” Torsion Springs to
One Center Bracket
Maximum Door Size 9’ x 9’ (Maximum Door Weight 210 lb.): Cut perforated angle (1-5/8 x 2-3/8” x 11 GA.)
to Dim “Y”. Thru-bolt top and bottom of angle to each girt using (4) 3/8” x 1-1/4” bolts and nuts. Thru-
bolt center bracket to perforated angle using (2) 3/8 x 1-1/4” bolts and nuts (See Fig. N-2).
Maximum Door Size 14’ x 12’ (Maximum Door Weight 400 lb.): Cut (2) perforated angle (1-5/8 x 2-3/8” x
11 GA.) to Dim “Y”. Thru-bolt top and bottom of each angle to each girt using (4) 3/8” x 1-1/4” bolts and
nuts. Thru-bolt each center bracket to perforated angle using (2) 3/8 x 1-1/4” bolts and nuts (See Fig. N-3).
Maximum Door Size 14’-2” x 12’-1” (Maximum Door Weight 800 lb.): Cut (2) pieces of perforated angle
(1-5/8 x 2-3/8” x 11 GA.) to Dim “Y” and (2) more pieces at Dim “Y” minus 3. Bolt the angles together
into a “Z” shape using (4) 3/8” x 1-1/4” bolts and nuts. Thru-bolt top and bottom of each “Z” shaped angle
to each girt using (4) 3/8” x 1-1/4” bolts and nuts. Thru-bolt each center bracket to perforated angle
assembly using (2) 3/8 x 1-1/4” bolts and nuts (See Fig. N-4).
NOTE:
Do NOT Bolt (2) 3-3/4” Torsion Springs To ONE Center Bracket
PG. 14
NOTE: Maximum Spacing For Dimension “Y” is
84 in. (7 ft.) These Instructions Are Not Appli-
cable For A Span Greater Than 84 in.
“Y”
(
< 7 ft.)
“Y”
(< 7 ft.)

PG. 4
STEP 10: Attaching the Back Hanger Angles: Apply another locking pliers above the No. 2 or No. 3 roller
and then remove the locking pliers from the top roller. With assistance push downward on the door and
remove all locking pliers. Carefully raise door until one and a half panels are in the horizontal track, lock
door into position using locking pliers.
Space the horizontal tracks 3/4” from section edge and level (or running upward). Using 1-5/8” x 2-3/8”
x 12 GA. Min. Angle, secure each horizontal track to the building as shown in Fig. Using 3/8” bolts and
nuts . Lateral brace all drop angles once proper spacing is determined.
Doors over 11 ft. high and over 14 ft. wide must have (1) intermediate drop hanger as shown above right
side.
Doors between 16’ and 18’ high must have (2) center hanger assemblies as shown above left side.
Doors over 18’ high must have center hangers placed at 6’ center max.
STEP 11: Checking the Counterbalance: Release the locking pliers from vertical track and check the door’s
counterbalance. Adjust springs if necessary.
STEP 12: Vertical Track and Top Bracket Adjustments: Vertical tracks can now receive final adjustments.
Open and close the door a few times, checking and adjusting side clearance (if necessary). Tighten jamb
fasteners (lags, teks, and anchors) to permanently secure verticals. Adjust door in or out from jamb by
loosening the track to obtain proper seal. Permanently tighten all track bolts. Adjust top bracket roller
carrier so that the top section is sealed against header.
STEP 13: Lubrication: Lubricate springs, rollers, and bearings with oil.
DO NOT GREASE THE INSIDE OF THE TRACK.
Intermediate hangers for all
doors over 11’ high and over
14’ wide. Positioned half way
between jamb and rear hanger.
Lateral brace all hanger
angles.
Use a 3/8” X 3/4”
truss bolt for
roller clearance.
Apply locking pliers to
secure while attaching
hangers.
Use 12 GA. Minimum
angle (1-5/8” X 2-3/8”)
Doors 16’ to 18’ use 2
intermediate hangers.
Over 18’ use hangers at
6’ max. centers
3/8” dia. Bolt should
protrude into track
to serve as a roller
stop.
PG. 13
2” TRACK 1/4” GRADUATION
8 SECTIONS HIGH OR LESS
FIG.B
FIG.E
FIG.D
FIG.C
STEP 3. Locate the left and right hand bottom brackets, secure the counterbalance cable using clevis pin,
washer and cotter key shown in fig. B
Secure bottom bracket to section using 1/4” self-drilling and tapping screws shown in fig. C
( for doors over 14’2” wide use double wide bottom brackets as shown in figure G) ( For doors
using Broken Cable Safety Device Refer to Fig. J and the auxiliary instructions.)
FIG.A
#1 HINGE
#2 HINGE
#3 HINGE
Step Plate (provided on
insulated doors)
1/4”-20 X 7/8” TEK
Screws (2)
Lift Handle
1/4”-20 Whiz Nuts (2)
Spacer (2)
1/4”-20 X 2-1/2” Hex
Head Bolt (2)
Lift Handle
Roller spacer (1/2” long)
required on BB-6 type bottom
brackets. Secure bracket with
(5) screws
NOTE: 2” TRACK HINGE SCHEDULE FOR
DOORS LESS THAN OR EQUAL TO 16’-1”
HIGH.

3” TRACK 1/4” GRADUATION
9 SECTIONS HIGH OR LESS
FIG.F
FIG.I
FIG.H
FIG.G
Align the appropriate end hinge to the pre-punched holes in the stiles and secure using (2) 1/4” x 5/8”
self tapping screws per hinge. Products 16’2” wide and less require (1) end hinge (fig. D) and doors over
16’2” wide require double end hinges. (Fig. H)
The end hinge sequence is dependent on track size (2” or 3”).
2” track applications begin with a number 1 hinge attached to the top corners of the bottom section.
3” track applications begin with a number 3 hinge.
( Refer to the illustrations dependant on your track size)
#3 HINGE
#4 HINGE
#5 HINGE
PG. 5
FIG.J
Refer to the auxiliary
instructions.
Secure Bracket
using (10) screws.
NOTE: 3” TRACK HINGE SCHEDULE ON
DOORS LESS THAN OR EQUAL TO 18’-1” HIGH.
DOORS OVER 18’-1” HIGH (OVER 9 SECTIONS)
WILL REQUIRE 1/8” GRADUATION. BY START-
ING WITH (2) #3 HINGES, (2) #4 HINGES, (2) #5
HINGES ETC...
NOTE: DOUBLE END-
STILES BEGIN AT 16’3” WIDE
ON ALL 2411-2415 DOORS
WARNING:
DO NOT USE UNDERSIZED WINDING RODS (SCREWDRIVERS, ETC.)
Wind springs 1/4 turn at a time to the number of complete
revolutions recommended on the spring tag. Wind up as
shown Fig. When the proper number of turns is reached,
rest the winding rod against the top section or header,
stretch the spring then, tighten the set screws on the
winding cone. Release the vice grips from the spring
shaft(s). Adjust the coupler on split solid shafts until
drums are in time (check door level) and tighten coupler.
WARNING:
Apply locking pliers to the track ABOVE the
roller and lock door if applicable, before winding the spring
Wind springs toward ceiling.
(Standard lift applications)
SPRING TURN CHART
PG. 12
DOOR HEIGHT 400-8 400-12 5250-18 800-32
6'6" 7 1/2 7 1/2
7'0" 7 7/8 7 7/8
7'6" 8 1/2 8 1/2
8'0" 8 7/8 8 7/8 6 3/4
8'6" 9 1/4 7 1/8
9'0" 9 1/2 7 3/8
9'6" 10 1/8 7 3/4
10'0" 10 1/2 8 1/8 5 3/8
10'6" 11 8 3/8 5 5/8
11'0" 11 1/2 8 7/8 5 7/8
11'6" 12 9 1/8 6
12'0" 12 1/2 9 1/2 6 1/4
12'6" 9 7/8 6 1/2
13'0" 10 1/4 6 3/4
13'6" 10 1/2 7
14'0" 10 7/8 7 3/8
DOOR HEIGHT 400-8 400-12 5250-18 800-32
14'6" 11 1/4 7 1/2
15'0" 11 1/2 7 5/8
15'6" 11 7/8 8
16'0" 12 1/4 8 1/8
16'6" 12 1/2 8 1/4
17'0" 12 7/8 8 5/8
17'6" 13 1/4 8 7/8
18'0" 13 1/2 9
18'6" 9 1/4
19'0" 9 1/2
19'6" 9 3/4
20'0" 9 7/8
20'6" 10 1/4
21'0" 10 3/8
21'6" 10 1/2
22'0" 11

(2) 3/8” Nuts and
Washers
Top
Plate
Perimeter Seal
Spring Mounting
Pad. 2 x 6” White
Pine or Denser.
Secured with min.
(4) 5/16” x 4” lag
bolts into header.
Header
(2) 3/8” x 1”
or 1-1/2”
Bolts
Pre-Cast
Steel
1/2” x 3” Sleeve Anchor
NOTE: Must secure sleeve
anchors to building first then
attach brackets to anchors
5/16” x 1” Self-Drilling
and tapping screw
Fig. N-1
PG. 11
(1) Tamper - Resistant
5/16 X 2” Lag Screw
Secure each end bracket to the horizontal reinforcing angle using (2) 3/8” x 3/4” truss bolts and nuts.
Anchor the wall mounting flange of the end bracket to the jamb using (2) 5/16” x 1-5/8” lags (wood),
(2) 5/16” x 1” self-drilling and tapping screws (steel), or (2) 3/8” x 3” sleeve anchors (precast ).
Spring pads must be securely anchored now before proceeding. The pads must be flush (± 1/8”) with the
jambs. Attach the spring center bearing brackets to the pad(s) using the following fasteners:
Pre-Cast: Secure each spring bearing bracket using (2) 1/2” x 3” sleeve anchors. This installation will
require the 1/2” anchors to be secured to the building, then securing the brackets to the anchors.
Wood: Secure each spring bearing bracket using (2) 5/16” x 1-5/8” lag screws for the upper two holes and
(1) 5/16” x 2” tamper proof lag screw for the lower hole.
Steel: Secure each spring bearing bracket using (3) 5/16” x 1” self-drilling and tapping screws. See Page 15
for alternate spring bearing bracket mounting methods.
NOTE: The coupler support brackets only require (2) fasteners, where the spring bearing brackets
require (2) fasteners in the lower slot and hole, then (1) fastener in the top slot.
Secure the stationary cone(s) (dead end) to the spring bearing bracket(s) using 3/8” bolts and nuts.
NOTE: 3-3/4”, 6” and Duplex , each spring is secured to one center bearing bracket. DO NOT attach or
attempt to attach two springs of this size to one bearing bracket.
Feed the cables (attached to the bottom bracket) up through the vertical track, behind the roller shafts and
secure to the drum. Push the drum up against the race, of the end bearing bracket and secure to the shaft
by tightening the set screws (solid shafts use 1/4” key(s) and set screws to secure drums). Rotate drum
until cable is taut and apply vice grips to shaft, with end resting, against wall or jamb. This will hold cables
onto drum. There must be at least 1/2 wrap of cable onto drum, if not contact Wayne-Dalton for proper
cable lengths. Attach cable and secure drum to shaft as mentioned above. Make sure drums are in time on
one piece shaft assemblies before winding spring(s). Each drum should be at the 3 O’clock position, make
adjustments as necessary.
If top section is not assembled, do so now, before winding springs. Also make sure all hardware is securely
attached to all sections.
Use appropriate diameter winding rods. (Snug fitting 1/2”, 5/8”, or 3/4”)
STEP 4. Products over 12’2” require U-bars to be secured to each section. Position the 2” or 3” Ubars below
the lower hinge leaf and attach with (2) 1/4-20 X 7/8” tek screws (1/2” from section edge) as shown in Fig.
K.
Doors requiring trusses, position the truss below the lower hinge leaf (1/2” from the section edge) and
secure truss using (2) 1/4”-20 x 7/8” self-drilling and tapping screws per stile. Refer to Fig. K.
Doors requiring (2) welded trusses or 8” truss refer to Auxiliary Installation Instructions.
STEP 5. Leveling Door. (Bottom section) Center and level (or support to a known grade level) the bottom
section in the opening, as seen in Fig. L. Temporarily attach the vertical tracks to the jambs. Allow 1/2”
clearance between the section and the track as illustrated in the Sideroom illustrations.
It is important that the bottom of each track is in the same level. (shim if necessary)
Products being installed to precast or block must use a 3/8 x 3” long sleeve anchor to attach the verticals
to the building. Use the slots in the wall angle as a drill template, drill a 3/8” hole (3-1/2” deep) and secure
to anchor.
STEP 6. Installing the Door Sections Secure the end hinges, (one side only) center hinges, and strutting
( if applicable) as previously illustrated. Locate the Lock Section (usually the second) and insert a roller into
the end hinge. Stack this section into the opening by hooking the roller in the vertical track and lower onto
the bottom section. Insert a roller into the appropriate end hinge and insert into vertical track on the
opposite end. Secure to the section using the self-tapping screws. Align the section edges, flip up the upper
hinge leafs and secure to the lock section using the self-tapping screws. Continue to hardware and stack the
remaining sections in the proper sequence. Attach the top brackets to the upper corners using self drilling
and tapping screws as shown in Fig. L.
NOTE : Top section maybe installed now or may wait until the last step (installer preference)
PG. 6
Refer To Strutting Schedule Insert.
STEP 7. Installing the Vertical Track: Adjust the vertical track to 1/2” spacing from the bottom section and
3/4” at the top section (splice) Refer to page 5. Permanently secure each vertical to the jambs using the
following fasteners:
Steel Jambs: 5/16” x 1” self drilling and tapping screw.
Wood Jambs: 5/16” x 1-5/8” lag screw.
Precast or Block: 3/8” x 3” sleeve anchor.
The left hand vertical track assembly indicates the standard fastener spacing.
Secure each end using
(2) 1/4 - 20 X 7/8” TEK
Screws per stile
6” Welded Truss
3” UBar
Fig. K
Top bracket installation illustration.
Secure each bracket using (2) 1/4” X 7/8”
self-tapping screws. Doors over 16’2” wide
or doors over 8 sections high require
double top brackets.
Secure each end of Top Section
using (2) 1/4 - 20 X 7/8” TEK
Screws and Strut Clips per End
Stile
NOTE: SUPPORT BRACKETS
ARE SUPPLIED ON ALL DOORS
REQUIRING DOUBLE END
STILES
An Extra Support Bracket
Will Need To Be Added To
Top Brackets On Double
Endstile Applications
Secure U-bar to each center stile
using (2) 1/4 - 20 X 7/8” TEK
Screws

PG. 7PG. 10
FOUR SPRINGS
(3-3/4” & 6”)
(6” Shown)
* NOTE: COUPLING USED ON SOLID SHAFT ONLY. TIGHTEN CONNECTING BOLTS AFTER WINDING SPRINGS.
RED WINDING CONES AND CABLE DRUMS WILL
ALWAYS BE ON THE LEFT
BLACK (OR PLAIN) WINDING CONES AND CABLE
DRUMS WILL ALWAYS BE ON THE RIGHT
LOOKING FROM THE INSIDE OF THE DOOR TO
THE OUTSIDE
RIGHT HAND DRUM
BLACK
EXTRA CENTER SUPPORT BRACKET USED WITH SPLIT SHAFT
WINDING CONE
BLACK
WINDING CONE
BLACK
WINDING CONE
RED
WINDING CONE
RED
3-1/2” for
3-3/4” SPRINGS
7” for
6” SPRINGS
LEFT HAND DRUM
RED
13”
8” MIN.
SPRING
PAD
12” MIN.
PAD
WIDTH
COUPLING (SEE NOTE * )
WINDING CONE
RED
13”
EXTRA CENTER SUPPORT BRACKET
USED WITH SPLIT SHAFT
COUPLING (SEE NOTE * )
RIGHT HAND DRUM
BLACK
WINDING CONE
BLACK
20”
24” MINIMUM SPRING PAD
WIDTH
LEFT HAND DRUM
RED
REVERSE MOUNTING
WHEN INSTALLING
3 3/4” SPRINGS
TWO SPRINGS
(3-3/4” & 6”)
SPLIT SHAFT
(6” Shown)
5/16” X 1” Self drilling
& tapping screw for use
on steel jambs.
3/8” X 3” Sleeve anchor for
use on pre-cast concrete.
( Drill a 3/8” x 3-1/2”
deep hole)
5/16” X 1 5/8” Lag
screw for use on
wood jambs.
Angle out
(wood jambs)
Reverse angle
(steel or precast/
block)
10”
NOTE: Typical
fastener spacing.
Install hardware onto left side
of section, install roller into
vertical track, rotate the
section into position and
stack, align sections and
secure right hand hardware.
Fig. L
Standard Strutting Schedule
(15.2 PSF)
30”or 18”
24”
24”
24”
Door Widths Strutting
THRU 12' 2" None
12' 3" - 16' 2" (1) 2" U-Bar Per Section
2411 Strutting Schedule
Standard Section Reinforcement
Door Widths Strutting
THRU 12' 2" None
12' 3" - 16' 2" (1) 2" U-Bar Per Section
16' 3" - 20' 2" (1) 3" U-Bar Per Section
20' 3" - 24' 2" (1) 6" Welded Truss Per Section
24' 3" - 26' 2" (2) 6" Welded Truss Per Section
26' 3" - 32' 2" (2) 8" Welded Truss Per Section
2415 Strutting Schedule
Standard Section Reinforcement

PG. 9PG. 8
STEP 8. Installing the Horizontal Track: Use chain or cable to suspend the rear of the horizontal tracks.
Secure the horizontal reinforcing angle to the wall angle using (1) 3/8” x 3/4” truss bolt and nut, then
secure the horizontal track to the splice plate or flagangle using (2) track bolts and hex flange nuts.
STEP 9. Installing the Torsion Springs: Torsion spring assemblies can be of several configurations depend-
ing on door size and weight. If single spring the left or right hand spring must be identified by the color of
the winding cone. (Refer to fig. M and pages 11 & 12)
Slide the cable drums and the end bearing brackets onto the 1 piece shaft (tubular or solid). Slide the cable
drums, end bearing brackets and coupler onto each split solid shaft and install similar to 1 piece shaft.
Position the shaft to the proper elevation and secure the bearing bracket(s) to the spring pad using the
proper fasteners as shown in fig. N-1.
WARNING: DO NOT INSTALL CENTER BEARING BRACKETS DIRECTLY ONTO PANELING
OR DRYWALL !
NOTE: Use a chalk line or line level to ensure all bearing brackets are in line. (± 1/8”)
BLACK
RED
RED
BLACK
(3) 3/8” x 3/4” truss bolts and
nuts.
(2) for securing end bracket
(1) for securing horizontal
angle
1/4” x 9/16”
track bolt and
nut.
RIGHT SIDE ILLUS-
TRATES DOUBLE
STILES AND HARD-
WARE
LEFT SIDE ILLUS-
TRATES SINGLE
ENDCAPS AND
HARDWARE
Fig. M
This illustration shows
15” radius track,
fastened to steel with
TEK Screws
This illustration shows
15” radius track,
fastened to concrete
with Concrete Anchors
This illustration shows
12” radius track,
fastened to wood with
Lag Screws
RIGHT HAND DRUM
WINDING CONE
LEFT HAND DRUM
SINGLE SPRING
TWO SPRINGS
(2” ONLY)
TWO SPRINGS
(3-3/4” & 6”)
TUBULAR OR 1 PIECE
SOLID SHAFT
LEFT HAND DRUM
WINDING CONE
RIGHT HAND DRUM
WINDING CONE
LEFT HAND DRUM
RED
RIGHT HAND DRUM
BLACK
WINDING CONE
RED
WINDING CONE
BLACK
3-1/2” for 3-3/4”
SPRINGS
NOTE: 6” SPRINGS UTILIZE SOLID SHAFTS
BLACK
BLACK
RED
BLACK
RED
BLACK
RED
3” MINIMUM SPRING PAD WIDTH (6” IF
FOR TROLLEY OPERATOR)
3” MINIMUM SPRING PAD WIDTH
(6” IF FOR TROLLEY OPERATOR)
9” MINIMUM SPRING PAD WIDTH
EXTRA CENTER SUPPORT
BRACKET USED WITH 3-3/4” & 6”
SPRINGS
7” for 6” SPRINGS

PG. 7PG. 10
FOUR SPRINGS
(3-3/4” & 6”)
(6” Shown)
* NOTE: COUPLING USED ON SOLID SHAFT ONLY. TIGHTEN CONNECTING BOLTS AFTER WINDING SPRINGS.
RED WINDING CONES AND CABLE DRUMS WILL
ALWAYS BE ON THE LEFT
BLACK (OR PLAIN) WINDING CONES AND CABLE
DRUMS WILL ALWAYS BE ON THE RIGHT
LOOKING FROM THE INSIDE OF THE DOOR TO
THE OUTSIDE
RIGHT HAND DRUM
BLACK
EXTRA CENTER SUPPORT BRACKET USED WITH SPLIT SHAFT
WINDING CONE
BLACK
WINDING CONE
BLACK
WINDING CONE
RED
WINDING CONE
RED
3-1/2” for
3-3/4” SPRINGS
7” for
6” SPRINGS
LEFT HAND DRUM
RED
13”
8” MIN.
SPRING
PAD
12” MIN.
PAD
WIDTH
COUPLING (SEE NOTE * )
WINDING CONE
RED
13”
EXTRA CENTER SUPPORT BRACKET
USED WITH SPLIT SHAFT
COUPLING (SEE NOTE * )
RIGHT HAND DRUM
BLACK
WINDING CONE
BLACK
20”
24” MINIMUM SPRING PAD
WIDTH
LEFT HAND DRUM
RED
REVERSE MOUNTING
WHEN INSTALLING
3 3/4” SPRINGS
TWO SPRINGS
(3-3/4” & 6”)
SPLIT SHAFT
(6” Shown)
5/16” X 1” Self drilling
& tapping screw for use
on steel jambs.
3/8” X 3” Sleeve anchor for
use on pre-cast concrete.
( Drill a 3/8” x 3-1/2”
deep hole)
5/16” X 1 5/8” Lag
screw for use on
wood jambs.
Angle out
(wood jambs)
Reverse angle
(steel or precast/
block)
10”
NOTE: Typical
fastener spacing.
Install hardware onto left side
of section, install roller into
vertical track, rotate the
section into position and
stack, align sections and
secure right hand hardware.
Fig. L
Standard Strutting Schedule
(15.2 PSF)
30”or 18”
24”
24”
24”
Door Widths Strutting
THRU 12' 2" None
12' 3" - 16' 2" (1) 2" U-Bar Per Section
2411 Strutting Schedule
Standard Section Reinforcement
Door Widths Strutting
THRU 12' 2" None
12' 3" - 16' 2" (1) 2" U-Bar Per Section
16' 3" - 20' 2" (1) 3" U-Bar Per Section
20' 3" - 24' 2" (1) 6" Welded Truss Per Section
24' 3" - 26' 2" (2) 6" Welded Truss Per Section
26' 3" - 32' 2" (2) 8" Welded Truss Per Section
2415 Strutting Schedule
Standard Section Reinforcement

(2) 3/8” Nuts and
Washers
Top
Plate
Perimeter Seal
Spring Mounting
Pad. 2 x 6” White
Pine or Denser.
Secured with min.
(4) 5/16” x 4” lag
bolts into header.
Header
(2) 3/8” x 1”
or 1-1/2”
Bolts
Pre-Cast
Steel
1/2” x 3” Sleeve Anchor
NOTE: Must secure sleeve
anchors to building first then
attach brackets to anchors
5/16” x 1” Self-Drilling
and tapping screw
Fig. N-1
PG. 11
(1) Tamper - Resistant
5/16 X 2” Lag Screw
Secure each end bracket to the horizontal reinforcing angle using (2) 3/8” x 3/4” truss bolts and nuts.
Anchor the wall mounting flange of the end bracket to the jamb using (2) 5/16” x 1-5/8” lags (wood),
(2) 5/16” x 1” self-drilling and tapping screws (steel), or (2) 3/8” x 3” sleeve anchors (precast ).
Spring pads must be securely anchored now before proceeding. The pads must be flush (± 1/8”) with the
jambs. Attach the spring center bearing brackets to the pad(s) using the following fasteners:
Pre-Cast: Secure each spring bearing bracket using (2) 1/2” x 3” sleeve anchors. This installation will
require the 1/2” anchors to be secured to the building, then securing the brackets to the anchors.
Wood: Secure each spring bearing bracket using (2) 5/16” x 1-5/8” lag screws for the upper two holes and
(1) 5/16” x 2” tamper proof lag screw for the lower hole.
Steel: Secure each spring bearing bracket using (3) 5/16” x 1” self-drilling and tapping screws. See Page 15
for alternate spring bearing bracket mounting methods.
NOTE: The coupler support brackets only require (2) fasteners, where the spring bearing brackets
require (2) fasteners in the lower slot and hole, then (1) fastener in the top slot.
Secure the stationary cone(s) (dead end) to the spring bearing bracket(s) using 3/8” bolts and nuts.
NOTE: 3-3/4”, 6” and Duplex , each spring is secured to one center bearing bracket. DO NOT attach or
attempt to attach two springs of this size to one bearing bracket.
Feed the cables (attached to the bottom bracket) up through the vertical track, behind the roller shafts and
secure to the drum. Push the drum up against the race, of the end bearing bracket and secure to the shaft
by tightening the set screws (solid shafts use 1/4” key(s) and set screws to secure drums). Rotate drum
until cable is taut and apply vice grips to shaft, with end resting, against wall or jamb. This will hold cables
onto drum. There must be at least 1/2 wrap of cable onto drum, if not contact Wayne-Dalton for proper
cable lengths. Attach cable and secure drum to shaft as mentioned above. Make sure drums are in time on
one piece shaft assemblies before winding spring(s). Each drum should be at the 3 O’clock position, make
adjustments as necessary.
If top section is not assembled, do so now, before winding springs. Also make sure all hardware is securely
attached to all sections.
Use appropriate diameter winding rods. (Snug fitting 1/2”, 5/8”, or 3/4”)
STEP 4. Products over 12’2” require U-bars to be secured to each section. Position the 2” or 3” Ubars below
the lower hinge leaf and attach with (2) 1/4-20 X 7/8” tek screws (1/2” from section edge) as shown in Fig.
K.
Doors requiring trusses, position the truss below the lower hinge leaf (1/2” from the section edge) and
secure truss using (2) 1/4”-20 x 7/8” self-drilling and tapping screws per stile. Refer to Fig. K.
Doors requiring (2) welded trusses or 8” truss refer to Auxiliary Installation Instructions.
STEP 5. Leveling Door. (Bottom section) Center and level (or support to a known grade level) the bottom
section in the opening, as seen in Fig. L. Temporarily attach the vertical tracks to the jambs. Allow 1/2”
clearance between the section and the track as illustrated in the Sideroom illustrations.
It is important that the bottom of each track is in the same level. (shim if necessary)
Products being installed to precast or block must use a 3/8 x 3” long sleeve anchor to attach the verticals
to the building. Use the slots in the wall angle as a drill template, drill a 3/8” hole (3-1/2” deep) and secure
to anchor.
STEP 6. Installing the Door Sections Secure the end hinges, (one side only) center hinges, and strutting
( if applicable) as previously illustrated. Locate the Lock Section (usually the second) and insert a roller into
the end hinge. Stack this section into the opening by hooking the roller in the vertical track and lower onto
the bottom section. Insert a roller into the appropriate end hinge and insert into vertical track on the
opposite end. Secure to the section using the self-tapping screws. Align the section edges, flip up the upper
hinge leafs and secure to the lock section using the self-tapping screws. Continue to hardware and stack the
remaining sections in the proper sequence. Attach the top brackets to the upper corners using self drilling
and tapping screws as shown in Fig. L.
NOTE : Top section maybe installed now or may wait until the last step (installer preference)
PG. 6
Refer To Strutting Schedule Insert.
STEP 7. Installing the Vertical Track: Adjust the vertical track to 1/2” spacing from the bottom section and
3/4” at the top section (splice) Refer to page 5. Permanently secure each vertical to the jambs using the
following fasteners:
Steel Jambs: 5/16” x 1” self drilling and tapping screw.
Wood Jambs: 5/16” x 1-5/8” lag screw.
Precast or Block: 3/8” x 3” sleeve anchor.
The left hand vertical track assembly indicates the standard fastener spacing.
Secure each end using
(2) 1/4 - 20 X 7/8” TEK
Screws per stile
6” Welded Truss
3” UBar
Fig. K
Top bracket installation illustration.
Secure each bracket using (2) 1/4” X 7/8”
self-tapping screws. Doors over 16’2” wide
or doors over 8 sections high require
double top brackets.
Secure each end of Top Section
using (2) 1/4 - 20 X 7/8” TEK
Screws and Strut Clips per End
Stile
NOTE: SUPPORT BRACKETS
ARE SUPPLIED ON ALL DOORS
REQUIRING DOUBLE END
STILES
An Extra Support Bracket
Will Need To Be Added To
Top Brackets On Double
Endstile Applications
Secure U-bar to each center stile
using (2) 1/4 - 20 X 7/8” TEK
Screws

3” TRACK 1/4” GRADUATION
9 SECTIONS HIGH OR LESS
FIG.F
FIG.I
FIG.H
FIG.G
Align the appropriate end hinge to the pre-punched holes in the stiles and secure using (2) 1/4” x 5/8”
self tapping screws per hinge. Products 16’2” wide and less require (1) end hinge (fig. D) and doors over
16’2” wide require double end hinges. (Fig. H)
The end hinge sequence is dependent on track size (2” or 3”).
2” track applications begin with a number 1 hinge attached to the top corners of the bottom section.
3” track applications begin with a number 3 hinge.
( Refer to the illustrations dependant on your track size)
#3 HINGE
#4 HINGE
#5 HINGE
PG. 5
FIG.J
Refer to the auxiliary
instructions.
Secure Bracket
using (10) screws.
NOTE: 3” TRACK HINGE SCHEDULE ON
DOORS LESS THAN OR EQUAL TO 18’-1” HIGH.
DOORS OVER 18’-1” HIGH (OVER 9 SECTIONS)
WILL REQUIRE 1/8” GRADUATION. BY START-
ING WITH (2) #3 HINGES, (2) #4 HINGES, (2) #5
HINGES ETC...
NOTE: DOUBLE END-
STILES BEGIN AT 16’3” WIDE
ON ALL 2411-2415 DOORS
WARNING:
DO NOT USE UNDERSIZED WINDING RODS (SCREWDRIVERS, ETC.)
Wind springs 1/4 turn at a time to the number of complete
revolutions recommended on the spring tag. Wind up as
shown Fig. When the proper number of turns is reached,
rest the winding rod against the top section or header,
stretch the spring then, tighten the set screws on the
winding cone. Release the vice grips from the spring
shaft(s). Adjust the coupler on split solid shafts until
drums are in time (check door level) and tighten coupler.
WARNING:
Apply locking pliers to the track ABOVE the
roller and lock door if applicable, before winding the spring
Wind springs toward ceiling.
(Standard lift applications)
SPRING TURN CHART
PG. 12
DOOR HEIGHT 400-8 400-12 5250-18 800-32
6'6" 7 1/2 7 1/2
7'0" 7 7/8 7 7/8
7'6" 8 1/2 8 1/2
8'0" 8 7/8 8 7/8 6 3/4
8'6" 9 1/4 7 1/8
9'0" 9 1/2 7 3/8
9'6" 10 1/8 7 3/4
10'0" 10 1/2 8 1/8 5 3/8
10'6" 11 8 3/8 5 5/8
11'0" 11 1/2 8 7/8 5 7/8
11'6" 12 9 1/8 6
12'0" 12 1/2 9 1/2 6 1/4
12'6" 9 7/8 6 1/2
13'0" 10 1/4 6 3/4
13'6" 10 1/2 7
14'0" 10 7/8 7 3/8
DOOR HEIGHT 400-8 400-12 5250-18 800-32
14'6" 11 1/4 7 1/2
15'0" 11 1/2 7 5/8
15'6" 11 7/8 8
16'0" 12 1/4 8 1/8
16'6" 12 1/2 8 1/4
17'0" 12 7/8 8 5/8
17'6" 13 1/4 8 7/8
18'0" 13 1/2 9
18'6" 9 1/4
19'0" 9 1/2
19'6" 9 3/4
20'0" 9 7/8
20'6" 10 1/4
21'0" 10 3/8
21'6" 10 1/2
22'0" 11

PG. 4
STEP 10: Attaching the Back Hanger Angles: Apply another locking pliers above the No. 2 or No. 3 roller
and then remove the locking pliers from the top roller. With assistance push downward on the door and
remove all locking pliers. Carefully raise door until one and a half panels are in the horizontal track, lock
door into position using locking pliers.
Space the horizontal tracks 3/4” from section edge and level (or running upward). Using 1-5/8” x 2-3/8”
x 12 GA. Min. Angle, secure each horizontal track to the building as shown in Fig. Using 3/8” bolts and
nuts . Lateral brace all drop angles once proper spacing is determined.
Doors over 11 ft. high and over 14 ft. wide must have (1) intermediate drop hanger as shown above right
side.
Doors between 16’ and 18’ high must have (2) center hanger assemblies as shown above left side.
Doors over 18’ high must have center hangers placed at 6’ center max.
STEP 11: Checking the Counterbalance: Release the locking pliers from vertical track and check the door’s
counterbalance. Adjust springs if necessary.
STEP 12: Vertical Track and Top Bracket Adjustments: Vertical tracks can now receive final adjustments.
Open and close the door a few times, checking and adjusting side clearance (if necessary). Tighten jamb
fasteners (lags, teks, and anchors) to permanently secure verticals. Adjust door in or out from jamb by
loosening the track to obtain proper seal. Permanently tighten all track bolts. Adjust top bracket roller
carrier so that the top section is sealed against header.
STEP 13: Lubrication: Lubricate springs, rollers, and bearings with oil.
DO NOT GREASE THE INSIDE OF THE TRACK.
Intermediate hangers for all
doors over 11’ high and over
14’ wide. Positioned half way
between jamb and rear hanger.
Lateral brace all hanger
angles.
Use a 3/8” X 3/4”
truss bolt for
roller clearance.
Apply locking pliers to
secure while attaching
hangers.
Use 12 GA. Minimum
angle (1-5/8” X 2-3/8”)
Doors 16’ to 18’ use 2
intermediate hangers.
Over 18’ use hangers at
6’ max. centers
3/8” dia. Bolt should
protrude into track
to serve as a roller
stop.
PG. 13
2” TRACK 1/4” GRADUATION
8 SECTIONS HIGH OR LESS
FIG.B
FIG.E
FIG.D
FIG.C
STEP 3. Locate the left and right hand bottom brackets, secure the counterbalance cable using clevis pin,
washer and cotter key shown in fig. B
Secure bottom bracket to section using 1/4” self-drilling and tapping screws shown in fig. C
( for doors over 14’2” wide use double wide bottom brackets as shown in figure G) ( For doors
using Broken Cable Safety Device Refer to Fig. J and the auxiliary instructions.)
FIG.A
#1 HINGE
#2 HINGE
#3 HINGE
Step Plate (provided on
insulated doors)
1/4”-20 X 7/8” TEK
Screws (2)
Lift Handle
1/4”-20 Whiz Nuts (2)
Spacer (2)
1/4”-20 X 2-1/2” Hex
Head Bolt (2)
Lift Handle
Roller spacer (1/2” long)
required on BB-6 type bottom
brackets. Secure bracket with
(5) screws
NOTE: 2” TRACK HINGE SCHEDULE FOR
DOORS LESS THAN OR EQUAL TO 16’-1”
HIGH.

PG. 3
DIM Y
HEADER TO
SHAFT
CENTERLINE
MINIMUM
HEADROOM
REQUIRED
(REFER TO
ABOVE CHART)
8” for 2” TRACK
12” for 3” TRACK
EXTEND JAMBS TO OPENING HEIGHT
plus
DIM Y
plus
1 1/2” (MINIMUM LENGTH)
TORSION SHAFTS REQUIRE 10” OF
SIDEROOM FOR SOLID SHAFTS and 5”
OF SIDEROOM FOR TUBULAR
SHAFTS
NOTE: HEADROOM CAN BE REDUCED 2-1/2” BY
USING THE QUICK CLOSING TOP FIXTURE OR BY
SHORTENING THE VERTICAL TRACKS BY
3” MAX.
SIDEROOM REQUIREMENTS
2 inch TRACK
3 inch TRACK
PRECAST WALL WITH
CORNER ANGLE
3” TRACK
PRECAST WALL WITHOUT
CORNER ANGLE
3” TRACK
STEEL JAMBS
3” TRACK
WOOD JAMBS
3” TRACK
STEEL JAMBS
2” TRACK
PRECAST WALL WITH
CORNER ANGLE
2” TRACK
PRECAST WALL WITHOUT
CORNER ANGLE
2” TRACK
WOOD JAMBS
2” TRACK
1” OVERLAP
1”
1/2”- 5/8”
4”
1” OVERLAP
1”
1/2”- 5/8”
4”
1”
1/2”- 5/8”
4”
FLUSH
1”
4”
4 3/4”
5/16 X 1”
DRILLING /
TAPPING
SCREW
3/8 X 3” MIN.
SLEEVE
ANCHOR
OPTIONAL
MOUNTING
BRACKET
5”
OPTIONAL
MOUNTING
BRACKET
3/8 X 3” MIN.
SLEEVE
ANCHOR
5/16 X 1”
DRILLING /
TAPPING
SCREW
2” X 6” JAMB
IS
RECOMENDED
1/2”- 5/8”
2 1/2” MIN.
SIDE ROOM
1” OVERLAP
1 1/2”
1/2”- 5/8”
3 1/2”
1” OVERLAP
1 1/2”
1/2”- 5/8”
3 1/2”
1” OVERLAP
1 1/2”
1/2”- 5/8”
3 1/2”
FLUSH
1 1/2”
3 1/2”
4 3/4”
5/16 X 1”
DRILLING /
TAPPING
SCREW
3/8 X 3” MIN.
SLEEVE
ANCHOR
OPTIONAL
MOUNTING
BRACKET
4 3/4”
OPTIONAL
MOUNTING
BRACKET
3/8 X 3” MIN.
SLEEVE
ANCHOR
5/16 X 1”
DRILLING /
TAPPING
SCREW
2” X 6” JAMB
IS
RECOMENDED
1/2”- 5/8”
2 1/2” MIN.
SIDE ROOM
2 1/2” MIN.
SIDE ROOM
3 1/2” MIN.
SIDE ROOM
5” MIN.
SIDE ROOM
3” MIN.
SIDE ROOM
3” MIN.
SIDE ROOM
3” MIN.
SIDE ROOM
5/16 X 1 5/8”
LAG SCREW
5/16 X 1 5/8”
LAG SCREW
1” OVERLAP
(2) 3/8” x 1-1/4” Bolts To
Secure Bracket To Angle
Heavy Perforated Angle
(1-5/8 x 2-3/8” x 11 GA.)
Center Spring Bracket
Girt
(2) 3/8” x 1-1/4” Bolts & Nuts
Top & Bottom
Girt
“Y”
(
< 7 ft.)
(2) 3/8” x 1-1/4” Bolts To
Secure Bracket To Angle
Heavy Perforated Angle
(1-5/8 x 2-3/8” x 11 GA.)
Center Spring Bracket
(2) 3/8” x 1-1/4” Bolts & Nuts
Top & Bottom
Girt
Girt
Space Center Brackets 12” -
14” Apart On Applications
Requiring Couplers
(2) 3/8” x 1-1/4” Bolts To
Secure Bracket To Angle
Heavy Perforated Angle
(1-5/8 x 2-3/8” x 11 GA.)
Center Spring Bracket
(2) 3/8” x 1-1/4” Bolts & Nuts
Top & Bottom
Girt
Girt
Space Center Brackets 12” -
14” Apart On Applications
Requiring Couplers
Bolt “Z” Shaped Assembly Using
(4) 3/8” x 1-1/4” Bolts And Nuts
Fig. N-2
Fig. N-3
Fig. N-4
Steel Spring Pad Applications
Contact Manufacturer For Applications Other Than What Is Listed Below
NOTE: These Spring Mounting Techniques Are
Not Supported For 800-32, 6375-164, 1100-18,
1350-28, & 800-120 Drums. These Instructions
Are Also Not Applicable For 5750-120 Drums
With 72” Or More High-Lift
NOTE: Do Not Bolt (2) 3-3/4” Torsion Springs to
One Center Bracket
Maximum Door Size 9’ x 9’ (Maximum Door Weight 210 lb.): Cut perforated angle (1-5/8 x 2-3/8” x 11 GA.)
to Dim “Y”. Thru-bolt top and bottom of angle to each girt using (4) 3/8” x 1-1/4” bolts and nuts. Thru-
bolt center bracket to perforated angle using (2) 3/8 x 1-1/4” bolts and nuts (See Fig. N-2).
Maximum Door Size 14’ x 12’ (Maximum Door Weight 400 lb.): Cut (2) perforated angle (1-5/8 x 2-3/8” x
11 GA.) to Dim “Y”. Thru-bolt top and bottom of each angle to each girt using (4) 3/8” x 1-1/4” bolts and
nuts. Thru-bolt each center bracket to perforated angle using (2) 3/8 x 1-1/4” bolts and nuts (See Fig. N-3).
Maximum Door Size 14’-2” x 12’-1” (Maximum Door Weight 800 lb.): Cut (2) pieces of perforated angle
(1-5/8 x 2-3/8” x 11 GA.) to Dim “Y” and (2) more pieces at Dim “Y” minus 3. Bolt the angles together
into a “Z” shape using (4) 3/8” x 1-1/4” bolts and nuts. Thru-bolt top and bottom of each “Z” shaped angle
to each girt using (4) 3/8” x 1-1/4” bolts and nuts. Thru-bolt each center bracket to perforated angle
assembly using (2) 3/8 x 1-1/4” bolts and nuts (See Fig. N-4).
NOTE:
Do NOT Bolt (2) 3-3/4” Torsion Springs To ONE Center Bracket
PG. 14
NOTE: Maximum Spacing For Dimension “Y” is
84 in. (7 ft.) These Instructions Are Not Appli-
cable For A Span Greater Than 84 in.
“Y”
(
< 7 ft.)
“Y”
(< 7 ft.)

PG. 15
OPERATOR ARM
(SUPPLIED BY OTHERS)
CENTER HINGES
6” WELDED
TRUSS
1/4-20 X 7/8”
TEK SCREWS
OPERATOR ARM
(SUPPLIED BY OTHERS)
1-1/2” X 2-1/4” ANGLE
(CUT TO FIT BETWEEN
STRUT AND CENTER
HINGE)
(SUPPLIED BY OTHERS)
Trolley installation for doors:
< 9’ 2” All Heights
9’ 3” thru 16’ 2” X 10’ 1” (5 sections)
Trolley installation for doors:
16’ 3” thru 19’ 2” over 10’ 1” (5 sections)
19’ 3” thru 24’ 2”
Trolley installation for doors:
9’ 3” thru 16’ 2” over 10’ 1” (5 sections)
16’ 3” thru 19’ 2” X 10’ 1” (5 sections)
STEP 14: INSTALLING THE INSIDE SIDE LOCK:
Attach the inside side lock using (4) 1/4” - 20 x 5/8”
Tek screws as shown in Fig. O
FIG. O
OPERATING ZONE
You Can Save Time And Effort If You First Establish All The Facts About
The “Operating Zone”
The “ Operating Zone” is the area surrounding the door opening, extending upward and backward as far as the door will
travel. We call it the Operating Zone because it is the area that the door will have to operate within and the dimensions are
critical and must be known in advance of a door and operator installation.
1. Daylight Opening; Exact size of finished opening
2. Sideroom; required distance from the door opening to a wall or any obstruction. Refer To Sideroom Chart
3. Headroom; required distance from top of door opening to the ceiling or underside of joists. Refer To Headroom Chart
4. Backroom; required distance from door opening header to the furthest back point to which the door track or operator unit, and their
brackets, will extend.
PG. 2
HEADROOM CHART For Standard Lift Track (Minimum Distance Required)
Dim. Y INDICATES THE DISTANCE FROM THE HEADER TO THE CENTER LINE OF TORSION SHAFT.
NOTE: 2 1/2” OF ADDITIONAL HEADROOM IS REQUIRED FOR SINGLE TROLLEY OPERATOR INSTALLATIONS.
STEP 1. Verify The OPERATING ZONE Dimensions
A - Exact size of finished daylight opening. Do you have the correct door size?
B - Sideroom requirements for track and spring shaft. (Refer to sideroom chart)
C - Headroom requirements. (Refer to headroom chart)
D - Backroom ( depth into room ) Manual lift = Door height plus 18” Operators = Door height plus 48”
E - Jambs must be plumb and solidly attached to the building. Floor must be level or exact gradeline established before
you start.
STEP 2. Shipping tags show important information, door size, track size and type, spring size and hardware type.
Verify that all material is present before attempting installation.
Dual Trolley installation
for doors over 24’ 2”
wide X any height.
CENTER HINGES
OPERATOR ARM
(SUPPLIED BY
OTHERS)
8” EXTENSION
(REQUIRED TO CLEAR
WELDED TRUSS)
(2) 1/4-20 X 7/8” TEK SCREWS
PER CORNER
OPERATOR BRACKET
8” WELDED
TRUSS SHOWN
1-1/2” X 2-1/4” ANGLE
(SUPPLIED BY OTHERS)
ATTACH TO EACH STILE WITH
(2) 1/4-20 X 7/8” TEK SCREWS
OPERATOR ARM
(SUPPLIED BY OTHERS)
1/4-20 X 7/8”
TEK SCREWS
8” EXTENSION
(REQUIRED TO CLEAR
WELDED TRUSS)
8” EXTENSION
(REQUIRED TO
CLEAR WELDED
TRUSS)
38 in. operator bracket
and dual trolley brackets
are optional for doors
19’ 3” thru 24’ 2” wide.
HEADROOM
“A”
“B”
SIDE ROOM
DAYLIGHT
OPENING
HEIGHT
BACKROOM
DAYLIGHT
OPENING
WIDTH
SIDE ROOM
TRACK DEPTH
SIZE INTO
ROOM
STEEL
and WOOD SOLID TUBE
MASONRY
DOOR HEIGHT
PLUS 18"
DOOR HEIGHT
PLUS 24"
DIM. A
DIM. B
SIDEROOM
SIDEROOM
TRACK
TORSION SHAFT
2" 2-1/2" 3-1/2" 10" 5"
5"3" 3" 5" 10"
3" TRACK 2" TRACK 2" TRACK
15" RADIUS 15" RADIUS 12" RADIUS
400-8 H EA DRO O M 15 1/2" 15" 12"
400-12 DIM Y 13" 12 1/2" 9 1/2"
H EA DRO O M 17 1/2" 17" 14"
DIM Y 14 1/2" 14" 11"
H EA DRO O M 21" 20 1/2" NA
DIM Y
16 1/2"
16"
NA
HEADROOM CHART
For Standard Lift Track (M inim um Distance Required)
DRUMS DIMS
5250-18
800-32

®
CONTENTS
WARNING: It is recommended that installa-
tion, repairs, or adjustments of this product be
made by a qualified door agency.
IMPORTANT
An overhead door is a large heavy object that moves with the help
of springs under high tension. Moving objects and springs under
tension can cause injuries. For your safety and the safety of others,
follow these instructions:
1. Wear protective gloves during installation to avoid possible cuts
from sharp metal edges.
2. It is always recommended to wear eye protection when using tools,
otherwise serious eye injury could result.
4. Keep door in full view while operating it. Watch the door open or
close completely before leaving the area.
5. Should the door become hard to operate or completely inopera-
tive, a qualified door agency should correct the problem to prevent
damage to the door or serious personal injury.
6. DO NOT PERMIT children to play with the garage door or the
electrical controls. Fatal injury could result, should the child become
entrapped between the door and the floor.
7. To prevent serious injury or death, avoid standing in the open
doorway or walking through the doorway while the door is moving.
8. Use lift handles/step plate when manually operating the door. DO
NOT place fingers into section joints when operating the door.
9. Remove pull rope if door is operated by an electric opener.
10. Door is constantly under EXTREME SPRING TENSION. To prevent
possible serious injury or death, adjustments, repairs, removal, or
installation, ESPECIALLY of SPRING ASSEMBLIES, CABLES, or
BOTTOM BRACKETS, should be performed ONLY by qualified door
service people.
SAFETY NOTICES
11. Check door and its hardware monthly for loose, worn, or broken
parts. Have any repairs or adjustments made by a qualified door agency.
12. Have the door professionally inspected once a year.
3. Operate door ONLY when properly adjusted and free of obstruc-
tions.
This manual MUST be attached to the wall in close proximity to the door.
Door Preparation
Leveling Door
Installing Door Sections
Installing Track
Torsion Springs
Trolley Operators
Operating Zone
Part #280724© Copyright 2001 Wayne-Dalton Corp. Rev.7 07/2002
®
© Copyright 2000 Wayne-Dalton Corporation
MAINTENANCE AND PAINTING INSTRUCTIONS
MAINTENANCE
While factory-applied finishes for steel garage doors are so durable that they will last many years longer than ordinary paints, it is desirable to clean them thoroughly
on a routine basis. Apparent discoloration of the paint may occur when it has been exposed in dirt-laden atmospheres for long periods of time. Slight chalking may
also cause some change in appearance in areas of strong sunlight. A good cleaning will generally restore the appearance of these coatings and render repainting
unnecessary. An occasional light cleaning will also help maintain an aesthetically pleasing appearance. To maintain the original finish of the garage doors, the only
regular maintenance necessary is that of annual washing. Mild solutions of detergents or household ammonia will aid in the removal of most dirt, and the following
are recommended levels:
One cup of Tide™, or other common detergents, which contain less than 0.5% phosphate, dissolved into five gallons of warm water. NOTE: The use of
detergents containing greater than 0.5% phosphate is not recommended for use in general cleaning of garage doors. NEVER BLEND CLEANSERS OR DETER-
GENTS WITH BLEACH.
SURFACE PREPARATION FOR PAINTING
Wax on the surface must be removed or paint peeling/flaking will result. To remove this wax, it will be necessary to lightly scuff the surface with a gray (not green!)
3M ScotchBrite pad saturated with soapy water. A final wipe and rinse should be done with clean water only, to remove any loose dust or soap film.
Surface scratches, which have not exposed the metal substrate, can be lightly buffed or sanded with 0000 steel wool or No. 400 sand paper to create a smoother
surface. Care must be taken to not expose the substrate under the paint (see Note No. 2). Once this exposed condition exists, the likelihood for rusting is greatly
increased. See the following paragraph if the metal substrate is observed.
Exposed substrate must be treated to prevent rust from forming (see Note No. 2). Sand the exposed area lightly and paint with high quality metal primer to protect
from corrosion. Follow drying time on primer can label before applying topcoat.
The surface to be recoated must not be to smooth or the repaint material will not adhere to it (see Note No. 2). It is advisable to test a representative area to evaluate
adhesion. If poor adhesion is observed, the surface must be abraded by sanding or buffing using grades mentioned above. Care must be taken to not expose the substrate
under the paint.
PAINTING
After the surface has been properly prepared it must be allowed to dry thoroughly, then coated immediately with a premium quality latex house paint. Follow the
paint label directions explicitly. Oil base paint is not recommended. Please note that if substrate is exposed, painting with latex paint may cause accelerated rusting
of steel.
NOTES:
1. Repainting of finish painted steel doors cannot be warranted as this condition is totally beyond door manufacturer’s control.
2. If the steel door surface has a finish painted textured surface representing wood grain, stucco, etc., this step should not be attempted as danger of
exposing substrate is greatly increased.
3. Consult a professional coatings contractor if in doubt about any of the above directions.
4. Follow directions explicitly on the paint and solvent container labels for proper applications of coatings and disposal of containers. Pay particular
attention to those directions involving acceptable conditions in which to paint.
ACRYLIC GLAZING CLEANING INSTRUCTIONS:
1. To clean acrylic glazing wash with plenty of nonabrasive soap or detergent and water. Use the bare hand to feel and dislodge any caked dirt or mud. A soft,
grit-free cloth, sponge or chamois may be used to wipe the surface. Do not use hard or rough cloth that will scratch the acrylic glazing. Dry with a clean damp
chamois.
2. Grease and oil may be removed with kerosene or a good grade of naphtha (No aromatic content.). Users of these solvents should become familiar with their
properties to handle them safely.
3. Do not use: Window cleaning fluids, scouring compounds, gritty cloths, leaded or ethyl gasolines, or solvents such as alcohol, acetone,
carbon tetrachloride, etc.
Model 2411 and 2415
LIMITED WARRANTY
The Manufacturer warrants that its door and its hardware fittings will be free from defect in workmanship and material. Should any defect in workmanship or
material appear within
ONE YEAR of delivery, manufacture shall, upon notification, correct such nonconformity at its option, by repairing or replacing any
defective part or parts. See Maintenance And Painting Instructions For Prepainted Steel Doors listed elsewhere in this manual or contact Wayne-Dalton Distributor
for a copy of the maintenance and painting instructions for prepainted steel doors.
The Manufacturer warrants the steel skin of the MODELS 2411 and 2415 Roll-Formed steel garage door for a period of 10 YEARS, from the time of delivery
against cracking, splitting or deterioration due to rust-through. Other conditions and exceptions as contained herein apply.
NO EMPLOYEE, DISTRIBUTER, OR REPRESENTATIVE IS AUTHORIZED TO CHANGE THE FOREGOING WARRANTIES IN ANY WAY OR GRANT
ANY OTHER WARRANTY ON BEHALF OF MANUFACTURER.
The Manufacturer shall not be responsible for any damage resulting to or caused by its products by reason of installation (the warranty becomes null and void if
other than Manufacturer’s specified holes are drilled), improper storage, unauthorized service, alteration of products, neglect or abuse, or attempt to use the products
for other than the customary usage or for their intended purposes. The above warranty does not cover normal wear or any damage beyond Manufacturer’s control
or replacement labor.
THIS WARRANTY COVERS A COMMERCIAL PRODUCT. THE FORGOING WARRANTIES ARE LIEU OF ALL OTHER WARRANTIES AND NO
REPRESENTATIONS, GUARANTEES, OR WARRANTIES, EXPRESSED OR IMPLIED, (INCLUDING, BUT NOT LIMITED TO, THE WARRANTY OF
MERCHANTABILITY OR FITNESS FOR A PARTICULAR PURPOSE), ARE MADE BY MANUFACTURE IN CONNECTION WITH THE MANUFACTURE OR
SALE OF ITS PRODUCTS.
Claims for defects in material and workmanship covered by this warranty shall be made in writing to the dealer from whom the product was purchased within the
warranty period. Manufacturer may either send a service representative or have the product returned to the Manufacturer at Buyer’s expense for inspection. If judged
by Manufacturer to be defective in material or workmanship, the product will be replaced or repaired at the option of Manufacturer, free from all charges except
authorized transportation and replacement labor.
THE REMEDIES OF BUYER SET FORTH HEREIN ARE EXCLUSIVE AND ARE IN LIEU OF ALL OTHER REMEDIES. THE LIABILITY OF MANUFAC-
TURER, WHETHER IN CONTRACT, TORT, UNDER ANY WARRANTY, OR OTHERWISE, SHALL NOT EXTEND BEYOND ITS OBLIGATION TO REPAIR
OR REPLACE, AT ITS OPTION, ANY PRODUCT OR PART FOUND BY MANUFACTURER TO BE DEFECTIVE IN MATERIAL OR WORKMANSHIP.
MANUFACTURER SHALL NOT BE LIABLE FOR COST OF REMOVAL OR INSTALLATION OR SHALL NOT BE RESPONSIBLE FOR ANY DIRECT,
INDIRECT, SPECIAL OR CONSEQUENTIAL DAMAGES OF ANY NATURE.
This warranty gives you specific legal rights which may vary from state to state. However, some states do not allow limitations on how long an implied warranty
lasts or the exclusion or limitation of incidental or consequential damages, so the above limitations or exclusions may not apply to you.
Yearly maintenance as described in the Maintenance and Painting Instructions for Prepainted Steel Doors is required. Should you need an additional copy,
contact your local authorized Wayne-Dalton distributor.
Model 2411 & 2415
COMMERCIAL GARAGE DOOR
INSTALLATION INSTRUCTIONS
and OWNERS MANUAL
Read these instructions carefully before attempting installation.
If in question about any of the procedures, Do Not perform the work.
Instead have a qualified door agency do the installation or repairs.
/