Page is loading ...

Usage and Installation Manual
Dual Jet High Speed Hand Dryer
N831/R00 (23.03.20)

Safety Precautions ……………………………………………………………1
Using
Part Names and indicator descriptions …………………………………… 3
Usage and features ………………………………………………………… 4
Maintenance ……………………………………………………………… 5
Troubleshooting …………………………………………………………… 8
Wiring Diagram …………………………………………………………… 9
Installing
Part Names and Dimensions ……………………………………………… 10
Safety Precautions before Installing ……………………………………… 11
Installing Procedures ……………………………………………………… 12
Test Run …………………………………………………………………… 15
Contents
Do not attempt to install the unit yourself unless you are a
trained service technician. Otherwise, this may affect the safety
and proper functioning of the unit.
Read this manual thoroughly and carefully before beginning to
use the unit, ensuring safety and proper function. Please keep
it well for later reference.
Dual Jet High Speed Hand Dryer
Novelty and beauty, economical of energy and money,
environment friendly and durability. Two airstreams of
high speed injection dry water drip off your hands
within 7 seconds and give you convenience and
comfort.
This unit is applicable to the homes, restaurants,
business buildings, commercial buildings,
supermarkets, hospitals and recreation
places, gives you fresh experience and
satisfactory use.
Put your
hands all
the way in.
Pull your hands
out slowly, about
7 seconds
Experience extraordinary comfort and convenience from Dual Jet High Speed Hand Dryer
Features
1
2 3
No need windpipe
Design in accordance with
human engineering.
High/Low Sensors
separate air supply, quite hygienic
No drip comes into the unit
Prevent water drops from
spattering on the body
ease of use
Drain tank
Airflow
principle
Air inlet
Start
receiving
sensor
Start
transmitting
sensor
Using “Injection Airstream”, obtain comfort and rapid drying

1
!
!
Dot not open the front panel.
Otherwise, This may get an electric shock.
Do not use in a wet environment, for example, near the bathroom
where it may get the direct water and the places where the
condensation may form.
Otherwise, this may cause electric shock and unit malfunction.
Do not allow the unit to get wet.
Otherwise, it will cause electric shock.
Do not modify and disassemble the unit unnecessarily.
Otherwise, this may cause fire, electric shock, or personal injury.
Ensure the unit is properly grounded.
Otherwise, may cause electric shock during malfunction or short circuit.
Installation work should be done by the qualified technician.
Incorrect wiring connection can cause electric shock and fire.
Be sure to install a residual current circuit breaker.
Otherwise, this may cause electric shock.
Use a type whose contact points are at least 3mm apart.
Please use the products of CCC standard.
Recommended ground-fault circuit breaker (for ground-fault
protection). (Use a single-phase 2-line, AC 220V/50Hz cable with
a 20A rated current, 15mA-type rated operating current)
Use a single-phase AC 220V/50Hz power supply.
Use within the required voltage, as voltage exceeding 220V + 10Ј
will fail the unit.
Using an incorrect power supply may cause fire, electric shock and
malfunction.
Use separate line
Using any other electric appliance with the same line, may cause the
branch socket to become very hot and cause fire.
Turn off the power switch before inspecting and cleaning the unit.
Otherwise, may cause electric shock.
※
※
Prohibited
Do not use in
the bathtub or
shower room.
Do not allow
the unit get wet.
Prohibit
disassembling
Important!
Always follow
instructions
closely.
Earth
grounding
connection
WARNING
If you don't use this unit properly or follow the
safety guidelines carefully, it would lead to
serious personal injury.
2
!
!
Always use the unit with the drain tank and air filter attached.
Don't allow the water comes into the unit.
Once water enters the unit inside, short circuit or electric shock occurs.
Wear gloves when inspecting and cleaning the unit.
Do not attempt to install the unit with the power on (power cord).
The installation location should be strong enough to support the
unit, and the unit should be installed firmly on the surface.
Otherwise, this may cause personal injury due to the unit falling.
Wear gloves when installing the unit.
Otherwise, this may cause injury.
Otherwise, this may cause electric shock.
Otherwise, this may cause injury.
If the unit does not start, or works abnormally, turn off the power
switch and groundfault breaker and contact your dealer for
inspection and repair.
Otherwise, this may cause electric shock or fire due to short circuit.
Do not use in the following places:
Where the ambient temperature is below -10℃ or above 40℃.
Where the unit may come into direct contact with water.
Where the unit is under direct or strong sunlight.
(this may cause sensor to malfunction)
Where the condensation may form within the unit.
Safety precautions before installing the unit
Prohibited
Important!
Follow intructions
Do not let children hang from the unit.
Otherwise, this may cause the unit to drop.
If you don't use this unit properly or follow the
safety guidelines carefully, it would lead to serious
personal injury or property damage.
WARNING

4
①
② ③
How to use the Dual Jet High Speed Hand Dryer
Dry your hands about "7" seconds
Stretch out both hands and
insert them all the way in.
Until the air blow your fingers
Pull them back slowly
Before starting to use
Turn on the power switch.
The power indicator lights up.
The lamp lights up. The functional indicator lamps light.
Using the Unit
Using methods
Special reminder:
The heating wire will starts
automatically when the
ambient temperature is
below 20 degrees. The
heating will be cut off
automatically, when the
ambient temperature
exceeds 20 degrees. If
the hot air is needed,
then press the forced
heating to start it.
Stretch out both hands
and insert them all the
way in. The unit starts
to run automatically.
Pull them out slowly,
letting the air blow the
water off.
Pull them out completely.
Stay 6 - 7 seconds.
Part Names and indicator descriptions
3
Power switch: Press the Power switch, turn ON
the power supply, power indicator lamp lights
up. Press this switch for 3 seconds, turn OFF
the power supply.
Air Speed switch: Press the Air Speed switch,
high speed and low speed switches are
changeable. Power indicator lamp is red when
the high speed switch is turned on, while the
power lamp is green when the low speed switch
is turned on.
Water level indicator: when the drain water
reaches the full line, the lamp lights, reminding
you to empty the water.
Forced Heating switch: Press the Force Heating
switch, the indicator lamp is red, without
considering the ambient temperature.
Switch and Indicator descriptions
Operating switch
Start sensor
panel
Air filter (Air inlet)
Water tank
Features:
“No touch” hand drying ensures superbly hygienic.
The high-speed streams of air blow your wet hands
fast, economical of money for paying electric charge.
A tamper-proof timer is equipped to prevent overuse.
No need paper and towels, simple and easy
maintenance.
No pollution, adopting the antibacterial material.
The Deodorant Box can be added. If the Deodorant
function is needed, the Deodorant Box is separately
bought.
The lamp flashes, when the drain water reaches the
full line, reminding you to empty the water.
To prevent overusing the unit, the built-in timer will
stop the unit after 30 seconds automatically.

5
Routine Cleaning
!
!
1
The antibacterial coating is effective when the bacteria exposed the coated
surfaces (See the shade areas on the figure)
The antibacterial coating becomes not effective when the surfaces get very
dirty.
WARNING
Caution
Before you clean the unit,
turn off the power switch.
Do not splatter water on
the unit
Wear gloves when cleaning.
Clean the unit with a soft cloth.
If the unit gets very dirty, clean with a soft cloth dampened with neutral
agent, then clean with a dry soft cloth.
Remove the dirt from the sensor. (to prevent malfunction)
Only use the neutral cleaning agents.
Do not use thinner, acidic or alkaline toilet cleaners, or nylon
brush. (Otherwise, they may damage the smoothness of
surface)
Only use the alcohol to clean the hand-drying area.
(Do not use alcohol anywhere else)
ЎAlcohol here means the alcohol used for disinfection
(concentration below 83%).
If the chemical cloths used, please read their instructions first.
Disinfecting agents will damage your unit.
!
Note
Draining and Cleaning the drain tank
Before it fills up (at least once a week)
The water blown off the hands is called “drain water”.
Empty the drain water at any moment, in order to prevent
accumulated water from exceeding the full level.
It will start smelling if the accumulated water remains in
the tank for too long time.
Pull the drain tank out in the
horizontal direction.
This ensures the drain water
does not splatter out.
Cleaning the exterior of unit
6
3
2
1
Routine Cleaning
1.Open the lid and empty the water.
Pull the lid open with your fingers
upward, and then remove the lid
completely.
2.Wash out the inside of the drain tank.
3.Close the water tank lid, and re-attach
it to the unit as original.
Confirm the lid is firmly inserted.
Use the unit after confirming
that the water tank is in place.
Add 200cc (around 1 cup)of
water through the drain hole.
(to prevent it from getting clogged)
Cleaning the air filter
(Once every 2 months)
Press the position (shown in the figure) inward by hand, remove the front panel.
Remove the air filter
!
Note
The cotton filter can not be washed
with water.
Do not expose to the fire.
Remove the cotton
filter elements (both
left and right).

7
2
3
!
Routine Cleaning
1.Cleaning the dirty from the air filter
Tap gently by hand or use a vacuum cleaner to remove the dust
If the air filter is particularly dirty, please replace it.
2. Re-attach to the unit. (As the original)
Reinstall the cotton filter (both the
left and right sides) securely into
the securing slot in the top panel.
Push it all the way inward, until it
stops. (Dirt and dust may get into
the unit and shorten its working
life if the air filter is out of position.)
Re-attach to
the unit.
(As the original)
Align the securing slot in the
top, press downward it.
After confirming it in place, press
down the bottom (as the arrow
direction shown), until the sound
“click” appears.
Reinstall the drain tank
Press down the front panel (higher than the top of unit), keep
balance with the unit (at both left and right sides), until the
sound “click”
Note

8
Troubleshooting
If the following problems occur, please perform checks and fix.
Problem Check Action
No air blows
even if hands
are inserted
The unit does
not stop blowing
No hot air
comes out
Indicator light
is flashing
Heater is built-in,
is the heater sensor
dirty?
If the power supply
problems occur,the
indicator lights up
and is flashing.
Do the display
indicators lights up?
Is the power switch
on?
Are you putting your
hands all the way in?
Is the sensor blocked
by the dirt or dust?
Turn the ground-fault circuit breaker on.
Turn the power switch on.
Put hands all the way in.
Turn the power switch off, and then,
after all the lamps in the display have
gone off, remove the dust matter.
Then turn on the power swtich.
Is the room temperature over 20 ЎЈ
Turn the power switch off. Remove
the front panel, then remove the
cover of terminal box, check the
fuse (terminal connector) whether
burnt or not.
Turn the power switch off. Check all
the indicators in the display area
have gone off (around 40 seconds),
then turn on the power switch again.
No power
Turn off power, take down the machine
and ask the technician to replace the
power cable.
If the above actions do not work, turn off the power and the ground-fault circuit
breaker, and call your dealer to inspect and repair it if necessary. (Costs are as per
agreement with the dealer)
Wiring Diagram
9
Temperature sensor
Power supply
Balanced inductor
Display board
Panel control board
Electrical wiring diagram
Emitter board
Lighting and
receptor board
Microcomputer master control board
PTC heater
Inductor
Magnetic ring
Motor
Check the malfunction
light go out blinking
Fault LED Check items Causes and treatment
Power / abnormal
voltage
Check the power connection and
confirm the voltage normal.
Tamper-proof timer
Sensor fault, continuous operation,
check whether or not the sensor is
blocked.

1110
Ф
500mm
230mm 230mm
200mm
296mm
566mm
164mm
Power cord
Names of components and dimensions
Accessories
Installation Panel fixed screw
(4x25 tapping screw)
Installation panel
Power cord
Manual
6
1
1
1
※Unit dimensions: 566x296x164mm weight:7. 0kg
※Package dimensions: 605x350x240mm weight:8. 5kg
Precautions before installing
Do not install in the following types of location (otherwise this may
cause malfunction):
Locations where the unit may come into direct contact with water.
Locations where the unit is under direct or
strong sunlight
Locations where there is a lot of
condensation.
Locations where corrosive, neutral,
or reductive gases are present
Installation position guide
Leave at least 400mm clearance at
both sides to make it easier to use.
Install the unit on the flat wall without
unevenness and which can support
the weight of the unit.
There are two methods to connect the power supply.
(1) Power cord with plug (2) Power cord with no plug (cut-off plug)
Directly connected to the socket :
Pluggable
mode:
The wall socket
is placed next
to the unit
(right or left is
suitable)
Bottom connecting
position
Socket placed on the
wall (below the unit)
Power cord
(with ground
wire)
※Note:
The 2 fixed screws should be
removed before installation,
otherwise, you cannot change
the filter, see the right figure.
165mm
58mm
Installation panel

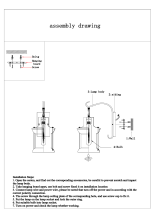
Installation Method
Installation position
After fixing the installation panel, you can use hang hook in the rear cover
of unit to hang the unit on the wall, as shown the left diagram.
After hanging the unit on the wall, lock the two anti-theft screws at the
bottom, as shown in the following figure.
12 13
500mm
Installation diagram
Installation location
Fix the installation panel to the wall, as shown in the below figure.
The installing method for the installation panel:
Choose the power connection mothod, then mark the position according
to the size of the paper pattern of the installation panel, drill the external
diameter Φ6 screw holes.
After drilling the screw holes, insert the rubber plug (attached with the unit)
in the screw hose.
Fix the installation panel with the mounting screws, as shown the below
figure.
Rear backinstallation panel
Anti-theft screw
Installation
panel
Power connection
Use a single-phase 220-240V power.
2 2
A single wire (cable core: between 2.0mm and 2.5mm ) is being used for
the power cable.
The first method of power line connection (pluggable):
At first, fix the socket near to the unit installation position.
Then, plug one end of the power cord into the unit, and plug the other end
into a socket on the wall.
Note! The power cord must be fixed in the wiring slot in the back of the unit.
※
When the unit is installed,
the power cord must be
clamped in the slot to
prevent the power cord
from falling off; otherwise
this may cause the unit
not to work.
Power socket
on the wall
near the unit
remove the screw before installation
100
Mounting screw
Mounting screw
Metal installation
panel
floor
anti-theft
screw hole
paper pattern of
installation panel
Anti-theft screw
floor
Recommended
installation heights
For men: 760mm
For women: 740 mm

15
Test Run
1
2
3
4
5
Test Run
Result Step Check
Check the voltage of power
supply
Turn the ground-fault circuit
breaker on
Turn the power switch on
Dry hands
Is single-phase alternating
current 220V-240V
(100-120V) used?
Does the power indicator light
up?
Is the air blowing?
Is the unit installed firmly?
Any vibration or strange noise?
Check the unit
* Do not turn the unit power switch on with your hands inside.
* If the self-check indicator in the display lights or is flashing, turn off the power switch off,
and turn the power back on when all the indicators go off (after 40 seconds).
Confirm ON
※
1
230mm
200mm
2
Power connection
The second method of power connection (cut-off plug)
Embed the switch box (with no cover) in
the installation position, used to connect
the power line (the combination of green
and yellow wires is ground wire).
If not using the switch box, the
power supply line will be squeezed
out of the unit body and cannot be
fixed firmly.
Power cord
(with ground
wire)
Cut off the plug of the
power cord
Remain about 30cm long power cord
connecting to the unit
14
3
230mm
230mm
After hanging the unit
on the wall, connect
the remaining power
cord to the power
socket on the wall
(below the unit).
Power connection
position (at the bottom
of unit)
Power socket on the
wall (below the unit)
Switch box
floor
/