Page is loading ...

Owner’s Manual
Pelican WF4/WF8 Premium Whole House
Iron and Manganese Filtration System

Pelican WF4/WF8 Premium Whole House Iron and Manganese
Filtration System
Rev V
Page 2
www.pelicanwater.com
(877) 842-1635
© Copyright 2019 Enviro Water Solutions Inc. All rights reserved.
All information contained herein is the property of Pelican Water Systems. Pelican Water Systems makes
no warranty of any kind with regard to this material, including, but not limited to, the implied warranties of
merchantability and fitness for a particular purpose. Pelican Water Systems shall not be liable for technical
or editorial errors or omissions contained herein or for incidental or consequential damages in connection
with the furnishing, performance, or use of this material. The information is provided “as is” without
warranty of any kind and is subject to change without notice. This document contains proprietary
information which is protected by copyright. No part of this document may be photocopied, reproduced, or
translated into another language without the prior written consent of Pelican Water Systems. Pelican Water
Systems is an Enviro Water Solutions, Inc. company.
© 2019 Enviro Water Solutions, Inc.
3060 Performance Circle, Suite 2, DeLand, FL 32724

Pelican WF4/WF8 Premium Whole House Iron and Manganese
Filtration System Page 3
www.pelicanwater.com
(877) 842-1635
Table of Contents
Table of Contents . . . . . . . . . . . . . . . . . . . . . . . . . . . . . . . . . . . . . . . . . . . . . . . . . . . . . . 3
Product Operation and Specifications . . . . . . . . . . . . . . . . . . . . . . . . . . . . . . . . . . . . . 4
Important Information . . . . . . . . . . . . . . . . . . . . . . . . . . . . . . . . . . . . . . . . . . . . . . . . . 4
Complete Parts List . . . . . . . . . . . . . . . . . . . . . . . . . . . . . . . . . . . . . . . . . . . . . . . . . . . . 5
Installation Overview . . . . . . . . . . . . . . . . . . . . . . . . . . . . . . . . . . . . . . . . . . . . . . . . . . 8
Pre-Installation . . . . . . . . . . . . . . . . . . . . . . . . . . . . . . . . . . . . . . . . . . . . . . . . . . . . . . . 8
Bypass Valve Installation . . . . . . . . . . . . . . . . . . . . . . . . . . . . . . . . . . . . . . . . . . . . . . . 8
Carbon Soak . . . . . . . . . . . . . . . . . . . . . . . . . . . . . . . . . . . . . . . . . . . . . . . . . . . . . . . 10
Carbon Flush . . . . . . . . . . . . . . . . . . . . . . . . . . . . . . . . . . . . . . . . . . . . . . . . . . 11
Installation . . . . . . . . . . . . . . . . . . . . . . . . . . . . . . . . . . . . . . . . . . . . . . . . . . . . . . . . . . 12
Sediment Filter Assembly . . . . . . . . . . . . . . . . . . . . . . . . . . . . . . . . . . . . . . . . . . . . . . 12
Sediment Filter Installation . . . . . . . . . . . . . . . . . . . . . . . . . . . . . . . . . . . . . . . . . . . . 12
Chemical Injector Pump and Solution Tank Installation . . . . . . . . . . . . . . . . . . . . . . . . . 13
Chemical Injector Pump Installation . . . . . . . . . . . . . . . . . . . . . . . . . . . . . . . . . . . . . 14
Solution Tank Installation . . . . . . . . . . . . . . . . . . . . . . . . . . . . . . . . . . . . . . . . . . . . 14
Iron and Manganese Tank Installation . . . . . . . . . . . . . . . . . . . . . . . . . . . . . . . . . . . . . 15
Whole House Water Filter Tank Installation . . . . . . . . . . . . . . . . . . . . . . . . . . . . . . . . . 17
Complete the Installation . . . . . . . . . . . . . . . . . . . . . . . . . . . . . . . . . . . . . . . . . . . . . . 18
Setting the Electronic Head . . . . . . . . . . . . . . . . . . . . . . . . . . . . . . . . . . . . . . . . . . 19
Step 1: Setting the Date & Time . . . . . . . . . . . . . . . . . . . . . . . . . . . . . . . . . . . . . . . 19
Step 2: Performing Manual Regeneration . . . . . . . . . . . . . . . . . . . . . . . . . . . . . . . . 19
Testing Chlorine Levels in Water - Dialing In . . . . . . . . . . . . . . . . . . . . . . . . . . . . . . . 20
Maintenance . . . . . . . . . . . . . . . . . . . . . . . . . . . . . . . . . . . . . . . . . . . . . . . . . . . . . . . . 21
Sediment Filter . . . . . . . . . . . . . . . . . . . . . . . . . . . . . . . . . . . . . . . . . . . . . . . . . . . . . 21
Replacing the Sediment Filter . . . . . . . . . . . . . . . . . . . . . . . . . . . . . . . . . . . . . . . . . . . 21
Chemical Injector Pump . . . . . . . . . . . . . . . . . . . . . . . . . . . . . . . . . . . . . . . . . . . . . . . 21
Solution Tank Refill . . . . . . . . . . . .. . . . . . . . . . . . . . . . . . . . . . . . . . . . . . . . . . . . . . . 21
Troubleshooting . . . . . . . . . . . . . . . . . . . . . . . . . . . . . . . . . . . . . . . . . . . . . . . . . . . . . . 22
Warranty . . . . . . . . . . . . . . . . . . . . . . . . . . . . . . . . . . . . . . . . . . . . . . . . . . . . . . . . . . . 23
Warranty Registration Form . . . . . . . . . . . . . . . . . . . . . . . . . . . . . . . . . . . . . . . . . . . . 25
Product Certifications . . . . . . . . . . . . . . . . . . . . . . . . . . . . . . . . . . . . . . . . . . . . . . . . . 26
Installation Overview Diagram . . . . . . . . . . . . . . . . . . . . . . . . . . . . . . . . . . . . . . . . . . . 7
Bypass Valve Operations . . . . . . . . . . . . . . . . . . . . . . . . . . . . . . . . . . . . . . . . . . . . . . . 8
Rev V
© 2019 Enviro Water Solutions, Inc.
3060 Performance Circle, Suite 2, DeLand, FL 32724

Pelican WF4/WF8 Premium Whole House Iron and Manganese
Filtration System Page 4
www.pelicanwater.com
(877) 842-1635
Product Operation and Specifications
Important Information
Read these instructions carefully and determine the location of all system components before
beginning installation.
Check all applicable plumbing, building, and electrical codes for installation compliance.
Install the system on the main water supply.
The use of Teflon Tape and/or Pipe Thread Seal Paste will be needed on all threaded connections.
Systems that contain electronic components cannot be installed outside in uncovered areas.
WARNING:
If this or any other system is installed in a metal (conductive) plumbing system, i.e. copper or
galvanized metal, the plastic components of the system will interrupt the continuity of the
plumbing system. As a result any errant electricity from improperly grounded appliances
downstream or potential galvanic activity in the plumbing system can no longer ground
through contiguous metal plumbing. Some homes may have been built in accordance with
building codes, which actually encouraged the grounding of electrical appliances through the
plumbing system. Consequently, the installation of a bypass consisting of the same material
as the existing plumbing, or a grounded "jumper wire" bridging the equipment and re-
establishing the contiguous conductive nature of the plumbing system must be installed prior
to your systems use.
CAUTION:
When adding a filtration/softening system to homes/buildings supplied by well water, the system should be
installed following the pressure tank. DO NOT USE this system for pneumatic or hydro pneumatic
applications. If you are using a booster pump, then install this system following the booster
pump. If you have questions, please call customer service.
Specification Description WF4 WF8
Max Flow Rate
10 GPM 15 GPM
Minimum Working Pressure 25 PSI
Maximum Working Pressure 80 PSI
Maximum Vacuum 5 inch/127 mm Hg
Operating Temperatures 36°F – 100°F
pH Range 7 - 11
Rev V
© 2019 Enviro Water Solutions, Inc.
3060 Performance Circle, Suite 2, DeLand, FL 32724

Pelican WF4/WF8 Premium Whole House Iron and Manganese
Filtration System Page 5
www.pelicanwater.com
(877) 842-1635
Complete Parts List
Note: Pelican supplies the parts below to accommodate a variety of water supply lines.
Table 1: Parts List
Part Description Qty. Part Description Qty.
1" Plastic Male NPT
Assembly:
V3007-04 1" Plastic Male
NPT Assembly (2): O-Rings
(2), Split Rings (2), and
Connectors (2)
1 Bypass Valve:
In/Out Bypass Valve with Red
Arrow Handles
1
2 Hose Bib Assembly 1
Sediment Filter System:
Big Blue Filter Housing,
Mounting Bracket, Phillips
Head Screws (4), Bolt Head
Screws (4), and Washers (4)
1 Bypass Valve for
Electronic Head
1
Sediment Filter:
5 Micron Poly-Spun
Sediment Filter
1 Sediment Filter Wrench 1
Electronic Head 1 Solution Tank 1
PVC Tubing Drain Line
(50 ft.)
1 Chemical Injector Pump
Tubing
1
Chlorine Test Strips 1 Chemical Injector Pump 1
Non-Abrasive Auto Wax
4 oz. Bottle
1
WAX
M
EN
U
SE
T
(2) 1" Bushings Included
1" PVC Tail Adaptor for
Electronic Head Bypass
90 Degree 1" PVC Tail Adaptors
also included
Rev V
© 2019 Enviro Water Solutions, Inc.
3060 Performance Circle, Suite 2, DeLand, FL 32724

Pelican WF4/WF8 Premium Whole House Iron and Manganese
Filtration System Page 6
www.pelicanwater.com
(877) 842-1635
Note: Drawings are not to scale.
Additional fittings will be needed to adapt to your plumbing.
Pelican Whole House
Carbon Filter
1 Pelican Whole House Iron
& Manganese Filter
1
Part Description Qty. Part Description Qty.
Rev V
© 2019 Enviro Water Solutions, Inc.
3060 Performance Circle, Suite 2, DeLand, FL 32724

WF48
Page 7
P
Pelican
Water Systems
5
DO NOT SCALE DRAWING
CONNECTION SIZE: 1"
MAX PRESSURE OPERATING: 80
PSI MAX TEMPERATURE: 100
°
INSTALLATION OVERVIEW
WF 4/8
**BACKWASH LINE TO BE PLUMBED TO A DRAIN
SHUT OFF VALVES
INJECTION PUMP
**
0
0
0
0
SEDIMENT FILTER
IRON
MANGANESE
FILTER
WATER
FILTER
BYPASS
HOSE SPIGOTS
SOLUTION
TANK
MENU
SET
Rev V

Pelican WF4/WF8 Premium Whole House Iron and Manganese
Filtration System
Page 8
www.pelicanwater.com
(877) 842-1635
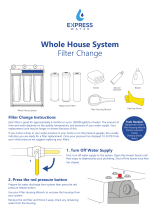
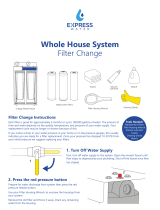
Installation Overview
Figure 1
Pre-Installation
Bypass Valve Installation
Drain Line
Barb
Whole House
Water Filter
Outgoing
Water to
House
Whole House
Iron & Manganese Filter
IN
OUT
Sediment Filter
Incoming
Water
Supply
Wall Wall
Solution Tank
Chemical
Injector
Pump Tubing
Chemical Injector
Pump
Spigot
Quick
Connect Nut
Red Arrow
Water Filter
Head
Whole House
Iron & Manganese Filter
Whole House
Water Filter
Electronic
Head
Bypass
Valve
INLET
OUTLET
INLET
OUTLET
Figure 2
Whole House Water Filter - The Bypass Valve comes pre-assembled and ready to install with the O-
Rings, Split Rings, and Quick Connect Nuts. Push the Bypass Valve into the head of the Whole House
Water Filter with the unthreaded ends orientated towards the tank and hand-tighten the Quick Connect
Nuts.
Whole House Iron & Manganese Filter - If the Red Clips are in the slots (female opening of
Electronic Head) remove them. Push the male O-Ring side of the Bypass Valve into the female opening
of the Electronic Head. Push the Red Clips back into the slots to tighten.
Red
Clip
Front View
Rev V
© 2019 Enviro Water Solutions, Inc.
3060 Performance Circle, Suite 2, DeLand, FL 32724

Pelican WF4/WF8 Premium Whole House Iron and Manganese
Filtration System
Page
www.pelicanwater.com
(877) 842-1635
Notice:
The Bypass Valve on the Electronic Head can be set to Bypass or Service by turning the knobs on the
top of the valve. The valves can be difficult to turn by hand until the seals become saturated. Use the
supplied Bypass Allen Wrench to turn the knobs if necessary.
Note: The Red Arrows on the Whole House Carbon Filter Bypass may be pointing in a different direction
then shown. If this is the case, remove the Red Arrows by pulling them straight up. Turn them around
and reposition correctly onto the Bypass Valve so they are positioned as shown in the service posistion
below.
The Bypass Valve on the Whole House Water Filter can be set to Bypass or Service by turning the Red
Arrows on the top of the valve.
Bypass Operation
SERVICE
BYPASS
SERVICE
BYPASS
Bypass Allen Wrench
Rev V
© 2019 Enviro Water Solutions, Inc.
3060 Performance Circle, Suite 2, DeLand, FL 32724

Pelican WF4/WF8 Premium Whole House Iron and Manganese
Filtration System
Page 10
www.pelicanwater.com
(877) 842-1635
Water Filter - Carbon Soak
!IMPORTANT!
Your system will not be ready for use for a minimum of 48 hours while the Carbon Soak process takes
place. Please plan your installation accordingly.
Notice:
Water will flow out of the outlet side of the Bypass Valve during this process. Be sure you perform this
series of steps in a location suitable for water flow.
Figure 3
1. Attach a garden hose to the Hose Bib Assembly
2. Connect the Hose Bib Assembly to the inlet side of the Bypass Valve and hand tighten
3. Fill the Whole House Water Filter until water comes out of outlet side of the Bypass Valve.
4. Turn the water off.
5. Remove the garden hose from the Hose Bib Assembly. Do not remove the fitting.
6. Allow the carbon in the Water Filter to soak for a minimum of 48 hours prior to installation.
NOTE: Allowing the Whole House Water Filter to soak longer than 48 hours is completely fine as
it will help with further saturation and minimize the break in period.
Garden
Hose
Hose Bib
Assembly
Water
Bypass Valve
Whole House Water Filter
INLET
OUTLET
Rev V
© 2019 Enviro Water Solutions, Inc.
3060 Performance Circle, Suite 2, DeLand, FL 32724

Pelican WF4/WF8 Premium Whole House Iron and Manganese
Filtration System
Page 11
www.pelicanwater.com
(877) 842-1635
Water Filter - Carbon Flush
!IMPORTANT!
Do not perform the Carbon Flush until the Carbon Soak process is complete.
Notice:
Water will flow out of the outlet side of the Bypass Valve during this process. Be sure you perform this
series of steps in a location suitable for water flow.
Figure 4
1. Reattach the garden hose to the Hose Bib Assembly.
2. Slowly turn on the water less than a 1/4 turn on the hose spigot.
3. Run water through the inlet side of the Bypass Valve for 30 minutes to expel any carbon fines.
4. Turn off the water.
5. Remove the Hose Bib Assembly from the inlet side and attach it to the outlet side of the Bypass Valve.
6. Slowly, fully open the hose spigot.
7. Run the water through the outlet side for 3 minutes to reset the carbon.
8. Turn off the water.
9. Remove the Hose Bib Assembly from the Bypass Valve and disconnect the garden hose.
Note: Please save the Hose Bib Assembly as this will be used in the future for the carbon replacement.
Water
Bypass Valve
Whole House Water Filter
Garden
Hose
Hose Bib
Assembly
OUTLET
INLET
INLET
Water
Bypass Valve
Whole House Water Filter
Garden
Hose
Hose Bib
Assembly
OUTLET
Figure 4-2
Carbon Reset
Carbon Flush
Rev V
© 2019 Enviro Water Solutions, Inc.
3060 Performance Circle, Suite 2, DeLand, FL 32724

Pelican WF4/WF8 Premium Whole House Iron and Manganese
Filtration System
Page 12
www.pelicanwater.com
(877) 842-1635
Installation
Sediment Filter Assembly
Figure 5
Sediment Filter Installation
Figure 6
Notice:
The Sediment Filter Housing comes with a 1” threaded female inlet/outlet and will require additional
fittings to adapt to your plumbing. A shut-off valve is recommended prior to the Sediment Filter System.
Sediment Filter Cover
Sediment Filter
O-Ring
Stand Pipe
Blue Filter Housing
Top View
Blue Filter Housing
Inlet Water
Supply
Mounting
Bracket
1. Unscrew the cover from the Blue Filter Housing.
2. Remove the plastic covering from the Sediment Filter.
3. Place the Sediment Filter onto the Stand Pipe in the Blue Filter Housing and set aside.
1. Shut off the water.
2. Attach the Filter Cover to the Mounting Bracket using the supplied Bolt Head Screws and
Washers. Make sure to properly orientate the IN and OUT to match your flow pattern.
3. Attach the Mounting Bracket to the wall using the supplied Phillips Head Screws.
4. Hand tighten the Blue Filter Housing and then using the supplied Filter Wrench lightly snug
the housing making sure not to over-tighten. (counter clockwise).
5. Determine the size of your inlet water supply line.
Rev V
© 2019 Enviro Water Solutions, Inc.
3060 Performance Circle, Suite 2, DeLand, FL 32724

Pelican WF4/WF8 Premium Whole House Iron and Manganese
Filtration System
Page 13
www.pelicanwater.com
(877) 842-1635
Chemical Injector Pump Overview
Dosage Adjustment
Dosage Lock
Nut
Suction Hose Nut
Pressure Release Button
Flow Direction Arrow
Figure 7
Pressure Release Button - Allows you to relieve the air pressure after install and maintenance.
Flow Direction Arrow - Indicates the proper flow pattern depending on how the unit is installed.
Dosage Adjustment - Allows you to increase or decrease the amount of solution injected per gallon of flow.
Dosage Lock Nut - Locks and unlocks the Dosage Adjustment for increasing and decreasing solution.
Suction Hose Nut - Compression nut the secures the injector tubing to the injector.
Chemical Injector Pump and Solution Tank Installation
Incoming
Water
Supply
Outgoing Water
to House
35 Gallon
Solution Tank
Chemical Injector
Pump Tubing
Chemical Injector
Pump
Sediment Filter
Pump Foot Valve
Figure 8
Rev V
© 2019 Enviro Water Solutions, Inc.
3060 Performance Circle, Suite 2, DeLand, FL 32724

Pelican WF4/WF8 Premium Whole House Iron and Manganese
Filtration System
Page 14
www.pelicanwater.com
(877) 842-1635
Chemical Injector Pump Installation
!IMPORTANT!
Install the Chemical Injector Pump onto the water supply after the Sediment Filter and before any other
filtration or softening system.
1. Determine the size and material of your incoming water supply line from the Sediment Filter System.
2. Mount the Chemical Injector Pump to the wall using the provided bracket. Line up the inflow and
outflow connections with the current water line.
3. Remove the two red thread protectors from inlets and discard. Injector Pump has 3/4" connections,
two 1" bushings are included.
4. Plumb the Injector Pump into your water line. The arrow on the body of the Injector Pump shows the
correct water flow direction. The Injector Pump can be rotated to match your flow direction. The
water should enter and exit the pump following the direction of the arrow.
Solution Tank Installation
1. Remove the black cap from the opening on the Solution Tank.
2. Drill one 1/2” hole into the top of the Solution Tank. (Hole should be larger than tubing to allow air in)
3. Insert the end of the Chemical Injector Pump Tubing with the pump foot valve connected, into the
hole which was covered by the black cap on the top of the Solution Tank.
4. Feed and pull the other end of the tubing through the drilled opening on the top of the Solution Tank.
5. Determine the length of Chemical Injector Pump Tubing required for the foot valve to reach 4" from
the bottom of the Solution Tank and cut tubing.
6. Connect the Chemical Injector Pump Tubing to the suction valve on the Chemical Injector Pump by
removing the suction hose nut, place nut over tubing, push tubing onto suction valve and tighten nut.
7. Fill the Solution Tank with 17 gallons of bottled water and proper number cups of bleach based on
the % concentration of Sodium Hypochlorite noted on the bottle. (see chart below)
!IMPORTANT! Ensure the Chemical Injector Pump Tubing is free of kinks and the Solution Tank is not
sitting directly on concrete. The cold temperatures held by concrete floors can separate your solution.
Concentration of Bleach
(% Sodium Hypochlorite) Number
of Cups Gallons of Water
3.00% 12 17
5.25% 7 17
6.00% 6 17
8.25% 4.5 17
Rev V
© 2019 Enviro Water Solutions, Inc.
3060 Performance Circle, Suite 2, DeLand, FL 32724

Pelican WF4/WF8 Premium Whole House Iron and Manganese
Filtration System
Page 15
www.pelicanwater.com
(877) 842-1635
Iron and Manganese Tank Installation
Figure 8
1. Level the Whole House Iron & Manganese Filter.
Notice:
If the tank is not level, lift the tank straight up 6 inches and tap it on the ground until the tank stands
vertical. The bottom of the tank is round and the boot allows the tank to stand upright.
2. Determine the size and material of your incoming water supply line from the Injection Pump
and choose the appropriate fittings required to connect it to the Bypass Valve.
CAUTION:
Do not over-tighten any of the fittings during installation.
Table 2: Bypass Valve Fittings
Part Description Qty.
1" PVC Tail Adaptor for
Electronic Head Bypass
2
Drain Line
Barb
Whole House
Water Filter
Outgoing
Water to
House
Whole House
Iron & Manganese Filter
IN
OUT
Sediment Filter
Incoming
Water
Supply
Wall Wall
Solution Tank
Electronic
Head
Chemical
Injector
Pump Tubing
Chemical Injector
Pump
Spigot
OUTLET
INLET
3. Remove the gray cap from the top of the Whole House Iron & Manganese tank.
4. Screw the Electronic Head onto the tank hand-tight.
5. Install the fittings onto the inlet and outlet, following the labels on the Head.
6. Connect the incoming water supply to the fitting on the inlet side of the Bypass Valve.
7. Connect the outgoing water supply to the outlet side of the Bypass Valve.
8. Firmly press one end of the PVC Tubing Drain Line onto the Drain Line Barb, and secure the
other end of the line to a drain.
Electronic Head
Bypass Valve
Tail Adaptors
Red Clips
Rev V
© 2019 Enviro Water Solutions, Inc.
3060 Performance Circle, Suite 2, DeLand, FL 32724

IMPORTANT!
• Ensure the PVC Tubing Backwash Drain
Line is not submerged and is free of kinks.
• Maximum vertical rise of the backwash line
is 6 feet
.
• If incorporating two or more backwashing
systems make sure to keep the drain lines
separate.
www.pelicanwater.com
(877) 842-1635
Pelican WF4/WF8 Premium Whole House Iron and Manganese
Filtration System Page 16
Rev V
© 2019 Enviro Water Solutions, Inc.
3060 Performance Circle, Suite 2, DeLand, FL 32724

Pelican WF4/WF8 Premium Whole House Iron and Manganese
Filtration System
Page 17
www.pelicanwater.com
(877) 842-1635
Whole House Water Filter Installation
1. Level the Whole House Water Filter.
Notice:
If the tank is not level, lift the tank straight up 6 inches and tap it on the ground until the tank stands
vertical. The bottom of the tank is round and the boot allows the tank to stand upright.
Figure 9
2. Determine the size and material of your incoming water supply line from the Whole House Iron &
Manganese Filter and choose the appropriate plumbing required to adapt to the 1” Male NPT
Assembly.
CAUTION:
Do not over-tighten any of the fittings during installation.
Table 3: Bypass Valve Fittings
Note: The fitting below is designed with a ¼
" give to allow for proper pipe alignment. It will not leak and
is intended to have some flexibility.
Part Description Qty.
1" Plastic Male NPT Assembly:
V3007-04 WS1 Fitting 1" Plastic Male NPT
Assembly (2): O-Rings (2), Split Rings
(2), and Connectors (2)
1
bag
O-Ring
Split Ring
Quick Connect Nut
Drain Line
Barb
Whole House
Water Filter
Outgoing
Water to
House
Whole House
Iron & Manganese Filter
IN
OUT
Sediment Filter
Incoming
Water
Supply
Wall Wall
Solution Tank
Chemical
Injector
Pump Tubing
Chemical Injector
Pump
Spigot
INLET
OUTLET
Rev V
© 2019 Enviro Water Solutions, Inc.
3060 Performance Circle, Suite 2, DeLand, FL 32724

Pelican WF4/WF8 Premium Whole House Iron and Manganese
Filtration System
Page 18
www.pelicanwater.com
(877) 842-1635
3. Install the fitting onto the inlet and outlet sides of the Bypass Valve. Follow the diagram supplied
with the fitting.
4. Connect the incoming water supply from the Whole House Iron & Manganese Filter to the fitting
on the inlet side of the Bypass Valve.
5. Connect the outgoing water supply back into the home to the outlet side of the Bypass Valve.
Complete the Installation
1. Turn on the main water supply.
2. Press Pressure Release Button on top of Injector Pump.
3. Check for leaks.
4. Peel off the protective plastic wrap from the stainless steel tank
jackets.
5. Add the Pelican logo sticker in the desired location on the tank.
6. Wax stainless steel tank jacket(s) with wax provided or any other non-abrasive auto wax a
minimum of 1-2 times per year or as needed based on the installed environment.
CAUTION:
Avoid high flow rates such as bathtub, utility sinks, hose bibs, multi-headed showers, body sprayers, or
anything that is considered high flow for the first 72 hours to avoid flow restrictions caused by carbon
blockage of the top basket inside the carbon tank.
Carbon dust may be released into the water lines of the house/building during the first few days of water
use after Whole House Water Filter installation. The carbon dust is harmless, but may give the
water a gray appearance that should diminish within a week or 10 days depending on water use.
Rev V
© 2019 Enviro Water Solutions, Inc.
3060 Performance Circle, Suite 2, DeLand, FL 32724

Pelican WF4/WF8 Premium Whole House Iron and Manganese
Filtration System
Page 19
www.pelicanwater.com
(877) 842-1635
IMPORTANT!
You will need to manually regenerate (Regen Now) your system prior to use. To do so follow the
programming below. You will not be able to use water for 20 minutes during this process.
1. Using the DOWN button select Manual Regen and press SET.
2. Using the UP or DOWN button select either Regen Now or Regen Tonight.
-Regen Now will start a regeneration process immediately.
-Regen Tonight will regenerate the system at the default regeneration time of 2:00am.
3. Once selected press the SET button to confirm. Gears will make noise and water will start to
flow. Allow the system to regenerate for approximately 20 minutes.
4. Once complete press the MENU button to return to the main menu.
5. Your programming is now complete.
1. P
r
ess and hold
the M
ENU
but
ton
until
you
hear
the
beep
to unlock.
2. Press
MENU button for menu.
3.
Press
SET
once Date
&
Time
Sett
ing
is
highlighted.
4.
Using
the UP and DOWN buttons input the correct Date and Time pressing SET after each input.
5. Once set press the MENU button to return to the main menu.
Programming the Electronic Head
Note: Power Source - For safety reasons t
he outlet must be protected by a Ground Fault Circuit
Interrupter (GFCI).
Your system is pre-set to regenerate every 3 days at 2:00 am, the complete process takes 20 minutes
In the event of spikes in Iron and Manganese levels you may choose to manually regenerate your
system if you experience colored water from your system.
Step 2: Performing a Manual Regeneration
Notice:
Step 1: Setting the Date & Time
MENU
SET
Rev V
© 2019 Enviro Water Solutions, Inc.
3060 Performance Circle, Suite 2, DeLand, FL 32724

Pelican WF4/WF8 Premium Whole House Iron and Manganese
Filtration System
Page 20
www.pelicanwater.com
(877) 842-1635
Testing Chlorine Levels in Water - Dialing In
Concentration of Bleach
(% Sodium Hypochlorite) Number of Cups Gallons of Bottled Water
3.00% 12 17
5.25% 7 17
6.00% 6 17
8.25% 4.5 17
F
igure 13
!IMPORTANT!
If after testing again there is still no reading of chlorine we recommend calling in to speak with a
Technical Support representative. 877-842-1635
1. Put the Whole House Water Filter into bypass. (See page 9 for bypass position)
2. Turn on the nearest cold water faucet to the system.
3. Listen and watch the pump to make sure it is pumping. The pump should pulse and not run
continuously. If the water is off, the pump will stop.
4. Let the water run for 15 minutes.
5. After 15 minutes, use a chlorine test strip to test a sample of water from the cold water faucet.
a. The optimum chlorine level reading is 2.6ppm on the test strip.
b. If you do not have a reading of chlorine you will need to add 3 more cups of bleach to the
solution tank and mix. Note the new total or bleach to 17 gallons water. Repeat steps 4 & 5
to achieve a new sample for testing. Double check to make sure the Water Filter is in
bypass. Page 9 shows the bypass position.
c. If your reading is close to 2.6ppm then you will unlock the dosage adjustment on the
injector pump and rotate up two full turns. Re-lock the dosage adjustment and repeat steps
4 & 5 to achieve a new sample for testing.
6. If you needed to test another sample and you still do not have a reading of chlorine add another 3
cups of bleach and mix. Note the new total of bleach to 17 gallons of water. Repeat steps 4 & 5 to
achieve a new sample for testing.
7. If your reading is close to 2.6ppm then you will unlock the dosage adjustment on the injector pump
and rotate up two full turns. Re-lock the dosage adjustment and repeat steps 4 & 5 to achieve a
new sample for testing.
Dosage Adjustment
Dosage Lock
Nut
Suction Hose
Nut
Pressure Release Button
Flow Direction Arrow
Rev V
© 2019 Enviro Water Solutions, Inc.
3060 Performance Circle, Suite 2, DeLand, FL 32724
/