Page is loading ...

OPERATION
MANUAL
MODEL:
RFX3000
+DIGITAL
AUDIO/VIDEO PLAYER
+SIRIUS
READY
+AM
/
FM
STEREO RADIO
+USB
MUSIC PLAYBACK

CONTENTS
CONTENTS
...................................
·
.......................
1
CONTROL
PANEL
ILLUSTRATION
.........................
2
REMOTE
CONTROL
FUNCTION
............................
3
WIRE
DIAGRAM
...................................................
4
INSTALLATION...................................................
5
BASIC
OPERATION
..............................................
6
SIRIUS
OPERATION
.............................................
7-10
RADIO
OPERATION
.............................................
11
AUX/USB
OPERATION
.........................................
12-13
CDC
OPERATION
................................................
14
SPECIFICATION.................................................
15
TROUBLESHOOTING..........................................
16
P1

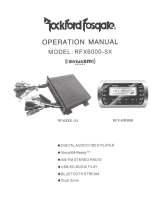
CONTROL PANEL ILLUSTRATION
@
@@@
,-
ltll
r· I I
@
RFX-MR5B
MEDIA
PLAYER
4X
OW
A
TIS
BAND
SCAN
3RDM
@
@
(OPTION)
CD
.
POWER
ON/OFF
®
.FUNCTION
SELECT
BUTTON
@.VOLUME
UP/DOWN
@ .
MODE
BUTTON
@.DISPLAY
BUTTON
@
.AUTOMATIC
OR
MANUAL
TUNING
(FREQ
UP~
OR
FREQ
DOWN~
)
(])
.AUTO
STORE
AND
PRESET
SCAN/MENU(A/PS)
/SELECT
TRACK/CHANNEL
SWITCH
@.BAND/CDC
DISC
UP/
-10
TRACKS
®
.AUTOMATIC
TUNING
CONTROL(SCAN)
/CDC
DISC
DOWN/
+1
0
TRACKS
@.PRESET
1,
PLAY/PAUSE
@
.PRESET
2,
REPEAT
PLAY
@.PRESET
3,RANDOM
PLAY
@
.PRESET
4/LEFT
@
.PRESET
5/DOWN(ENTER)
@
.PRESET
6/RIGHT
@
.MENU/DIMMER
SETTING
BUTTON/UP
@.LCD
DISPLAY
@
.MUTE
P2
•
MENU
f-'----'<:r------\---@
~~~~~~
~
®
~k---1-\---@
.~::::::::::::::=:::::::::~
~#'------'\\---hf"'-r--~++-
@
@
~'<--®
"-...
~
-----FtL-
~
------""'.~-Il--+-
@
(
RFX-MR6)
@
OPTION

REMOTE CONTROL FUNCTION
(OPTION)
G)
.
POWER
ON/OFF
®.
FUNCTION
SELECT
BUTTON
@
.VOLUME
UP/DOWN
@ .
MODE
BUTTON
@.
AUTOMATIC
TUNING
(FREQ
UP~
OR
FREQ
DOWN~)
(!).
PRESET
SCAN
@.
BAND/CDC
DISC
UP
@
.AUTOMATIC
TUNING
CONTROL
/
CDC
DISC
DOWN
@.
MENU
@.
NUMO-NUM9
@.
NUM5(
DIRECTION
UP)
@.
NUMO
(DIRECTION
DOWN)
@.
NUM7(DIRECTION
LEFT)
@.
NUM9(
DIRECTION
RIGHT)
@
.NUMB(
ENTER)
P3
@
@
@
(!)
®
@
®

WIRE
DIAGRAM
>-
2
0
:s:
2
2
2
<.9
<{
~
w
~
~
~ ~
a:
w
a::
w
w
w
<.9
1-
1::
f- f-
f-
CJ
0
w
0
I
0
I
0
I
co
z
w
I
>-
w w w
a::
a::
(j)
co
<(
a::
f-
a:
s:
~
a:
s:
a:
~
a:
s:
0
a::
1-
1-
::::>
1.!')
(")
a::
w
0::
I
I
f-
i
I
I
I I
a:
a:
w
u..
0
0
::>
<(
<(
0
a:
~
~<0
<.9
0
a..
UJt-
UJ
0
z
U5
10:
z
()
()
1-
I
0
Z::>
0
0
X~
<(
(.9
oo
>
a:
a:
X
()
X
u..
I
~
UJ
::::>
w
~~
a:x
I
0
No
0
1-
a:
()
co
.....J_
>
z
<(
<(
z
oo
au..
::::>
<(0
0
w
z
f-~
f-~
0
(j)
::>::>
a:
a::
0
()
0<(
u..
()
POWER
BLACK
ANTENNA
GROUND(-)
MEMORY
YELLOW
RED
BACK
UP
IGNITION
SWITCH
(B+)
FRONT
+WHITE
GREY+
FRONT
LEFT
RIGHT
SPEAKER
-WHITE/BLACK
SPEAKER
REAR
+GREEN
VIOLET+
REAR
LEFT
RIGHT
SPEAKER
-GREEN/BLACK
VIOLET/BLACK-
SPEAKER
Fuse replacement
If
the
fuse blows,
check
the
power
connection
and replace the fuse.
If
the fuse
blows
again
after
the
replacement,
there
may be an internal
malfunction.
In
this
case,
consult
your
nearest
repairing center.
Warning:
Only
replace
fuse
with the
same
type and rating. Use of a
different
type
or
rating
may
cause
serious
damage.
Be sure
your
wire
remote(RFX-MR3/RFX-MR6)
is
installed correctly,
wrong connection
will cause serious damage to the wire remote.
P4

INSTALLATION
1.
Precautions
Choose
the
mounting
location
carefully
so
that
the
unit
will
not
interfere
with
the
normal
driving
functions
of
the
boat.
Avoid
installing
the
unit
where
it
would
be
subject
to high
temperature,
such
as
from
direct
sunlight
or
hot
air,
or
where
it
would
be
subject
to
dust,
dirt
or
excessive
vibration.
Use
only
the
supplied
mounting
hardware
for
a
safe
and
secure
installation.
2.
Mounting
illustration
I
Correct
mounting
gositions
Better:
45
facing
upward
Incorrect
mounting
positions
3.
Installation
Note
Do
not
mount
black
box
in
either
of
the
following
positions,
this
will
allow
water
to
intrude
and
will
result
in
damage
to
the
unit.
Best:
90
facing
upward
Please
find
enclosed
nylon
wire
tie-downs(wire
clamps)for
added
support.
use
the
wire
clamps
to
hold
down
the
harness,
preventing
water
from
running
along
the
wires
and
into
the
unit.
P5

BASIC
OPERATION
POWER
ON/OFF(1)
Press
the
button
to
turn
the
unit
on
or
off
.
SELECT
(2)&VOLUME
UP/DOWN(3)
Repeatedly
press
SEL
button
to
select
BAS-+TRE-+BAL-+FAD-+SUB-+EQ-+
ID3-+VOL,
then
you can
use
the
VOL+/-
button
to
change
the
setting.
Long
press
SEL
button
to
enter
zone
selection,
and
short
press
it
again
repeatedly
to
select
channel
switch,
Beep
setting,
trigger
1/trigger
2
setting,
press
the
VOL+
I-
to
change
the
settings.
a
ZONE:
AMERICA
I
EUROPE
I
CHINA.
b
STEREO/MONO
SWITCH:
FM
mode.
c
Beep:
Activate
Beep
on/off.
d
TRI1
:Activate
Trigger
1
(12V
_1)
on/off.
e
TRI
2:
Activate
Trigger
2(12V
_2)
on/off.
Adjust
back
light(MENU)
(16)
By
pressing
MENU
key
more
than
2s,
you can
adjust
back
light.(25°/o, 1 00°/o)
DISPLAY
(DISP)
(5)
Press
DISP
button
once
to
display
the
system
time
on
the
LCD.
a.
Press
and
hold
DISP
button
until
hour
digit
starts
blinking,
use
~I
1+4
to
adjust
hour.
b.
Press
DISP
again,
minute
digit
starts
blinking,
use
~
/1+4
to
adjust
minute.
MODE
button
(MODE)
(4)
Press
to
switch
mode:
SIRIUS/CDC/AUX/TUNER/DIGI
PORT/USB.
LCD
display
(17)
Display
the
current
state
of
the
unit.
Low
Voltage
Warning
When
the
power
supply
drops
down
to 1
OV,
it will
display
II
BATTERY
LOWII
on
LCD
and
beeps
for
1
minute,
the
black
box
will be
turned
off
automatically
in 1
minute.
LOCKTHECONTROLPANEL
Press
and
hold
"SEL"
(2)and
"DISP"
(5)
buttons
together
for
3
seconds
to
lock
the
RFX-MR5BB
control
panel,
the
Black
Box
will
not
response
the
button
press
on
the
panel
when
the
panel
is
locked.
Press
and
hold
"SEL"
and
"DISP"
buttons
for
3
seconds
again
to
unlock
the
RFX,MR5BB
control
panel.
Press and hold "MUTE" (18)and "Volume Down" (3)button together for 3 seconds
to lock RFX-MR7. After locked, RFX-MR7 will not response to any button press. Press
and hold the same buttons again to unlock the RFX-MR7.
Note: this function
is
available for RFX-MR7 made after July 2011.
P6

SIRIUS OPERATION
Sirius
Operation
+This
unit
is
compatible
with
a
variety
of
SIRIUS
Satellte
Radio
solutions
including
the
SCC1
Sirius
Connect
Vehicle
Tuner
and
SCVDOC1
Sirius
Connect
Vehicle
Kit
with
any
compatible
SIRIUS
Dock
&
Play
radio.
The
operation
will
be
the
same
regardless
of
the
SIRIUS
radio
is
used.
+User
needs
follow
the
instruction
of
SCCI
or
SCVDOC1
for
installation.
Always
make
sure
the
Sirius
SIRIUS
antenna
is
connected
properly
located
for
maximum
signal
reception.
1.
Button
definitions
1)
POWER
ON/OFF
2)
SEL:
Function
Select
button
3)
VOL+/-:
Volume
set
button
4)
MODE:
Switch
between
different
modes
5) DISP:
Display
the
SIRIUS
channel
info
6)
SEEK+/-:
Short
press
to
select
previous/next
station,
Long
press
(more
than
2
seconds)
to
switch
channel
rapidly
7)
AS/PS:
Short
press
to
input
channel
number
directly
8)
BAND:
Switch
between
SR1,
SR2
and
SR3
9)
SCAN:
Short
press
to
LOCK/UNLOCK
channels,
Long
press
to
change
the
password.
1 0)
Preset
1:
For
preset
station
1
Also
used
to
input
the
first
digit
of
pass
code
or
channel#.
11)
Preset
2:
For
preset
station
2
Also
used
to
input
the
second
digit
of
pass
code
or
channel#.
12)
Preset
3:
For
preset
station
3
Also
used
to
input
the
third
digit
of
pass
code
of
channel#.
13)
Preset
4:
For
preset
station
4
Also
used
to
input
the
fourth
digit
of
pass
code
14)
Preset
5:
For
preset
station
5
15)
Preset
6:
For
preset
station
6
16)
MENU:
Short
press
to
turn
on/off
Category.
When
category
is on, you can
press
11
SEL
11
key
to
select
between
categories
and
then
seek
in
current
selected
category
by
pressing
SEEK+/-
key.
17)
LCD
DISPLAY
P7

SIRIUS OPERATION
2.Sirius
ID
and
Activate
Sirius
service
After
system
is
turned
on,
press
the
MODE
button
to
enter
the
SIRIUS
mode.
The
system
will
display
a
"SIRIUS"
logo
on
the
LCD
screen.
Until
you
subscribe
and
activate
the
SIRIUS
service,
you can
only
access
channel
0
(the
SIRIUS
ID
channel)
and
184
(Preview
Channel).
Tune
to
Channel
0 to
display
your
radio's
unique
12-digit
SIRIUS
ID
number
(SID).
This
number
is
also
available
on
the
back
of
SIRIUS
Tuner
SCC1.
Write
down
this
number
and
caii1-888-539-SIRIUS
(1-888-539-7474)with
your
credit
card
handy
to
activate
SIRIUS
service.
You
may
go
to
website
https://activate.siriusradio.com/1
to
activate
the
service.
If
you
do
not
subscribe
the
full
service,
the
unsubscribed
channel
will
display
"CALL
888-539-SIRIUS
to
subscribe"when
tuned.
3.
Preset
Stations
The
unit
has
total18
preset
stations
in
SIRIUS
Mode.
Use
BAND
button
to
switch
between
SR1, SR2,
and
SR3.
Each
band
has
6
preset
stations.
Short
press
the
Preset
1-6
button
to
listen
to
the
preset
stations.
Long
press
the
preset
1-6
button
to
store
current
station
to
preset
memory.
4.
Select
channels
by
category
Short
press
MENU
button
to
turn
on/off
the
category
mode.
A
"CAT"
icon
in
the
LCD
will
indicate
the
Category
mode
is on.
When
Category
mode
is on,
long
press
"SEEK+/-"
to
switch
between
the
categories,
such
as POP,
ROCK,
COUNTRY,
etc.
And
you can
switch
channels
in
selected
category
by
short
pressing
"SEEK+/-"
button.
The
category
mode
will
not
time
out
unless
you
turn
off
this
mode
by
short
press
MENU
button
again.
5.
Input
channel
directly.
Short
press
the
AS/PS
key
to
enter
the
direct
input
mode.
The
LCD
will
display:
"CH
X X
XX"
Press
Preset
1
repeatedly
to
select
the
first
digit
of
channel
number
(the
first
digit
changes
incrementally
from
0, 1, 2).
Press
Preset
2
repeatedly
to
select
the
second
digit
of
channel
number(the
second
digit
incrementally
from
0, 1, 2, ...
To
9)
Press
Preset
3
repeatedly
to
select
the
third
digit
of
the
channel
number
(the
third
digit
changes
incrementally
from
0, 1, 2, ...
To
9).
When
3
digits
are
selected,
press
"SEL"
button
to
enter
the
desired
channel.
P8

SIRIUS OPERATION
6. Parental Control
You
can
lock
any
Sirius
channels
you
do
not
others
to
have
access
without
your
permission.
The
default
code
is
"5220"if
you
forget
your
pass
code,
you
may
disconnect
the
unit
completely
from
power.
The
unit
will
restore
to
the
default
pass
code
after
power
on
again.
Enter
a
Locked
channel:
When
user
tunes
to
a
locked
channel,
the
LCD
screen
will
display:
"LOCKED
CH"
first
and
then
display:
"CODEX
XXX".
Press
Preset
1
repeatedly
to
select
the
first
digit
of
pass
code.
Press
Preset
2
repeatedly
to
select
the
second
digit
of
pass
code.
Press
Preset
3
repeatedly
to
select
the
third
digit
of
pass
code.
Press
Preset
4
repeatedly
to
select
the
last
digit
of
pass
code.
When
all
digits
are
selected,
press
"SEL"
button
will
enter
the
channel.
If
the
code
is
wrong,
it
will
display
"CODE
X X X
X"
again
and
wait
for
user
to
enter
code
again.
If
user
enters
a
wrong
code
again,
the
unit
will
display
"PWD
ERROR"
and
go
back
to
previous
screen.
Note:
user
needs
wait
for
"CODE
X X X X"
display
to
enter
pass
code.
Otherwise
the
Preset
1-4
still
enters
as
Preset
station.
To
lock
a
channel:
When
a
channel
is
selected,
use
"SCAN"
to
lock
this
channel.
The
LCD
will
display
"LOCK
CH"
first
and
then
display:
"CODE
X X X X".
Use
Preset
1-4
(same
as
above)
to
enter
pass
code
and
press
SEL
to
lock.
Note:
After
a
channel
is
locked,
user
cannot
tune
to
this
channel
by
SEEK+/-
button.
User
must
input
the
channel#
directly
to
enter
this
channel.
To
unlock
a
channel:
User
needs
enter
the
locked
channel
first
and
then
short
press
"SCAN"button.
The
LCD
will
display
"UNLOCK
CH"
and
then
display:
"CODE
X X X X".
Same
procedure
as
above
to
enter
the
code
and
unlock
the
channel.
To
change
pass
code:
Long
press
"SCAN"button
to
change
the
pass
code.
The
screen
will
display
"OLD
CODE"shortly
and
then
display
"CODE
X X X X"
Use
Preset
1-4
buttons
as
above
to
enter
the
pass
code.
If
the
old
pass
code
is
entered
correctly,
the
screen
will
display
"NEW
CODE"
and
then
display:
"SET
X X X X"
Use
Preset
1-4
buttons
again
to
set
up a
new
pass
code.
pg

SIRIUS OPERATION
7.
Display
channel
information:
Press
DISP
button
repeatedly
to
display
different
information
of
the
channel
such
as
channel#,
channel
name,
category,
song
title,
artist,
composer
...
8.
Message
display:
..
Check
Sirius
Tuner
..
:
..
Antenna
Error
..
..
Acquiring
signal
..
..
Updating
..
..
FW
Updating
..
"Subscription
updating
..
..
Updating
Channels
..
Tuner
is
not
connected
or
is
bad
.
Antenna
is bad
or
not
connected.
No
signal
output
from
the
Sirius
TUNER
Updates
the
Sirius
information
into
unit.
Updates
firmware
Updates
subscription
Updates
the
GCI(Channel
info)
P10

Radio
Operation
Listening
to
the
radio
RADIO OPERATION
Press
the
MODE
(4)
button
and
select
the
radio
mode,
the
frequency
appears
in
the
display.
Press
the
BAND
(8)
button
and
select
the
radio
band
FM1-FM2-FM3-AM1-AM2.
Tuning
There
are
3
types
of
tuning
mode
available:
SEEK
tuning,
MANUAL
tuning
and
Preset
stations.
Auto
Seek
a
Station
Press
the
BAND
(8)
button
and
select
the
desired
band (FM
or
AM).
Press
..,...
or
...._
to
start
to
seek
a
station.
Manual
Tuning
Press
the
..,...
or
...._
button
longer
than
2s,
will
change
to
manual
tuning
mode.
Storing
a
Station
Select
a
band
(if
needed),
then
select
a
station.
Press
and
hold
a
Preset
button
1-6
for
more
than
2
seconds,
the
current
station
will
be
stored
to
the
number.
Automatic
Tuning
Control
(SCAN)
(9)
In
radio
mode,
press
SCAN
button
to
scan
stations,
the
unit
will
pause
for
5
seconds
at
each
strong
radio
station.
At
the
desired
station
press
the
SCAN
again
to
stop
scanning.
A/PS(7)
Short
press
A/PS
button,
the
unit
will
scan
stored
stations
in
the
current
band,
it
pauses
for
5
seconds
at
each
preset
station.
Long
press
A/PS
button,
the
unit
will
search
six
strong
stations
and
automatically
store
them
on
buttons
1-6.
P11

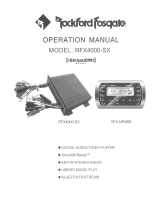
USB OPERATION
When a USB
device
with
audio/video/picture
files is plugged, a menu will be
displayed
on
external
LCD.
L
~
:v~~~i=~-~-~-~1
I
I~'
02.MYMUSI-1
1./?
01-HAPPY
DAY
!
I I i.t?
02-HELLO
I i.t?
03-0NL
y
YOU
I :
.t?
04-MY
LOVE
I l.t?
05-MY
OH MY
The menu can
include
six blocks:
r:%
) I [
MYMUSI-1]
HELLO
B
01.\
L./
02.MYMUSI-1
4 5
I
GJ
.t?
01-HAPPY
DAY
.t?
02-HELLO
.t?
03-0NL
Y
YOU
.t?
04-MY
LOVE
@
.t?
05-MY
OH
MY
I i
I !
i
Block
CD:
Current
playing.
This
area
shows
what is playing right now.
Block®:
Folders. All
available
folders
will be
displayed
in
this area.
Block@:
Media
Files. The
media
files are
displayed
in this area.
Block@:
Audio
sources
Block@:
Picture
sources
Block@:
Video
sources
While
the
Block
4/5/6
is
selected,
the
corresponding
media
folders
and
files
will
displayed
in
Block
1 and 2.
Operation
Tips:
You
can
press
the
buttons
on
the
RFX-MR5BB
control
panel
or
the
wireless
remote
to
select
different
sources
or
files.
On
the
RFX-MR5BB,
the
MENU
button
is
for
UP;
Preset
5 is
for
down
while
Preset
4
is
for
left
and
Preset
6 is
for
right.
Long
press
Preset
5 to
confirm
the
selection.
Preset
1 is
used
for
AUDIO/VIDEO/PICTURE
playing.
On
the
wireless
remote,
number
5 is
for
UP;
number
0 is
for
down;
number
7
for
left,
number
9
for
right,
while
number
8 is
for
confirmating
the
selection.
P12

USB/AUX
OPERATION
You
may
use
SCAN
as
..
10+
..
button
and
BAND
as
..
10-
11
button
for
fast
search
during
the
USB
operation.
The
marine
unit
can
support
playing
the
music
in
USB
by
inputting
the
song
sequence
number
directly:
when
the
unit
is
playing
songs,
press
AS/PS
button
on
the
front
panel,
it
will
display
..
SCH
0000
..
on
the
LCD,
the
four
digits
indicates
the
sequence
number
that
you
want
to
listen
to. You
can
use
preset
key
1
,2,3,4,
to
set
the
four
digits
by
pressing
them
repeatedly
and
press
SEL
to
confirm
input,
the
unit
will
start
playing
the
new
song
automatically.
When
the
unit
is
playing
video
or
pictures,
users
can
exit
the
playing
mode
by
long
pressing
Preset
1 on
the
front
panel.
Dual
Zone
Play
The
RFX3000
black
box
also
provide
a
..
dual
zone
play
..
function
for
customers.
When
the
unit
is
playing
media
files
at
USB
mode,
long
press
MODE
key,
the
black
box
will
enter
..
dual
zone
play
..
mode.
In
this
mode,
user
may
listen
to
music
from
radio/SIRIUS/AUX
or
CDC
while
the
dual
zone
A/V
output
port
is
playing
the
USB
media
files.
Please
note
that
the
dual
zone
A/V
can
not
controlled
by
the
RFX3000.
You
can
exit
..
dual
zone
play
..
mode
by
long
press
MODE
key
again.
IMPORTANT
NOTE:
Because
of
the
great
variety
of
products
with
USB
port
and
sometimes
quite
manufacturer-specific
functions
we
can
neither
guarantee
that
all
devices
will
be
recognized
nor
that
all
operating
options
that
are
possible
in
theory
will
actually
work.
some
USB
devices
may
take
more
than
45
seconds
to
initiate
after
plugging
in.
AUXIN
PORT
For
portable
media
players.
P13

CDC OPERATION
CDC
Operation
(1)
Press
<b
to
power
on.
(2)
Connect
the
CDC
to
your
unit,
then
press
..
MODE
..
to
CDC
mode.
(3)
The
LCD
will
display
..
disc
style
....
item
number
....
playing
time
...
( 4)
Press
..
...,I
..
to
pause
the
playing.
(5)
Press
PRESET
2 (11)
to
enter
REPEAT
playing
mode.
(6)
Press
PRESET
3
(12)
to
enter
RANDOM
playing
mode.
(7)
Follow
the
function
key
instruction
to
do
the
operation.
(8)
You
may
press
SCAN
as
..
next-
disc
..
button
and
BAND
as
..
pre-disc
..
button
for
change
disc
operation.
Notes
for
CD
(1)
Keep
the
disk
clean
and
undamaged,
do
not
stick
things
on
the
disc.
(2) Do
not
play
the
damaged
or
transformative
disc,
keep
the
disc
correctly.
(3) Do
not
keep
the
disc
under
sunshine
or
in
high
temperature
environment.
(4)
Put
the
disc
into
its
box
after
using.
(5)
Finger
mark
or
besmirch
will
effect
the
disc
playing
quality,
it
can•t
be
cleaned
by
soft
cloth.
If it is
necessary,
diluted
natural
solvent
can
be
used
to
help
clean
the
disc.
Record
cleaner
or
antistatic
solvent
can•t
be
used
to
clean
the
disc.
P14

SPECIFICATION
TUNER(FM)
Frequency
Range
.....................................................
87.5-1
07.9
MHz
Channel
Step
..........................................................
200KHz
Sensitivity
............................................................
8dB
Stereo
Separation
....................................................
30dB
Signal
to
Noise
Radio
................................................
60dB
TUNER(AM)
Frequency
Range
....................................................
530-171
0
KHz
Usable
Sensitivity
....................................................
32
dBuV
Channel
Step
..........................................................
1OKHz
Signal
to
Noise
Radio
...............................................
50dB
LINE-OUT
Output
..................................................................
3
Volt
(max)
lmpedance
...........................................................
33
Ohm
GENERAL
Power
Supply
..........................................................
13.8V
DC
(1
0-15.6V
allowable)
Speaker
Impedance
.................................................
4
or
8
ohm
Output
Power
......................................................
.....
SOW
x 4CH
Fuse
........................................................................
1
OA
Note:
Specifications
and
the
design
are
subject
to
possible
modification
without
notice
due
to
improvement.
P15

TROUBLESHOOTING
Can
not
read some
USB
devices
The
unit
is
not
1
00°/o
compatible
with
all
USB
devices
or
the
USB
device
has
special
format.
Try
to
format
the
USB
device
in
FAT
16/32
standard.
Can
not
play
certain songs with
specific
formats
that
are
downloaded
from
websites
Example:Tunes
which
is in
DAM(
digital
right
management)
format
is
not
supported
by
the
current
unit.
Unit
takes
about
60 seconds to recognize some
USB
device
It
is
normal.
The
unit
sometimes
takes
longer
time
to
read all
the
files
inside
the
USB
device.
LCD Can
Not
display
the MP3
song
name
correctly
The
songs
are
in
foreign
language
or
not
in
103
Tag
format.
Power
does
not
turn on (no
sound)
Check
the
wire.
Check
the
unit
fuse.
Replace
new
fuse
if
blown.
If it
happens
again,
consult
the
dealer.
No sound out put when operating the unit with amplifiers or power antenna is attached
Power
antenna
lead
is
shorted
to
ground
or
excessive
current
is
required
for
amplifiers
or
power
antenna.
Button is
not
responsive
or
the LCD
display
is wrong.
The
connection
pins
for
the
front
panel
may
be
dirt.
Use
a
soft
cloth
to
clean
its
surface.
If
it
does
not
fix
the
problem,
consult
your
dealer.
The
unit
picks
up
the
engine
noise.
Check
the
ground
wire.
After
turn the
power
on, the unit powers
off
immediately
The
battery
may
be
too
low
(The
unit
operating
voltage
is
11
V to
16V).If
the
unit
still
cannot
turn
on,
consult
your
dealer.
RFX-MR7
and
RFX-MR5BB
have
button
malfunction
with
water
splash.
The touch
panel is very sensitive. Please
use dry
towel
or
paper to wipe the water from the
control
panel.
RFX-MR7
buttons
fail
to
response.
Check if you
locked the button. Press and
hold "Mute"
and
"Volume-"
for 3 second to
unlock.
RFX-MR5BB
buttons
fail
to
response
Check if you
locked the buttons. Press and
hold "DISP" and
"SEL"
buttons to unlock.
WARRANTY
INFORMATION:
Should
this
product
require
service,
you
may
obtain
specific
information
by
contacting
the
dealer
from
whom
this
product
was
purchased.
For
any
service
related
questions,
please
call
our
technical
service
team.
Technical
Support
Phone
Number:574-293-1521
P16


DIG I
PORT
OPERATION
Connecting
the
compatible
digital
MP3
players
A
special
digi
port
adaptor
is
needed
to
connect
the
compatible
digital
MP3
players.
Users
need
purchase
this
adaptor
separately
and
connect
this
adaptor
to
the
digi
port
at
the
rear
of
the
unit.
Please
contact
the
dealers
for
the
list
of
compatible
digital
Mp3
players.
Playing
songs
in
digital
MP3
player
1.
Press
MODE
repeatedly
until
the
digi
port
mode
is
displayed
in
the
LCD.
2.
Press~~
to
pause
the
playing,
press
again
to
resume.
3.
Press
menu to
enter
menu
selection
,you can
press
~I~+~~
to
switch
between
folders(PLAYLIST,ALBUM,ARTIST
etc.)and
press
SEL
to
select
the
folder
or
play
the
songs.
When
you
are
selecting
between
the
menus,
simply
press
this
key
to
return
to up
one
level
menu.
4.
Press
and
hold~
I~+~~,
it
will
fast
forward
/rewind
the
song
in
playing.
5.
Fast
search(A/PS)
The
marine
unit
can
support
playing
the
music
in
players
by
inputting
the
song
sequence
number
directly:
when
the
unit
is
playing
songs,
press
A/PS
button
on
the
front
panel,
it
will
display
"SCH
00000"
on
the
LCD,
the
five
digits
indicates
the
sequence
number
that
you
want
to
listen
to. You can
use
preset
key 1
,2,3,4,5
to
set
the
five
digits
by
pressing
them
repeatedly
and
press
SEL
to
confirm
input,
the
unit
will
start
playing
the
new
song
automatically.
6.
Playing
mode
switch
The
RFX2000/3000
unit
will
control
and
play
the
music
in
the
digital
MP3
players
when
the
digital
MP3
players
are
connected
to
the
RFX2000/3000,
Press
and
Hold
"SEL"
and
"SCAN"
buttons
together
for
3
seconds
to
change
current
playing
mode
to
the
direct
mode,
in
this
mode
users
can
control
and
play
the
music
by
the
digital
MP3
player,
press
and hold
the
two
buttons
again
to
switch
back
to
the
default
playing
mode.
/