Spektrum AS6410NBL DSMX 6Ch AS3X Receiver Owner's manual
- Category
- Remote controlled toys
- Type
- Owner's manual
This manual is also suitable for
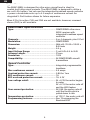
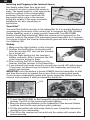
Spektrum AS6410NBL DSMX 6Ch AS3X Receiver is a compact and lightweight receiver designed for ultra micro aircraft. It features AS3X stabilization technology, which provides enhanced flight performance and stability, making it ideal for both experienced and beginner pilots. The receiver also includes an integrated programmable brushless speed controller, allowing you to easily control the motor of your aircraft. Additionally, the AS6410NBL has an X-Port, which allows for future expansion and connectivity with other devices.
Spektrum AS6410NBL DSMX 6Ch AS3X Receiver is a compact and lightweight receiver designed for ultra micro aircraft. It features AS3X stabilization technology, which provides enhanced flight performance and stability, making it ideal for both experienced and beginner pilots. The receiver also includes an integrated programmable brushless speed controller, allowing you to easily control the motor of your aircraft. Additionally, the AS6410NBL has an X-Port, which allows for future expansion and connectivity with other devices.


-
 1
1
-
 2
2
-
 3
3
-
 4
4
-
 5
5
-
 6
6
-
 7
7
-
 8
8
-
 9
9
-
 10
10
-
 11
11
-
 12
12
-
 13
13
-
 14
14
-
 15
15
-
 16
16


Spektrum AS6410NBL DSMX 6Ch AS3X Receiver Owner's manual
- Category
- Remote controlled toys
- Type
- Owner's manual
- This manual is also suitable for
Spektrum AS6410NBL DSMX 6Ch AS3X Receiver is a compact and lightweight receiver designed for ultra micro aircraft. It features AS3X stabilization technology, which provides enhanced flight performance and stability, making it ideal for both experienced and beginner pilots. The receiver also includes an integrated programmable brushless speed controller, allowing you to easily control the motor of your aircraft. Additionally, the AS6410NBL has an X-Port, which allows for future expansion and connectivity with other devices.
Ask a question and I''ll find the answer in the document
Finding information in a document is now easier with AI
Related papers
-
Spektrum AR6400NBL DSM2 6Ch Ultra Micro Rx BL-ESC No Servos User manual
-
-
-
Spektrum SPM7000 Owner's manual
-
-
-
-
-
-
Spektrum AR10100T User guide
Other documents
-
E-flite EFLU4864 Owner's manual
-
 Hangar 9 HAN101 Owner's manual
-
Blade Blade 180 CFX User manual
-
-
Blade BLH4480 User manual
-
-
-
E-flite P-51D Mustang User manual
-
E-flite EC-1500 Owner's manual
-
E-flite EFL6875 User manual
