Page is loading ...

Installation Instructions
For Part Number:
450-331
2015-17 Ford Mustang
3.7L V6
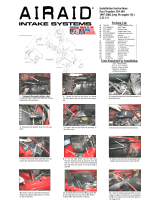
2. Disconnect the 2 breather lines from the intake tube,
loosen the hose clamps and remove the factory intake .
3. Remove the 6mm airbox mounting bolt in the inner
fender and lift the entire airbox assembly out of the vehi-
cle. Set the bolt aside for now. It will be reused.
4. Be sure to retain the speed clip in the inner fender, but
remove the grommet if it does not come out with the air
box .
5. Install the Grommets and Aluminum Fittings into the
Airaid Intake Tube. Apply the Airaid Bubble Decal
onto the Intake Tube as shown.
6. Remove the protective film from the Panels and create
the assembly as shown using 4 1/4 -20 Button Head
Screws and Lock washers.
7. Install the Filter Adapter onto the Panel Assembly as
shown, using the three 1/4-20 Button Head Screws and
Flat Washers.
Component Identification
1 Airaid Track Day Filter 1
2AiraidIntakeTube1
3TopPanel1
4BottomPanel1
5 HumpHose Reducer 1
6HumpHose1
7FilterAdapter1
8Weatherstrip23"1
91/4"FlatWasher3
10 1/4‐20X1/2"ButtonHeadCapScrew 3
11 ¼"‐20x¼"ButtonHeadScrew 4
12#48HoseClamp1
13#64HoseClamp1
14#68HoseClamp2
151/2"IDGrommet1
16 3/8AluminumFitting 1
17 5/8AluminumFitting 1
1813/16"IDGrommet1
19¼"LockWasher4
20AiraidDecal1
1. Remove the battery box cover in the cowl and discon-
nect the negative battery terminal.
Full color instructions can be viewed on our web site at Airaid.com. If you need any assistance please call 1-800-858-3333 to speak with a repre-
sentative in our Customer Service Center before returning the product.
Grommet
Clip
8. Transfer the OEM air box grommet and anti-crush
sleeve into the Panel assembly as shown.
9. Remove the drivers side fan shroud bolt and set it
aside.

Thank you for purchasing the Airaid Intake System. Contact Airaid @ (800) 498-6951 8:00 AM - 5:00 PM MST weekdays for questions
regarding fit or instructions that are not clear to you. Your Airaid Intake System was carefully inspected and packaged. Check that no parts are
missing, or were damaged during shipping. If any parts are missing, contact Airaid. The air filter element is protected from direct exposure to wa-
ter and debris; care should be taken not to drive through deep water. WATER INGESTION IS THE DRIVERS RESPONSIBILITY! The air filter
is reusable and should be cleaned periodically.
13. Slide the Hump Hose with two, #68 Clamps onto the
Filter Adapter.
11 Install the Panel assembly into the engine compart-
ment as shown and secure using the OEM hardware
removed in steps 3 and 11.
12 When properly installed, the Panel tab resides be-
hind the fan shroud as shown.
14. Slide the Reducer with one #64 and one #48 clamp
onto the throttle body as shown.
15. Install the Airaid Tube into the Hump Hose and
Reducer as shown. Tighten all four Hose Clamps at
this time.
For your Oiled media filter we suggest using
the AIRAID Filter Tune-Up Kit!
16. Reconnect the breathers to the Aluminum Fittings in
the Airaid Tube.
17. Install the Airaid Premium Filter onto the Filter
Adapter.
18. Install the weatherstrip on top of the Panel assem-
bly as shown with the contour rolling away from the
filter.
19. Double check your work. Make sure all clamps,
hoses, bolts, and screws are tight. Double check the hood
clearance. Reconnect the negative battery cable and rein-
stall the cover.
10. Remove the drivers side, upper fan shroud bolt and
set it aside.
REV.01.26.17
Breathers
#68
#64
#48
Airaid. 1815 West Crest Lane. Phoenix AZ 85027 (800) 498-6951 [email protected] www.airaid.com
AIR-I45331C
/