Page is loading ...

HI769828
Multiparameter Probe
Dear Customer,
Thank you for choosing a Hanna
Instruments product. Please read carefully
this instruction manual before using the
product.
If you need additional technical infor-
mation, do not hesitate to e-mail us at
This product is in compliance with the CE
directives.
PRELIMINARY EXAMINATION
Remove the probe/sensors from the
packing material and examine it
carefully to make sure that no damage has
occurred during shipment. If there is any
damage, please contact your local Hanna
Instruments Office.
Note Conserve all packing material until
the product has been observed
to function correctly. Any defec-
tive item must be returned in its
original packing.
GENERAL DESCRIPTION
HI769828 is the multisensor probe for
HI9828.
The probe has been designed to resist to
all harsh operating conditions. It is very
easy-to-use and can be installed for direct
pipe measurements.
The protection sleeve allows to dip the
probe for a long period without damag-
ing the sensors and the calibration beaker
permits to perform maintenance opera-
tions directly on field.
Calibration data are stored in the probe
internal memory, so that sensors can be
changed without needing recalibration.
The user can disconnect all sensors sepa-
rately for a better cleaning and to change
the probe body, if for example a different
cable length is required.
INSTRUCTION MANUAL
SPARE PARTS
HI769828/4 Probe body with tem-
perature sensor & 4 m
cable
HI769828/10 Probe body with tem-
perature sensor &
10 m cable
HI769828/20 Probe body with tem-
perature sensor & 20
m cable
HI769828-0 pH sensor
HI769828-1 pH/ORP sensor
HI769828-2 DO sensor
HI769828-3 EC sensor
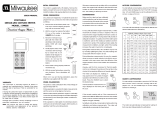
pH/ORP sensor
DO sensor
EC sensor
Hook for
safety rope
Temperature
sensor
Protection sleeve Calibration beaker
Hanna Instruments reserves the right to modify the design,
construction and appearance of its products without ad-
vance notice.
IST769828 12/17
www.hannainst.com
HI769828-0 HI769828-1 HI769828-2 HI769828-3
Sensor Type pH pH/ORP DO EC
Measurement pH; mV (pH) pH; mV (pH); mV DO% sat; DO
conc.
EC; TDS; Resistivity;
Salinity
Range 0.00 to 14.00
±600.0 mV (pH)
0.00 to 14.00
±600.0 mV (pH)
±2000.0 mV
0.0 to 500.0 %
0.00 to 50.00 mg/L
0.000-200.000 mS/cm
0-400000 mg/L
0 to 1.0000 MΩ˙cm
0.00 to 70.00 PSU
Color Code Red Red White Blue
Materials Tip: glass (pH)
Junction: cloth
Body: PEI
Electrolyte: gel
Reference: double
Tip: glass (pH); Pt
(ORP)
Junction: cloth
Body: PEI
Electrolyte: gel
Reference: double
Cat/An: Ag/Zn
Membrane: PTFE
Body: PVC
Stainless Steel AISI
316
Body:PVC
Maintenance
Solution
HI70300 (storage) HI70300
(storage)
HI7042S (refilling)
Dimensions 100 x 14 Ø mm 100 x 14 Ø mm 101 x 16.5 Ø mm 111 x 14 Ø mm
SPECIFICATIONS
HI9828-25 Quick calibration so-
lution, 500 mL bottle
HI9828-27 Quick calibration so-
lution, 1 G bottle
HI7698282 Probe maintenance kit
HI7698283 Calibration beaker
HI7698284 Flow cell
HI7040L Zero oxygen solution,
500 mL bottle
HI7042S Electrolyte solution for
D.O. sensor, 30 mL
bottle
HI76409A/P D.O. membrane, 5 pcs.
HI70300L Storage solution,
500 mL bottle
ACCESSORIES

INSTALLATION
D.O. sensor
The temperature sensor built
near the galvanic D.O. sen-
sor allows stable temperature
compensated D.O. readings
in a few seconds.
The thin permeable membrane isolates
the sensor elements from the testing solu-
tion, but allows oxygen to enter. Oxygen
that passes through the membrane causes
a current flow, from which the oxygen
concentration is determined.
The D.O. sensor is shipped dry. Activate
it before installing the probe. To hydrate
the sensor and prepare it for use proceed
as follows:
• Remove the black & red plastic cap. This
cap is used for shipping purposes only
and can be thrown away.
• Insert the O-ring in the membrane.
• Rinse the membrane with HI7042S
electrolyte solution while shaking it
gently. Refill with clean electrolyte. Gen-
tly tap the membrane over a surface to
ensure that no air bubbles remain
trapped. To avoid damaging the mem-
brane, do not touch it with your fingers.
• With the sensor facing down screw the
cap clockwise to the end of the threads.
Some electrolyte will overflow.
• Insert the sensor in the probe body with
the right alignment to the corresponding
white connector.
• With the supplied tool screw the locking
nut to fix the sensor.
Conductivity sensor
The conductivity sensor uses
the 4-ring technology that
allows stable and linear
readings without any inter-
ference in the whole range.
• Insert the sensor in the probe body with
the right alignment to the corresponding
blue connector.
• With the supplied tool screw the locking
nut to fix the sensor.
pH and pH/ORP sensor
The pH and pH/ORP sen-
sors are gel filled and fea-
ture cloth junction, glass
and Pt sensors respectively.
The external plastic body is
built to last even in harsh
environmental conditions.
• Insert the sensor in the probe body with
the right alignment to the corresponding
red connector.
• After mounting the sensors, screw the
protection sleeve for taking measure-
ments or the transparent beaker for
performing calibration.
• With the meter off, connect the probe
to the DIN socket on the bottom of the
meter by aligning the pins and pushing
in the plug. Tighten the nut to ensure a
good connection.
PROBE MAINTENANCE
General maintenance
After use, rinse the probe with tap water
and dry it. The pH electrode bulb must be
kept moist, while the D.O. and EC sensors
should be stored dry.
Maintenance of D.O. sensor
For a top performance probe, replace
the membrane every 2 months and the
electrolyte once a month. Proceed as
follows:
• Unscrew the membrane by
turning it counterclockwise.
• Rinse the spare membrane
with some electrolyte while
shaking it gently. Refill with
clean electrolyte.
• Gently tap the membrane over a surface
to ensure that no air bubbles remain
trapped.
• With the sensor facing down, screw the
cap clockwise to the end of the threads.
Some electrolyte will overflow.
If any deposit scales the sensors, gently brush
the sensor surface with the brush supplied in
the maintenance kit, while paying attention
to not damage the plastic body.
Maintenance of EC sensor
After every series of measurements, rinse
the probe with tap water.
If a more thorough cleaning is required,
clean the probe with the brush supplied
in the maintenance kit or a nonabrasive
detergent.
After cleaning the probe, always re-
calibrate the instrument.
Maintenance of pH & pH/ORP sensors
• Remove the protective cap. Do not be
alarmed if any salt deposits are present.
This is normal with electrodes and they
will disappear when rinsed with water.
• Shake the electrode down as you would
do with a clinical thermometer to elimi-
nate any air bubbles inside the glass
bulb.
• If the bulb and/or junction are dry, soak
the electrode in HI70300 storage solu-
tion for at least one hour.
• To minimize clogging and ensure a quick
response time, the glass bulb and the
junction should be kept moist and not
allowed to dry.
• Replace the solution in the protective cap
with a few drops of HI70300 storage
solution. Tap water may also be used
for a very short period (couple of days).
NEVER STORE THE ELECTRODE
IN DISTILLED OR DEIONIZED
WATER.
• Inspect the electrode for scratches or
cracks. If any present, replace the elec-
trode.
• Cleaning procedure: clean frequently
the probe by soaking it for 1 minute in
HI70670 or HI70671 cleaning solu-
tions. After performing this procedure,
soak the electrode in HI70300 storage
solution before taking measurements.
NOTE For additional information about
calibration, connections and
readings, please refer to the instru-
ment (HI9828 multiparameter)
instruction manual.
/