Page is loading ...

Thank you for purchasing a Holman waterWHIZ™ fully automatic watering system. Following is the suggested way to
install your waterWHIZ™ system. Holman trust you enjoy the freedom delivered by the waterWHIZ™ automatic watering
system. Before you start installing your system, ensure you have the controller instruction manual on hand and read
through the installation instructions. Assess which garden tap you are going to use and begin the installation.
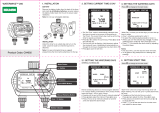
MAINS
POWERED
MODEL
1.
2.
3.
4.
5.
6.
7.
8.
9.
10.
Once the unit is removed from the packaging, undo the locking nut from the top of the
product in a clockwise direction, (Note: The thread is left handed).
Remove it altogether with the tap connector to install on to the tap.
Firstly slide the locking nut over the outlet of the tap then screw on the tap connector to the
tap itself. This ensures the locking nut is held captive to the tap.
Place the valve system onto the tap connector and hand tighten the locking nut in an anti-
clockwise direction, (in the same direction as the arrow). Ensure your valve system is
securely tightened to the tap to avoid any leaks. (NO TOOLS REQUIRED)
Unroll the cable that is pre-wired to your valve system & layout between the tap and where
the controller is to be mounted.
LOCATING THE CONTROL UNIT.
Choosing a location to mount the controller will depend on how you can suit the
requirements listed below:
! The controller supplied is an indoor unit, this means it is NOT a water proof unit and must be
mounted indoors or under cover from direct rain.
! The suitable location must not be further than the length of the pre-wired cable (10 metres),
or extra cable will have to be purchased.
! The unit must also be able to reach a mains power point, the unit simply plugs into a 240volt
outlet. Note: Safe 24VAC plug pack supplied.
! The controller is best mounted at eye level for easy access.
! Mounting the control unit requires 3 screws.
MOUNTING THE CONTROLLER:
Once a location has been determined, drive a screw into the wall leaving about 4mm of the
screw exposed. Remove the battery cover and terminal and hang the controller from the key
slot on the rear of the case making sure the head is properly seated inside the case. Two
additional screws are used inside the unit to hold it firmly to the wall.
WIRING THE CONTROLLER: AC MODEL
Ensure you read the instruction manual for the controller before you start.
First strip off 10mm of the plastic insulation off all the wires.
Following the wiring diagram in the manual, gather all the coloured wires with the white
stripes, twist all the bare copper ends together to form one and screw them to the common
terminal (COM).
Then follow the colour convention for all the valve wires to the respective station numbers.
Station 1 – Blue (ST1) & Blue/White (COM)
Station 2 – Brown (ST2) & Brown/White (COM)
Station 3 – Green (ST3) & Green/White (COM)
Station 4 – Orange (ST4) & Orange/White (COM)
Lastly, take the plug pack wires and screw each one to the terminal block labelled 24VAC,
POS (+) & NEG (-) are not applicable.
Install a 9 volt block battery (not supplied) to the battery snap,
replace the battery cover and then the terminal cover.
Plug the unit into the power point & turn on. The instruction
manual will outline the easy steps to programming the unit
Or to water manually.
Your installation is now complete, simply fit your hose or
poly systems to the waterWHIZ™ outlets.
Cable
Copyright 2006 waterWHIZ™ - AC Model, RSR style, Installation Instructions - P/N 0044P2067 Rev03
Locking
Nut
Tap
Connector
Twisted
common
wires
Valve
wires
/