Page is loading ...

OPERATING
INSTRUCTIONS
STEP 1: Disassemble the garden rake
holder and lay out components.
STEP 2: Place metal garden rake into track.
*Please note that the rake does not need to
snap fit into the track.
STEP 3: Using a Phillips screw driver,
assemble the screw washer and lock nut
as pictured. *Please note that there will be
a slight gap between the top and bottom
holder.
Push Broom:
Remove screw from
the attachment
neck. Insert the neck
into the mating
attachment (head).
Line the hole in the tip of the neck to the
hole in the mating attachment. Using a
Phillips screw driver, secure the neck to
the broom. Tighten wing nuts on the shop
broom.
For instructional video visit:
www.thehandlersystem.com
For instructional video visit
www.thehandlersystem.com
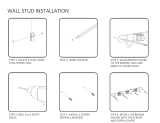
ASSEMBLY INSTRUCTIONSWALL MOUNT ASSEMBLY
STEP 1: Remove wall mounts and screw
pack from packaging and locate stud on
wall.
STEP 2: Position wall mounts on stud as
pictured. Drill screws into stud. Be sure
to allow enough space between mounts
to insure that the head attachments will
not interfere with each other.
STEP 3: Insert attachments into
mounts.
For instructional video visit:
www.thehandlersystem.com
Scan QR code with your
smartphone!
STEP 1
STEP 2
STEP 3
STEP 1
STEP 2 STEP 3

OPERATING INSTRUCTIONS
CONNECTING INTERCHANGEABLE HEADS
REMOVING INTERCHANGEABLE HEADS
STEP 1:
Press down the
release button.
The locking
mechanism is
designed to be
engaged at all times and is only deactivated
when the release button is pressed.
STEP 2:
Install tool
attachment on
The Handler.
The release
button must be held down while installing
the attachment.
The flats on The Handler tip must be aligned with
the flats on the attachment socket in order for
The Handler to be
fully engaged and
work properly.
To align the flats,
simply twist the
attachment while
installing. The attachment will bottom out on the
handle when the flats are properly aligned and
prevent the attachment from rotating.
CAUTION:
Do not push the release button while using The
Handler. Doing so could cause the attachment to
become disconnected and serious injury could result.
The Handler Care:
For optimal performance it is important to keep the
locking tip and attachments free of dirt and debris.
Locking Tip: Rinse the locking tip with water. DO
NOT PUSH THE RELEASE BUTTON. Doing so could
result in debris getting into the ball joints imped-
ing the performance of the locking tip mechanism.
Attachments: Rinse attachments with water
removing debris.
STEP 1:
Press down the
release button.
The locking
mechanism is
designed to be
engaged at all times and is only deactivated
when the release button is pressed.
STEP 2:
Remove tool
attachment
from The
Handler.
The release
button must be held down while removing
the attachment.
/