Page is loading ...

Customer Support (800) 676-1343
E-mail: [email protected]
Corporate Offices (831) 763-7000
89 Hangar Way, Watsonville, CA 95076
INSTRUCTION MANUAL
Providing Exceptional Consumer Optical Products Since 1975
Orion
®
EON
™
Apochromatic
ED Refractors
#9781 EON 72mm, #9927 EON 80mm, #9925 EON 120mm
IN 326 Rev. A 01/08

2
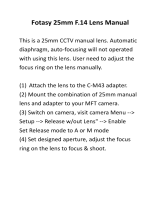
Figure 1a.
The EON 72mm and 80mm ED Refractor optical
tube assembly
Congratulations on your purchase of an Orion
®
EON
™
ED Apochromatic Refractor optical tube assembly. The
exceptional optical and mechanical quality of your EON refractor will provide you with a pleasing telescope experi-
ence. The ED glass in the objective lens yields extremely sharp, high-contrast images with virtually no color distor-
tion compared to a standard refractor. The smooth and fine movement of the dual-speed Crayford focuser allows
for easy and precise focusing. These instructions will help you use your EON refractor optical tube assembly.
Parts List
EON 72mm & 80mm
Optical tube assembly
Dust Cover
1.25" eyepiece adapter
2.5mm hex key
Hard carrying case
EON 120mm
Optical tube assembly
Dust Cover
1.25" eyepiece adapter
Tube rings (quantity 2)
Dovetail mounting plate
2.5mm hex key
Hard carrying case
Getting Started
Your EON refractor is fully assembled from the factory. The
optics have been installed and collimated, so you do not
need to make any adjustments to them.
We recommend keeping all of the original packaging. In the
unlikely event you should need to ship the telescope back to
Orion for warranty repair service, you should use the origi-
nal packaging to ensure the telescope stays intact during
shipping.
Take a moment to inspect the telescope and all of its parts.
Functions and Features
The EON refractors have several features designed to maxi-
mize the use and enjoyment of your telescope. When you
have become familiar with all of the functions of your EON
refractor, you will be ready to begin using your new tele-
scope under the night sky!
Retractable Dew Shield
All EON refractors feature a retractable dew shield which
allows the telescope to become more compact for stor-
age. The dew shield’s primary purpose is to prevent dew
(water condensation) from forming on the lens during cold
and humid nights. The dew shield is also useful for reduc-
ing glare under unwanted outside lights. To extend the dew
shield, remove the optical tube dust cover, then pull the dew
shield outward until it stops (Figure 2).
Focus rotation lock ring
(for EON 80mm only)
Finder scope dovetail base
(for EON 80mm only)
Dovetail mounting plate
Tube rings
Finder scope
dovetail base
Tube ring
clamps
2" Eyepiece
holder
1.25"
Eyepiece
adapter
Coarse focus knob
Fine focus knob
Mounting block
Dew shield
Figure 2. Gently pull the dew shield outward until it stops.
Figure 1b. The additional features of the EON 120mm ED
Refractor optical tube assembly

3
2" Dual-Speed Crayford Focuser
The high quality dual-speed 2" Crayford focuser is one of
the most important components of your EON refractor. The
Crayford design allows for smooth, precise focusing without
any image shift that typical rack-and-pinion designs experi-
ence.
For quick focusing of your EON refractor, the two larger
focus knobs will provide a coarse focus. For more precise
focusing, as needed for applications such as critical high
power planetary observing and digital imaging, the smaller
black focus knob (Figure 1a) offers fine focus adjustment.
The fine focus knob rotates eleven times to one single rota-
tion of the coarse focus knobs, making an 11:1 ratio for
extremely precise focusing.
The dual-speed Crayford is capable of handling the weight
of heavy accessories, such as large 2" eyepieces or a CCD
or DSLR camera. Adding tension to the focuser drawtube
will further increase the amount of weight the focuser can
handle without slipping. To adjust the focuser drawtube ten-
sion, locate the focus tension set screw on the underside
of the focuser (Figure 3). Using the 2.5mm hex key, turn
the set screw clockwise until you have added the appropri-
ate amount of tension for your needs. In some cases, you
may want to loosen the tension, which will also decrease
the resistance of the focus knob movement. Simply turn the
focus tension set screw counter-clockwise as needed to
loosen the focus drawtube tension.
Tightening the focus lock thumbscrew (Figure 3) will prevent
the drawtube from moving. This feature can be utilized for
imaging, or visual use, when you have achieved focus and
do not want the drawtube to move. While you are focusing,
make sure the focus lock thumbscrew is loosened, or the
drawtube may not move properly.
Note: Applying too little tension on the focuser will result in
the focus drawtube to slide under its own weight, or under
the weight of your accessories installed. Make sure there is
enough tension to support your 2"or 1.25" accessories.
Focuser Rotation
The focuser assembly on the EON refractors have the abil-
ity to be rotated. Under normal use, you should not have
to rotate the focuser, since the eyepiece and diagonal can
be rotated instead. However, focuser rotation can be ben-
eficial for changing the camera orientation while imaging
(see “Imaging with the EON Refractors”). Additionally, this
feature can allow you to keep the focus knobs parallel to the
ground no matter how your telescope is positioned. This can
be especially convenient when the telescope is mounted in
different orientations, causing the focus knob orientation to
change.
To rotate the focuser, turn the focus rotation lock ring (Figure
1a) counter-clockwise until the assembly loosens. Rotate the
focuser to the desired orientation. Lock the focuser in place
by turning the focus rotation lock ring clockwise. To ensure
a secure lock, it is sometimes necessary to grab hold of
the entire focuser assembly and firmly rotate it clockwise,
bracing your other hand against the stationary portion of the
optical tube.
The 72mm EON refractor has screw holes for an optional
finder scope dovetail base attached to the rotating portion
of the focuser, allowing you to change the orientation of the
finder scope as desired.
The EON 72mm uses a single thumbscrew instead of a
lock ring to lock the focuser rotation. To rotate the focuser
on the EON 72mm, loosen the focuser rotation lock thumb-
screw and rotate the focuser to the desired orientation. Lock
the focuser in place by tightening the focuser rotation lock
thumbscrew.
Using 1.25" and 2" Accessories
Your EON refractor can accommodate both 1.25" and 2"
accessories, including just about any eyepiece, diagonal,
or camera. The Crayford focuser has a 2" eyepiece holder
with a 1.25" eyepiece adapter installed (Figure 4). Both the
2" eyepiece holder and 1.25" eyepiece adapter feature a
brass compression ring to hold your accessories in place.
The brass compression ring securely holds the 1.25" or 2"
accessory in place without marking its metal barrel.
The telescope must be used with either a diagonal or exten-
sion tube in order for the eyepiece to reach focus. In most
cases, you will be using a 90° star diagonal for visual use
with an eyepiece.
To attach a 1.25" diagonal or extension tube to your tele-
scope:
1. Remove the dust cap from the 1.25" eyepiece adapter.
2. Insert the barrel of your diagonal or extension tube
into the 1.25" eyepiece adapter.
Figure 3.
Adjustments can be made to the focus tension set
screw using the provided 2.5mm hex key. Tightening the focus lock
thumbscrew will stop the focuser drawtube from moving.
Focus tension set
screw
Focus lock thumbscrew

4
3. Secure the barrel in place by firmly tightening the
thumbscrew on the 1.25" eyepiece adapter.
To attach a 2" diagonal or extension tube to your telescope:
1. Loosen the thumbscrew on the Crayford focuser’s 2"
eyepiece holder and remove the 1.25" eyepiece adapter.
2. Insert the barrel of your diagonal or extension tube
into the 2" eyepiece holder.
3. Secure the barrel in place by firmly tightening the
thumbscrew.
Finder Scope Compatibility
The included finder scope dovetail base on the EON 80mm
and 120mm refractors are ready to accept any Orion finder
scope. The EON 72mm does not include a finder scope
dovetail base; however, it is available optionally from Orion
and directly fits the holes in the EON 72mm (Figure 5).
To insert a finder scope onto your EON refractor, slide the
finder scope bracket into the finder scope dovetail base and
secure it in place by tightening the thumbscrew(s) on the dove-
tail base (Figure 6).
Operating the EON
Refractor
Now that you have become familiar with the different fea-
tures and functions of your EON refractor, you are ready to
begin using your new telescope outside under a starry night.
The EON refractors are essentially ready to begin observing
with immediately. There is a small period of time where the
internal temperature of the telescope must match the out-
side temperature to obtain the best image quality. This time
period is nearly nominal, taking only a few minutes. Typically,
the EON will have reached outside temperature by the time
the telescope is setup.
Figure 6. Slide the finder scope bracket into the finder scope
dovetail base and secure the locking thumbscrew(s).
1/4"-20 threads
Mounting
block
Dovetail plate
Figure 5. The EON 72mm is compatible with the Orion finder
scope dovetail base.
Holes for optional
finder scope dovetail
base
Figure 7. The EON 72mm and 80mm have a built-in mounting
block ready to connect to a sturdy camera tripod or telescope
mount.
2" Eyepiece holder 1.25" Eyepiece adapter
Brass compression ring
2" Eyepiece
holder
thumbscrew
1.25" Eyepiece
adapter thumbscrew
Figure 4.
The EON refractors accept both 1.25" and 2”
accessories. The brass compression rings in the 1.25" eyepiece
adapter and 2" eyepiece holder ensure a secure fit without marking
up the barrel of your accessory.

5
Connecting the EON 72mm and 80mm to a
Tripod or Mount
The EON 72mm and 80mm have a built-in mounting block
ready to connect to a sturdy camera tripod or telescope
mount (Figure 7). The mounting block is threaded to accept
a common 1/4"-20 stud found on almost any camera tripod.
To connect the EON 72mm or 80mm to a camera tripod,
simply screw the 1/4"-20 stud found on your camera tripod
to the underside of the EON’s mounting block. The EON
72mm has three different holes to choose from, and the
EON 80mm has two holes. Pick the 1/4"-20 hole that pro-
vides the best balance on your tripod.
The mounting block also functions as a dovetail plate which
is compatible with many Orion telescope mounts. The dove-
tail plate is also compatible with many other mounts. To con-
nect the EON 72mm or 80mm to a telescope mount, loosen
the attachment screw(s) on the mount’s dovetail holder until
the screw(s) provides enough clearance for the dovetail
mounting plate. Align the mounting block with the dovetail
holder and slide it forward (Figure 8). Tighten the attachment
screw(s) on the dovetail holder of the mount.
For the best stability and motion on your mount, the EON
should be balanced front to back. If you are using the mount-
ing block as a dovetail plate, then balancing the EON simply
requires sliding the telescope forward or backward in the
dovetail holder as needed. Loosen the attachment screw(s)
on your mount just enough to free the dovetail plate, then
reposition the telescope and retighten the screw(s).
If you are using a camera tripod or telescope mount and
need additional balance adjustment, the orientation of the
mounting block can be reversed. This is especially helpful
when using heavy accessories, such as 2” eyepieces or
DSLR cameras. To reverse the orientation of the mount-
ing block, remove the screw (using a 4mm hex key) that
attaches the mounting block to the telescope tube and turn
it around 180° (Figure 9). Once the mounting block orienta-
tion has been reversed, reattach the screw.
Connecting the EON 120mm to a Mount
The EON 120mm refractor includes a preinstalled pair of
tube rings and a dovetail mounting plate, ready to attach to
a heavy-duty telescope mount. The dovetail plate is compat-
ible with many Orion telescope mounts. The dovetail plate is
also compatible with many other available mounts. To con-
nect the EON 120mm to a mount, loosen the attachment
screw(s) on the mount’s dovetail holder until the screw(s)
provide enough clearance for the dovetail mounting plate.
Carefully place the dovetail plate flat against the top surface
of the dovetail holder of the mount and tighten the attach-
ment screw(s) securely.
Balancing the EON 120mm can be achieved by sliding
the dovetail mounting plate forward or backward within the
mount’s dovetail holder. You can also move the telescope
forward or backward within the tube rings. The tube rings
offer the most adjustment range. Loosen the tube ring
clamps (Figure 1b) slightly and slide the telescope tube
forward or backward as needed to reach optimum balance,
then retighten the tube ring clamps.
Figure 8. Align the mounting block with the dovetail holder and
slide it forward. Tighten the attachment screw(s) on the dovetail
holder of the mount.
Figure 9. For a greater range of balance on the EON 72mm
and 80mm, switch the direction of mounting block using a 4mm hex
key.

6
Using Different Eyepieces
The EON refractors work well with virtually any 1.25" or 2"
eyepiece. Because the EON refractors implement high-qual-
ity ED optics, the eyepieces you use should also have excel-
lent, fully multi-coated optics to utilize the full performance
of the EON. The diagonal used should also be a quality 90°
mirror with high reflectivity.
It is desirable to have a range of eyepieces of different focal
lengths, to allow viewing over a range of magnifications. To
calculate the magnification, or power, of a telescope, simply
divide the focal length of the telescope by the focal length of
the eyepiece:
Telescope Focal Length (mm)
= Magnification
Eyepiece Focal Length (mm)
For example, the EON 80mm ED, which has a focal length
of 500mm, used in combination with a 25mm eyepiece,
yields a power of 20x.
500mm
= 20x
25mm
If all outside viewing conditions are ideal, every telescope
with good optics supports a maximum of about 60x per
inch, or 2.4x per millimeter, of aperture. Keep in mind that
at higher powers, an image will always be dimmer and less
sharp (this is a fundamental law of optics). In most cases
the steadiness of the air (the “seeing”) will limit how much
magnification the scope can tolerate, rather than the tele-
scope itself.
Always start viewing with your lowest-power (longest focal
length) eyepiece in the telescope. After you have located
and observed the object with it, you can try switching to a
higher-power eyepiece to ferret out more detail, if atmo-
spheric conditions permit. If the image you see is not crisp
and steady, reduce the magnification by switching to a
longer focal length eyepiece. As a general rule, a small but
well-resolved image will show more detail and provide a
more enjoyable view than a dim and fuzzy, over-magnified
image.
Imaging with the EON Refractors
The EON refractors make very capable astrographs for your
CCD or DSLR camera. To attach a DSLR camera, all you
will need is the appropriate T-ring for the make and model
of your camera, and a 2" prime focus camera adapter (avail-
able from Orion). Simply attach the T-ring to the camera
body and thread the 2" prime focus camera adapter into
the T-ring. Insert the barrel of the camera adapter into the
2" eyepiece holder on the EON focuser (Figure 10), and
secure it with the thumbscrew.
Most CCD cameras will have a 1.25" or 2" barrel ready
to attach directly to your telescope like an eyepiece or
diagonal. No adapter is required, simply insert the barrel
of the CCD camera into the 1.25" or 2" eyepiece holder and
secure the camera with the thumbscrew.
The EON ED refractors were designed to reach focus with
both DSLR and CCD cameras. However, every camera's
focus point is a little different. Depending on your camera,
you may need to use an extension tube for your particular
imaging setup. Any imaging accessory, such as a color filter
wheel, increases the amount of inward focus travel required.
Before attaching any extra imaging accessory, try reaching
focus first with the camera directly attached to the focuser,
then see if you have enough inward focus travel left for extra
accessories.
Imaging equipment is sometimes heavier than a diagonal
and eyepiece. The dual-speed Crayford focuser is capable of
handling the weight of your CCD or DSLR camera. Adding
tension to the focuser drawtube will increase the amount of
weight the focuser can handle. Install your camera onto the
focuser during the day. Check the focuser for any slippage. If
the focuser drawtube slips under the weight of the camera,
you will need to add more tension to the focuser by tighten-
ing the focus tension set screw.
Note About Chromatic Aberration
Chromatic aberration literally means color distortion.
Whenever light passes through one material to another,
different wavelengths (color) are bent by different amounts.
This is a problem that plagues refractor-type telescopes,
since light passes through both air and glass to form an
image. Most astronomical objects emit a spectrum com-
prised of many different wavelengths of light, so each
wavelength will be bent by a slightly different amount when
passing through a lens. This results in each color of light
reaching precise focus at a slightly different point, which will
provide a soft image with a halo of unfocused color.
The EON is designed to minimize chromatic aberration. The
objective lens is actually comprised of two individual lenses,
the crown (front) element, and flint (rear) element. The EON
features a flint glass element made of high-performance
ED glass. The use of this ED glass minimizes the amount
of chromatic aberration, resulting in a much more pleasing
view as compared to refractors that do not have ED glass.
Critical stellar or planetary observations become more accu-
rate with this color correction since the focus is sharper with
no unfocused “false” or unwanted color around the object.
The ED optics will render true, high-contrast images.
Figure 10. To attach a DSLR camera, attach the T-ring to the
camera body, then thread the camera adapter to the t-ring. Insert
the camera adapter barrel into the 2” eyepiece holder on the
focuser and tighten the attachment thumbscrew.
DSLR
2" Prime focus
camera adapter
2" Eyepiece
holder
Camera T-ring

7
Care & Maintenance
Give your telescope reasonable care and it will last a lifetime.
When not in use, keep its dust cover on as well as the dust
cap on the eyepiece opening. Keep the telescope inside the
hard storage carrying case when not in use. Store it indoors
or in a dry garage. Do not leave the telescope outside except
when using it. The optical tube is aluminum and has a smooth
anodized surface that should resist scratches and smudges.
If a scratch does appear on the tube, it will not harm the tele-
scope. Smudges on the tube can be wiped off with standard
household cleaners.
Dew
When you are ready to pack up your telescope at the end of
the night, avoid immediately storing it in the hard case if you
encountered heavy dew and the telescope is damp. Instead,
bring the telescope inside and allow the moisture on the tele-
scope to evaporate. If dew forms on the objective lens, then
leave the dust cover off of the telescope until all the moisture
has evaporated. Once the telescope has completely dried out,
place it in the hard case.
Cleaning Optical Surfaces
In general, your telescope will only need to be cleaned on a
very minimal basis. Dust particles on the objective lens do not
effect the optical quality of your EON. Loose dust can simply
be blown off with air, using a compressed air can or blower
bulb (available from Orion). Any remaining dust is best left
alone, unless the build up is extreme. Finger prints and water
marks should be cleaned from your telescope’s objective
lens. Any quality optical lens tissue and cleaning fluid spe-
cifically designed for multi-coated optics can be used to clean
the telescope’s objective lens as well as the lenses of your
eyepieces and finder scope. Never use regular glass cleaner
or cleaning fluid designed for eyeglasses. Before cleaning
with fluid and tissue, however, blow any loose particles off the
lens with a blower bulb or compressed air, or lightly brush the
lens with a soft camel hair brush. Apply some cleaning fluid to
a tissue, never directly on the optics. Wipe the lens gently in
a circular motion, then remove any excess fluid with a fresh
lens tissue. Oily fingerprints and smudges may be removed
using this method. Use caution; rubbing too hard may scratch
the lens! Clean only a small area at a time, using a fresh lens
tissue on each area. Never reuse tissues.
Specifications
EON 72mm ED Apochromatic Refractor
Optical tube: Seamless aluminum
Objective lens: Apochromatic, rear element made
of FPL-51 ED glass, air-spaced
Objective lens coating: Fully multi-coated
Lens cell: Machined aluminum
Focal length: 430mm
Focal ratio: f/6.0
Baffles: 2 knife-edge baffles
Focuser: Dual Speed 11:1 Crayford, accepts
1.25" or 2" accessories, brass
compression ring
Mounting: Mounting block, dovetail design,
1/4"-20 threaded
Weight: 5.0 lbs./2.27 kg
Length: 12.5"/31.75cm with dew shield
retracted
Outside Diameter: 3.43"/87mm
EON 80mm ED Apochromatic Refractor
Optical tube: Seamless aluminum
Objective lens: Apochromatic, rear element made
of FPL-53 ED glass, air-spaced
Objective lens coating: Fully multi-coated
Lens cell: Machined aluminum
Focal length: 500mm
Focal ratio: f/6.25
Baffles: Cone baffle
Focuser: Dual Speed 11:1 Crayford, accepts
1.25" or 2" accessories, brass
compression ring
Mounting: Mounting block, dovetail design,
1/4"-20 threaded
Weight: 6.5 lbs./2.95 kg
Length: 15.25"/38.74cm with dew shield
retracted
Outside Diameter: 3.54"/90mm
EON 120mm ED Apochromatic Refractor
Optical tube: Seamless aluminum
Objective lens: Apochromatic, rear element made
of FPL-53 ED glass, air-spaced
Objective lens coating: Fully multi-coated
Lens cell: Machined aluminum
Focal length: 900mm
Focal ratio: f/7.5
Baffles: 3 knife-edge baffles
Focuser: Dual Speed 11:1 Crayford, accepts
1.25" or 2" accessories, brass
compression ring
Mounting: Tube rings and dovetail plate
Weight: 14.31 lbs./6.49 kg
Length: 31.25"/79.38cm with dew shield
retracted
Outside Diameter: 3.54"/122mm

8
One-Year Limited Warranty
The Orion EON Refractor is warranted against defects in materials or workmanship for a period of one year
from the date of purchase. This warranty is for the benefit of the original retail purchaser only. During this war-
ranty period Orion Telescopes & Binoculars will repair or replace, at Orion’s option, any warranted instrument
that proves to be defective, provided it is returned postage paid to: Orion Warranty Repair, 89 Hangar Way,
Watsonville, CA 95076. Proof of purchase (such as a copy of the original receipt) is required.
This warranty does not apply if, in Orion’s judgment, the instrument has been abused, mishandled, or modified,
nor does it apply to normal wear and tear. This warranty gives you specific legal rights, and you may also have
other rights, which vary from state to state. For further warranty service information, contact: Customer Service
Department, Orion Telescopes & Binoculars, 89 Hangar Way, Watsonville, CA 95076; (800) 676-1343.
/