EN 19
Reverse Forward
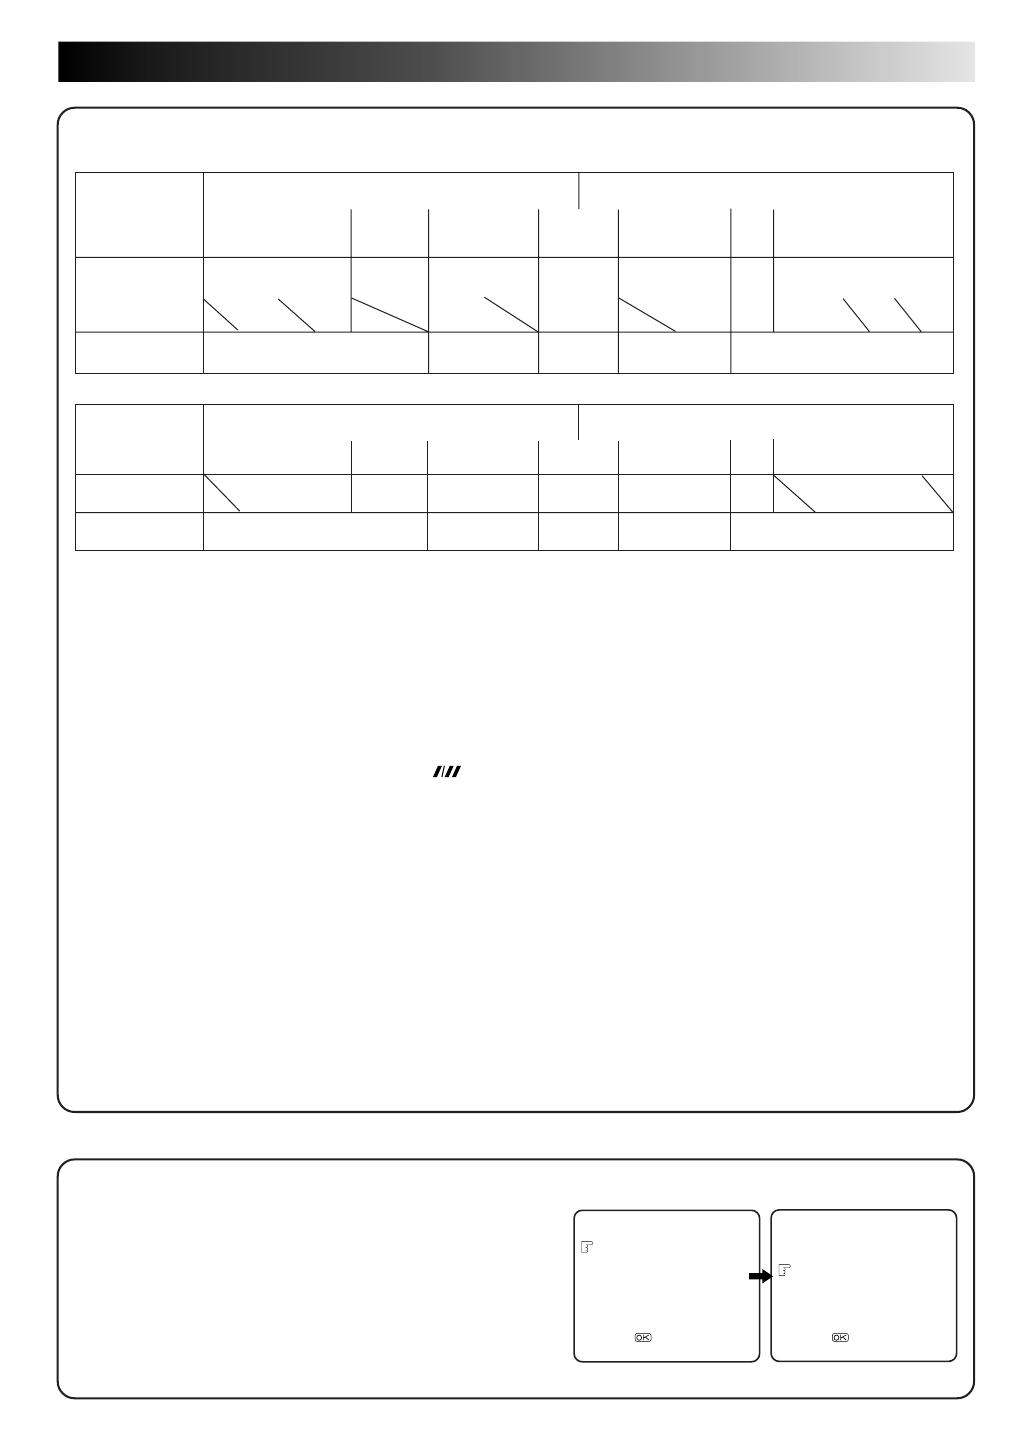
Search Play Slow-motion *Still Slow-motion Play Search
-7x -5x -3x -1x -1/6x -1/18x 0 1/18x 1/6x 1x 2x 3x 5x 7x
Audio is output.
Audio is not Audio is Audio is not
Audio is output.
output. output. output.
Reverse Forward
Search Play
Slow-motion
*Still
Slow-motion
Play Search
(Time Jog**) (Time Jog**)
-9x -7x -5x -3x -1x -1/2x -1/3x 0 1/3x 1/2x 1x 1.5x 2x 3x 5x 7x 9x
-7x -3x -1/2x 0 1/2x 1x 1.5x 2x 5x 9x
Audio is output.
Audio is not Audio is Audio is
Audio is output.
output. output. output.
TimeScan
* Still mode cannot be engaged using the remote control's PUSH JOG or button. Still mode can only be engaged by
pressing the PAUSE button.
**Smooth slow motion delivering an uninterrupted moving image without distortion. Time Jog does not work NTSC or
MECECAM playback.
If you don't want to hear TimeScan audio, set "TIME SCAN AUDIO" to "OFF" (See below).
TimeScan Audio
The audio output can be set ON/OFF during TimeScan. Select ON/OFF
as required.
* The default setting is "ON".
1 Press MENU to access the Main Menu screen.
2 Press PUSH JOG %fi to place the pointer next to "FUNCTION
SET", then press OK or PUSH JOG .
3 Press PUSH JOG %fi to place the pointer next to "TIME SCAN
AUDIO", then press OK or PUSH JOG to select "ON" or "OFF".
4 Press MENU to return to the normal screen.
%
%
Names of
Special-effects
playback
SPEED SP
SPEED LP
Audio output
FUNCTION SET
B. E. S. T. ON
PICTURE CONTROL AUTO
AUTO TIMER OFF
O. S. D. ON
AUTO SP=LP TIMER OFF
NEXT PAGE
[5/∞] =
[MENU] : EXIT
PREVIOUS PAGE
DIGITAL 3R ON
S-VHS ON
TIME SCAN AUDIO ON
[5/∞] =
[MENU] : EXIT
< PAL or MESECAM tape >
Names of
Special-effects
playback
SPEED SP/EP
Audio output
< NTSC tape >
%
fi
●
If the picture jitters vertically, noise appears or the upper or
lower part of the picture is distorded at -1/2x, -1/3x, 1/3x, 1/2x
or 1.5x normal speed, use TV PROG + or – to correct the
picture.
● Noise tends to apperar at -9x or 9x normal speed during
TimeScan search.
● When noise appears or the upper or lower part of the
picture is distorted during TimeScan search, press
and
adjust tracking with TV PROG + or – button.
● The speed is shown during TimeScan in the upper right
corner of the TV screen for approx. 5 seconds. (The display
may be distorted.)
● To resume normal playback, press PLAY.
● When using the recorder's TIME SCAN SHUTTLE ring, the
playback speed may not change in the correct step if it is
turned too fast.
● Picture and audio may become distorted when the
recording speed changes. When this happens, resume
normal playback once, and then try using TimeScan again.
● The picture may be noisy or there may be a loss of colour
when you change the playback speed. (More noise will
appear with LP recordings.)
● During high-speed search with an NTSC tape containing
both SP and EP recordings, the search speed will change
automatically to 7x normal playback speed with TimeScan
when the recording tape speed switches from EP to SP.
●
Noise may appear or the upper part of the picture may be
distorted during search (including TimeScan), still, frame-by-
frame playback, 2x search, or depending on the tape being used.
●
Picture may appear distorted in comparison to normal playback.
● When normal playback resumes from search (including
TimeScan), still, slow motion or frame-by-frame playback,
the picture may jitter vertically momentarily depending on
the type of TV being used.
●
In TimeScan mode there will be a time lag between the video
and the audio and noise may appear in the audio signal.
● TimeScan sound quality will differ in comparison to normal
playback.
● When material such as music videos where there is non-
stop sound (very few breaks in the soundtrack) are viewed
at 1.5x or 2x normal speed, the audio playback may be
faster than normal.
● Depending on the type of tape contents, the sound may not
be clear during forward slow-motion playback.
● Time Jog cannot be activated by pressing PAUSE for longer
than 2 seconds.
● When the playback direction is reversed, it takes
approximately 6 seconds until sound is heard.
●
There will be a loss of colour or the picture will be monochrome
with an LP-recorded MESECAM tape during TimeScan.
● TimeScan at -1/2x, 1/2x and 1.5x normal speed are not
possible with a MESECAM tape.
–––
–––
–––
–––
–––
–––
–––
–––
–––
–––
–––––
–––––
–––––
–––––
–––––
–––––
–––––
–––––
–––––
–––––
–––––––––––––––––––––––––––––––––––––––
–––––––––––––––––––––––––––––––––––––––
–––––––––––––––––––––––––––––––––––––––


